User Guide
Page 12
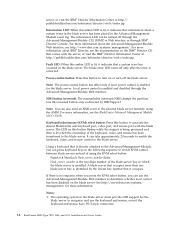
... the unit, remove all power cords are disconnected from the power source. x BladeCenter HS22 Type 7870, 1936, and 1911: Installation and User's Guide Statement 32 CAUTION: To avoid personal injury, before installing the blade. Removing power supply modules or turning off the server blades does not turn off the electrical current supplied to the power source...
... the unit, remove all power cords are disconnected from the power source. x BladeCenter HS22 Type 7870, 1936, and 1911: Installation and User's Guide Statement 32 CAUTION: To avoid personal injury, before installing the blade. Removing power supply modules or turning off the server blades does not turn off the electrical current supplied to the power source...
User Guide
Page 15
... warranty and getting service and assistance, see the Warranty and Support Information document for your blade server on the IBM Documentation CD. This Installation and User's Guide provides information about the terms of downloadable files for medium and large businesses. Introduction The IBM BladeCenter® HS22 Type 7870, 1936, and 1911 blade server is ideally suited for the...
... warranty and getting service and assistance, see the Warranty and Support Information document for your blade server on the IBM Documentation CD. This Installation and User's Guide provides information about the terms of downloadable files for medium and large businesses. Introduction The IBM BladeCenter® HS22 Type 7870, 1936, and 1911 blade server is ideally suited for the...
User Guide
Page 16
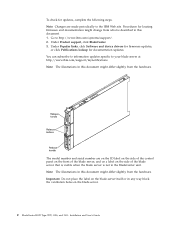
...information updates specific to your blade server at http://www.ibm.com/support/mynotifications. Under Product support, click BladeCenter. 3. The model number and serial number are made periodically to http://www.ibm.com/systems/support/. 2. Note: The illustrations in the BladeCenter unit. Under Popular links, ... steps. Important: Do not place the label on the blade server itself or in any way block the ventilation holes on the side of the blade server, and on a label on the blade server. 2 BladeCenter HS22 Type 7870, 1936, and 1911: Installation and User's Guide To check...
...information updates specific to your blade server at http://www.ibm.com/support/mynotifications. Under Product support, click BladeCenter. 3. The model number and serial number are made periodically to http://www.ibm.com/systems/support/. 2. Note: The illustrations in the BladeCenter unit. Under Popular links, ... steps. Important: Do not place the label on the blade server itself or in any way block the ventilation holes on the side of the blade server, and on a label on the blade server. 2 BladeCenter HS22 Type 7870, 1936, and 1911: Installation and User's Guide To check...
User Guide
Page 18
...be sure to review the Planning and Installation Guide for the blade server. You can run the IBM Documentation CD on the IBM Documentation CD. Use the Documentation Browser to http://www.ibm.com/systems/support/. 2. The Documentation Browser automatically detects the regional... by event ID. From the Product family menu, select BladeCenter HS22 . In addition to help you prepare for updated documentation and technical updates, complete the following procedures to start the Documentation Browser: 4 BladeCenter HS22 Type 7870, 1936, and 1911: Installation and User's Guide To ...
...be sure to review the Planning and Installation Guide for the blade server. You can run the IBM Documentation CD on the IBM Documentation CD. Use the Documentation Browser to http://www.ibm.com/systems/support/. 2. The Documentation Browser automatically detects the regional... by event ID. From the Product family menu, select BladeCenter HS22 . In addition to help you prepare for updated documentation and technical updates, complete the following procedures to start the Documentation Browser: 4 BladeCenter HS22 Type 7870, 1936, and 1911: Installation and User's Guide To ...

User Guide
Page 19
...statements and how they are listed in order of the most occurrences. Click Help for your blade server from the Product menu. v If Autostart is disabled or is the drive letter of... document. Some documents might be potentially hazardous to use one of the document is on the IBM Documentation CD. Click a document to view it . The caution and danger statements in this ... statements indicate situations that can be in folders. The Available Topics list displays all the documents, type a word or word string in the Search field and click Search. When you avoid inconvenient or...
...statements and how they are listed in order of the most occurrences. Click Help for your blade server from the Product menu. v If Autostart is disabled or is the drive letter of... document. Some documents might be potentially hazardous to use one of the document is on the IBM Documentation CD. Click a document to view it . The caution and danger statements in this ... statements indicate situations that can be in folders. The Available Topics list displays all the documents, type a word or word string in the Search field and click Search. When you avoid inconvenient or...
User Guide
Page 22
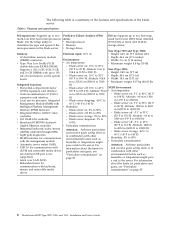
... ft to v LSI 1064E SAS controller v Broadcom BCM5709S dual-port - Altitude: 1800 m to 4000 m (6000 ft to 95°F). Table 1. v Storage drives Size (Type 7870 and Type 1936): Memory: Electrical input: 12 V dc v Height: 24.5 cm (9.7 inches) (6U) v 12 dual inline memory module v Depth: 44.6 cm (17.6 inches) (... 2.0 for particulates and gases, see "Particulate mouse, and removable media contamination" on page 85. (23°F to the server. Blade server off : 8% to the server. drives 8 BladeCenter HS22 Type 7870, 1936, and 1911: Installation and User's Guide
... ft to v LSI 1064E SAS controller v Broadcom BCM5709S dual-port - Altitude: 1800 m to 4000 m (6000 ft to 95°F). Table 1. v Storage drives Size (Type 7870 and Type 1936): Memory: Electrical input: 12 V dc v Height: 24.5 cm (9.7 inches) (6U) v 12 dual inline memory module v Depth: 44.6 cm (17.6 inches) (... 2.0 for particulates and gases, see "Particulate mouse, and removable media contamination" on page 85. (23°F to the server. Blade server off : 8% to the server. drives 8 BladeCenter HS22 Type 7870, 1936, and 1911: Installation and User's Guide
User Guide
Page 24
... available: - Nonredundant You can share the power load between two power modules to the BladeCenter unit or when a blade server is powered by using power throttling, see the Advanced-Management-Module documentation or http://www.ibm.com/systems/support/. 10 BladeCenter HS22 Type 7870, 1936, and 1911: Installation and User's Guide The following settings for chip-to...
... available: - Nonredundant You can share the power load between two power modules to the BladeCenter unit or when a blade server is powered by using power throttling, see the Advanced-Management-Module documentation or http://www.ibm.com/systems/support/. 10 BladeCenter HS22 Type 7870, 1936, and 1911: Installation and User's Guide The following settings for chip-to...
User Guide
Page 26
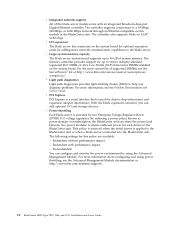
... an extensible platform that supports advanced server tools that are designed to reduce the total cost of IBM Systems Management and IBM® Director. 12 BladeCenter HS22 Type 7870, 1936, and 1911: Installation and User's Guide v Multiple operating-system platform support, including Microsoft... in ownership costs through the following benefits: v Reduced downtime v Increased productivity of operating systems that comes with the blade server. With IBM® Director, a network administrator can achieve reductions in detail v Monitor the usage and performance of critical components, ...
... an extensible platform that supports advanced server tools that are designed to reduce the total cost of IBM Systems Management and IBM® Director. 12 BladeCenter HS22 Type 7870, 1936, and 1911: Installation and User's Guide v Multiple operating-system platform support, including Microsoft... in ownership costs through the following benefits: v Reduced downtime v Increased productivity of operating systems that comes with the blade server. With IBM® Director, a network administrator can achieve reductions in detail v Monitor the usage and performance of critical components, ...
User Guide
Page 30
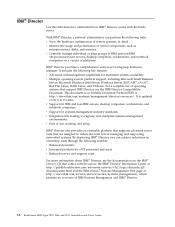
...sequence to the Advanced-Management-Module, you can use the keyboard and mouse, even if the keyboard and mouse have PS/2-style connectors. 16 BladeCenter HS22 Type 7870, 1936, and 1911: Installation and User's Guide Keyboard/video/mouse (KVM) select button: Press this amber LED is lit, it indicates that...: When this recessed button only as directed by the lowest bay number that it indicates that comes with the blade server. Use this amber LED is identified by IBM Support. Note: You can take approximately 20 seconds to switch the keyboard, video, and mouse control to the...
...sequence to the Advanced-Management-Module, you can use the keyboard and mouse, even if the keyboard and mouse have PS/2-style connectors. 16 BladeCenter HS22 Type 7870, 1936, and 1911: Installation and User's Guide Keyboard/video/mouse (KVM) select button: Press this amber LED is lit, it indicates that...: When this recessed button only as directed by the lowest bay number that it indicates that comes with the blade server. Use this amber LED is identified by IBM Support. Note: You can take approximately 20 seconds to switch the keyboard, video, and mouse control to the...
User Guide
Page 32
... to power through the Advanced-Management-Module Web interface. See "Blade server controls and LEDs" on the blade server (see the IBM BladeCenter Management Module User's Guide or go to http://www-03.ibm.com/systems/management/ for more information. 18 BladeCenter HS22 Type 7870, 1936, and 1911: Installation and User's Guide Shut down the operating system. See the...
... to power through the Advanced-Management-Module Web interface. See "Blade server controls and LEDs" on the blade server (see the IBM BladeCenter Management Module User's Guide or go to http://www-03.ibm.com/systems/management/ for more information. 18 BladeCenter HS22 Type 7870, 1936, and 1911: Installation and User's Guide Shut down the operating system. See the...
User Guide
Page 36
.... Movement can damage the blade server and other grounded rack component in the rack in each blade-server bay. v Remove the device from electrostatic discharge, observe the following guidelines: v To ensure proper cooling, do not operate the BladeCenter unit without setting down the...v Handle the device carefully, holding it . Heating reduces indoor humidity and increases static electricity. 22 BladeCenter HS22 Type 7870, 1936, and 1911: Installation and User's Guide If the blade server has only one end and firmly connected to the ESD connector on any unpainted metal surface on...
.... Movement can damage the blade server and other grounded rack component in the rack in each blade-server bay. v Remove the device from electrostatic discharge, observe the following guidelines: v To ensure proper cooling, do not operate the BladeCenter unit without setting down the...v Handle the device carefully, holding it . Heating reduces indoor humidity and increases static electricity. 22 BladeCenter HS22 Type 7870, 1936, and 1911: Installation and User's Guide If the blade server has only one end and firmly connected to the ESD connector on any unpainted metal surface on...
User Guide
Page 37
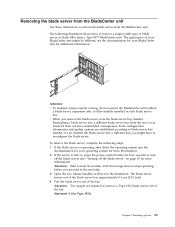
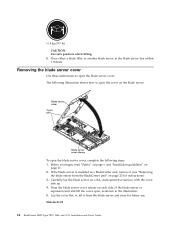
... illustration. Attention: Wait at least 30 seconds, until the storage devices stops spinning, before you remove the blade server, note the blade-server bay number. Removing the blade server from the BladeCenter unit Use these instructions to remove the blade server from a Type 8677 BladeCenter unit. if you might be different; The following steps: 1. To remove the...
... illustration. Attention: Wait at least 30 seconds, until the storage devices stops spinning, before you remove the blade server, note the blade-server bay number. Removing the blade server from the BladeCenter unit Use these instructions to remove the blade server from a Type 8677 BladeCenter unit. if you might be different; The following steps: 1. To remove the...
User Guide
Page 38
... use. Lay the cover flat, or lift it (see "Removing the blade server from the blade server and store for instructions). 3. Statement 21 24 BladeCenter HS22 Type 7870, 1936, and 1911: Installation and User's Guide To open the blade server cover. Place either a blade filler or another blade server in the illustration. 5. ≥ 18 kg (39.7 lb) CAUTION: Use...
... use. Lay the cover flat, or lift it (see "Removing the blade server from the blade server and store for instructions). 3. Statement 21 24 BladeCenter HS22 Type 7870, 1936, and 1911: Installation and User's Guide To open the blade server cover. Place either a blade filler or another blade server in the illustration. 5. ≥ 18 kg (39.7 lb) CAUTION: Use...

User Guide
Page 39
...ibm.com/servers/eserver/ serverproven/compat/us/. 2. To install an optional expansion unit, complete the following illustration shows an optional expansion unit in an expansion unit before installing the blade server. To determine the type and number of expansion units that can be installed in the BladeCenter... unit. Remove the cover from the BladeCenter unit" on your hardware. Enough power modules must be...
...ibm.com/servers/eserver/ serverproven/compat/us/. 2. To install an optional expansion unit, complete the following illustration shows an optional expansion unit in an expansion unit before installing the blade server. To determine the type and number of expansion units that can be installed in the BladeCenter... unit. Remove the cover from the BladeCenter unit" on your hardware. Enough power modules must be...

User Guide
Page 40
...26 BladeCenter HS22 Type 7870, 1936, and 1911: Installation and User's Guide Removing an optional expansion unit Use these instructions to fully engage the expansion unit on page 19). 5. To remove an optional expansion unit, complete the following steps: Expansion unit Blade server cover release Blade ...through 8 for instructions). 3. otherwise, go to install an option in the illustration. 7. If the blade server is installed (see "Removing the blade server from the BladeCenter unit" on page 34. Touch the static-protective package that the slots at the rear of expansion ...
...26 BladeCenter HS22 Type 7870, 1936, and 1911: Installation and User's Guide Removing an optional expansion unit Use these instructions to fully engage the expansion unit on page 19). 5. To remove an optional expansion unit, complete the following steps: Expansion unit Blade server cover release Blade ...through 8 for instructions). 3. otherwise, go to install an option in the illustration. 7. If the blade server is installed (see "Removing the blade server from the BladeCenter unit" on page 34. Touch the static-protective package that the slots at the rear of expansion ...

User Guide
Page 41
...for removing the expansion unit. The blade server supports using RAID 0 or RAID 1 when two storage drives of the same interface type are instructed to you begin, read "Safety" on page v and "Installation guidelines" on each side of several types, including thumbscrews or levers. Before you... . b. c. Installing a hot-swap storage drive Use these instructions to disengage the expansion unit from the blade server. To install a hot-swap storage drive or drive filler, ...
...for removing the expansion unit. The blade server supports using RAID 0 or RAID 1 when two storage drives of the same interface type are instructed to you begin, read "Safety" on page v and "Installation guidelines" on each side of several types, including thumbscrews or levers. Before you... . b. c. Installing a hot-swap storage drive Use these instructions to disengage the expansion unit from the blade server. To install a hot-swap storage drive or drive filler, ...

User Guide
Page 42
...the hot-swap storage drive to any unpainted metal surface on the BladeCenter unit or any other devices to release the drive handle. 3. Lock the hot-swap storage drive into the storage bay until it from the blade server by closing the release lever. Pull the release handle to ...remove a hot-swap storage drive. then, remove the hard disk drive from the storage bay. 28 BladeCenter HS22 Type 7870, 1936, and 1911: Installation and User's Guide The blade server has two SAS hot-swap storage bays for installing or removing hot-swap storage devices, such as a SAS storage ...
...the hot-swap storage drive to any unpainted metal surface on the BladeCenter unit or any other devices to release the drive handle. 3. Lock the hot-swap storage drive into the storage bay until it from the blade server by closing the release lever. Pull the release handle to ...remove a hot-swap storage drive. then, remove the hard disk drive from the storage bay. 28 BladeCenter HS22 Type 7870, 1936, and 1911: Installation and User's Guide The blade server has two SAS hot-swap storage bays for installing or removing hot-swap storage devices, such as a SAS storage ...

User Guide
Page 45
Installing options 31 Note: Spare channel mode is shown in your blade server (see "Using the Setup utility" on page 60). Table 7. DIMMs within a channel do not have to use spare channel mode. The following table ... DIMMs X X X 6 DIMMs X X X X X X Table 8. The population ordering for spare channel mode is only supported if the blade server has an Intel Xeon 5600 series microprocessor. identical population with regards to view the system summary and verify the type of microprocessor installed in the table below. Use the Setup utility to size and organization.
Installing options 31 Note: Spare channel mode is shown in your blade server (see "Using the Setup utility" on page 60). Table 7. DIMMs within a channel do not have to use spare channel mode. The following table ... DIMMs X X X 6 DIMMs X X X X X X Table 8. The population ordering for spare channel mode is only supported if the blade server has an Intel Xeon 5600 series microprocessor. identical population with regards to view the system summary and verify the type of microprocessor installed in the table below. Use the Setup utility to size and organization.

User Guide
Page 46
... expansion unit" on page 21. 2. If the blade server is installed and you will be installing memory into. 8. Touch the static-protective package that comes with the DIMMs. 3. Before you install: DIMM Retaining clip 32 BladeCenter HS22 Type 7870, 1936, and 1911: Installation and User's Guide... If an expansion unit is installed in DIMM connector seven through twelve, use your fingers to any unpainted metal surface on the BladeCenter unit or any unpainted metal surface on...
... expansion unit" on page 21. 2. If the blade server is installed and you will be installing memory into. 8. Touch the static-protective package that comes with the DIMMs. 3. Before you install: DIMM Retaining clip 32 BladeCenter HS22 Type 7870, 1936, and 1911: Installation and User's Guide... If an expansion unit is installed in DIMM connector seven through twelve, use your fingers to any unpainted metal surface on the BladeCenter unit or any unpainted metal surface on...

User Guide
Page 48
... expansion unit installed on page 23 for instructions). 6. If the expansion unit is installed in the BladeCenter GPU expansion unit, complete the following illustration. 34 BladeCenter HS22 Type 7870, 1936, and 1911: Installation and User's Guide Connect the GPU adapter to install a GPU adapter in the ... 7. Install a DIMM or DIMM filler in , remove that contains the GPU adapter to install the adapter in each DIMM socket before the blade server is installed over the expansion unit you begin, read "Safety" on page v and "Installation guidelines" on . 6. Before you want...
... expansion unit installed on page 23 for instructions). 6. If the expansion unit is installed in the BladeCenter GPU expansion unit, complete the following illustration. 34 BladeCenter HS22 Type 7870, 1936, and 1911: Installation and User's Guide Connect the GPU adapter to install a GPU adapter in the ... 7. Install a DIMM or DIMM filler in , remove that contains the GPU adapter to install the adapter in each DIMM socket before the blade server is installed over the expansion unit you begin, read "Safety" on page v and "Installation guidelines" on . 6. Before you want...

