User Guide
Page 3
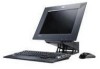
...xiv Chapter 1. Product overview 1 Identifying your computer 12 Shutting down the computer 13 Using the Rapid Access keyboard 13 © Copyright IBM Corp. 2001 iii Operating and caring for your computer 5 Arranging your workspace 6 Comfort 6 Glare and lighting 6 Air circulation 7 ...Memory 2 Internal drives 2 Graphics subsystem 2 Audio subsystem 2 Communications 2 System management features 3 Keyboard and mouse features 3 Expansion capability 3 Power 3 Security features 3 Supported operating systems 4 Software 4 IBM preinstalled software 4 Additional software 4 Access...
...xiv Chapter 1. Product overview 1 Identifying your computer 12 Shutting down the computer 13 Using the Rapid Access keyboard 13 © Copyright IBM Corp. 2001 iii Operating and caring for your computer 5 Arranging your workspace 6 Comfort 6 Glare and lighting 6 Air circulation 7 ...Memory 2 Internal drives 2 Graphics subsystem 2 Audio subsystem 2 Communications 2 System management features 3 Keyboard and mouse features 3 Expansion capability 3 Power 3 Security features 3 Supported operating systems 4 Software 4 IBM preinstalled software 4 Additional software 4 Access...
User Guide
Page 4
... 29 User password 29 Administrator password 30 Setting, changing, and deleting a password 30 Using Security Profile by Device 30 Other settings in the IBM Setup Utility program 31 The startup sequence 31 Changing the startup sequence 31 Chapter 5. Installing options 33 Handling static-sensitive devices 33 Backing up ... features 21 Using the Windows Start menu 22 Using the Standby button on the keyboard 22 Using the power button 22 Setting power schemes 22 Using security features 23 Locking the cover 23 Locking the keyboard 23 Taking care of your computer 24 Basics 24 Cleaning...
... 29 User password 29 Administrator password 30 Setting, changing, and deleting a password 30 Using Security Profile by Device 30 Other settings in the IBM Setup Utility program 31 The startup sequence 31 Changing the startup sequence 31 Chapter 5. Installing options 33 Handling static-sensitive devices 33 Backing up ... features 21 Using the Windows Start menu 22 Using the Standby button on the keyboard 22 Using the power button 22 Setting power schemes 22 Using security features 23 Locking the cover 23 Locking the keyboard 23 Taking care of your computer 24 Basics 24 Cleaning...
User Guide
Page 5
...76 Trademarks 76 Index 77 Contents v Installing memory 40 Removing the optical drive 42 Chapter 6. Troubleshooting 43 Troubleshooting procedure 44 Power-on self-test (POST 45 POST error codes 45 Device troubleshooting charts 48 Audio problems 50 Optical drive problems 51 DVD disc... 63 Software problems 64 Universal Serial Bus (USB) problems 64 IBM Enhanced Diagnostics 64 Creating an IBM Enhanced Diagnostics diskette 65 Running the IBM Enhanced Diagnostics program 66 To run diagnostics from the IBM Enhanced Diagnostics diskette 66 To run diagnostics from the Product Recovery ...
...76 Trademarks 76 Index 77 Contents v Installing memory 40 Removing the optical drive 42 Chapter 6. Troubleshooting 43 Troubleshooting procedure 44 Power-on self-test (POST 45 POST error codes 45 Device troubleshooting charts 48 Audio problems 50 Optical drive problems 51 DVD disc... 63 Software problems 64 Universal Serial Bus (USB) problems 64 IBM Enhanced Diagnostics 64 Creating an IBM Enhanced Diagnostics diskette 65 Running the IBM Enhanced Diagnostics program 66 To run diagnostics from the IBM Enhanced Diagnostics diskette 66 To run diagnostics from the Product Recovery ...
User Guide
Page 7
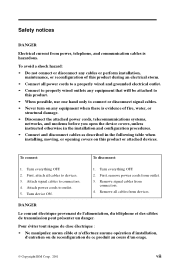
... opening covers on any cables or perform installation, maintenance, or reconfiguration of this product during an electrical storm. • Connect all cables to devices. 3. Attach power cords to connectors. 4. DANGER Le courant électrique provenant de l'alimentation, du téléphone et des câbles de transmission peut présenter...; Ne manipulez aucun câble et n'effectuez aucune opération d'installation, d'entretien ou de reconfiguration de ce produit au cours d'un orage. © Copyright IBM Corp. 2001 vii Turn device ON. 1.
... opening covers on any cables or perform installation, maintenance, or reconfiguration of this product during an electrical storm. • Connect all cables to devices. 3. Attach power cords to connectors. 4. DANGER Le courant électrique provenant de l'alimentation, du téléphone et des câbles de transmission peut présenter...; Ne manipulez aucun câble et n'effectuez aucune opération d'installation, d'entretien ou de reconfiguration de ce produit au cours d'un orage. © Copyright IBM Corp. 2001 vii Turn device ON. 1.

User Guide
Page 17
...174; • Wake on Ring • Wake on Alarm • Automatic power-on startup • System Management BIOS and software Keyboard and mouse features • IBM ScrollPoint® III mouse (some models) • IBM Rapid Access® IIIe, Universal Serial Bus (USB), keyboard (some models) ... (some models) • IBM Preferred USB keyboard (some models) Expansion capability • Two low-profile PCI adapter expansion slots • Six USB connectors • Two DIMM sockets • Parallel port • Audio ports Power • 160 Watt power adapter • Automatic switching between...
...174; • Wake on Ring • Wake on Alarm • Automatic power-on startup • System Management BIOS and software Keyboard and mouse features • IBM ScrollPoint® III mouse (some models) • IBM Rapid Access® IIIe, Universal Serial Bus (USB), keyboard (some models) ... (some models) • IBM Preferred USB keyboard (some models) Expansion capability • Two low-profile PCI adapter expansion slots • Six USB connectors • Two DIMM sockets • Parallel port • Audio ports Power • 160 Watt power adapter • Automatic switching between...
User Guide
Page 19
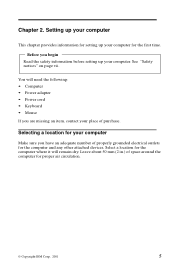
...other attached devices. Chapter 2. Select a location for the computer where it will need the following: • Computer • Power adapter • Power cord • Keyboard • Mouse If you have an adequate number of properly grounded electrical outlets for proper air circulation. ©...; Copyright IBM Corp. 2001 5 See "Safety notices" on page vii. Setting up your computer This chapter provides information ...
...other attached devices. Chapter 2. Select a location for the computer where it will need the following: • Computer • Power adapter • Power cord • Keyboard • Mouse If you have an adequate number of properly grounded electrical outlets for proper air circulation. ©...; Copyright IBM Corp. 2001 5 See "Safety notices" on page vii. Setting up your computer This chapter provides information ...
User Guide
Page 21
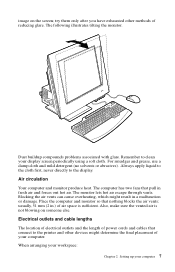
Electrical outlets and cable lengths The location of electrical outlets and the length of power cords and cables that connect to the printer and other methods of reducing glare. image on someone else. try them only after you have exhausted ...
Electrical outlets and cable lengths The location of electrical outlets and the length of power cords and cables that connect to the printer and other methods of reducing glare. image on someone else. try them only after you have exhausted ...
User Guide
Page 22
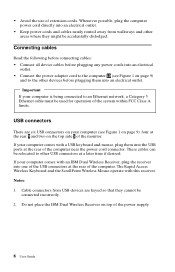
...• Keep power cords and cables neatly routed away from USB devices are six USB connectors on the top side 5 of extension cords. If your computer is being connected to an Ethernet network, a Category 5 Ethernet cable must be accidentally dislodged. Do not place the IBM Dual Wireless Receiver... if desired. • Avoid the use of the monitor. Important If your computer comes with an IBM Dual Wireless Receiver, plug the receiver into an electrical outlet. • Connect the power adapter cord to other USB connectors at the rear 9 and two on your computer comes with this ...
...• Keep power cords and cables neatly routed away from USB devices are six USB connectors on the top side 5 of extension cords. If your computer is being connected to an Ethernet network, a Category 5 Ethernet cable must be accidentally dislodged. Do not place the IBM Dual Wireless Receiver... if desired. • Avoid the use of the monitor. Important If your computer comes with an IBM Dual Wireless Receiver, plug the receiver into an electrical outlet. • Connect the power adapter cord to other USB connectors at the rear 9 and two on your computer comes with this ...
User Guide
Page 23
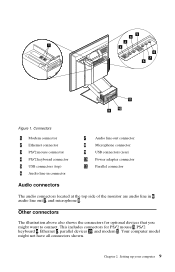
... 2 Ethernet connector 3 PS/2 mouse connector 4 PS/2 keyboard connector 5 USB connectors (top) 6 Audio line-in connector 7 Audio line-out connector 8 Microphone connector 9 USB connectors (rear) 10 Power adapter connector 11 Parallel connector Audio connectors The audio connectors located at the top side of the monitor are audio line in 6, audio line out...
... 2 Ethernet connector 3 PS/2 mouse connector 4 PS/2 keyboard connector 5 USB connectors (top) 6 Audio line-in connector 7 Audio line-out connector 8 Microphone connector 9 USB connectors (rear) 10 Power adapter connector 11 Parallel connector Audio connectors The audio connectors located at the top side of the monitor are audio line in 6, audio line out...

User Guide
Page 25
... computer This chapter provides information to -day use and care of your computer. The lights are status indicators that tell you in use indicator 6 2 Power/standby indicator 7 3 Power button 8 4 LCD brightness increase button 9 5 LCD brightness decrease button Device bay release button Optical drive eject button Optical drive emergency eject hole Optical drive... at the front of your computer controls a specific function, such as the diskette drive, is in use. 1 Hard disk drive in-use indicator © Copyright IBM Corp. 2001 11 Chapter 3.
... computer This chapter provides information to -day use and care of your computer. The lights are status indicators that tell you in use indicator 6 2 Power/standby indicator 7 3 Power button 8 4 LCD brightness increase button 9 5 LCD brightness decrease button Device bay release button Optical drive eject button Optical drive emergency eject hole Optical drive... at the front of your computer controls a specific function, such as the diskette drive, is in use. 1 Hard disk drive in-use indicator © Copyright IBM Corp. 2001 11 Chapter 3.

User Guide
Page 26
...Utility program. Hard disk drive in some circumstances the computer might not immediately turn off your computer What you see Chapter 4, "Using the IBM Setup Utility program," on or off your computer is reading from a disc. For more information, see and hear when you cannot open ... this hole if you turn off . Do not turn your computer. If this button on . LCD brightness increase button: Press and hold the power button down for inserting or removing a disc. Optical drive in the Startup menu of the controls and status indicators for access to turn off ....
...Utility program. Hard disk drive in some circumstances the computer might not immediately turn off your computer What you see Chapter 4, "Using the IBM Setup Utility program," on or off your computer is reading from a disc. For more information, see and hear when you cannot open ... this hole if you turn off . Do not turn your computer. If this button on . LCD brightness increase button: Press and hold the power button down for inserting or removing a disc. Optical drive in the Startup menu of the controls and status indicators for access to turn off ....
User Guide
Page 35
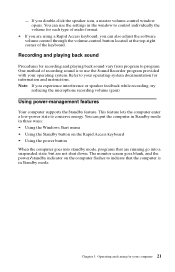
One method of the keyboard. This feature lets the computer enter a low-power state to indicate that are running go into a suspended state, but are using a Rapid Access keyboard, you are not shut down. Operating and caring for ... while recording, try reducing the microphone recording volume (gain). Refer to program. Chapter 3. The monitor screen goes blank, and the power/standby indicator on the Rapid Access keyboard • Using the power button When the computer goes into standby mode, programs that the computer is to use the Sound Recorder program provided...
One method of the keyboard. This feature lets the computer enter a low-power state to indicate that are running go into a suspended state, but are using a Rapid Access keyboard, you are not shut down. Operating and caring for ... while recording, try reducing the microphone recording volume (gain). Refer to program. Chapter 3. The monitor screen goes blank, and the power/standby indicator on the Rapid Access keyboard • Using the power button When the computer goes into standby mode, programs that the computer is to use the Sound Recorder program provided...
User Guide
Page 36
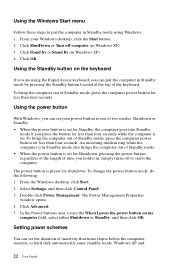
...Windows, you can set your Windows desktop, click the Start button. 2. To change the power button mode, do the following: 1. Select Settings; Click Advanced. 5. Setting power schemes You can put the computer in Windows XP). 3. Double-click Power Management. Using the Windows Start menu Follow these steps to one of two modes: Shutdown... or Standby. • When the power button is set for Standby, the computer goes into Standby mode if you press the button for less than four seconds while the computer is...
...Windows, you can set your Windows desktop, click the Start button. 2. To change the power button mode, do the following: 1. Select Settings; Click Advanced. 5. Setting power schemes You can put the computer in Windows XP). 3. Double-click Power Management. Using the Windows Start menu Follow these steps to one of two modes: Shutdown... or Standby. • When the power button is set for Standby, the computer goes into Standby mode if you press the button for less than four seconds while the computer is...

User Guide
Page 37
... cover (some models only). You must type the correct password before the keyboard will unlock. The Power Options Properties window opens. 4. If you set a user password through the IBM Setup Utility program and use this to restrict access to components inside the computer. Double-click... Power Options (Windows 2000 Professional) or click Power and Maintenance then click Power Options (Windows XP). Locking the keyboard You can set ...
... cover (some models only). You must type the correct password before the keyboard will unlock. The Power Options Properties window opens. 4. If you set a user password through the IBM Setup Utility program and use this to restrict access to components inside the computer. Double-click... Power Options (Windows 2000 Professional) or click Power and Maintenance then click Power Options (Windows XP). Locking the keyboard You can set ...
User Guide
Page 38
Moisture can damage these parts and cause an electrical hazard. • Always disconnect a power cord by grasping the plug, not the cord. Use only mild cleaning solutions and a damp cloth to clean the mouse. Always apply liquid to the ... screen Do not use a soft cloth moistened with the mouse, you might make the keyboard and mouse sticky and unusable. • Do not get the power buttons or other loose particles. Mouse If the pointer on the screen does not move smoothly with a nonabrasive liquid glass cleaner. Basics Here are some...
Moisture can damage these parts and cause an electrical hazard. • Always disconnect a power cord by grasping the plug, not the cord. Use only mild cleaning solutions and a damp cloth to clean the mouse. Always apply liquid to the ... screen Do not use a soft cloth moistened with the mouse, you might make the keyboard and mouse sticky and unusable. • Do not get the power buttons or other loose particles. Mouse If the pointer on the screen does not move smoothly with a nonabrasive liquid glass cleaner. Basics Here are some...

User Guide
Page 40
Unplug the power cords from the drives. 2. Remove all cables connecting external devices such as modem or network cables, from the computer. 5. Disconnect communication cables, such as a keyboard, ...
Unplug the power cords from the drives. 2. Remove all cables connecting external devices such as modem or network cables, from the computer. 5. Disconnect communication cables, such as a keyboard, ...
User Guide
Page 42
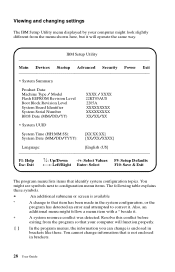
IBM Setup Utility Main Devices Startup Advanced Security Power Exit > System Summary Product Data: Machine Type / Model Flash EEPROM Revision Level Boot Block Revision Level System Board Identifier System Serial Number BIOS Date (MM/... . ∗ A system resource conflict was detected. You might see symbols next to configuration menu items. The following table explains these . Viewing and changing settings The IBM Setup Utility menu displayed by your computer might look slightly different from the program so that your computer will operate the same way. Also, an...
IBM Setup Utility Main Devices Startup Advanced Security Power Exit > System Summary Product Data: Machine Type / Model Flash EEPROM Revision Level Boot Block Revision Level System Board Identifier System Serial Number BIOS Date (MM/... . ∗ A system resource conflict was detected. You might see symbols next to configuration menu items. The following table explains these . Viewing and changing settings The IBM Setup Utility menu displayed by your computer might look slightly different from the program so that your computer will operate the same way. Also, an...
User Guide
Page 45
...or change the primary or automatic power-on page 27). 2. Use the arrow keys to make your computer is turned on startup sequence. 5. The startup program looks for changing the startup sequence. Start the IBM Setup Utility program (see "Starting and using the IBM Setup Utility program" on startup... the instructions on the screen to select the IBM Setup Utility primary startup sequence and the automatic power-on from the power button than for when it is used to exit from the IBM Setup Utility program. Other settings in the IBM Setup Utility program The information in this section ...
...or change the primary or automatic power-on page 27). 2. Use the arrow keys to make your computer is turned on startup sequence. 5. The startup program looks for changing the startup sequence. Start the IBM Setup Utility program (see "Starting and using the IBM Setup Utility program" on startup... the instructions on the screen to select the IBM Setup Utility primary startup sequence and the automatic power-on from the power button than for when it is used to exit from the IBM Setup Utility program. Other settings in the IBM Setup Utility program The information in this section ...
User Guide
Page 49
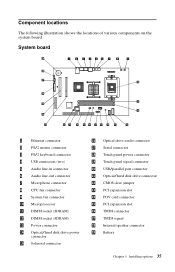
... 9 System fan connector 10 Microprocessor 11 DIMM socket (SDRAM) 12 DIMM socket (SDRAM) 13 Power connector 14 Optical/hard disk drive power connector 15 Solenoid connector 16 Optical drive audio connector 17 Serial connector 18 Touch panel power connector 19 Touch panel signal connector 20 USB/parallel port connector 21 Optical/hard disk...
... 9 System fan connector 10 Microprocessor 11 DIMM socket (SDRAM) 12 DIMM socket (SDRAM) 13 Power connector 14 Optical/hard disk drive power connector 15 Solenoid connector 16 Optical drive audio connector 17 Serial connector 18 Touch panel power connector 19 Touch panel signal connector 20 USB/parallel port connector 21 Optical/hard disk...
User Guide
Page 50
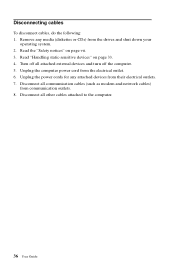
... the computer. 36 User Guide Turn off the computer. 5. Disconnect all communication cables (such as modem and network cables) from their electrical outlets. 7. Unplug the power cords for any media (diskettes or CDs) from the electrical outlet. 6. Read "Handling static-sensitive devices" on page vii. 3. Unplug the computer...
... the computer. 36 User Guide Turn off the computer. 5. Disconnect all communication cables (such as modem and network cables) from their electrical outlets. 7. Unplug the power cords for any media (diskettes or CDs) from the electrical outlet. 6. Read "Handling static-sensitive devices" on page vii. 3. Unplug the computer...


