
User Guide
Page 3
Console Switch Installation and User's Guide
Console Switch Installation and User's Guide

User Guide
Page 9
...Tables ...xiii Chapter 1: Product Overview 1 Features and Benefits ...1 Switch Cable ...1 Safety Precautions ...4 Rack Mounting of Systems ...7 Chapter 2: Installation ...9 Getting Started ...9 Supplied with the console switch 9 Rack Mounting the Console Switch 9 Vertical installation in the side of a rack 9 Horizontal... installation in the 1 U rack mounting space 10 Installing the Console Switch ...11 Tiering Multiple Console Switches 13 Adding Earlier-model Switches ...14 Configuring the Console Switch System 16 Chapter 3: Basic Operations 17 Controlling the System at the ...
...Tables ...xiii Chapter 1: Product Overview 1 Features and Benefits ...1 Switch Cable ...1 Safety Precautions ...4 Rack Mounting of Systems ...7 Chapter 2: Installation ...9 Getting Started ...9 Supplied with the console switch 9 Rack Mounting the Console Switch 9 Vertical installation in the side of a rack 9 Horizontal... installation in the 1 U rack mounting space 10 Installing the Console Switch ...11 Tiering Multiple Console Switches 13 Adding Earlier-model Switches ...14 Configuring the Console Switch System 16 Chapter 3: Basic Operations 17 Controlling the System at the ...

User Guide
Page 10
x Table of Contents Scanning the System...32 Broadcasting to Servers...34 Changing the Switch Mode ...36 Setting the Keyboard Country Code 37 Appendices...39 Appendix A: Firmware Upgrades...39 Appendix B: Technical Specifications 41 Appendix C: Notices ...42 Appendix D: Electronic Emission Notices 44 Index...47
x Table of Contents Scanning the System...32 Broadcasting to Servers...34 Changing the Switch Mode ...36 Setting the Keyboard Country Code 37 Appendices...39 Appendix A: Firmware Upgrades...39 Appendix B: Technical Specifications 41 Appendix C: Notices ...42 Appendix D: Electronic Emission Notices 44 Index...47

User Guide
Page 11
...PS/2 Switch Cable and USB Switch Cable 2 Figure 1.2: Example of a Console Switch Configuration 4 Figure 2.1: Console Switch vertical installation 10 Figure 2.2: Console Switch Horizontal Installation 11 Figure 2.3: Basic Console Switch Configuration 12 Figure 2.4: Console Switch Configuration with a Tiered Switch 13 Figure 2.5: Console Switch Configuration with an Earlier-model Switch 15 Figure... Window 34 Figure 3.16: Broadcast Window...35 Figure 3.17: Broadcast Enable Window 36 Figure 3.18: Switch Window ...37 Figure 3.19: Keyboard Window ...37 Figure 3.20: Keyboard Warning Window 38
...PS/2 Switch Cable and USB Switch Cable 2 Figure 1.2: Example of a Console Switch Configuration 4 Figure 2.1: Console Switch vertical installation 10 Figure 2.2: Console Switch Horizontal Installation 11 Figure 2.3: Basic Console Switch Configuration 12 Figure 2.4: Console Switch Configuration with a Tiered Switch 13 Figure 2.5: Console Switch Configuration with an Earlier-model Switch 15 Figure... Window 34 Figure 3.16: Broadcast Window...35 Figure 3.17: Broadcast Enable Window 36 Figure 3.18: Switch Window ...37 Figure 3.19: Keyboard Window ...37 Figure 3.20: Keyboard Warning Window 38

User Guide
Page 13
xiii LIST OF TABLES List of Tables Table 1.1: Console Switch Cable Resolution and Refresh Rate 2 Table 2.1: Earlier-model Switches 14 Table 3.1: OSCAR Interface Status Symbols 18 Table 3.2: OSCAR Interface Navigation Basics 20 Table 3.3: Setup Features to Manage Routine Tasks for the Servers 21 Table 3.4: OSCAR Interface Status Flags 26
xiii LIST OF TABLES List of Tables Table 1.1: Console Switch Cable Resolution and Refresh Rate 2 Table 2.1: Earlier-model Switches 14 Table 3.1: OSCAR Interface Status Symbols 18 Table 3.2: OSCAR Interface Navigation Basics 20 Table 3.3: Setup Features to Manage Routine Tasks for the Servers 21 Table 3.4: OSCAR Interface Status Flags 26
User Guide
Page 15
... 16 ARI ports for easy system configuration and server selection. Using a PS/2 switch cable you can attach additional switches to the console switch. The IBM 3M Console Switch Cables (PS/2 and USB) are unique benefits of the switch cable simplifies configuration by assigning and retaining unique server names and port numbers for mouse. Using the On...
... 16 ARI ports for easy system configuration and server selection. Using a PS/2 switch cable you can attach additional switches to the console switch. The IBM 3M Console Switch Cables (PS/2 and USB) are unique benefits of the switch cable simplifies configuration by assigning and retaining unique server names and port numbers for mouse. Using the On...

User Guide
Page 16
... time, the screen saver mode engages, and access is prohibited until the appropriate password is used to connect a USB server to a console switch. Servers can achieve resolutions up to 1280 x 1024 with a screen saver password. You can be identified by a unique name and port...VGA, SVGA, and XGA video. 2 IBM Console Switch Installation and User's Guide The USB switch cable is entered to reactivate the system. PS/2 Switch Cable USB Switch Cable Figure 1.1: PS/2 Switch Cable and USB Switch Cable OSCAR Graphical User Interface The console switch uses the OSCAR interface, which features ...
... time, the screen saver mode engages, and access is prohibited until the appropriate password is used to connect a USB server to a console switch. Servers can achieve resolutions up to 1280 x 1024 with a screen saver password. You can be identified by a unique name and port...VGA, SVGA, and XGA video. 2 IBM Console Switch Installation and User's Guide The USB switch cable is entered to reactivate the system. PS/2 Switch Cable USB Switch Cable Figure 1.1: PS/2 Switch Cable and USB Switch Cable OSCAR Graphical User Interface The console switch uses the OSCAR interface, which features ...

User Guide
Page 17
... 256 servers in Chapter 2 for more information. Each model can expand the system by tiering with the VESA DDC2B standard. See "Tiering Console Switches" in one system. See "Appendix A: Firmware Upgrades" for more information. This extra tier of the monitor and is always running the most ...current version available. Chapter 1: Product Overview 3 Table 1.1: Console Switch Cable Resolution and Refresh Rate 800 x 600 800 x 600 800 x 600 56 Hz 60 Hz 72 Hz 800 x 600 1024 x 768 75 Hz...
... 256 servers in Chapter 2 for more information. Each model can expand the system by tiering with the VESA DDC2B standard. See "Tiering Console Switches" in one system. See "Appendix A: Firmware Upgrades" for more information. This extra tier of the monitor and is always running the most ...current version available. Chapter 1: Product Overview 3 Table 1.1: Console Switch Cable Resolution and Refresh Rate 800 x 600 800 x 600 800 x 600 56 Hz 60 Hz 72 Hz 800 x 600 1024 x 768 75 Hz...
User Guide
Page 18
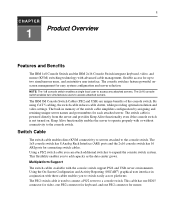
4 IBM Console Switch Installation and User's Guide Earlier-model Switch (tiered) Switch Cable (tiered) Console Switch (tiered) Rack of Servers Critical Server Local User B Console Switch (main) Local User A Figure 1.2: Example of a Console Switch Configuration Safety Precautions Use the following safety guidelines to help ensure your own personal safety and to help protect the system and working environment from potential damage.
4 IBM Console Switch Installation and User's Guide Earlier-model Switch (tiered) Switch Cable (tiered) Console Switch (tiered) Rack of Servers Critical Server Local User B Console Switch (main) Local User A Figure 1.2: Example of a Console Switch Configuration Safety Precautions Use the following safety guidelines to help ensure your own personal safety and to help protect the system and working environment from potential damage.
User Guide
Page 20
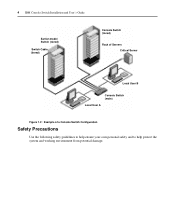
... or local power company. Also, do not block cooling vents. • Do not spill food or liquids on the electrical ratings label. 6 IBM Console Switch Installation and User's Guide General • Observe and follow the operating instructions. • Keep the console... or plug is damaged. • An object has fallen into the product. • The console switch has been exposed to water. • The console switch has been dropped or damaged. • The console switch does not operate correctly when you are marked with the triangular symbol with approved equipment. • Enable...
... or local power company. Also, do not block cooling vents. • Do not spill food or liquids on the electrical ratings label. 6 IBM Console Switch Installation and User's Guide General • Observe and follow the operating instructions. • Keep the console... or plug is damaged. • An object has fallen into the product. • The console switch has been exposed to water. • The console switch has been dropped or damaged. • The console switch does not operate correctly when you are marked with the triangular symbol with approved equipment. • Enable...

User Guide
Page 21
...that they cannot be greater than direct connections to the branch circuit (for the power strip. • To help protect the console switch from a cable. • Observe extension cable and power strip ratings. Consider equipment nameplate ratings for safe operation of the rack environment ...overloading of the ampere ratings limit for example, use a surge suppressor, line conditioner, or uninterruptible power supply. • Position console switch cables and power cables carefully. Always follow the local and national wiring rules. Rack Mounting of power strips). Be sure that nothing ...
...that they cannot be greater than direct connections to the branch circuit (for the power strip. • To help protect the console switch from a cable. • Observe extension cable and power strip ratings. Consider equipment nameplate ratings for safe operation of the rack environment ...overloading of the ampere ratings limit for example, use a surge suppressor, line conditioner, or uninterruptible power supply. • Position console switch cables and power cables carefully. Always follow the local and national wiring rules. Rack Mounting of power strips). Be sure that nothing ...

User Guide
Page 22
8 IBM Console Switch Installation and User's Guide
8 IBM Console Switch Installation and User's Guide

User Guide
Page 23
... Guide • 1U filler panel Additional items needed • One IBM 3M Console Switch Cable (PS/2 or USB) per attached server • One IBM 3M Console Switch Cable (PS/2) per attached switch • One Phillips screwdriver Rack Mounting the Console Switch Before installing the console switch and other items necessary for proper installation. Supplied with the console...
... Guide • 1U filler panel Additional items needed • One IBM 3M Console Switch Cable (PS/2 or USB) per attached server • One IBM 3M Console Switch Cable (PS/2) per attached switch • One Phillips screwdriver Rack Mounting the Console Switch Before installing the console switch and other items necessary for proper installation. Supplied with the console...
User Guide
Page 24
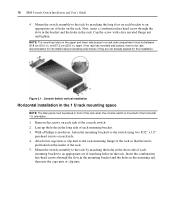
...bracket to the rack by matching the long slots on each side of the console switch. 2. 10 IBM Console Switch Installation and User's Guide 4. Remove the screws on the rack. Mount the switch assembly to the switch using two 8/32" x 1/2" pan-head screws on the inside of matching holes...clip nuts to the rack documentation for information about relocating side braces if they are not already spaced for this installation. Figure 2.1: Console Switch vertical installation Horizontal installation in the 1 U rack mounting space NOTE: The filler panel must be placed in front of each side. 4....
...bracket to the rack by matching the long slots on each side of the console switch. 2. 10 IBM Console Switch Installation and User's Guide 4. Remove the screws on the rack. Mount the switch assembly to the switch using two 8/32" x 1/2" pan-head screws on the inside of matching holes...clip nuts to the rack documentation for information about relocating side braces if they are not already spaced for this installation. Figure 2.1: Console Switch vertical installation Horizontal installation in the 1 U rack mounting space NOTE: The filler panel must be placed in front of each side. 4....

User Guide
Page 25
See the following detailed set of the console switch and then into an appropriate power source. Figure 2.3 illustrates one possible configuration for the console switch. Chapter 2: Installation 11 Figure 2.2: Console Switch Horizontal Installation Installing the Console Switch Connect the supplied power cord into the back of procedures to successfully install the console switch.
See the following detailed set of the console switch and then into an appropriate power source. Figure 2.3 illustrates one possible configuration for the console switch. Chapter 2: Installation 11 Figure 2.2: Console Switch Horizontal Installation Installing the Console Switch Connect the supplied power cord into the back of procedures to successfully install the console switch.
User Guide
Page 26
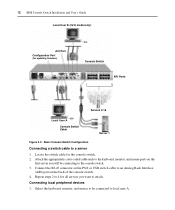
...IBM Console Switch Installation and User's Guide Local User B (2x16 model only) ACI Port Configuration Port (for updating firmware) Console Switch ARI Ports Servers 2-16 Local User A Console Switch Cable Server 1 Figure 2.3: Basic Console Switch Configuration Connecting a switch cable to local user A. Select the keyboard, monitor, and mouse to be connecting to the console switch.... 3. Connect the RJ-45 connector on the back of the console switch. 4. Repeat steps 2 to 4 for the console switch. 2. Connecting local peripheral devices 1. ...
...IBM Console Switch Installation and User's Guide Local User B (2x16 model only) ACI Port Configuration Port (for updating firmware) Console Switch ARI Ports Servers 2-16 Local User A Console Switch Cable Server 1 Figure 2.3: Basic Console Switch Configuration Connecting a switch cable to local user A. Select the keyboard, monitor, and mouse to be connecting to the console switch.... 3. Connect the RJ-45 connector on the back of the console switch. 4. Repeat steps 2 to 4 for the console switch. 2. Connecting local peripheral devices 1. ...
User Guide
Page 27
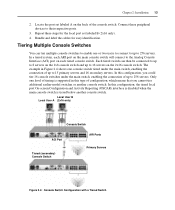
...secondary servers. Only one console switch tiered under the main switch, enabling the connection of configuration, which means that you could tier 16 console switches under the main switch, enabling the connection of the console switch. Each tiered switch can tier multiple console switches to enable one or two ...users to connect to up to 16 servers on the 1x8 console switch and up to 256 servers....
...secondary servers. Only one console switch tiered under the main switch, enabling the connection of configuration, which means that you could tier 16 console switches under the main switch, enabling the connection of the console switch. Each tiered switch can tier multiple console switches to enable one or two ...users to connect to up to 16 servers on the 1x8 console switch and up to 256 servers....
User Guide
Page 28
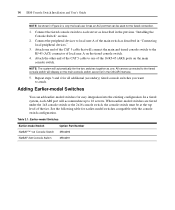
...switches for earlier-model switches compatible with the console switch configuration. All servers connected to the tiered console switch will connect the main and tiered console switch to each ARI port will automatically tier the two switches together as one of local user A on the main console switch. 14 IBM Console Switch...end of the main switch as described in "Connecting local peripheral devices." 3. Table 2.1: Earlier-model Switches Earlier-model Switch NetBAY™ 1x4 Console Switch NetBAY 2x8 Console Switch Option Part Number 09N4290 09N4291 Connect the peripheral ...
...switches for earlier-model switches compatible with the console switch configuration. All servers connected to the tiered console switch will connect the main and tiered console switch to each ARI port will automatically tier the two switches together as one of local user A on the main console switch. 14 IBM Console Switch...end of the main switch as described in "Connecting local peripheral devices." 3. Table 2.1: Earlier-model Switches Earlier-model Switch NetBAY™ 1x4 Console Switch NetBAY 2x8 Console Switch Option Part Number 09N4290 09N4291 Connect the peripheral ...

User Guide
Page 29
... port to local user A. Select the keyboard, monitor, and mouse to be connected to recognize the switch cable. 6. Repeat steps 2 to 5 for all tiered switches you want to attach to the local port on the back of the switch cable to the system. Attach the keyboard, monitor, and mouse connectors of the console...
... port to local user A. Select the keyboard, monitor, and mouse to be connected to recognize the switch cable. 6. Repeat steps 2 to 5 for all tiered switches you want to attach to the local port on the back of the switch cable to the system. Attach the keyboard, monitor, and mouse connectors of the console...

User Guide
Page 30
Chapter 3 provides detailed instructions about naming customization and OSCAR interface setup and configuration. For the 2x16 console switch, repeat steps 1 and 2 for easy identification. Connect these peripherals devices to their respective ports. 3. 16 IBM Console Switch Installation and User's Guide 2. Bundle and label the cables for the local port set labeled A on the console switch. Configuring the Console Switch System With the console switch system, you can auto detect and configure each port on the back of the console switch. Locate the port set labeled B. 4.
Chapter 3 provides detailed instructions about naming customization and OSCAR interface setup and configuration. For the 2x16 console switch, repeat steps 1 and 2 for easy identification. Connect these peripherals devices to their respective ports. 3. 16 IBM Console Switch Installation and User's Guide 2. Bundle and label the cables for the local port set labeled A on the console switch. Configuring the Console Switch System With the console switch system, you can auto detect and configure each port on the back of the console switch. Locate the port set labeled B. 4.
