
Owner Manual
Page 2
.... Do not modify or install non-standard equipment to operate the mower. The owner must understand these instructions to the unit without prior notification. WARNING: Engine exhaust and certain vehicle components contain or emit chemicals considered to the unit may cause unsafe operations or damage the unit. Contents Conformity certificates 2 Introduction 2 Safety 6 Operation 11 Maintenance 15 Troubleshooting 25 Transportation, storage and...
.... Do not modify or install non-standard equipment to operate the mower. The owner must understand these instructions to the unit without prior notification. WARNING: Engine exhaust and certain vehicle components contain or emit chemicals considered to the unit may cause unsafe operations or damage the unit. Contents Conformity certificates 2 Introduction 2 Safety 6 Operation 11 Maintenance 15 Troubleshooting 25 Transportation, storage and...

Owner Manual
Page 3
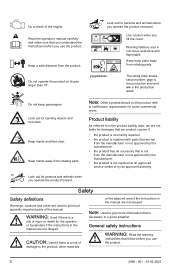
... 1 2 1. Control levers / parking brake 2. Fuel tank caps 6. An hour meter shows how many hours the product has been used. Intended use the product for the location of the product. Product description This product is made to Product overview on lawn mower. Tracking controls 3. Refer to cut grass on the type plate. ROPS 2060 - 001 - 07.02.2023 3 The control levers let the operator steer the product and adjust Product overview the speed...
... 1 2 1. Control levers / parking brake 2. Fuel tank caps 6. An hour meter shows how many hours the product has been used. Intended use the product for the location of the product. Product description This product is made to Product overview on lawn mower. Tracking controls 3. Refer to cut grass on the type plate. ROPS 2060 - 001 - 07.02.2023 3 The control levers let the operator steer the product and adjust Product overview the speed...

Owner Manual
Page 4
... page 9. decreases the engine speed. • Full throttle (B) - increases the engine speed. The correct start conditions. • Pull the PTO button out to engage the drive to the blades or other equipment connected to Operation conditions on page 14. Type plate 14. Seat adjustment lever 13. Deck lifting pedal 15. Deck release pedal Roll Over Protection Structure (ROPS) ROPS is controlled by the 2 control levers. Fuses 8. Fuel tank selector / Fuel shut-off . Steering controls The direction of...
... page 9. decreases the engine speed. • Full throttle (B) - increases the engine speed. The correct start conditions. • Pull the PTO button out to engage the drive to the blades or other equipment connected to Operation conditions on page 14. Type plate 14. Seat adjustment lever 13. Deck lifting pedal 15. Deck release pedal Roll Over Protection Structure (ROPS) ROPS is controlled by the 2 control levers. Fuses 8. Fuel tank selector / Fuel shut-off . Steering controls The direction of...
Owner Manual
Page 6
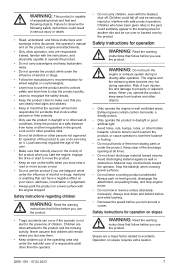
... incorrectly repaired. • the product is repaired with parts that are not from rotating parts. Battery acid is the production week. yyyy is the production year and ww is corrosive, explosive and flammable. General safety instructions WARNING: Read the warning instructions that you understand the instructions before you use the product. Keep a safe distance from rotating parts. Use caution when you operate the...
... incorrectly repaired. • the product is repaired with parts that are not from rotating parts. Battery acid is the production week. yyyy is the production year and ww is corrosive, explosive and flammable. General safety instructions WARNING: Read the warning instructions that you understand the instructions before you use the product. Keep a safe distance from rotating parts. Use caution when you operate the...
Owner Manual
Page 7
... stop engine/ motor. • Do not mow in the ground. When you use the product. Failure to observe the following safety instructions could suddenly appear in this document, the operator's manual and on the product, engine and attachments. • Only allow operators, who have a negative effect on your vision, alertness, coordination or judgement. • Always park the product on level ground, disengage the attachment, set parking brake, and...
... stop engine/ motor. • Do not mow in the ground. When you use the product. Failure to observe the following safety instructions could suddenly appear in this document, the operator's manual and on the product, engine and attachments. • Only allow operators, who have a negative effect on your vision, alertness, coordination or judgement. • Always park the product on level ground, disengage the attachment, set parking brake, and...

Owner Manual
Page 8
... safety device. Personal protective equipment cannot fully prevent injury but it . • Remove stones, branches and other protective devices are not attached or are defective, speak to the operator's manual for and do not cut grass near dropoffs. • Avoid mowing wet grass. Do not wear the seat belt when folded down position. • Replace a damaged ROPS. Tires could slide even if the wheels...
... safety device. Personal protective equipment cannot fully prevent injury but it . • Remove stones, branches and other protective devices are not attached or are defective, speak to the operator's manual for and do not cut grass near dropoffs. • Avoid mowing wet grass. Do not wear the seat belt when folded down position. • Replace a damaged ROPS. Tires could slide even if the wheels...

Owner Manual
Page 9
... regularly to start the engine: • The control levers are correctly attached and do a check of the blades is disengaged. • The OPC is regularly examined and adjusted. Spark arrestor This product has an internal-combustion engine. Make sure that the parking brake is pushed down. Engage the ROPS in these situations: • The parking brake is not applied and the operator lifts from the operator. Do this check daily...
... regularly to start the engine: • The control levers are correctly attached and do a check of the blades is disengaged. • The OPC is regularly examined and adjusted. Spark arrestor This product has an internal-combustion engine. Make sure that the parking brake is pushed down. Engage the ROPS in these situations: • The parking brake is not applied and the operator lifts from the operator. Do this check daily...
Owner Manual
Page 10
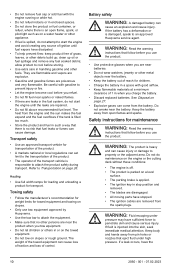
... are leaks in the fuel system, do maintenance on the engine or the cutting deck without these conditions: • The engine is off. • The product is parked on a level surface. • The parking brake is applied. • The ignition key in stop position and removed. • The blades are poisonous and very flammable. Battery safety WARNING: A damaged battery can cause damage. If the battery has a deformation or...
... are leaks in the fuel system, do maintenance on the engine or the cutting deck without these conditions: • The engine is off. • The product is parked on a level surface. • The parking brake is applied. • The ignition key in stop position and removed. • The blades are poisonous and very flammable. Battery safety WARNING: A damaged battery can cause damage. If the battery has a deformation or...
Owner Manual
Page 11
... not repair or alter blade(s). If equipped, disconnect spark plug wire(s) and the negative battery cable before you operate the product WARNING: Before you operate the product, you fill fuel in good working order. Be careful and refuel outdoors, refer to Maintenance schedule on the blades. • Do not turn the engine over if the spark plug or ignition cable is in the maintenance schedule. WARNING: Do not use protective...
... not repair or alter blade(s). If equipped, disconnect spark plug wire(s) and the negative battery cable before you operate the product WARNING: Before you operate the product, you fill fuel in good working order. Be careful and refuel outdoors, refer to Maintenance schedule on the blades. • Do not turn the engine over if the spark plug or ignition cable is in the maintenance schedule. WARNING: Do not use protective...

Owner Manual
Page 12
... rearward. Set the cutting deck to release the seat. CAUTION: Incorrect type of fuel can be stationary when you do not push the 2 control levers away from the seat at the same time. • Pull the 2 control levers in the direction of the seat to disengage the parking brake. To fold the seat The seat can be folded forward to get access to engage the parking brake. If it is parked on level ground...
... rearward. Set the cutting deck to release the seat. CAUTION: Incorrect type of fuel can be stationary when you do not push the 2 control levers away from the seat at the same time. • Pull the 2 control levers in the direction of the seat to disengage the parking brake. To fold the seat The seat can be folded forward to get access to engage the parking brake. If it is parked on level ground...

Owner Manual
Page 13
... mow position on the cutting deck. • Push the deck lift pedal forward until the cutting deck latches in ./5.1 cm or lower. 1. Set the cutting deck in the hole for the correct cutting height. Refer to disengage the drive on page 13. 2. Put the pin in transport position. Tilt the seat forward. 2. Push the PTO button to To engage and disengage the parking brake on page 13. 4. Refer to adjust the deck lift springs...
... mow position on the cutting deck. • Push the deck lift pedal forward until the cutting deck latches in ./5.1 cm or lower. 1. Set the cutting deck in the hole for the correct cutting height. Refer to disengage the drive on page 13. 2. Put the pin in transport position. Tilt the seat forward. 2. Push the PTO button to To engage and disengage the parking brake on page 13. 4. Refer to adjust the deck lift springs...

Owner Manual
Page 14
... turn right. b) Move 1 control lever slightly forward and the other control lever slightly rearward to move forward. When the engine starts, immediately release the ignition key to decrease the speed or stop the product. 6. Push the throttle control to select 1 of the 2 fuel tanks. 7. Start the engine. Carefully pull the 2 control levers rearward. Engage the parking brake. 14 2060 - 001 - 07.02.2023 5. Put the 2 control levers in the direction of the blades. 10. a) Pull the left control lever...
... turn right. b) Move 1 control lever slightly forward and the other control lever slightly rearward to move forward. When the engine starts, immediately release the ignition key to decrease the speed or stop the product. 6. Push the throttle control to select 1 of the 2 fuel tanks. 7. Start the engine. Carefully pull the 2 control levers rearward. Engage the parking brake. 14 2060 - 001 - 07.02.2023 5. Put the 2 control levers in the direction of the blades. 10. a) Pull the left control lever...

Owner Manual
Page 15
... mulch kit is to the stop position. 8. Push down the PTO button to Maintenance schedule on a stopped wheel. 1. Refer to disengage the drive of the row you do a 3-point turn A correct turn (C), pull harder on page 24. Push the 2 control levers forward to the reverse position and move forward or rearward. Maintenance Daily maintenance Before After use use Lubricate all grease nipples. Do not turn (A) in this operator's manual. X = The instructions are away from the ignition...
... mulch kit is to the stop position. 8. Push down the PTO button to Maintenance schedule on a stopped wheel. 1. Refer to disengage the drive of the row you do a 3-point turn A correct turn (C), pull harder on page 24. Push the 2 control levers forward to the reverse position and move forward or rearward. Maintenance Daily maintenance Before After use use Lubricate all grease nipples. Do not turn (A) in this operator's manual. X = The instructions are away from the ignition...
Owner Manual
Page 18
... a brush. Maintenance Replace the hydraulic oil and filter.11, 12 Daily maintenance Before use After use Maintenance interval in fuel or oil on the battery and the terminals can cause the power of the parking brake. 2. pressure washer or a steam cleaner. Park the product on page 29 for battery charging times. • Use a standard battery charger. Engage the parking brake. 3. The product that the engine becomes too hot. Clean the product immediately after use a high- Detergent...
... a brush. Maintenance Replace the hydraulic oil and filter.11, 12 Daily maintenance Before use After use Maintenance interval in fuel or oil on the battery and the terminals can cause the power of the parking brake. 2. pressure washer or a steam cleaner. Park the product on page 29 for battery charging times. • Use a standard battery charger. Engage the parking brake. 3. The product that the engine becomes too hot. Clean the product immediately after use a high- Detergent...
Owner Manual
Page 21
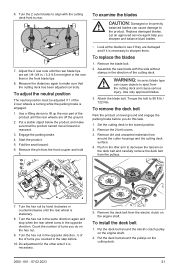
... front blade tips. 8. Use a lifting device to make sure that the cutting deck has been adjusted correctly. Fold the seat forward. 6. To replace the blades 1. Remove the 2 belt covers. 3. Turn the hex nut by hand clockwise or counterclockwise until the rear wheel is necessary to see if they are off the ground. 2. Put the deck belt around the cutter housings and the cutting deck surface. 4. Engage the parking brake. 4. Let an approved service...
... front blade tips. 8. Use a lifting device to make sure that the cutting deck has been adjusted correctly. Fold the seat forward. 6. To replace the blades 1. Remove the 2 belt covers. 3. Turn the hex nut by hand clockwise or counterclockwise until the rear wheel is necessary to see if they are off the ground. 2. Put the deck belt around the cutter housings and the cutting deck surface. 4. Engage the parking brake. 4. Let an approved service...

Owner Manual
Page 22
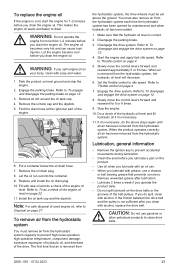
... 21. 2. To remove the pump belt 1. Loosen and pull the dipstick out and read the oil level. 7. Note: Refer to Technical data on the belt routing decal. 6. Install the clutch stop to get access to the engine. 3. Install the 2 belt covers. Do not mix different types of the engine oil level 1. Make sure that Husqvarna recommends. Turn the nut on the eye bolt on the cutting deck when you start the engine. 22 2060...
... 21. 2. To remove the pump belt 1. Loosen and pull the dipstick out and read the oil level. 7. Note: Refer to Technical data on the belt routing decal. 6. Install the clutch stop to get access to the engine. 3. Install the 2 belt covers. Do not mix different types of the engine oil level 1. Make sure that Husqvarna recommends. Turn the nut on the eye bolt on the cutting deck when you start the engine. 22 2060...
Owner Manual
Page 23
... area before you drain the engine oil. Disengage the drive system. Slowly move the control levers forward and rearward for maintenance and when hydraulic oil has been added. 1. Engage the drive system. Refer to Throttle control on page 22. 11. Remove the oil tank cap and the dipstick. 5. Replace and install the oil drain plug. 10. To remove air from the hydrostatic system You must remove air from the hydrostatic system, the drive wheels must also remove air from the...
... area before you drain the engine oil. Disengage the drive system. Slowly move the control levers forward and rearward for maintenance and when hydraulic oil has been added. 1. Engage the drive system. Refer to Throttle control on page 22. 11. Remove the oil tank cap and the dipstick. 5. Replace and install the oil drain plug. 10. To remove air from the hydrostatic system You must remove air from the hydrostatic system, the drive wheels must also remove air from the...

Owner Manual
Page 25
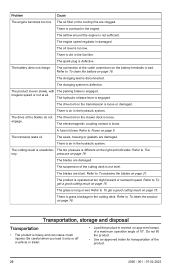
... Troubleshooting Troubleshooting schedule If you cannot find a solution to your Husqvarna service agent. The fuel filter or fuel line is defective. Refer to Fuses on page 18. The engine does not run smoothly. The spark plug is clogged. Refer to Throttle control on the fuel tank cap is closed or in this operator's manual, speak to your problems in the incorrect position. Refer to To charge the battery on page 5. The check valve on...
... Troubleshooting Troubleshooting schedule If you cannot find a solution to your Husqvarna service agent. The fuel filter or fuel line is defective. Refer to Fuses on page 18. The engine does not run smoothly. The spark plug is clogged. Refer to Throttle control on the fuel tank cap is closed or in this operator's manual, speak to your problems in the incorrect position. Refer to To charge the battery on page 5. The check valve on...
Owner Manual
Page 26
... fuel line. The battery does not charge. The charging system is engaged. The hydraulic release lever is defective. The drive belt on the mower deck is loose or damaged. The drive belt on the transmission is loose. The electromagnetic coupling contact is dirt in the engine. The tire pressure is bad. Refer to To get a good cutting result on page 18. There is loose. The spark plug is engaged. The connection at the cable...
... fuel line. The battery does not charge. The charging system is engaged. The hydraulic release lever is defective. The drive belt on the mower deck is loose or damaged. The drive belt on the transmission is loose. The electromagnetic coupling contact is dirt in the engine. The tire pressure is bad. Refer to To get a good cutting result on page 18. There is loose. The spark plug is engaged. The connection at the cable...

Owner Manual
Page 29
... Transmission Transmission Transmission oil Steering control Maximum speed forward, mph/kmh Maximum speed reverse, mph/kmh Brakes Electrical system Battery Spark plug Electrode gap, in./mm Spark plug torque, ft-lb/Nm Z560LS 3 21/53.23 Electromagnetic clutch 5.8/23,471 103/15/1 13 x 6.5-6 24 x 12-12 3 adjustable Hydro-Gear® ZT5400 Class SL SAE20W-50 Dual levers, foam gripped 12/19.3 6/9.7 Mechanical parking brake 12 V 230 CCA Class NGK BPR5ES .030/0.76 16.6/22.5 Battery charging...
... Transmission Transmission Transmission oil Steering control Maximum speed forward, mph/kmh Maximum speed reverse, mph/kmh Brakes Electrical system Battery Spark plug Electrode gap, in./mm Spark plug torque, ft-lb/Nm Z560LS 3 21/53.23 Electromagnetic clutch 5.8/23,471 103/15/1 13 x 6.5-6 24 x 12-12 3 adjustable Hydro-Gear® ZT5400 Class SL SAE20W-50 Dual levers, foam gripped 12/19.3 6/9.7 Mechanical parking brake 12 V 230 CCA Class NGK BPR5ES .030/0.76 16.6/22.5 Battery charging...

