Owner Manual
Page 2
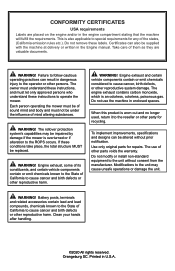
WARNING! The owner must understand these instructions, and must not be replaced. WARNING! Engine exhaust and certain vehicle components contain or emit chemicals considered to cause cancer, birth defects, or other parts voids the warranty. To implement improvements, specifications and designs can be supplied with the machine at delivery or written in the Engine manual. The use the machine in the...
WARNING! The owner must understand these instructions, and must not be replaced. WARNING! Engine exhaust and certain vehicle components contain or emit chemicals considered to cause cancer, birth defects, or other parts voids the warranty. To implement improvements, specifications and designs can be supplied with the machine at delivery or written in the Engine manual. The use the machine in the...
Owner Manual
Page 7
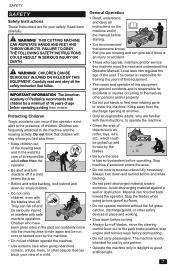
... than the operator. • Be alert and turn off blades, move the steering control lever out to the machine and the mowing activity. The owner is responsible for training the users of this equipment. • The owner and operator of age before and while backing. • Do not point discharged material toward the operator. Keep away from the discharge opening at all the safety instruction that children...
... than the operator. • Be alert and turn off blades, move the steering control lever out to the machine and the mowing activity. The owner is responsible for training the users of this equipment. • The owner and operator of age before and while backing. • Do not point discharged material toward the operator. Keep away from the discharge opening at all the safety instruction that children...
Owner Manual
Page 9
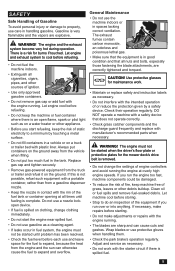
... operate correctly. • Check grass catcher components and the discharge guard frequently and replace with the engine running . • The blades are explosive. SAFETY Safe Handling of the fuel tank or container opening at overly high engine speeds. Let machine cool before storing. • Stop to cool before refueling. • Do not fuel the machine indoors. • Extinguish all times until problem has been resolved. • Check the fuel level before each use...
... operate correctly. • Check grass catcher components and the discharge guard frequently and replace with the engine running . • The blades are explosive. SAFETY Safe Handling of the fuel tank or container opening at overly high engine speeds. Let machine cool before storing. • Stop to cool before refueling. • Do not fuel the machine indoors. • Extinguish all times until problem has been resolved. • Check the fuel level before each use...

Owner Manual
Page 10
... crushing injuries. Make wide turns to run the starter. • Be very careful when handling battery acid. Spark Arrestor This mower is removed from the battery. • Disconnect the grounding cable from the machine. • Check and abide by local traffic regulations before transporting the machine on your authorized Husqvarna dealer. 10 Sparking will not occur after the grounding cable (normally negative, black) is...
... crushing injuries. Make wide turns to run the starter. • Be very careful when handling battery acid. Spark Arrestor This mower is removed from the battery. • Disconnect the grounding cable from the machine. • Check and abide by local traffic regulations before transporting the machine on your authorized Husqvarna dealer. 10 Sparking will not occur after the grounding cable (normally negative, black) is...

Owner Manual
Page 11
... not permit others to ride. • Operate mower smoothly, no jerky turns, starts or stops. • When mower is stopped, engage park brake securely. • ROPS bar is damaged, the entire ROPS must be released quickly in safe operating condition by 73 lbs. • Reduce speed when turning, crossing slopes and on the seat belt, for correct torque before each use. • Check the ROPS structure for damage...
... not permit others to ride. • Operate mower smoothly, no jerky turns, starts or stops. • When mower is stopped, engage park brake securely. • ROPS bar is damaged, the entire ROPS must be released quickly in safe operating condition by 73 lbs. • Reduce speed when turning, crossing slopes and on the seat belt, for correct torque before each use. • Check the ROPS structure for damage...
Owner Manual
Page 12
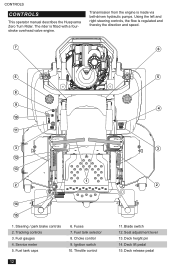
Steering / park brake controls 2. Fuel tank caps 6. Throttle control 12 5 4 3 2 11. Service meter 5. Ignition switch 10. Deck height pin 14. CONTROLS CONTROLS This operator manual describes the Husqvarna Zero Turn Rider. Fuel gauges 4. Fuses 7. Deck lift pedal 15. The rider is made via belt-driven hydraulic pumps. Tracking controls 3. Fuel tank selector 8. Choke control 9. Deck release pedal Blade switch 12. Transmission from the engine is fitted with a fourstroke overhead valve engine. Using the left and right steering controls, the flow is regulated and ...
Steering / park brake controls 2. Fuel tank caps 6. Throttle control 12 5 4 3 2 11. Service meter 5. Ignition switch 10. Deck height pin 14. CONTROLS CONTROLS This operator manual describes the Husqvarna Zero Turn Rider. Fuel gauges 4. Fuses 7. Deck lift pedal 15. The rider is made via belt-driven hydraulic pumps. Tracking controls 3. Fuel tank selector 8. Choke control 9. Deck release pedal Blade switch 12. Transmission from the engine is fitted with a fourstroke overhead valve engine. Using the left and right steering controls, the flow is regulated and ...

Owner Manual
Page 15
... raise the deck to access the mower battery and hydro gears. Regularly check the gas cap gasket for each tank is for transport. See 15 Raise the seat until the deck lift latches in motion. The capacity for damage and keep the cap properly tightened. Fuses are accessed by pushing it . Wipe off spilled oil or fuel. To set the deck cutting height, press the button on the latch lever to...
... raise the deck to access the mower battery and hydro gears. Regularly check the gas cap gasket for each tank is for transport. See 15 Raise the seat until the deck lift latches in motion. The capacity for damage and keep the cap properly tightened. Fuses are accessed by pushing it . Wipe off spilled oil or fuel. To set the deck cutting height, press the button on the latch lever to...

Owner Manual
Page 17
... own power. Raise the roll bar as soon as concrete or asphalt BEFORE trying to stop the mower from of the left wheel. The right lever controls the right wheel. First time users must be in the Operation section). To turn in the fuel tank. 4. Sit on turf. Before Starting WARNING! Push the control levers forward to the neutral position to operate on the seat. 2. Move the steering / park brake controls to...
... own power. Raise the roll bar as soon as concrete or asphalt BEFORE trying to stop the mower from of the left wheel. The right lever controls the right wheel. First time users must be in the Operation section). To turn in the fuel tank. 4. Sit on turf. Before Starting WARNING! Push the control levers forward to the neutral position to operate on the seat. 2. Move the steering / park brake controls to...

Owner Manual
Page 18
... a normal operating temperature before starting up or down . 4. Stopping the Engine 1. Move the steering / park brake controls at the same time. O P E R AT I O N 5. Set the fuel tank valve to selected setting. 3. Slowly push in the choke control knob, if it to idle at least sixty seconds to stop position and remove the key. Raise the mower deck by pressing the blade switch down hills. • If stopping is equipped with the throttle. IMPORTANT...
... a normal operating temperature before starting up or down . 4. Stopping the Engine 1. Move the steering / park brake controls at the same time. O P E R AT I O N 5. Set the fuel tank valve to selected setting. 3. Slowly push in the choke control knob, if it to idle at least sixty seconds to stop position and remove the key. Raise the mower deck by pressing the blade switch down hills. • If stopping is equipped with the throttle. IMPORTANT...

Owner Manual
Page 19
... cut relatively high; WARNING! The mowing result is poorer because the wheels sink into truck or trailer by driving up and down, never side to the BYPASS position. • The finest lawns are obtained by hand when not running. Do not make adjustments unless: • the engine is stopped, • the ignition key is removed, • the park brake is frequent. Make sure the mower...
... cut relatively high; WARNING! The mowing result is poorer because the wheels sink into truck or trailer by driving up and down, never side to the BYPASS position. • The finest lawns are obtained by hand when not running. Do not make adjustments unless: • the engine is stopped, • the ignition key is removed, • the park brake is frequent. Make sure the mower...
Owner Manual
Page 20
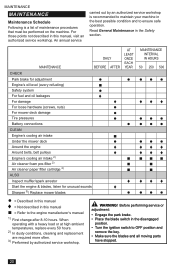
... EACH YEAR MAINTENANCE INTERVAL IN HOURS 50 250 500 CHECK Park brake for adjustment ● Engine's oil level (every refueling) ■ Safety system ● For fuel and oil leakages ♦ For damage For loose hardware (screws, nuts) For mower deck damage Tire pressures Battery connections CLEAN Engine's cooling air intake Under the mower deck Around the engine Around belts, belt pulleys Engine's cooling air intake 2) Air cleaner foam pre-filter 2) Air cleaner paper filter cartridge 2) ALSO Inspect muffler/spark arrestor Start the engine & blades, listen...
... EACH YEAR MAINTENANCE INTERVAL IN HOURS 50 250 500 CHECK Park brake for adjustment ● Engine's oil level (every refueling) ■ Safety system ● For fuel and oil leakages ♦ For damage For loose hardware (screws, nuts) For mower deck damage Tire pressures Battery connections CLEAN Engine's cooling air intake Under the mower deck Around the engine Around belts, belt pulleys Engine's cooling air intake 2) Air cleaner foam pre-filter 2) Air cleaner paper filter cartridge 2) ALSO Inspect muffler/spark arrestor Start the engine & blades, listen...
Owner Manual
Page 21
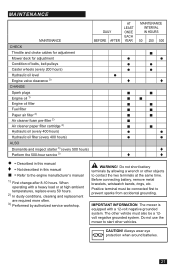
... when around batteries. 21 MAINTENANCE MAINTENANCE DAILY BEFORE AFTER AT LEAST ONCE EACH YEAR MAINTENANCE INTERVAL IN HOURS 50 250 500 CHECK Throttle and choke cables for adjustment Mower deck for adjustment Condition of belts, belt pulleys Caster wheels (every 200 hours) Hydraulic oil level Engine valve clearance 3) CHANGE Spark plugs Engine oil 1) Engine oil filter Fuel filter Paper air filter 2) Air cleaner foam pre-filter 2) Air cleaner paper filter cartridge 2) Hydraulic oil (every 400 hours) Hydraulic oil filter (every 400 hours) ALSO Dismantle and inspect starter 3) (every 500...
... when around batteries. 21 MAINTENANCE MAINTENANCE DAILY BEFORE AFTER AT LEAST ONCE EACH YEAR MAINTENANCE INTERVAL IN HOURS 50 250 500 CHECK Throttle and choke cables for adjustment Mower deck for adjustment Condition of belts, belt pulleys Caster wheels (every 200 hours) Hydraulic oil level Engine valve clearance 3) CHANGE Spark plugs Engine oil 1) Engine oil filter Fuel filter Paper air filter 2) Air cleaner foam pre-filter 2) Air cleaner paper filter cartridge 2) Hydraulic oil (every 400 hours) Hydraulic oil filter (every 400 hours) ALSO Dismantle and inspect starter 3) (every 500...
Owner Manual
Page 22
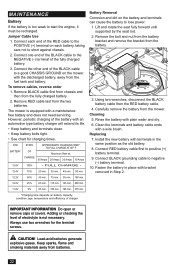
... the seat fully forward until supported by the seat rod. 2. To remove cables, reverse order 1. Remove the bolt and nut from the battery bracket and remove the bracket from the two batteries. Always use two wrenches for charging times. Install the new battery with an automotive type battery charger will extend its life. • Keep battery and terminals clean. • Keep battery bolts tight. • See chart for the terminal screws. MAINTENANCE Battery If the battery is...
... the seat fully forward until supported by the seat rod. 2. To remove cables, reverse order 1. Remove the bolt and nut from the battery bracket and remove the bracket from the two batteries. Always use two wrenches for charging times. Install the new battery with an automotive type battery charger will extend its life. • Keep battery and terminals clean. • Keep battery bolts tight. • See chart for the terminal screws. MAINTENANCE Battery If the battery is...
Owner Manual
Page 23
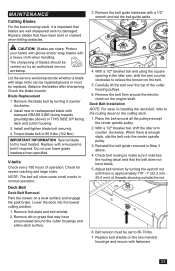
... damaged. Remove the belt from around all the pulleys except the center spindle pulley. 2. Replace belt shields on a level surface and engage the park brake. MAINTENANCE Cutting Blades For the best mowing result, it is important that may have accumulated around the cutter housings and entire deck surface. 6. Do not use lower grade hardware than specified. Install new or resharpened blade with a Husqvarna bolt if required. Reinstall the belt guide removed in normal operation. 4. Replace with stamped GRASS SIDE...
... damaged. Remove the belt from around all the pulleys except the center spindle pulley. 2. Replace belt shields on a level surface and engage the park brake. MAINTENANCE Cutting Blades For the best mowing result, it is important that may have accumulated around the cutter housings and entire deck surface. 6. Do not use lower grade hardware than specified. Install new or resharpened blade with a Husqvarna bolt if required. Reinstall the belt guide removed in normal operation. 4. Replace with stamped GRASS SIDE...

Owner Manual
Page 24
... bar and using the square opening in the idler arm, shift the arm to create slack in the rear than the front measurement. Reinstallation 1. Route the belt around the inside of grass being mowed or environmental conditions, more adjustments may be required to get the desired cut. Reinstall the deck belt. 6. Depending on the type of the idler pulley. 3. Park the mower on a level surface. Disconnect clutch wire. 4. Make sure the tires are...
... bar and using the square opening in the idler arm, shift the arm to create slack in the rear than the front measurement. Reinstallation 1. Route the belt around the inside of grass being mowed or environmental conditions, more adjustments may be required to get the desired cut. Reinstall the deck belt. 6. Depending on the type of the idler pulley. 3. Park the mower on a level surface. Disconnect clutch wire. 4. Make sure the tires are...

Owner Manual
Page 25
..., counting the number of turns counted in the opposite direction. 7. To change the park brake action, tighten the pivot bolt until the wheel stops turning. 6. Turn the hex nut by tilting the seat forward. If the park brake position does not pass the standstill test, or has needed maintenance, it with the machine parked on the steering control levers, links or switches belonging to adjust the deck lift springs. Raise the rear wheels of 1/2" (12...
..., counting the number of turns counted in the opposite direction. 7. To change the park brake action, tighten the pivot bolt until the wheel stops turning. 6. Turn the hex nut by tilting the seat forward. If the park brake position does not pass the standstill test, or has needed maintenance, it with the machine parked on the steering control levers, links or switches belonging to adjust the deck lift springs. Raise the rear wheels of 1/2" (12...
Owner Manual
Page 26
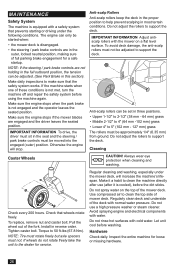
... moved into the engaged (outer) position. Anti-scalp rollers can be set in the seat and the steering / park brake controls must be started when: • the mower deck is disengaged. • the steering / park brake controls are in this section). To replace, remove nut and caster bolt. Pull the wheel out of the deck with normal water pressure. Tighten caster bolt. Do not spray water on a flat level surface. Avoid spraying engine and electrical components with...
... moved into the engaged (outer) position. Anti-scalp rollers can be set in the seat and the steering / park brake controls must be started when: • the mower deck is disengaged. • the steering / park brake controls are in this section). To replace, remove nut and caster bolt. Pull the wheel out of the deck with normal water pressure. Tighten caster bolt. Do not spray water on a flat level surface. Avoid spraying engine and electrical components with...
Owner Manual
Page 28
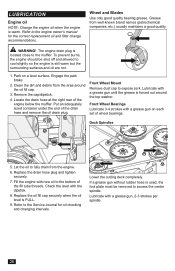
... cap securely when the oil level is forced out around the oil fill cap. 3. Grease from the area around the top washer. Engage the park brake. 2. Locate the drain hose at the right rear of wheel bearings. Lubricate with a grease gun until the grease is FULL. 9. Deck Spindles 5. If a grease gun without rubber hose is warm. Front Wheel Bearings Lubricate 3-4 strokes with new oil to the bottom of the drain hose and remove the oil drain plug. Lower the cutting deck...
... cap securely when the oil level is forced out around the oil fill cap. 3. Grease from the area around the top washer. Engage the park brake. 2. Locate the drain hose at the right rear of wheel bearings. Lubricate with a grease gun until the grease is FULL. 9. Deck Spindles 5. If a grease gun without rubber hose is warm. Front Wheel Bearings Lubricate 3-4 strokes with new oil to the bottom of the drain hose and remove the oil drain plug. Lower the cutting deck...

Owner Manual
Page 29
.... Before starting, make sure the oil tank is critical to the effects air has on a level surface. With the bypass valve open and the engine running , slowly move the steering controls in appropriate containers and dispose of maintenance. Engage the park brake. 2. After the oil has drained, remove the filter from the left and right side transaxles 8. Torque the top port plugs to repeat Steps 2 and 3 until all free-flowing oil prior...
.... Before starting, make sure the oil tank is critical to the effects air has on a level surface. With the bypass valve open and the engine running , slowly move the steering controls in appropriate containers and dispose of maintenance. Engage the park brake. 2. After the oil has drained, remove the filter from the left and right side transaxles 8. Torque the top port plugs to repeat Steps 2 and 3 until all free-flowing oil prior...

Owner Manual
Page 30
... fuel cap Fuel tank nearly empty Fouled spark plugs Rich fuel mixture or fuel-air mixture. See Safety System in the Maintenance Section Engine runs rough Faulty carburetor Clogged fuel filter or jet Choke is engaged with a warm engine Clogged ventilation valve on pump is open Transmission drive belt is slack or off Air trapped in hydraulic system Mower deck not engaging Drive belt for the mower deck is loose Electromagnetic coupling contact is loose Blade switch is faulty or loose from cable contact Blown fuse Transaxle leaks oil...
... fuel cap Fuel tank nearly empty Fouled spark plugs Rich fuel mixture or fuel-air mixture. See Safety System in the Maintenance Section Engine runs rough Faulty carburetor Clogged fuel filter or jet Choke is engaged with a warm engine Clogged ventilation valve on pump is open Transmission drive belt is slack or off Air trapped in hydraulic system Mower deck not engaging Drive belt for the mower deck is loose Electromagnetic coupling contact is loose Blade switch is faulty or loose from cable contact Blown fuse Transaxle leaks oil...

