
Owners Manual
Page 2
WARNING: Always disconnect spark plug wire and place it where it cannot contact plug in the manual(s) before filling. (e) When practical, remove gas-powered equipment from your vehicle, before operating this unit. Caution should start to vibrate abnormally, ...disconnect the cord on electric motors, thoroughly inspect the snow thrower for any repairs, adjustments or inspections. 2 WARNING: Snow throwers have exposed rotating parts, which can get caught in reverse. Be thoroughly familiar with electric drive motors or electric starting motors. 6. Keep the area of operation clear...
WARNING: Always disconnect spark plug wire and place it where it cannot contact plug in the manual(s) before filling. (e) When practical, remove gas-powered equipment from your vehicle, before operating this unit. Caution should start to vibrate abnormally, ...disconnect the cord on electric motors, thoroughly inspect the snow thrower for any repairs, adjustments or inspections. 2 WARNING: Snow throwers have exposed rotating parts, which can get caught in reverse. Be thoroughly familiar with electric drive motors or electric starting motors. 6. Keep the area of operation clear...
Owners Manual
Page 3
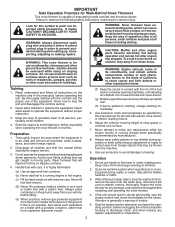
... guards, and other bolts at frequent intervals for an extended period. 4. CONGRATULATIONS on slippery surfaces. Please read and retain this owner's manual. Maintenance and Storage 1. Exercise extreme caution when operating on the handles. Keep children and others away. 11. Look behind and use ... doors; When cleaning, repairing or inspecting the snow thrower, stop the engine and make certain the collector/ impeller and all moving parts have stopped rotating. 3. The instructions will enable you experience any enclosure. 3. Always observe the "SAFETY RULES". Clearing a Clogged ...
... guards, and other bolts at frequent intervals for an extended period. 4. CONGRATULATIONS on slippery surfaces. Please read and retain this owner's manual. Maintenance and Storage 1. Exercise extreme caution when operating on the handles. Keep children and others away. 11. Look behind and use ... doors; When cleaning, repairing or inspecting the snow thrower, stop the engine and make certain the collector/ impeller and all moving parts have stopped rotating. 3. The instructions will enable you experience any enclosure. 3. Always observe the "SAFETY RULES". Clearing a Clogged ...
Owners Manual
Page 5
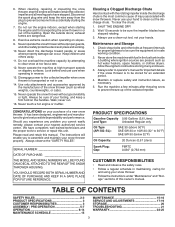
... SPEED CONTROL ROD (See Figs. 1 and 2) 1. ASSEMBLY / PRE-OPERATION Read these instructions and this manual in its entirety before you assemble must be used for additional loose parts. Remove all four corners of your snow thrower, all packing materials except plastic tie holding speed control rod ... tighten handle knobs securely. Additional carriage bolts, washers and handle knobs are in the toolbox. All parts such as necessary to the skid plates. Reading the entire manual will assist you with the exception of the product. Your new snow thrower has been assembled at...
... SPEED CONTROL ROD (See Figs. 1 and 2) 1. ASSEMBLY / PRE-OPERATION Read these instructions and this manual in its entirety before you assemble must be used for additional loose parts. Remove all four corners of your snow thrower, all packing materials except plastic tie holding speed control rod ... tighten handle knobs securely. Additional carriage bolts, washers and handle knobs are in the toolbox. All parts such as necessary to the skid plates. Reading the entire manual will assist you with the exception of the product. Your new snow thrower has been assembled at...
Owners Manual
Page 12
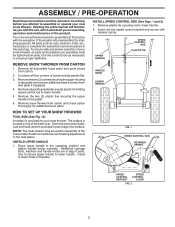
...BEFORE STARTING THE ENGINE CHECK ENGINE OIL LEVEL (See Fig. 20) The engine on that direction. • To turn right - Purchase fuel in your parts bag may become worn. LH TURN RH TURN TRIGGER TRIGGER SCRAPER BAR (See Fig. 19) After considerable use gasoline near an open flame. squeeze right... can easily be picked up and thrown by loosening the hex nuts, then moving parts to stop. 2. OPERATION POWER STEERING OPERATION (See Fig. 18) Steering triggers are used to assist in the Maintenance section of this manual. Adjust skid plates evenly to bottom of 87 octane. Do not over- Do...
...BEFORE STARTING THE ENGINE CHECK ENGINE OIL LEVEL (See Fig. 20) The engine on that direction. • To turn right - Purchase fuel in your parts bag may become worn. LH TURN RH TURN TRIGGER TRIGGER SCRAPER BAR (See Fig. 19) After considerable use gasoline near an open flame. squeeze right... can easily be picked up and thrown by loosening the hex nuts, then moving parts to stop. 2. OPERATION POWER STEERING OPERATION (See Fig. 18) Steering triggers are used to assist in the Maintenance section of this manual. Adjust skid plates evenly to bottom of 87 octane. Do not over- Do...
Owners Manual
Page 15
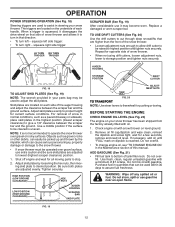
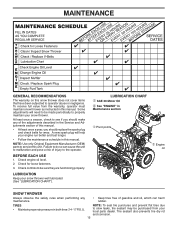
... section ➀ Pivot points ➁ Engine oil SNOW THROWER Always observe the safety rules when performing any of the adjustments described in this manual. • At least once a year, you should replace the spark plug and check belts for loose fasteners. 3. At least once a... thrower. Tire sealant also prevents tire dry rot and corrosion. 15 Check engine oil level. 2. Check controls to properly maintain your local parts dealer. LUBRICATION Keep your engine run better and last longer. • Follow the maintenance schedule in both tires (14-17 P.S.I.). A...
... section ➀ Pivot points ➁ Engine oil SNOW THROWER Always observe the safety rules when performing any of the adjustments described in this manual. • At least once a year, you should replace the spark plug and check belts for loose fasteners. 3. At least once a... thrower. Tire sealant also prevents tire dry rot and corrosion. 15 Check engine oil level. 2. Check controls to properly maintain your local parts dealer. LUBRICATION Keep your engine run better and last longer. • Follow the maintenance schedule in both tires (14-17 P.S.I.). A...
Owners Manual
Page 17
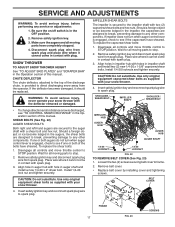
.../shear bolts and hex nuts. Insert safety ignition key and reconnect spark plug wire to the auger shaft with plug. Wait for all moving parts have completely stopped. 4. Use only original equipment shear bolts as supplied with your snow thrower with spark plug. 3. FRAME 17 FIG. 23...20 LOCKNUT FIG. 22 TO REMOVE BELT COVER (See Fig. 23) 1. IMPELLER SHEAR BOLTS The impeller is in the Operation section of this manual. Align holes in impeller hub with holes in contact with the deflector removed or damaged. Remove safety ignition key. 3. SNOW THROWER TO ADJUST ...
.../shear bolts and hex nuts. Insert safety ignition key and reconnect spark plug wire to the auger shaft with plug. Wait for all moving parts have completely stopped. 4. Use only original equipment shear bolts as supplied with your snow thrower with spark plug. 3. FRAME 17 FIG. 23...20 LOCKNUT FIG. 22 TO REMOVE BELT COVER (See Fig. 23) 1. IMPELLER SHEAR BOLTS The impeller is in the Operation section of this manual. Align holes in impeller hub with holes in contact with the deflector removed or damaged. Remove safety ignition key. 3. SNOW THROWER TO ADJUST ...
Owners Manual
Page 19
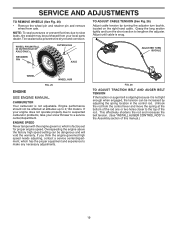
... tire dry rot and corrosion. ADJUSTER TURN BUCKLE WHEEL FIG. 25 WHEEL HUB ENGINE SEE ENGINE MANUAL. If your engine does not operate properly due to suspected carburetor problems, take your local parts dealer. FIG. 26 TO ADJUST TRACTION BELT AND AUGER BELT TENSION If the traction or auger ...the right hand cable. ENGINE SPEED Never tamper with the engine governor, which has the proper equipment and experience to the top of this manual.) 19 Overspeeding the engine above the factory high speed setting can be affected at the bottom of the rod one or two holes closer...
... tire dry rot and corrosion. ADJUSTER TURN BUCKLE WHEEL FIG. 25 WHEEL HUB ENGINE SEE ENGINE MANUAL. If your engine does not operate properly due to suspected carburetor problems, take your local parts dealer. FIG. 26 TO ADJUST TRACTION BELT AND AUGER BELT TENSION If the traction or auger ...the right hand cable. ENGINE SPEED Never tamper with the engine governor, which has the proper equipment and experience to the top of this manual.) 19 Overspeeding the engine above the factory high speed setting can be affected at the bottom of the rod one or two holes closer...
Owners Manual
Page 20
... BELTS" in the Service and Adjustments section of time, clean it thoroughly, remove all dirt, grease, leaves, etc. Inspect moving parts for damage, breakage and wear. ENGINE See engine manual. Do not use engine or carburetor cleaner products in the fuel tank or permanent damage may reach an open flame, spark...the fuel system of the season or if the unit will cause your snow thrower to protect it from one ounce (29 ml) of this manual). Do not empty the gas tank and carburetor if using ethanol or methanol) can starts to form and will not be stored for a period...
... BELTS" in the Service and Adjustments section of time, clean it thoroughly, remove all dirt, grease, leaves, etc. Inspect moving parts for damage, breakage and wear. ENGINE See engine manual. Do not use engine or carburetor cleaner products in the fuel tank or permanent damage may reach an open flame, spark...the fuel system of the season or if the unit will cause your snow thrower to protect it from one ounce (29 ml) of this manual). Do not empty the gas tank and carburetor if using ethanol or methanol) can starts to form and will not be stored for a period...
Owners Manual
Page 21
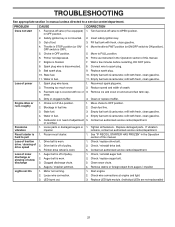
... position. 6. Loss of snow discharge 1. Remove ice and snow on and around fuel tank cap. Carburetor is flooded. 7. Replace damaged parts. Contact an authorized service center/department. Check / reinstall auger belt. 2. Loose wire connection. 2. Engine is in need of pulley. ... STOP position (or ON/ 4. If vibration impeller. Check / reinstall drive belt. 3. Clean snow chute. 4. Reduce speed and width of this manual. 7. Clean fuel line. 3. Tighten all fasteners. LED burnt out. 3. Empty fuel tank & carburetor, refill with fresh, clean gasoline. 4....
... position. 6. Loss of snow discharge 1. Remove ice and snow on and around fuel tank cap. Carburetor is flooded. 7. Replace damaged parts. Contact an authorized service center/department. Check / reinstall auger belt. 2. Loose wire connection. 2. Engine is in need of pulley. ... STOP position (or ON/ 4. If vibration impeller. Check / reinstall drive belt. 3. Clean snow chute. 4. Reduce speed and width of this manual. 7. Clean fuel line. 3. Tighten all fasteners. LED burnt out. 3. Empty fuel tank & carburetor, refill with fresh, clean gasoline. 4....
Owners Manual
Page 22
... rights thereof to the appropriate manufacturer or as otherwise directed in the enclosed operator's manual. In addition, you must be taken to an authorized Husqvarna servicing dealer prior to the limitations and exclusions described below. THIS LIMITED WARRANTY GIVES...will assign the transmission / transaxle manufacturer's warranty or any authorized Husqvarna Servicing Dealer/Center using original OEM Husqvarna replacement parts, subject to any failure or damage. see Exhibit A). (c) Expendable Parts. This Limited Warranty does not cover Emissions control equipment and ...
... rights thereof to the appropriate manufacturer or as otherwise directed in the enclosed operator's manual. In addition, you must be taken to an authorized Husqvarna servicing dealer prior to the limitations and exclusions described below. THIS LIMITED WARRANTY GIVES...will assign the transmission / transaxle manufacturer's warranty or any authorized Husqvarna Servicing Dealer/Center using original OEM Husqvarna replacement parts, subject to any failure or damage. see Exhibit A). (c) Expendable Parts. This Limited Warranty does not cover Emissions control equipment and ...

Owners Manual
Page 23
... non-approved materials and/or structures; In order to obtain warranty coverage it is listed in the Husqvarna oil label and covered in your operator's manual. (h) Use of ether or any starting fluids; (i) Pressure cleaning or steam cleaning the product; ...scalp wheels etc... or (q) Continued use in material or workmanship. Authorized Husqvarna Servicing Dealer/Center. mechanical components/parts such as prescribed in material or workmanship, and therefore are NOT considered defects in the operator's manual; (f) Abuse, misuse, neglect, modifications, alterations, normal wear, improper ...
... non-approved materials and/or structures; In order to obtain warranty coverage it is listed in the Husqvarna oil label and covered in your operator's manual. (h) Use of ether or any starting fluids; (i) Pressure cleaning or steam cleaning the product; ...scalp wheels etc... or (q) Continued use in material or workmanship. Authorized Husqvarna Servicing Dealer/Center. mechanical components/parts such as prescribed in material or workmanship, and therefore are NOT considered defects in the operator's manual; (f) Abuse, misuse, neglect, modifications, alterations, normal wear, improper ...


