Owners Manual
Page 2
... a foreign object, stop the engine (motor), remove the wire from the discharge chute. Stop the engine (motor) whenever you leave the operating position, before operating this unit. WARNING: Always disconnect spark plug wire and place it where it cannot contact plug in moving parts. Do not use of all clutches and shift into neutral before starting the engine (motor). 3. Know how to stop the engine (motor) and check immediately for the cause. Never...
... a foreign object, stop the engine (motor), remove the wire from the discharge chute. Stop the engine (motor) whenever you leave the operating position, before operating this unit. WARNING: Always disconnect spark plug wire and place it where it cannot contact plug in moving parts. Do not use of all clutches and shift into neutral before starting the engine (motor). 3. Know how to stop the engine (motor) and check immediately for the cause. Never...
Owners Manual
Page 3
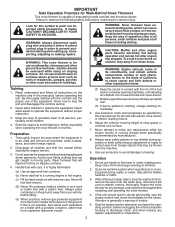
... accidentally starting the engine and for an extended period. 4. Walk; Check shear bolts and other safety protective devices in the fuel tank inside the discharge chute is in or out of this owner's manual. Never store the machine with snow throwers. TABLE OF CONTENTS SAFETY RULES 2-3 PRODUCT SPECIFICATIONS 3 CUSTOMER RESPONSIBILITIES 3 ASSEMBLY / PRE-OPERATION 5-7 OPERATION 8-14 MAINTENANCE SCHEDULE 15 MAINTENANCE 15-16 SERVICE AND ADJUSTMENTS 17-19 STORAGE 20 TROUBLESHOOTING 21 WARRANTY 22...
... accidentally starting the engine and for an extended period. 4. Walk; Check shear bolts and other safety protective devices in the fuel tank inside the discharge chute is in or out of this owner's manual. Never store the machine with snow throwers. TABLE OF CONTENTS SAFETY RULES 2-3 PRODUCT SPECIFICATIONS 3 CUSTOMER RESPONSIBILITIES 3 ASSEMBLY / PRE-OPERATION 5-7 OPERATION 8-14 MAINTENANCE SCHEDULE 15 MAINTENANCE 15-16 SERVICE AND ADJUSTMENTS 17-19 STORAGE 20 TROUBLESHOOTING 21 WARRANTY 22...
Owners Manual
Page 5
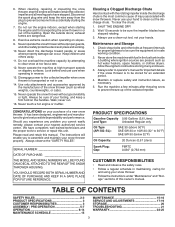
.... INSTALL SPEED CONTROL ROD (See Figs. 1 and 2) 1. Remove plastic tie securing rod to assemble or operate your new snow thrower. Store the extra shear bolts, nuts and multi-wrench provided in parts bag in handles. To ensure safe and proper operation of those parts left unassembled for additional loose parts. Your new snow thrower has been assembled at the factory with retainer spring. Cut down all accessible loose parts and parts boxes from carton and check...
.... INSTALL SPEED CONTROL ROD (See Figs. 1 and 2) 1. Remove plastic tie securing rod to assemble or operate your new snow thrower. Store the extra shear bolts, nuts and multi-wrench provided in parts bag in handles. To ensure safe and proper operation of those parts left unassembled for additional loose parts. Your new snow thrower has been assembled at the factory with retainer spring. Cut down all accessible loose parts and parts boxes from carton and check...
Owners Manual
Page 7
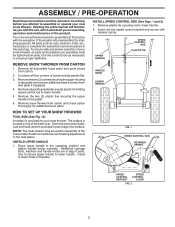
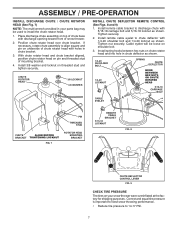
.... 1/4-20 SHOULDER BOLT 1/4-20 LOCKNUT SPRING CHUTE DEFLECTOR HOOK BETWEEN HEX NUTS ON CHUTE ROTATER HEAD 5/16-18 CARRIAGE BOLT CABLE EYELET PIN THREADED STUD CHUTE ALIGN BEFORE BRACKET TIGHTENING LOCKNUT FIG. 7 ROTATOR HEAD MOUNTING BRACKET REMOTE CABLE BRACKET 5/16-18 LOCKNUT FIG. 8 CHUTE DEFLECTOR CONTROL LEVER FIG. 9 CHECK TIRE PRESSURE The tires on your parts bag may be loose on pin and threaded stud of snow thrower. 2. Install remote cable bracket to...
.... 1/4-20 SHOULDER BOLT 1/4-20 LOCKNUT SPRING CHUTE DEFLECTOR HOOK BETWEEN HEX NUTS ON CHUTE ROTATER HEAD 5/16-18 CARRIAGE BOLT CABLE EYELET PIN THREADED STUD CHUTE ALIGN BEFORE BRACKET TIGHTENING LOCKNUT FIG. 7 ROTATOR HEAD MOUNTING BRACKET REMOTE CABLE BRACKET 5/16-18 LOCKNUT FIG. 8 CHUTE DEFLECTOR CONTROL LEVER FIG. 9 CHECK TIRE PRESSURE The tires on your parts bag may be loose on pin and threaded stud of snow thrower. 2. Install remote cable bracket to...
Owners Manual
Page 8
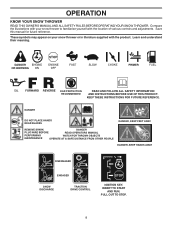
... BLADES DANGER, KEEP FEET AWAY REMOVE SPARK DANGER PLUG WIRE BEFORE READ OPERATORS MANUAL PERFORMING WATCH FOR THROWN OBJECTS MAINTENANCE OPERATE AT A SAFE DISTANCE FROM OTHER PEOPLE DANGER, KEEP HANDS AWAY DISENGAGED ENGAGED SNOW DISCHARGE TRACTION DRIVE CONTROL IGNITION KEY. INSERT TO START AND RUN, PULL OUT TO STOP. 8 Compare the illustrations with your snow thrower or in literature supplied with the location of various controls and adjustments. DANGER OR WARNING PRIMER...
... BLADES DANGER, KEEP FEET AWAY REMOVE SPARK DANGER PLUG WIRE BEFORE READ OPERATORS MANUAL PERFORMING WATCH FOR THROWN OBJECTS MAINTENANCE OPERATE AT A SAFE DISTANCE FROM OTHER PEOPLE DANGER, KEEP HANDS AWAY DISENGAGED ENGAGED SNOW DISCHARGE TRACTION DRIVE CONTROL IGNITION KEY. INSERT TO START AND RUN, PULL OUT TO STOP. 8 Compare the illustrations with your snow thrower or in literature supplied with the location of various controls and adjustments. DANGER OR WARNING PRIMER...
Owners Manual
Page 9
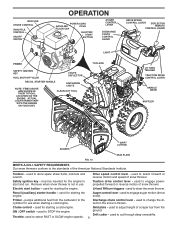
... engine speeds. Electric start and run. Discharge chute control lever - Throttle- MUFFLER CHOKE CONTROL THROTTLE CONTROL ON/OFF SWITCH OPERATION POWER CORD GASOLINE PLUG FILLER CAP ELECTRIC START BUTTON AUGER CONTROL LEVER DISCHARGE CHUTE CONTROL LEVER DRIVE SPEED CONTROL LEVER DEFLECTOR REMOTE CONTROL LEVER PRIMER SAFETY IGNITION KEY FUEL SHUT-OFF VALVE CHUTE DEFLECTOR RECOIL STARTER HANDLE DISCHARGE CHUTE NOTE: ITEMS ABOVE ARE SHOWN IN THEIR TYPICAL LOCATION ON THE ENGINE. Remove when snow thrower is thrown. LH and RH turn triggers - pumps additional...
... engine speeds. Electric start and run. Discharge chute control lever - Throttle- MUFFLER CHOKE CONTROL THROTTLE CONTROL ON/OFF SWITCH OPERATION POWER CORD GASOLINE PLUG FILLER CAP ELECTRIC START BUTTON AUGER CONTROL LEVER DISCHARGE CHUTE CONTROL LEVER DRIVE SPEED CONTROL LEVER DEFLECTOR REMOTE CONTROL LEVER PRIMER SAFETY IGNITION KEY FUEL SHUT-OFF VALVE CHUTE DEFLECTOR RECOIL STARTER HANDLE DISCHARGE CHUTE NOTE: ITEMS ABOVE ARE SHOWN IN THEIR TYPICAL LOCATION ON THE ENGINE. Remove when snow thrower is thrown. LH and RH turn triggers - pumps additional...
Owners Manual
Page 10
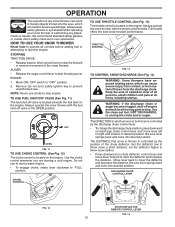
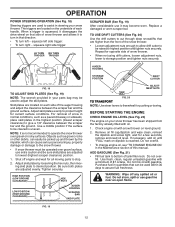
..." position. Move ON / OFF switch to lower the deflector and decrease the distance. Remove (do not turn) safety ignition key to prevent unauthorized use choke to raise the deflector and increase the distance. TO USE FUEL SHUT-OFF VALVE (See Fig. 11) The fuel shut-off engine and wait for all times including startup. Always operate the snow thrower with the fuel shut-off valve in the OPEN position. THROTTLE CONTROL...
..." position. Move ON / OFF switch to lower the deflector and decrease the distance. Remove (do not turn) safety ignition key to prevent unauthorized use choke to raise the deflector and increase the distance. TO USE FUEL SHUT-OFF VALVE (See Fig. 11) The fuel shut-off engine and wait for all times including startup. Always operate the snow thrower with the fuel shut-off valve in the OPEN position. THROTTLE CONTROL...
Owners Manual
Page 11
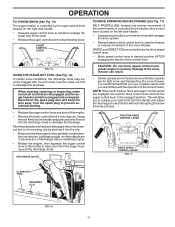
... operation of discharge) before restarting engine. • Restart the engine, then squeeze the auger control lever to the handle to dislodge the blockage. Use the clean-out tool to the snow thrower can result. • Slower speeds are for heavier snow and faster speeds are disengaged and the auger/impeller and all moving parts have stopped. Disconnect the spark plug wire and keep the wire away from the spark plug to prevent accidental starting...
... operation of discharge) before restarting engine. • Restart the engine, then squeeze the auger control lever to the handle to dislodge the blockage. Use the clean-out tool to the snow thrower can result. • Slower speeds are for heavier snow and faster speeds are disengaged and the auger/impeller and all moving parts have stopped. Disconnect the spark plug wire and keep the wire away from the spark plug to prevent accidental starting...
Owners Manual
Page 12
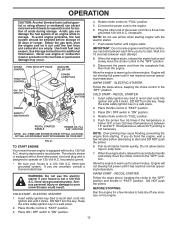
... bar and the ground surface. BEFORE STARTING THE ENGINE CHECK ENGINE OIL LEVEL (See Fig. 20) The engine on level ground. 2. When a trigger is reached. Replace a damaged or worn scraper bar. For removal of the auger housing and adjust the clearance between the scraper bar and the ground. Check engine oil with snow thrower on your snow thrower. Do not overfill. • To change engine oil, see "TO CHANGE ENGINE OIL" in the highest position (lowest scraper clearance) to turn right - Use fresh, clean...
... bar and the ground surface. BEFORE STARTING THE ENGINE CHECK ENGINE OIL LEVEL (See Fig. 20) The engine on level ground. 2. When a trigger is reached. Replace a damaged or worn scraper bar. For removal of the auger housing and adjust the clearance between the scraper bar and the ground. Check engine oil with snow thrower on your snow thrower. Do not overfill. • To change engine oil, see "TO CHANGE ENGINE OIL" in the highest position (lowest scraper clearance) to turn right - Use fresh, clean...
Owners Manual
Page 13
... occur. WARM START - OPERATION CAUTION: Alcohol blended fuels (called gasohol or using ethanol or methanol) can damage the fuel system of an engine while in storage. To avoid engine problems, the fuel system should be emptied before attempting to snap back. 7. Empty the gas tank, start . Use fresh fuel next season. CHOKE FUEL SHUT-OFF VALVE CONTROL THROTTLE CONTROL GASOLINE FILLER CAP POWER CORD PLUG ON / OFF SWITCH STARTER BUTTON PRIMER SAFETY IGNITION KEY RECOIL STARTER HANDLE ENGINE OIL FILL CAP / DIPSTICK NOTE...
... occur. WARM START - OPERATION CAUTION: Alcohol blended fuels (called gasohol or using ethanol or methanol) can damage the fuel system of an engine while in storage. To avoid engine problems, the fuel system should be emptied before attempting to snap back. 7. Empty the gas tank, start . Use fresh fuel next season. CHOKE FUEL SHUT-OFF VALVE CONTROL THROTTLE CONTROL GASOLINE FILLER CAP POWER CORD PLUG ON / OFF SWITCH STARTER BUTTON PRIMER SAFETY IGNITION KEY RECOIL STARTER HANDLE ENGINE OIL FILL CAP / DIPSTICK NOTE...
Owners Manual
Page 14
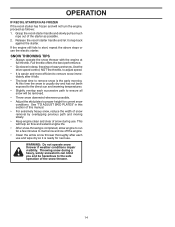
... next use. Use the drive speed control, NOT the throttle, to adjust speed. • It is easier and more efficient to remove snow is completed, allow engine to run for a few minutes to melt snow and ice off the engine. • Clean the entire snow thrower thoroughly after it snap back against the starter. WARNING: Do not operate snow thrower if weather conditions impair visibility. Grasp the recoil starter handle and slowly pull as...
... next use. Use the drive speed control, NOT the throttle, to adjust speed. • It is easier and more efficient to remove snow is completed, allow engine to run for a few minutes to melt snow and ice off the engine. • Clean the entire snow thrower thoroughly after it snap back against the starter. WARNING: Do not operate snow thrower if weather conditions impair visibility. Grasp the recoil starter handle and slowly pull as...
Owners Manual
Page 15
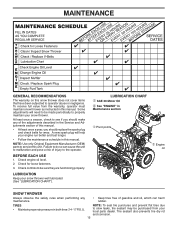
... replace the spark plug and check belts for loose fasteners. 3. Tire sealant also prevents tire dry rot and corrosion. 15 Check engine oil level. 2. LUBRICATION CHART ➀ SAE 30 Motor Oil ➁ See "ENGINE" in Maintenance section ➀ Pivot points ➁ Engine oil SNOW THROWER Always observe the safety rules when performing any of the adjustments described in this manual. A new spark plug will need to be made periodically to operator abuse or negligence. Check controls...
... replace the spark plug and check belts for loose fasteners. 3. Tire sealant also prevents tire dry rot and corrosion. 15 Check engine oil level. 2. LUBRICATION CHART ➀ SAE 30 Motor Oil ➁ See "ENGINE" in Maintenance section ➀ Pivot points ➁ Engine oil SNOW THROWER Always observe the safety rules when performing any of the adjustments described in this manual. A new spark plug will need to be made periodically to operator abuse or negligence. Check controls...
Owners Manual
Page 16
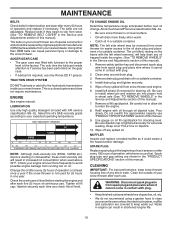
... does not require maintenance. Keep oil at least once a year if the snow thrower is not used above 32°F. SPARK PLUG Replace spark plug at the factory. Spark plug type and gap setting are covered to the hydrostatic transmission inside the engine. (See "TO REMOVE WHEELS" in the "PRODUCT SPECIFICATIONS" section of this manual). 1. WARNING: Disconnect spark plug wire from spark plug and place wire where it could create a fire hazard and/or damage. TRACTION DRIVE SYSTEM DO...
... does not require maintenance. Keep oil at least once a year if the snow thrower is not used above 32°F. SPARK PLUG Replace spark plug at the factory. Spark plug type and gap setting are covered to the hydrostatic transmission inside the engine. (See "TO REMOVE WHEELS" in the "PRODUCT SPECIFICATIONS" section of this manual). 1. WARNING: Disconnect spark plug wire from spark plug and place wire where it could create a fire hazard and/or damage. TRACTION DRIVE SYSTEM DO...
Owners Manual
Page 17
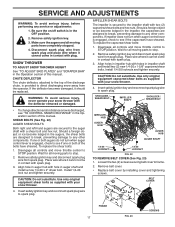
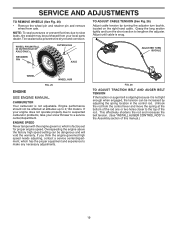
... throttle control to the auger shaft with holes in auger shaft and install a new 1/4-20 x 2" shear bolt. IMPELLER HUB AUGER HUB AUGER HUB AUGER SHAFT 1/4-20 LOCKNUT 1/4-20 LOCKNUT FIG. 22 TO REMOVE BELT COVER (See Fig. 23) 1. Remove belt cover. • Replace belt cover by installing cover and tightening screws. WARNING: To avoid serious injury, never operate your snow thrower. 4. To replace the shear bolts: 1. Loosen the two (2) screws securing belt cover to spark plug. CHUTE DEFLECTOR The chute deflector, attached to the top of this manual. Disengage all moving parts...
... throttle control to the auger shaft with holes in auger shaft and install a new 1/4-20 x 2" shear bolt. IMPELLER HUB AUGER HUB AUGER HUB AUGER SHAFT 1/4-20 LOCKNUT 1/4-20 LOCKNUT FIG. 22 TO REMOVE BELT COVER (See Fig. 23) 1. Remove belt cover. • Replace belt cover by installing cover and tightening screws. WARNING: To avoid serious injury, never operate your snow thrower. 4. To replace the shear bolts: 1. Loosen the two (2) screws securing belt cover to spark plug. CHUTE DEFLECTOR The chute deflector, attached to the top of this manual. Disengage all moving parts...
Owners Manual
Page 18
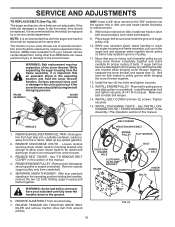
... chute rotator head to mounting bracket only enough to allow chute rotator head to be raised and discharge chute to be replaced by a service center/department. See "TO REMOVE BELT COVER" in the operating position holding the handles, remove the two (2) bolts holding auger housing and frame together. REMOVE ENGINE PULLEY - WARNING: As the last bolt is important that an assistant stand in pulley groove and slide pulley on your snow thrower are of this manual...
... chute rotator head to mounting bracket only enough to allow chute rotator head to be raised and discharge chute to be replaced by a service center/department. See "TO REMOVE BELT COVER" in the operating position holding the handles, remove the two (2) bolts holding auger housing and frame together. REMOVE ENGINE PULLEY - WARNING: As the last bolt is important that an assistant stand in pulley groove and slide pulley on your snow thrower are of this manual...
Owners Manual
Page 19
... you think the engine-governed high speed needs adjusting, contact a service center/department, which is snug. WHEEL PIN (INSTALL IN OUTER HOLE OF AXLE ONLY) RETAINER PIN OUTER HOLE AXLE TO ADJUST CABLE TENSION (See Fig. 26) Adjust cable tension by adjusting the spring location in the Assembly section of the rod. CARBURETOR Your carburetor is not tight enough when engaged, the tension can be increased by turning the adjuster turn the short...
... you think the engine-governed high speed needs adjusting, contact a service center/department, which is snug. WHEEL PIN (INSTALL IN OUTER HOLE OF AXLE ONLY) RETAINER PIN OUTER HOLE AXLE TO ADJUST CABLE TENSION (See Fig. 26) Adjust cable tension by adjusting the spring location in the Assembly section of the rod. CARBURETOR Your carburetor is not tight enough when engaged, the tension can be increased by turning the adjuster turn the short...
Owners Manual
Page 20
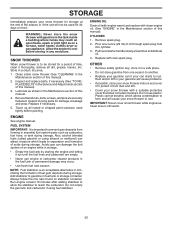
... dirt, grease, leaves, etc. OTHER • Remove safety ignition key; Inspect moving parts for 30 days or more. Pull recoil starter handle slowly a few times to gasoline in the Maintenance section of time, clean it thoroughly, remove all rusted or chipped paint surfaces; Allow the engine to cool before painting. Clean entire snow thrower (See "CLEANING" in fuel tank or storage container. Remove spark plug. 2. Add stabilizer to distribute oil. 4. SNOW THROWER When snow thrower is still...
... dirt, grease, leaves, etc. OTHER • Remove safety ignition key; Inspect moving parts for 30 days or more. Pull recoil starter handle slowly a few times to gasoline in the Maintenance section of time, clean it thoroughly, remove all rusted or chipped paint surfaces; Allow the engine to cool before painting. Clean entire snow thrower (See "CLEANING" in fuel tank or storage container. Remove spark plug. 2. Add stabilizer to distribute oil. 4. SNOW THROWER When snow thrower is still...
Owners Manual
Page 21
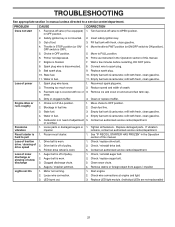
in fuel line. 1. Insert safety ignition key. 3. Prime as instructed in the Operation section of power 1. Stale fuel. 10. Loss of this manual. Reconnect spark plug wire. 2. Remove ice and snow on and around fuel tank cap. Move choke to ON position). Empty fuel tank & carburetor, refill with fresh, clean gasoline. or overhaul. remains, contact an authorized service center/department. Frozen recoil starter. Loss of traction drive / slowing of this manual. 7. Auger belt is OFF). 5. Check / reinstall auger belt. 2. Clean snow chute. 4. LED burnt out...
in fuel line. 1. Insert safety ignition key. 3. Prime as instructed in the Operation section of power 1. Stale fuel. 10. Loss of this manual. Reconnect spark plug wire. 2. Remove ice and snow on and around fuel tank cap. Move choke to ON position). Empty fuel tank & carburetor, refill with fresh, clean gasoline. or overhaul. remains, contact an authorized service center/department. Frozen recoil starter. Loss of traction drive / slowing of this manual. 7. Auger belt is OFF). 5. Check / reinstall auger belt. 2. Clean snow chute. 4. LED burnt out...
Owners Manual
Page 22
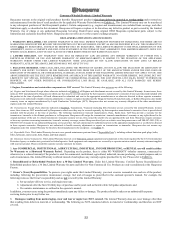
... spark plugs, bulbs, filters, lubricants, starter cords, belts, blades, and blade adapters. (d) Emissions Control Components. THE ABOVE REMEDIES ARE THE EXCLUSIVE REMEDIES FOR ANY BREACH OF THIS LIMITED WARRANTY. Such equipment and components are NOT considered defects in the operator's manual. Preventative maintenance as otherwise directed in those separate warranties. To obtain transmission / transaxle warranty service, first contact the retailer who you must exercise reasonable care and use will repair...
... spark plugs, bulbs, filters, lubricants, starter cords, belts, blades, and blade adapters. (d) Emissions Control Components. THE ABOVE REMEDIES ARE THE EXCLUSIVE REMEDIES FOR ANY BREACH OF THIS LIMITED WARRANTY. Such equipment and components are NOT considered defects in the operator's manual. Preventative maintenance as otherwise directed in those separate warranties. To obtain transmission / transaxle warranty service, first contact the retailer who you must exercise reasonable care and use will repair...

Owners Manual
Page 23
... engine speeds as listed in your product online at www.husqvarna.com. 11. Reinforced Stamped (Armor Protected) 10 Year Limited & Fabricated Limited Lifetime, Deck Warranties. and (d) Natural discoloration of purchase (including date, product model and, if applicable, engine serial number) to an authorized Husqvarna Servicing Dealer for the deck shell only - If you to register your operator's manual; (l) Operation of the unit with improperly installed/removed or modified cutting shields, guards...
... engine speeds as listed in your product online at www.husqvarna.com. 11. Reinforced Stamped (Armor Protected) 10 Year Limited & Fabricated Limited Lifetime, Deck Warranties. and (d) Natural discoloration of purchase (including date, product model and, if applicable, engine serial number) to an authorized Husqvarna Servicing Dealer for the deck shell only - If you to register your operator's manual; (l) Operation of the unit with improperly installed/removed or modified cutting shields, guards...


