
Owners Manual
Page 3
... 17 Spark Arrestor 17 CONTROLS 18 Control Locations 18 Steering Control Levers 19 Park Brake 20 Throttle Control 20 Cold Weather Control 20 Blade Switch 21 Ignition Switch 21 SmartSwitch Courtesy Buttons 21 Service Minder 22 Tracking Knob 22 Seat Adjustment Lever 22 Fuse 23 Fuel Tank... 38 Battery 40 Safety System 41 Park Brake 41 Tire Pressures 42 Anti-scalp Rollers 42 Caster Wheels 42 V-belts 43 Cutting Blades 44 Blade replacement 44 Adjusting the Mower Deck 45 Leveling deck 45 Cleaning 46 Hardware 46 LUBRICATION 47 Lubrication Schedule 47 Wheel and Deck Zerks...
... 17 Spark Arrestor 17 CONTROLS 18 Control Locations 18 Steering Control Levers 19 Park Brake 20 Throttle Control 20 Cold Weather Control 20 Blade Switch 21 Ignition Switch 21 SmartSwitch Courtesy Buttons 21 Service Minder 22 Tracking Knob 22 Seat Adjustment Lever 22 Fuse 23 Fuel Tank... 38 Battery 40 Safety System 41 Park Brake 41 Tire Pressures 42 Anti-scalp Rollers 42 Caster Wheels 42 V-belts 43 Cutting Blades 44 Blade replacement 44 Adjusting the Mower Deck 45 Leveling deck 45 Cleaning 46 Hardware 46 LUBRICATION 47 Lubrication Schedule 47 Wheel and Deck Zerks...
Owners Manual
Page 7
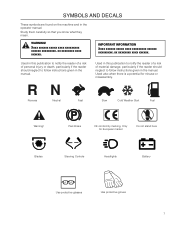
WARNING! IMPORTANT INFORMATION Xxxx xxxxxx xxxxx xxxx xxxxxxxxx xxxxxx xxxxxxxxx. Used also when there is a potential for European market Do not stand here Blades Steering Controls Headlights Battery Use protective glasses Use protective gloves 7 Park Brake CE conformity marking. Xxxx xxxxxx xxxxx xxxx xxxxxxxxx xxxxxx xxxxxxxxx. Only for misuse ...
WARNING! IMPORTANT INFORMATION Xxxx xxxxxx xxxxx xxxx xxxxxxxxx xxxxxx xxxxxxxxx. Used also when there is a potential for European market Do not stand here Blades Steering Controls Headlights Battery Use protective glasses Use protective gloves 7 Park Brake CE conformity marking. Xxxx xxxxxx xxxxx xxxx xxxxxxxxx xxxxxx xxxxxxxxx. Only for misuse ...
Owners Manual
Page 8
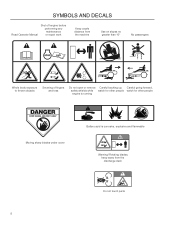
SYMBOLS AND DECALS Read Operator Manual Shut off engine before performing any maintenance or repair work Keep a safe distance from the discharge deck Do not touch parts 8 Rotating blades, keep away from the machine Use on slopes no greater than 10° No passengers Whole body exposure to thrown objects Severing of fingers and toes Do not open or remove Careful backing up, Careful going forward, safety shields while watch for other people watch for other people engine is running Moving sharp blades under cover Battery acid is corrosive, explosive and flammable Warning!
SYMBOLS AND DECALS Read Operator Manual Shut off engine before performing any maintenance or repair work Keep a safe distance from the discharge deck Do not touch parts 8 Rotating blades, keep away from the machine Use on slopes no greater than 10° No passengers Whole body exposure to thrown objects Severing of fingers and toes Do not open or remove Careful backing up, Careful going forward, safety shields while watch for other people watch for other people engine is running Moving sharp blades under cover Battery acid is corrosive, explosive and flammable Warning!
Owners Manual
Page 9
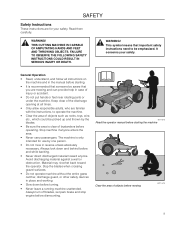
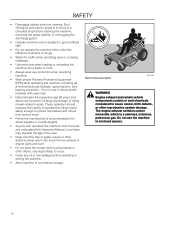
...not mow in place and working • Slow down and behind before mowing 8011-513 9 Always look down before operating. Stop the blades when crossing gravel surfaces. • Do not operate machine without the entire grass catcher, discharge guard, or other safety devices in reverse... unless absolutely necessary. SAFETY Safety Instructions These instructions are for use by the blades. • Be sure the area is clear of bystanders before turning. • Never leave a running machine unattended. WARNING! It concerns...
...not mow in place and working • Slow down and behind before mowing 8011-513 9 Always look down before operating. Stop the blades when crossing gravel surfaces. • Do not operate machine without the entire grass catcher, discharge guard, or other safety devices in reverse... unless absolutely necessary. SAFETY Safety Instructions These instructions are for use by the blades. • Be sure the area is clear of bystanders before turning. • Never leave a running machine unattended. WARNING! It concerns...
Owners Manual
Page 10
...; Anyone who operates this machine must first read and understand this machine, including (at a minimum) sturdy footwear, eye protection, and hearing protection. SAFETY • Disengage blades when not mowing. Never take passengers 8011-520 WARNING!
...; Anyone who operates this machine must first read and understand this machine, including (at a minimum) sturdy footwear, eye protection, and hearing protection. SAFETY • Disengage blades when not mowing. Never take passengers 8011-520 WARNING!

Owners Manual
Page 11
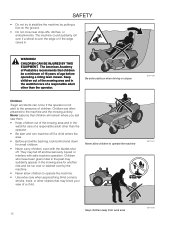
..., preferably with steel toe caps. • Always wear approved protective glasses or a full visor when assembling or driving. • Always wear gloves when handling the blades. • Never wear loose clothing that you feel uneasy on it . • Mow up the slope or if you will reduce the degree of control... illustrations) shall be used. Ask your retailer for holes, ruts, bumps, rocks, or other attachments; Operation on a slope. If the tires lose traction, disengage the blades and proceed slowly straight down slopes (10 degrees maximum), not across any slopes.
..., preferably with steel toe caps. • Always wear approved protective glasses or a full visor when assembling or driving. • Always wear gloves when handling the blades. • Never wear loose clothing that you feel uneasy on it . • Mow up the slope or if you will reduce the degree of control... illustrations) shall be used. Ask your retailer for holes, ruts, bumps, rocks, or other attachments; Operation on a slope. If the tires lose traction, disengage the blades and proceed slowly straight down slopes (10 degrees maximum), not across any slopes.
Owners Manual
Page 12
... over the edge or if the edge caves in the watchful care of a child. Never assume that children be seriously injured or interfere with the blades shut off. Children are often attracted to the presence of the mowing area and in . The American Academy of Pediatrics recommends that children will remain...
... over the edge or if the edge caves in the watchful care of a child. Never assume that children be seriously injured or interfere with the blades shut off. Children are often attracted to the presence of the mowing area and in . The American Academy of Pediatrics recommends that children will remain...
Owners Manual
Page 14
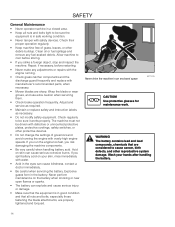
... cowlings, safety switches, or other debris buildup. Wash your skin, rinse immediately with manufacturer's recommended parts, when necessary. • Mower blades are sharp. Repair, if necessary, before storing. • If you risk damaging the machine components. • Be very careful when ... Never operate machine in a closed area. • Keep all nuts and bolts, especially those fastening the blade attachments, are properly tightened and torqued. Wrap the blade or wear gloves, and use extra caution when servicing them. • Check brake operation frequently. If you...
... cowlings, safety switches, or other debris buildup. Wash your skin, rinse immediately with manufacturer's recommended parts, when necessary. • Mower blades are sharp. Repair, if necessary, before storing. • If you risk damaging the machine components. • Be very careful when ... Never operate machine in a closed area. • Keep all nuts and bolts, especially those fastening the blade attachments, are properly tightened and torqued. Wrap the blade or wear gloves, and use extra caution when servicing them. • Check brake operation frequently. If you...

Owners Manual
Page 15
...8226; Ensure that may have accumulated on the battery, the battery can cause cuts and gashes. Adjust and service as necessary. • The mulch blades should only be used in storage. • Regularly clean deck and underside of fire by the manufacturer. If necessary, make repairs before starting. •... on the machine. • Allow the machine to run over or into anything. This can occur when working with water. Wrap the blades or use the machine indoors or in this circuit can not occur after the chassis cable (normally negative, black) is tested and approved ...
...8226; Ensure that may have accumulated on the battery, the battery can cause cuts and gashes. Adjust and service as necessary. • The mulch blades should only be used in storage. • Regularly clean deck and underside of fire by the manufacturer. If necessary, make repairs before starting. •... on the machine. • Allow the machine to run over or into anything. This can occur when working with water. Wrap the blades or use the machine indoors or in this circuit can not occur after the chassis cable (normally negative, black) is tested and approved ...
Owners Manual
Page 16
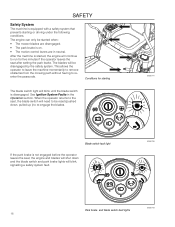
...run for starting or driving under the following conditions. After the machine is not engaged before the operator leaves the seat, the engine and blades will shut down , pulled up ) to be disengaged by the safety system. Conditions for five minutes if the operator leaves the seat ...park brake. When the operator returns to the seat, the blade switch will need to re-engage the blades. SAFETY Safety System The machine is equipped with a safety system that prevents starting The blade switch light will blink until the blade switch is disengaged. The engine can only be started , ...
...run for starting or driving under the following conditions. After the machine is not engaged before the operator leaves the seat, the engine and blades will shut down , pulled up ) to be disengaged by the safety system. Conditions for five minutes if the operator leaves the seat ...park brake. When the operator returns to the seat, the blade switch will need to re-engage the blades. SAFETY Safety System The machine is equipped with a safety system that prevents starting The blade switch light will blink until the blade switch is disengaged. The engine can only be started , ...
Owners Manual
Page 18
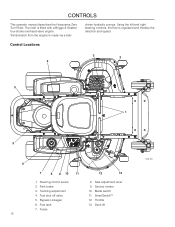
driven hydraulic pumps. Park brake 3. Bypass Linkages 6. Fuel tank 7. Fuses 12 13 8. Blade switch 11. Throttle 13. Seat adjustment lever 9. SmartSwitchTM 12. CONTROLS This operator manual describes the Husqvarna Zero Turn Rider. Transmission from the engine is regulated and thereby the direction and speed. Fuel shut off valve 5. Using the left and right...
driven hydraulic pumps. Park brake 3. Bypass Linkages 6. Fuel tank 7. Fuses 12 13 8. Blade switch 11. Throttle 13. Seat adjustment lever 9. SmartSwitchTM 12. CONTROLS This operator manual describes the Husqvarna Zero Turn Rider. Transmission from the engine is regulated and thereby the direction and speed. Fuel shut off valve 5. Using the left and right...
Owners Manual
Page 20
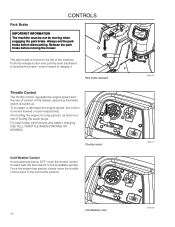
... a risk of fouling the spark plugs. Cold Weather start detent to the snowflake symbol. The park brake is found on the left of the blades, assuming the blade switch is pulled up. For best mower performance and battery charging, USE FULL THROTTLE WHEN STARTING OR MOWING. Always set the park brake before...
... a risk of fouling the spark plugs. Cold Weather start detent to the snowflake symbol. The park brake is found on the left of the blades, assuming the blade switch is pulled up. For best mower performance and battery charging, USE FULL THROTTLE WHEN STARTING OR MOWING. Always set the park brake before...
Owners Manual
Page 21
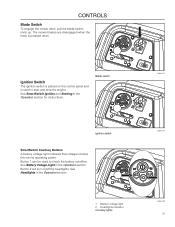
... check the battery condition. See Battery Voltage Light in the Operation section for instructions. The mower blades are disengaged when the knob is below the normal operating power. Blade switch 8058-247 Ignition switch SmartSwitch Courtesy Buttons A battery voltage light indicates that voltage is pressed ...SmartSwitch Ignition and Starting in the Operation section. See Headlights in the Operation section. 8058-247 1 2 1. CONTROLS Blade Switch To engage the mower deck, pull the blade switch knob up. Ignition Switch The ignition switch is used to start and stop the engine.
... check the battery condition. See Battery Voltage Light in the Operation section for instructions. The mower blades are disengaged when the knob is below the normal operating power. Blade switch 8058-247 Ignition switch SmartSwitch Courtesy Buttons A battery voltage light indicates that voltage is pressed ...SmartSwitch Ignition and Starting in the Operation section. See Headlights in the Operation section. 8058-247 1 2 1. CONTROLS Blade Switch To engage the mower deck, pull the blade switch knob up. Ignition Switch The ignition switch is used to start and stop the engine.
Owners Manual
Page 24
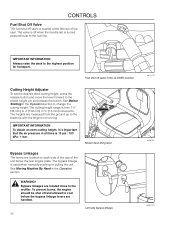
... the unit below the rear engine plate. IMPORTANT INFORMATION Always raise the deck to the muffler. Fuel shut off valve is turned perpendicular to the blade tip with the engine not running. Bypass linkages are located on each side of the rear of the seat. CONTROLS Fuel Shut Off Valve The...
... the unit below the rear engine plate. IMPORTANT INFORMATION Always raise the deck to the muffler. Fuel shut off valve is turned perpendicular to the blade tip with the engine not running. Bypass linkages are located on each side of the rear of the seat. CONTROLS Fuel Shut Off Valve The...
Owners Manual
Page 25
... the machine to move the mower under its own power. Adjust the engine speed to idle, disengage the park brake but do not engage the blades at this will allow mower to start the engine (see Moving Machine By Hand in a forward direction, pull the right lever back towards the neutral...
... the machine to move the mower under its own power. Adjust the engine speed to idle, disengage the park brake but do not engage the blades at this will allow mower to start the engine (see Moving Machine By Hand in a forward direction, pull the right lever back towards the neutral...
Owners Manual
Page 27
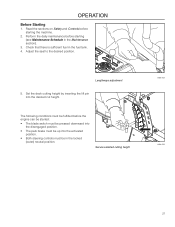
Perform the daily maintenance before the engine can be started: • The blade switch must be pressed downward into the disengaged position. • The park brake must be up into the desired cut height. Check that there is ...
Perform the daily maintenance before the engine can be started: • The blade switch must be pressed downward into the disengaged position. • The park brake must be up into the desired cut height. Check that there is ...
Owners Manual
Page 28
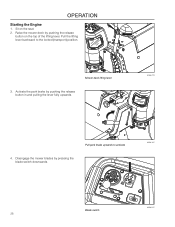
Mower deck lifting lever 3. Disengage the mower blades by pushing the release button on the seat. 2. OPERATION Starting the Engine 1. Raise the mower deck by pressing the blade switch downwards. 8058-187 Blade switch 8058-247 28 Activate the park brake by pushing the release button in and pulling the lever fully upwards. 8058-019 Pull park brake upwards to the locked (transport) position. Pull the lifting lever backward to activate 4. Sit on the top of the lifting lever.
Mower deck lifting lever 3. Disengage the mower blades by pushing the release button on the seat. 2. OPERATION Starting the Engine 1. Raise the mower deck by pressing the blade switch downwards. 8058-187 Blade switch 8058-247 28 Activate the park brake by pushing the release button in and pulling the lever fully upwards. 8058-019 Pull park brake upwards to the locked (transport) position. Pull the lifting lever backward to activate 4. Sit on the top of the lifting lever.

Owners Manual
Page 31
... fault light will blink if the blade control switch has not been disengaged (down position) or is not being followed and will not allow the unit to be started until all system ... fault light 8058-239 31 The park brake fault light will blink if the motion control levers are resolved. Park brake fault light 8058-237 Blade switch fault light The motion control fault light will blink if the park brake has not been engaged. OPERATION Ignition System Faults The SmartSwitch Ignition...
... fault light will blink if the blade control switch has not been disengaged (down position) or is not being followed and will not allow the unit to be started until all system ... fault light 8058-239 31 The park brake fault light will blink if the motion control levers are resolved. Park brake fault light 8058-237 Blade switch fault light The motion control fault light will blink if the park brake has not been engaged. OPERATION Ignition System Faults The SmartSwitch Ignition...
Owners Manual
Page 32
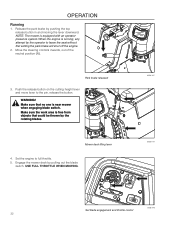
... controls inwards, out of the neutral position (N). WARNING! Mower deck lifting lever 4. OPERATION Running 1. Release the park brake by pulling out the blade switch. Push the release button on the cutting height lever and move lever to full throttle. 5. Make sure that no one is free from objects...button in and moving the lever downward. Make sure the work area is near mower when engaging blade switch. Park brake released 3. USE FULL THROTTLE WHEN MOWING. 8058-187 8058-019 Set blade engagement and throttle control 8058-248 32 Set the engine to the pin, release the button....
... controls inwards, out of the neutral position (N). WARNING! Mower deck lifting lever 4. OPERATION Running 1. Release the park brake by pulling out the blade switch. Push the release button on the cutting height lever and move lever to full throttle. 5. Make sure that no one is free from objects...button in and moving the lever downward. Make sure the work area is near mower when engaging blade switch. Park brake released 3. USE FULL THROTTLE WHEN MOWING. 8058-187 8058-019 Set blade engagement and throttle control 8058-248 32 Set the engine to the pin, release the button....
Owners Manual
Page 33
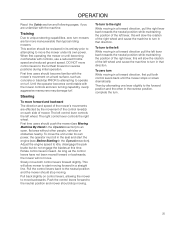
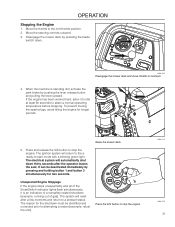
... throttle to attain a normal operating temperature before stopping. The reason for longer periods. Move the steering controls outward. 3. Disengage the mower deck by pressing the blade switch down thirty seconds after a few moments and return to -start mode with a blinking green light. The system will return to the a ready-to a prestart...
... throttle to attain a normal operating temperature before stopping. The reason for longer periods. Move the steering controls outward. 3. Disengage the mower deck by pressing the blade switch down thirty seconds after a few moments and return to -start mode with a blinking green light. The system will return to the a ready-to a prestart...


