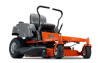
Owners Manual
Page 3
... General Maintenance 14 Safety System 16 Transport 17 Towing 17 Spark Arrestor 17 CONTROLS 18 Control Locations 18 Steering Control Levers 19 Park Brake 20 Throttle Control 20 Cold Weather Control 20 Blade Switch 21 Ignition Switch 21 SmartSwitch Courtesy Buttons 21 Service Minder 22 Tracking Knob 22 Seat Adjustment Lever 22 Fuse 23 Fuel Tank 23 Fuel Shut Off Valve 24 Cutting Height Adjuster 24 Bypass Linkages 24 OPERATION 25 Training 25 Steering 25 SmartSwitch Ignition 26 Before Starting 27 Starting the Engine 28 Ignition System...
... General Maintenance 14 Safety System 16 Transport 17 Towing 17 Spark Arrestor 17 CONTROLS 18 Control Locations 18 Steering Control Levers 19 Park Brake 20 Throttle Control 20 Cold Weather Control 20 Blade Switch 21 Ignition Switch 21 SmartSwitch Courtesy Buttons 21 Service Minder 22 Tracking Knob 22 Seat Adjustment Lever 22 Fuse 23 Fuel Tank 23 Fuel Shut Off Valve 24 Cutting Height Adjuster 24 Bypass Linkages 24 OPERATION 25 Training 25 Steering 25 SmartSwitch Ignition 26 Before Starting 27 Starting the Engine 28 Ignition System...
Owners Manual
Page 5
... specifications and design are used for mowing grass on mower. INTRODUCTION Congratulations Thank you for the safety of the operator and others in or on sloped ground. DO NOT operate this operator manual, left and right, backward and forward are subject to maintain this operator manual provides a Service Journal. Use only approved repair parts to change without obstacles such as stones, tree stumps, etc. The following of instructions (use...
... specifications and design are used for mowing grass on mower. INTRODUCTION Congratulations Thank you for the safety of the operator and others in or on sloped ground. DO NOT operate this operator manual, left and right, backward and forward are subject to maintain this operator manual provides a Service Journal. Use only approved repair parts to change without obstacles such as stones, tree stumps, etc. The following of instructions (use...

Owners Manual
Page 13
...; Check the fuel level before each use extreme care in contact with the rim of the fuel tank or container opening at all cigarettes, cigars, pipes, and other appliance. • Before you begin refueling, minimize the risk of Gasoline SAFETY WARNING! Replace gas cap and tighten securely. • Do not start the engine near spilled fuel. • Never use a nozzle lock-open flame, spark, or pilot light...
...; Check the fuel level before each use extreme care in contact with the rim of the fuel tank or container opening at all cigarettes, cigars, pipes, and other appliance. • Before you begin refueling, minimize the risk of Gasoline SAFETY WARNING! Replace gas cap and tighten securely. • Do not start the engine near spilled fuel. • Never use a nozzle lock-open flame, spark, or pilot light...
Owners Manual
Page 14
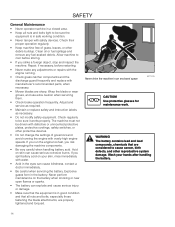
... replace safety and instruction labels, as necessary. • Do not modify safety equipment. SAFETY General Maintenance • Never operate machine in a closed area. • Keep all nuts and bolts, especially those fastening the blade attachments, are properly tightened and torqued. Use protective glasses for maintenance work. Check their proper operation regularly. • Keep machine free of governors and avoid running . • Check grass catcher components and the discharge guard frequently and replace with overly high engine speeds...
... replace safety and instruction labels, as necessary. • Do not modify safety equipment. SAFETY General Maintenance • Never operate machine in a closed area. • Keep all nuts and bolts, especially those fastening the blade attachments, are properly tightened and torqued. Use protective glasses for maintenance work. Check their proper operation regularly. • Keep machine free of governors and avoid running . • Check grass catcher components and the discharge guard frequently and replace with overly high engine speeds...

Owners Manual
Page 15
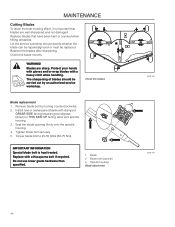
... cause cuts and gashes. Adjust and service as necessary. • The mulch blades should only be used in familiar areas when higher quality mowing is removed from the battery first and reconnect it last. • Do not make repairs before putting it in storage. • Regularly clean deck and underside of deck, avoid spraying engine and electrical components with the battery and the heavy cables of sparking...
... cause cuts and gashes. Adjust and service as necessary. • The mulch blades should only be used in familiar areas when higher quality mowing is removed from the battery first and reconnect it last. • Do not make repairs before putting it in storage. • Regularly clean deck and underside of deck, avoid spraying engine and electrical components with the battery and the heavy cables of sparking...
Owners Manual
Page 21
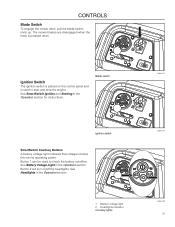
... 1 can be used to check the battery condition. Blade switch 8058-247 Ignition switch SmartSwitch Courtesy Buttons A battery voltage light indicates that voltage is below the normal operating power. Headlights indicator Courtesy lights 8058-239 21 Button 2 will turn on the control panel and is pressed down. See Headlights in the Operation section. See SmartSwitch Ignition and Starting in the Operation section for instructions. CONTROLS Blade Switch To engage the mower deck, pull the blade switch knob up.
... 1 can be used to check the battery condition. Blade switch 8058-247 Ignition switch SmartSwitch Courtesy Buttons A battery voltage light indicates that voltage is below the normal operating power. Headlights indicator Courtesy lights 8058-239 21 Button 2 will turn on the control panel and is pressed down. See Headlights in the Operation section. See SmartSwitch Ignition and Starting in the Operation section for instructions. CONTROLS Blade Switch To engage the mower deck, pull the blade switch knob up.
Owners Manual
Page 24
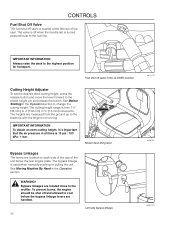
... to the blade tip with the engine not running. IMPORTANT INFORMATION To obtain an even cutting height, it is important that the air pressure in the Operation section to change the cutting height. CONTROLS Fuel Shut Off Valve The fuel shut off when the handle tab is turned perpendicular to the fuel line. See Before Starting in all tires is used when manually pushing or pulling the unit. Mower deck lifting lever Bypass Linkages The levers are handled. 24...
... to the blade tip with the engine not running. IMPORTANT INFORMATION To obtain an even cutting height, it is important that the air pressure in the Operation section to change the cutting height. CONTROLS Fuel Shut Off Valve The fuel shut off when the handle tab is turned perpendicular to the fuel line. See Before Starting in all tires is used when manually pushing or pulling the unit. Mower deck lifting lever Bypass Linkages The levers are handled. 24...
Owners Manual
Page 25
... engage the blades at this time. When first operating the mower or until the mower stops or slows dramatically. Slowly move the mower under its own power, the operator must sit in the seat and start moving . Then by the movement of the control lever(s) on control levers, allowing the mower to move both control levers back until becoming comfortable with the machine. Steering To move backwards. Adjust the engine speed...
... engage the blades at this time. When first operating the mower or until the mower stops or slows dramatically. Slowly move the mower under its own power, the operator must sit in the seat and start moving . Then by the movement of the control lever(s) on control levers, allowing the mower to move both control levers back until becoming comfortable with the machine. Steering To move backwards. Adjust the engine speed...
Owners Manual
Page 38
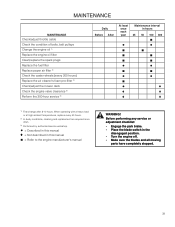
... service workshop. MAINTENANCE Check the park brake Check the engine's oil level (every refueling) Check the safety system Check for fuel and oil leakages Check/clean the engine's cooling air intake Check the mower deck Check for loose hardware (screws, nuts) Clean under the mower deck Start the engine and blades, listen for unusual sounds Check for damage Thoroughly clean around the engine Clean around belts, belt pulleys Check the tire pressures Check battery connections Sharpen3)/ Replace mower blades Clean the engine's cooling air intake 2) Clean the air cleaner's foam pre-filter...
... service workshop. MAINTENANCE Check the park brake Check the engine's oil level (every refueling) Check the safety system Check for fuel and oil leakages Check/clean the engine's cooling air intake Check the mower deck Check for loose hardware (screws, nuts) Clean under the mower deck Start the engine and blades, listen for unusual sounds Check for damage Thoroughly clean around the engine Clean around belts, belt pulleys Check the tire pressures Check battery connections Sharpen3)/ Replace mower blades Clean the engine's cooling air intake 2) Clean the air cleaner's foam pre-filter...
Owners Manual
Page 39
...● = Described in this manual ♦ = Not described in the disengaged position. • Turn the engine off. • Make sure the blades and all moving parts have completely stopped. 39 MAINTENANCE MAINTENANCE Check/adjust throttle cable Check the condition of belts, belt pulleys Change the engine oil 1) Replace the engine oil filter Clean/replace the spark plugs Replace the fuel filter Replace paper air filter 2) Check the caster wheels (every 200 hours) Replace the air cleaner's foam pre-filter 2) Check/adjust the mower deck Check the engine valve clearance 3) Perform the 300-hour...
...● = Described in this manual ♦ = Not described in the disengaged position. • Turn the engine off. • Make sure the blades and all moving parts have completely stopped. 39 MAINTENANCE MAINTENANCE Check/adjust throttle cable Check the condition of belts, belt pulleys Change the engine oil 1) Replace the engine oil filter Clean/replace the spark plugs Replace the fuel filter Replace paper air filter 2) Check the caster wheels (every 200 hours) Replace the air cleaner's foam pre-filter 2) Check/adjust the mower deck Check the engine valve clearance 3) Perform the 300-hour...
Owners Manual
Page 40
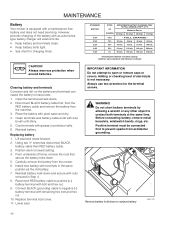
.... 2. Replace terminal boot cover. 11. Disconnect BLACK battery cable first, then the RED battery cable and remove the battery from the mower. 6. However, periodic charging of charger IMPORTANT INFORMATION Do not attempt to lowest setting. 4. Adding or checking level of frame, remove the nuts that secure the battery hold -down . 5. Rinse the battery with grease or petroleum jelly. 6. Positive terminal must be connected first to lose power. 1. MAINTENANCE Battery Your mower...
.... 2. Replace terminal boot cover. 11. Disconnect BLACK battery cable first, then the RED battery cable and remove the battery from the mower. 6. However, periodic charging of charger IMPORTANT INFORMATION Do not attempt to lowest setting. 4. Adding or checking level of frame, remove the nuts that secure the battery hold -down . 5. Rinse the battery with grease or petroleum jelly. 6. Positive terminal must be connected first to lose power. 1. MAINTENANCE Battery Your mower...
Owners Manual
Page 42
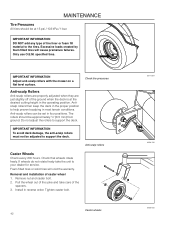
.... MAINTENANCE Tire Pressures All tires should be at the desired cutting height in most terrain conditions. Caster wheels 42 8011-564 8058-135 8058-055 Antiscalp rollers then keep the deck in reverse order. Check that wheels rotate freely. Remove nut and caster bolt. 2. Excessive loads created by foam filled tires will void the warranty. IMPORTANT INFORMATION Adjust anti-scalp rollers with the mower on a flat level surface...
.... MAINTENANCE Tire Pressures All tires should be at the desired cutting height in most terrain conditions. Caster wheels 42 8011-564 8058-135 8058-055 Antiscalp rollers then keep the deck in reverse order. Check that wheels rotate freely. Remove nut and caster bolt. 2. Excessive loads created by foam filled tires will void the warranty. IMPORTANT INFORMATION Adjust anti-scalp rollers with the mower on a flat level surface...
Owners Manual
Page 43
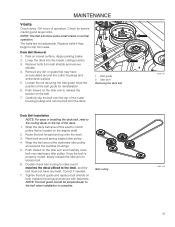
... around the electric clutch pulley that may have any dirt or grass that is located on the idler arm and carefully route belt over the top of operation. Place belt around the mandrel housings. 5. Park on the belt. 7. Idler arm Removing the deck belt Deck Belt Installation NOTE: For ease in normal 1 operation. Apply parking brake. 2. Double check belt routing to make sure it matches the decal affixed to release the tension on a level surface. Tighten the belt guide and replace belt shields on...
... around the electric clutch pulley that may have any dirt or grass that is located on the idler arm and carefully route belt over the top of operation. Place belt around the mandrel housings. 5. Park on the belt. 7. Idler arm Removing the deck belt Deck Belt Installation NOTE: For ease in normal 1 operation. Apply parking brake. 2. Double check belt routing to make sure it matches the decal affixed to release the tension on a level surface. Tighten the belt guide and replace belt shields on...
Owners Manual
Page 44
... the blade can be repaired/ground or must be carried out by turning counterclockwise. 2. Replace with a heavy cloth when handling. MAINTENANCE Cutting Blades To attain the best mowing effect, it is heat treated. Check the blade mounts. Tighten blade bolt securely. 5. Do not use lower grade hardware than specified. 1. WARNING! Protect your hands with gloves and/or wrap blades with a Husqvarna bolt if required. Remove blade bolt by an authorized service workshop. Torque blade bolt...
... the blade can be repaired/ground or must be carried out by turning counterclockwise. 2. Replace with a heavy cloth when handling. MAINTENANCE Cutting Blades To attain the best mowing effect, it is heat treated. Check the blade mounts. Tighten blade bolt securely. 5. Do not use lower grade hardware than specified. 1. WARNING! Protect your hands with gloves and/or wrap blades with a Husqvarna bolt if required. Remove blade bolt by an authorized service workshop. Torque blade bolt...
Owners Manual
Page 49
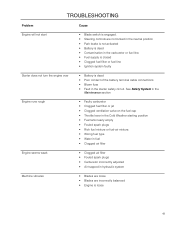
...; Ignition system faulty Starter does not turn the engine over • Battery is loose 49 See Safety System in the Maintenance section Engine runs rough • Faulty carburetor • Clogged fuel filter or jet • Clogged ventilation valve on the fuel cap • Throttle lever in the Cold Weather starting position • Fuel tank nearly empty • Fouled spark plugs • Rich fuel mixture or fuel-air mixture. • Wrong fuel type • Water in fuel • Clogged air filter Engine seems...
...; Ignition system faulty Starter does not turn the engine over • Battery is loose 49 See Safety System in the Maintenance section Engine runs rough • Faulty carburetor • Clogged fuel filter or jet • Clogged ventilation valve on the fuel cap • Throttle lever in the Cold Weather starting position • Fuel tank nearly empty • Fouled spark plugs • Rich fuel mixture or fuel-air mixture. • Wrong fuel type • Water in fuel • Clogged air filter Engine seems...
Owners Manual
Page 50
... engine • Contamination in the carburetor or fuel line. • Fouled spark plugs Battery not charging • Poor contact of the battery terminal cable connections • Charging lead is disconnected The machine moves slowly, unevenly, or not at all • Park brake on • Bypass valve on pump open • Drive belt for the transmission slack or has come off • Air trapped in hydraulic system Mower deck not engaging • Drive belt...
... engine • Contamination in the carburetor or fuel line. • Fouled spark plugs Battery not charging • Poor contact of the battery terminal cable connections • Charging lead is disconnected The machine moves slowly, unevenly, or not at all • Park brake on • Bypass valve on pump open • Drive belt for the transmission slack or has come off • Air trapped in hydraulic system Mower deck not engaging • Drive belt...
Owners Manual
Page 51
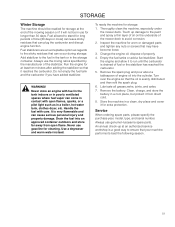
... the mower deck. Lubricate all grease zerks, joints, and axles. 7. Always use gasoline for long periods of the mower deck to the fuel in the tank or in the storage container. Touch up at an authorized service workshop is drained of engine oil into an approved container outdoors and store far away from direct cold. 8. Empty the fuel tanks or add a fuel stabilizer. Remove the spark plug and...
... the mower deck. Lubricate all grease zerks, joints, and axles. 7. Always use gasoline for long periods of the mower deck to the fuel in the tank or in the storage container. Touch up at an authorized service workshop is drained of engine oil into an approved container outdoors and store far away from direct cold. 8. Empty the fuel tanks or add a fuel stabilizer. Remove the spark plug and...
Owners Manual
Page 53
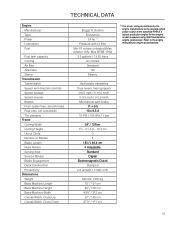
... Power Lubrication Fuel Fuel tank capacity Cooling Air filter Alternator Starter Transmission Transmission Speed and direction controls Speed forward Speed reverse Brakes Front caster tires, smooth tread Rear tires, turf pneumatic Tire pressure Frame Cutting Width Cutting Height Uncut Circle Number of Blades Blade Length Nose Rollers Sprung Seat Service Minder Blade Engagement Deck Construction Productivity Dimensions Weight Base Machine Length Base Machine Height Base Machine Width Overall Width, Chute Up Overall Width, Chute Down Briggs & Stratton Endurance 24 hp 1) Pressure with oil filter...
... Power Lubrication Fuel Fuel tank capacity Cooling Air filter Alternator Starter Transmission Transmission Speed and direction controls Speed forward Speed reverse Brakes Front caster tires, smooth tread Rear tires, turf pneumatic Tire pressure Frame Cutting Width Cutting Height Uncut Circle Number of Blades Blade Length Nose Rollers Sprung Seat Service Minder Blade Engagement Deck Construction Productivity Dimensions Weight Base Machine Length Base Machine Height Base Machine Width Overall Width, Chute Up Overall Width, Chute Down Briggs & Stratton Endurance 24 hp 1) Pressure with oil filter...
Owners Manual
Page 57
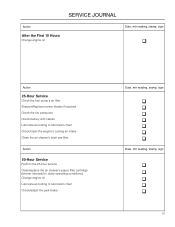
... q Action 25-Hour Service Check the fuel pump's air filter Sharpen/Replace mower blades if required Check the tire pressures Check battery with cables Lubricate according to lubrication chart Check/clean the engine's cooling air intake Clean the air cleaner's foam pre-filter Action 50-Hour Service Perform the 25-hour service Clean/replace the air cleaner's paper filter cartridge (shorter intervals for dusty operating conditions) Change engine oil Lubricate according to lubrication chart Check/adjust the park brake Date, mtr reading...
... q Action 25-Hour Service Check the fuel pump's air filter Sharpen/Replace mower blades if required Check the tire pressures Check battery with cables Lubricate according to lubrication chart Check/clean the engine's cooling air intake Clean the air cleaner's foam pre-filter Action 50-Hour Service Perform the 25-hour service Clean/replace the air cleaner's paper filter cartridge (shorter intervals for dusty operating conditions) Change engine oil Lubricate according to lubrication chart Check/adjust the park brake Date, mtr reading...
Owners Manual
Page 58
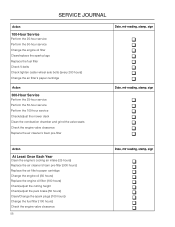
..., mtr reading, stamp, sign q q q q q q q Action At Least Once Each Year Clean the engine's cooling air intake (25 hours) Replace the air cleaner's foam pre-filter (300 hours) Replace the air filter's paper cartridge Change the engine oil (50 hours) Replace the engine oil filter (100 hours) Check/adjust the cutting height Check/adjust the park brake (50 hours) Clean/Change the spark plugs (100 hours) Change the fuel filter (100 hours) Check the engine valve clearance 58 Date, mtr reading, stamp, sign q q q q q q q q q q
..., mtr reading, stamp, sign q q q q q q q Action At Least Once Each Year Clean the engine's cooling air intake (25 hours) Replace the air cleaner's foam pre-filter (300 hours) Replace the air filter's paper cartridge Change the engine oil (50 hours) Replace the engine oil filter (100 hours) Check/adjust the cutting height Check/adjust the park brake (50 hours) Clean/Change the spark plugs (100 hours) Change the fuel filter (100 hours) Check the engine valve clearance 58 Date, mtr reading, stamp, sign q q q q q q q q q q


