Owners Manual
Page 3
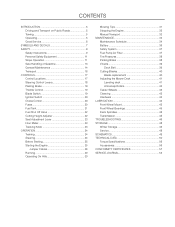
... Control 19 Blade Switch 19 Ignition Switch 20 Choke Control 20 Fuses 20 Fuel Tank 21 Fuel Shut Off Valve 22 Cutting Height Adjuster 22 Seat Adjustment Lever 23 Hour Meter 23 Tracking Knob 23 Operation 24 Training 24 Steering 24 Before Starting 25 Starting the Engine 25 Jumper Cables 28 ...System 37 Fuel Pump Air Filter 37 Tire Pressures 38 Parking Brake 38 V-belts 39 Deck Belt 39 Cutting Blades 40 Blade replacement 40 Adjusting the Mower Deck 41 Leveling deck 41 Anti-scalp Rollers 42 Caster Wheels 43 Cleaning 43 Hardware 43 LUBRICATION 44 Front Wheel Mount 45 ...
... Control 19 Blade Switch 19 Ignition Switch 20 Choke Control 20 Fuses 20 Fuel Tank 21 Fuel Shut Off Valve 22 Cutting Height Adjuster 22 Seat Adjustment Lever 23 Hour Meter 23 Tracking Knob 23 Operation 24 Training 24 Steering 24 Before Starting 25 Starting the Engine 25 Jumper Cables 28 ...System 37 Fuel Pump Air Filter 37 Tire Pressures 38 Parking Brake 38 V-belts 39 Deck Belt 39 Cutting Blades 40 Blade replacement 40 Adjusting the Mower Deck 41 Leveling deck 41 Anti-scalp Rollers 42 Caster Wheels 43 Cleaning 43 Hardware 43 LUBRICATION 44 Front Wheel Mount 45 ...
Owners Manual
Page 17
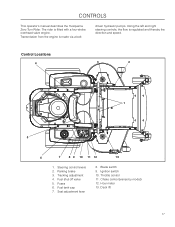
Transmission from the engine is regulated and thereby the direction and speed. Steering control levers 2. Fuel shut off valve 5. Blade switch 9. Hour meter 13. Tracking adjustment 4. Using the left and right steering controls, the flow is made via a belt...with a four-stroke overhead valve engine. driven hydraulic pumps. Fuel tank cap 7. Throttle control 11. Fuses 6. Seat adjustment lever 8. Parking brake 3. Ignition switch 10. CONTROLS This operator's manual describes the Husqvarna Zero Turn Rider. Control Locations 4 3 2 1 5 6 7 8 9 10 11 12 13 1. Choke ...
Transmission from the engine is regulated and thereby the direction and speed. Steering control levers 2. Fuel shut off valve 5. Blade switch 9. Hour meter 13. Tracking adjustment 4. Using the left and right steering controls, the flow is made via a belt...with a four-stroke overhead valve engine. driven hydraulic pumps. Fuel tank cap 7. Throttle control 11. Fuses 6. Seat adjustment lever 8. Parking brake 3. Ignition switch 10. CONTROLS This operator's manual describes the Husqvarna Zero Turn Rider. Control Locations 4 3 2 1 5 6 7 8 9 10 11 12 13 1. Choke ...
Owners Manual
Page 18
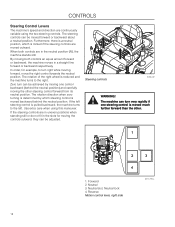
... can turn can be achieved by which is moved backward behind the neutral position) and carefully moving the controls outward, they can be adjusted. Forward 2. The steering controls can be moved forward or backward about a neutral position. In order, for moving the other . 1.... Steering controls 8058-022 WARNING! Neutral 3. CONTROLS Steering Control Levers The machine's speed and direction are moved outward. By moving one steering control is determined by moving both controls are in uneven positions...
... can turn can be achieved by which is moved backward behind the neutral position) and carefully moving the controls outward, they can be adjusted. Forward 2. The steering controls can be moved forward or backward about a neutral position. In order, for moving the other . 1.... Steering controls 8058-022 WARNING! Neutral 3. CONTROLS Steering Control Levers The machine's speed and direction are moved outward. By moving one steering control is determined by moving both controls are in uneven positions...
Owners Manual
Page 22
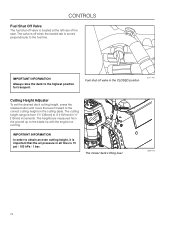
... to the fuel line. The heights are measured from 1½" (38mm) to 4" (102mm) in the CLOSED position 8011-419 Cutting Height Adjuster To set the desired deck cutting height, press the release button and move the lever forward to the correct cutting height on the cutting plate. The mower deck's lifting... lever 8058-019 22 CONTROLS Fuel Shut Off Valve The fuel shut off valve is from the ground up to the blade tip...
... to the fuel line. The heights are measured from 1½" (38mm) to 4" (102mm) in the CLOSED position 8011-419 Cutting Height Adjuster To set the desired deck cutting height, press the release button and move the lever forward to the correct cutting height on the cutting plate. The mower deck's lifting... lever 8058-019 22 CONTROLS Fuel Shut Off Valve The fuel shut off valve is from the ground up to the blade tip...
Owners Manual
Page 23
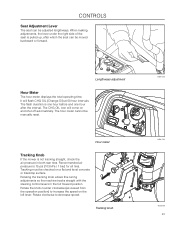
...not tracking straight, check the air pressure in the full forward position. Rotating the tracking knob allows fine tuning adjustments so the machine tracks straight with the steering control levers in both rear tires. Rotate clockwise to increase the speed on and shut off automatically. Tracking must be ... kPa / 1 bar) for all tires. The hour meter cannot be checked on a flat and level concrete or blacktop surface. When making adjustments, the lever under the right side of the seat is one hour before and one hour after which the seat can be moved backward or forward. CONTROLS...
...not tracking straight, check the air pressure in the full forward position. Rotating the tracking knob allows fine tuning adjustments so the machine tracks straight with the steering control levers in both rear tires. Rotate clockwise to increase the speed on and shut off automatically. Tracking must be ... kPa / 1 bar) for all tires. The hour meter cannot be checked on a flat and level concrete or blacktop surface. When making adjustments, the lever under the right side of the seat is one hour before and one hour after which the seat can be moved backward or forward. CONTROLS...
Owners Manual
Page 24
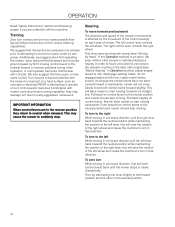
... prior to attempting to move the mower under its own power. Then by the movement of the control lever(s) on a hard surface, such as the control levers have not been moved forward or backwards, mower will slow the rotation of mower. Training Zero turn to... moving in Operation section), adjust engine speed to the neutral position and mower should stop moving backwards. IMPORTANT INFORMATION When control levers are in a forward direction pull the left lever, this will slow the rotation of the right lever, this time, rotate control levers inward. First time users should...
... prior to attempting to move the mower under its own power. Then by the movement of the control lever(s) on a hard surface, such as the control levers have not been moved forward or backwards, mower will slow the rotation of mower. Training Zero turn to... moving in Operation section), adjust engine speed to the neutral position and mower should stop moving backwards. IMPORTANT INFORMATION When control levers are in a forward direction pull the left lever, this will slow the rotation of the right lever, this time, rotate control levers inward. First time users should...
Owners Manual
Page 25
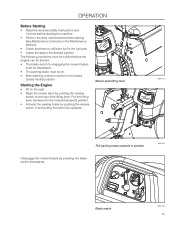
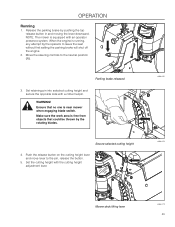
... brake must be on. • Both steering controls must be in and pulling the lever fully upwards. Mower deck lifting lever 8058-019 Pull parking brake upwards to activate. Pull the lifting lever backward to the locked (transport) position. • Activate the parking brake by pushing the... the blade switch downwards. 8058-020 Blade switch 8058-134 25 Starting the Engine • Sit on the top of the lifting lever. operation Before Starting • Read the sections Safety Instructions and Controls before starting (see Maintenance Schedule in the Maintenance section). •...
... brake must be on. • Both steering controls must be in and pulling the lever fully upwards. Mower deck lifting lever 8058-019 Pull parking brake upwards to activate. Pull the lifting lever backward to the locked (transport) position. • Activate the parking brake by pushing the... the blade switch downwards. 8058-020 Blade switch 8058-134 25 Starting the Engine • Sit on the top of the lifting lever. operation Before Starting • Read the sections Safety Instructions and Controls before starting (see Maintenance Schedule in the Maintenance section). •...
Owners Manual
Page 29
... is free from objects that could be thrown by the rotating blades. Secure selected cutting height 4. Push the release button on the cutting height lever and move lever to the neutral position (N). Move the steering controls to the pin, release the button. 5. Make sure the work area is near mower when ...the engine is equipped with an operator presence system. Set retaining pin into selected cutting height and secure the opposite side with the cutting height adjustment lever. 8058-020 8058-024 Mower deck lifting lever 8058-019 29 Set the cutting height with a cotter hairpin.
... is free from objects that could be thrown by the rotating blades. Secure selected cutting height 4. Push the release button on the cutting height lever and move lever to the neutral position (N). Move the steering controls to the pin, release the button. 5. Make sure the work area is near mower when ...the engine is equipped with an operator presence system. Set retaining pin into selected cutting height and secure the opposite side with the cutting height adjustment lever. 8058-020 8058-024 Mower deck lifting lever 8058-019 29 Set the cutting height with a cotter hairpin.
Owners Manual
Page 33
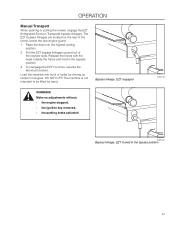
To reengage the EZT's to be lifted by driving up and out of the frame, below the rear engine guard. 1. Make no adjustments without: • the engine stopped, • the ignition key removed, • the parking brake activated 8058-032 8058-033 Bypass linkage, EZT locked in the ...bypass position. 3. Pull the EZT bypass linkages up ramps in low gear. Release the levers with the head outside the frame and held in the bypass position 33 Load the machine into the highest cutting position. 2. The machine is not...
To reengage the EZT's to be lifted by driving up and out of the frame, below the rear engine guard. 1. Make no adjustments without: • the engine stopped, • the ignition key removed, • the parking brake activated 8058-032 8058-033 Bypass linkage, EZT locked in the ...bypass position. 3. Pull the EZT bypass linkages up ramps in low gear. Release the levers with the head outside the frame and held in the bypass position 33 Load the machine into the highest cutting position. 2. The machine is not...

Owners Manual
Page 38
... check that there is found on the lever, cables, or switch belonging to the parking brake. IMPORTANT INFORMATION The machine must be at 15 psi / 103 kPa / 1 bar. Parking brake 8011-564 8058-020 38 To adjust the parking brake, contact the Husqvarna service workshop. Faulty adjustment will result in reduced braking ability and...
... check that there is found on the lever, cables, or switch belonging to the parking brake. IMPORTANT INFORMATION The machine must be at 15 psi / 103 kPa / 1 bar. Parking brake 8011-564 8058-020 38 To adjust the parking brake, contact the Husqvarna service workshop. Faulty adjustment will result in reduced braking ability and...


