Owners Manual
Page 3
... Steering Control Levers 18 Parking Brake 19 Throttle Control 19 Blade Switch 19 Ignition Switch 20 Choke Control 20 Fuses 20 Fuel Tank 21 Fuel Shut Off Valve 22 Cutting Height Adjuster 22 Seat Adjustment Lever 23 Hour Meter 23 Tracking Knob 23 Operation 24 Training 24 Steering 24 Before Starting 25 Starting the Engine 25 Jumper Cables 28 Running 29 Operating On Hills 30 Mowing Tips 31 Stopping the Engine 32 Manual Transport 33 Maintenance 34 Maintenance Schedule 34 Battery 36 Safety System 37 Fuel Pump Air Filter 37 Tire Pressures 38 Parking Brake 38 V-belts...
... Steering Control Levers 18 Parking Brake 19 Throttle Control 19 Blade Switch 19 Ignition Switch 20 Choke Control 20 Fuses 20 Fuel Tank 21 Fuel Shut Off Valve 22 Cutting Height Adjuster 22 Seat Adjustment Lever 23 Hour Meter 23 Tracking Knob 23 Operation 24 Training 24 Steering 24 Before Starting 25 Starting the Engine 25 Jumper Cables 28 Running 29 Operating On Hills 30 Mowing Tips 31 Stopping the Engine 32 Manual Transport 33 Maintenance 34 Maintenance Schedule 34 Battery 36 Safety System 37 Fuel Pump Air Filter 37 Tire Pressures 38 Parking Brake 38 V-belts...
Owners Manual
Page 5
... the safety instructions. Operating instructions for mowing grass on the towed equipment. Safety requires good judgement, careful use in accordance with delivery. A control panel easily accessible to your dealer for the maintenance and affects the machine's resale value. This manual is taken to the operator and a hydrostatic transmission regulated by all power equipment, can also be operated, maintained, and repaired by persons familiar with special accessories provided...
... the safety instructions. Operating instructions for mowing grass on the towed equipment. Safety requires good judgement, careful use in accordance with delivery. A control panel easily accessible to your dealer for the maintenance and affects the machine's resale value. This manual is taken to the operator and a hydrostatic transmission regulated by all power equipment, can also be operated, maintained, and repaired by persons familiar with special accessories provided...
Owners Manual
Page 9
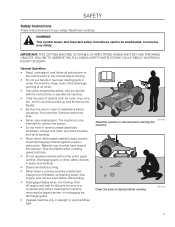
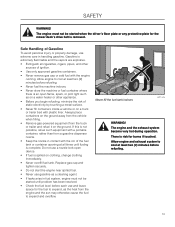
...; Slow down and behind before operating. FAILURE TO OBSERVE THE FOLLOWING SAFETY INSTRUCTIONS COULD RESULT IN SERIOUS INJURY OR DEATH. Stop machine if anyone . Shut off blades, set parking brake, stop before cleaning the machine, removing the grass catcher, or unclogging the discharge guard. • Operate machine only in the manual before mowing 8011-513 9 SAFETY Safety Instructions These instructions are familiar with the instructions, to operate the machine. • Clear...
...; Slow down and behind before operating. FAILURE TO OBSERVE THE FOLLOWING SAFETY INSTRUCTIONS COULD RESULT IN SERIOUS INJURY OR DEATH. Stop machine if anyone . Shut off blades, set parking brake, stop before cleaning the machine, removing the grass catcher, or unclogging the discharge guard. • Operate machine only in the manual before mowing 8011-513 9 SAFETY Safety Instructions These instructions are familiar with the instructions, to operate the machine. • Clear...
Owners Manual
Page 13
...! Gasoline is spilled on clothing, change clothing immediately. • Never overfill fuel tank. Do not use a nozzle lock-open flame, spark, or pilot light such as a cleaning agent. • If leaks arise in fuel system, engine must not be started when the driver's floor plate or any protective plate for the mower deck's drive belt is risk for the fuel to expand and overflow. The...
...! Gasoline is spilled on clothing, change clothing immediately. • Never overfill fuel tank. Do not use a nozzle lock-open flame, spark, or pilot light such as a cleaning agent. • If leaks arise in fuel system, engine must not be started when the driver's floor plate or any protective plate for the mower deck's drive belt is risk for the fuel to expand and overflow. The...
Owners Manual
Page 14
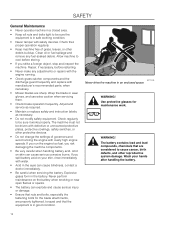
...; Acid in the battery. Clean oil or fuel spillage and remove any adjustments or repairs with the engine running the engine with safety devices. Acid on the battery when smoking or near open flames or sparks. • The battery can cause serious corrosive burns. WARNING! Wrap the blade or wear gloves, and use extra caution when servicing them. • Check brake operation frequently. If you run the engine too fast, you...
...; Acid in the battery. Clean oil or fuel spillage and remove any adjustments or repairs with the engine running the engine with safety devices. Acid on the battery when smoking or near open flames or sparks. • The battery can cause serious corrosive burns. WARNING! Wrap the blade or wear gloves, and use extra caution when servicing them. • Check brake operation frequently. If you run the engine too fast, you...
Owners Manual
Page 15
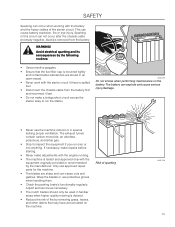
... quality mowing is spilled fuel. • Disconnect the chassis cable from the battery. Avoid electrical sparking and its consequences by the manufacturer. Only use protective gloves when handling them. • Check the parking brake's functionality regularly. Sparking in spaces lacking proper ventilation. If necessary, make repairs before starting. • Never make a bridge short circuit across the starter relay to inspect the equipment if you run the starter...
... quality mowing is spilled fuel. • Disconnect the chassis cable from the battery. Avoid electrical sparking and its consequences by the manufacturer. Only use protective gloves when handling them. • Check the parking brake's functionality regularly. Sparking in spaces lacking proper ventilation. If necessary, make repairs before starting. • Never make a bridge short circuit across the starter relay to inspect the equipment if you run the starter...
Owners Manual
Page 17
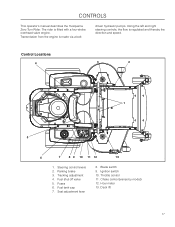
...control levers 2. Fuel tank cap 7. Ignition switch 10. CONTROLS This operator's manual describes the Husqvarna Zero Turn Rider. Using the left and right steering controls, the flow is fitted with a four-stroke overhead valve engine. Parking brake 3. Fuses 6. driven hydraulic pumps. Tracking adjustment 4. Hour meter 13. Choke control (varies by model) 12. Fuel shut off valve 5. Throttle control 11. Seat adjustment lever 8. Deck lift 17 Control Locations 4 3 2 1 5 6 7 8 9 10 11 12 13 1. Blade switch 9. Transmission from the engine is made via a belt...
...control levers 2. Fuel tank cap 7. Ignition switch 10. CONTROLS This operator's manual describes the Husqvarna Zero Turn Rider. Using the left and right steering controls, the flow is fitted with a four-stroke overhead valve engine. Parking brake 3. Fuses 6. driven hydraulic pumps. Tracking adjustment 4. Hour meter 13. Choke control (varies by model) 12. Fuel shut off valve 5. Throttle control 11. Seat adjustment lever 8. Deck lift 17 Control Locations 4 3 2 1 5 6 7 8 9 10 11 12 13 1. Blade switch 9. Transmission from the engine is made via a belt...
Owners Manual
Page 24
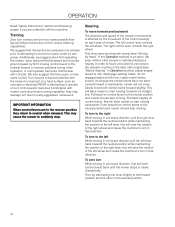
... slows dramatically. Steering To move both control levers back until operator becomes comfortable with the machine. Slowly move forward and backward The direction and speed of the right wheel and cause the machine to turn in that this section be in Operation section), adjust engine speed to idle, disengage parking brake, do not engage blades at this will allow mower to start moving in the reverse position they may...
... slows dramatically. Steering To move both control levers back until operator becomes comfortable with the machine. Slowly move forward and backward The direction and speed of the right wheel and cause the machine to turn in that this section be in Operation section), adjust engine speed to idle, disengage parking brake, do not engage blades at this will allow mower to start moving in the reverse position they may...
Owners Manual
Page 25
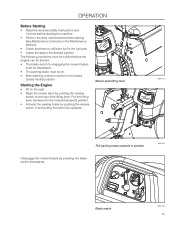
... blade switch for engaging the mower blades must be depressed. • The parking brake must be on. • Both steering controls must be in the locked (outer) neutral position. Mower deck lifting lever 8058-019 Pull parking brake upwards to the locked (transport) position. • Activate the parking brake by pushing the release button in and pulling the lever fully upwards. operation Before Starting • Read the sections Safety Instructions and Controls before starting (see Maintenance Schedule...
... blade switch for engaging the mower blades must be depressed. • The parking brake must be on. • Both steering controls must be in the locked (outer) neutral position. Mower deck lifting lever 8058-019 Pull parking brake upwards to the locked (transport) position. • Activate the parking brake by pushing the release button in and pulling the lever fully upwards. operation Before Starting • Read the sections Safety Instructions and Controls before starting (see Maintenance Schedule...
Owners Manual
Page 30
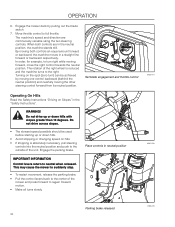
... press forward to the right. Do not drive across slopes. • The slowest speed possible should be achieved by pulling out the blade switch. 7. Set blade engagement and throttle control Operating On Hills Read the Safety Instructions "Driving on hills. • If stopping is reduced and the machine turns to regain forward motion. • Make all turns slowly. 8052-001 8061-026 Parking brake released 8058-020 30
... press forward to the right. Do not drive across slopes. • The slowest speed possible should be achieved by pulling out the blade switch. 7. Set blade engagement and throttle control Operating On Hills Read the Safety Instructions "Driving on hills. • If stopping is reduced and the machine turns to regain forward motion. • Make all turns slowly. 8052-001 8061-026 Parking brake released 8058-020 30
Owners Manual
Page 34
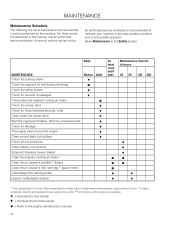
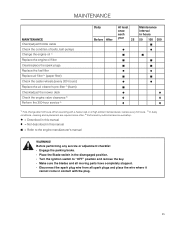
... MAINTENANCE Check the parking brake Check the engine's oil level (every refueling) Check the safety system Check for fuel and oil leakages Check/clean the engine's cooling air intake Check the mower deck Check for loose hardware (screws, nuts) Clean under the mower deck Start the engine and blades, listen for unusual sounds Check for damage Thoroughly clean around the engine Clean around belts, belt pulleys Check the tire pressures Before After Check battery connections Sharpen3)/ Replace mower blades Clean the engine's cooling air intake 2) Clean the air cleaner's pre-filter...
... MAINTENANCE Check the parking brake Check the engine's oil level (every refueling) Check the safety system Check for fuel and oil leakages Check/clean the engine's cooling air intake Check the mower deck Check for loose hardware (screws, nuts) Clean under the mower deck Start the engine and blades, listen for unusual sounds Check for damage Thoroughly clean around the engine Clean around belts, belt pulleys Check the tire pressures Before After Check battery connections Sharpen3)/ Replace mower blades Clean the engine's cooling air intake 2) Clean the air cleaner's pre-filter...
Owners Manual
Page 35
... performing any service or adjustment checklist • Engage the parking brake. • Place the Blade-switch in hours 50 100 300 ● ♦ ♦ 1) First change after 5-8 hours. MAINTENANCE MAINTENANCE Check/adjust throttle cable Check the condition of belts, belt pulleys Change the engine oil 1) Replace the engine oil filter Clean/replace the spark plugs Replace the fuel filter Replace air filter 2) (paper filter) Check the caster wheels (every 200 hours) Replace the air cleaner's pre-filter 2) (foam) Check/adjust the mower deck Check the engine valve clearance 3) Perform...
... performing any service or adjustment checklist • Engage the parking brake. • Place the Blade-switch in hours 50 100 300 ● ♦ ♦ 1) First change after 5-8 hours. MAINTENANCE MAINTENANCE Check/adjust throttle cable Check the condition of belts, belt pulleys Change the engine oil 1) Replace the engine oil filter Clean/replace the spark plugs Replace the fuel filter Replace air filter 2) (paper filter) Check the caster wheels (every 200 hours) Replace the air cleaner's pre-filter 2) (foam) Check/adjust the mower deck Check the engine valve clearance 3) Perform...
Owners Manual
Page 36
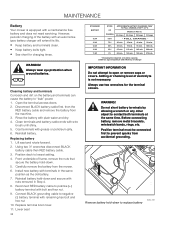
... with plain water and dry. 4. MAINTENANCE Battery Your mower is not necessary. Cleaning battery and terminals Corrosion and dirt on battery capacity, condition, age, temperature and efficiency of electrolyte is equipped with wire brush until shiny. 5. Position deck to prevent sparks from accidental grounding. 8050-109 Remove battery hold -down. 5. Reconnect RED battery cable to open or remove caps or covers. FULL CHARGE - 20 min. 35 min...
... with plain water and dry. 4. MAINTENANCE Battery Your mower is not necessary. Cleaning battery and terminals Corrosion and dirt on battery capacity, condition, age, temperature and efficiency of electrolyte is equipped with wire brush until shiny. 5. Position deck to prevent sparks from accidental grounding. 8050-109 Remove battery hold -down. 5. Reconnect RED battery cable to open or remove caps or covers. FULL CHARGE - 20 min. 35 min...
Owners Manual
Page 39
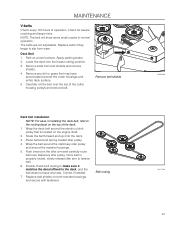
... the electric clutch pulley that may have any dirt or grass that is properly routed, slowly release idler arm to slip from belt shields and remove shields. 4. Route the belt forward and up onto the deck. 3. Place belt around the mandrel housings. 5. Double check belt routing to make sure it matches the decal affixed to the routing decal on the engine shaft. 2. The belts are not adjustable. Apply parking brake. 2. Replace belt shields on a level surface...
... the electric clutch pulley that may have any dirt or grass that is properly routed, slowly release idler arm to slip from belt shields and remove shields. 4. Route the belt forward and up onto the deck. 3. Place belt around the mandrel housings. 5. Double check belt routing to make sure it matches the decal affixed to the routing decal on the engine shaft. 2. The belts are not adjustable. Apply parking brake. 2. Replace belt shields on a level surface...

Owners Manual
Page 40
... gloves and/or wrap blades with a Husqvarna bolt if required. Let the service workshop decide whether the blade can be repaired/ ground or must be replaced when hitting obstacles that the blades are sharp. Remove blade bolt by an authorized service workshop. Cutter housing Blade attachment 3 8058-027 40 Check the blades WARNING! Torque blade bolt to attain the best mowing effect, it is heat treated. Do not use lower grade hardware...
... gloves and/or wrap blades with a Husqvarna bolt if required. Let the service workshop decide whether the blade can be repaired/ ground or must be replaced when hitting obstacles that the blades are sharp. Remove blade bolt by an authorized service workshop. Cutter housing Blade attachment 3 8058-027 40 Check the blades WARNING! Torque blade bolt to attain the best mowing effect, it is heat treated. Do not use lower grade hardware...

Owners Manual
Page 46
...; Ignition system faulty • Battery is loose 46 See Checking the Safety System in the "Maintenance Section" • Faulty carburetor • Choke control is pulled out with a warm engine • Clogged fuel filter or jet • Clogged ventilation valve on the fuel cap • Fuel tank nearly empty • Fouled spark plugs • Rich fuel mixture or fuel-air mixture. • Wrong fuel type • Water in fuel • Clogged air filter • Clogged air filter • Fouled spark plugs • Carburetor incorrectly adjusted...
...; Ignition system faulty • Battery is loose 46 See Checking the Safety System in the "Maintenance Section" • Faulty carburetor • Choke control is pulled out with a warm engine • Clogged fuel filter or jet • Clogged ventilation valve on the fuel cap • Fuel tank nearly empty • Fouled spark plugs • Rich fuel mixture or fuel-air mixture. • Wrong fuel type • Water in fuel • Clogged air filter • Clogged air filter • Fouled spark plugs • Carburetor incorrectly adjusted...
Owners Manual
Page 47
... the carburetor or fuel line. • Fouled spark plugs • Poor contact of the battery terminal cable connections • Charging lead is disconnected • Parking brake on • Bypass valve on pump open • Drive belt for the transmission slack or has come off • Air trapped in hydraulic system • Drive belt for the mower deck has come loose • Contact for the electromagnetic coupling has loosened • Blade switch...
... the carburetor or fuel line. • Fouled spark plugs • Poor contact of the battery terminal cable connections • Charging lead is disconnected • Parking brake on • Bypass valve on pump open • Drive belt for the transmission slack or has come off • Air trapped in hydraulic system • Drive belt for the mower deck has come loose • Contact for the electromagnetic coupling has loosened • Blade switch...
Owners Manual
Page 48
... at an authorized service workshop is drained of the mower deck to the fuel in the tank or in a boiler, hot water tank, clothes dryer, etc. Start the engine and allow it to run until the carburetor is a good way to the paint and spray a thin layer of oil on the underside of fuel or the stabilizer has reached the carburetor. 5. Remove the battery. Use a degreaser and...
... at an authorized service workshop is drained of the mower deck to the fuel in the tank or in a boiler, hot water tank, clothes dryer, etc. Start the engine and allow it to run until the carburetor is a good way to the paint and spray a thin layer of oil on the underside of fuel or the stabilizer has reached the carburetor. 5. Remove the battery. Use a degreaser and...

Owners Manual
Page 60
... 50-Hour Service Perform the 25-hour service Clean/replace the air cleaner's filter cartridge (paper filter (shorter intervals for dusty operating conditions) Change engine oil Lubricate according to lubrication chart Check/adjust the parking brake Date, mtr reading, stamp, sign q q q q q Action 100-Hour Service Perform the 25-hour service Perform the 50-hour service Change the engine oil filter Clean/replace the spark plugs Replace the fuel filter Check V-belts Check tighten caster wheel axle bolts (every 200 hours) Change the air filter's paper cartridge...
... 50-Hour Service Perform the 25-hour service Clean/replace the air cleaner's filter cartridge (paper filter (shorter intervals for dusty operating conditions) Change engine oil Lubricate according to lubrication chart Check/adjust the parking brake Date, mtr reading, stamp, sign q q q q q Action 100-Hour Service Perform the 25-hour service Perform the 50-hour service Change the engine oil filter Clean/replace the spark plugs Replace the fuel filter Check V-belts Check tighten caster wheel axle bolts (every 200 hours) Change the air filter's paper cartridge...

Parts Manual
Page 37
MOWER DECK / CUTTING DECK ITEM PART NO. QTY. QTY. DESCRIPTION 1.. 522 744401 1 DECK w/ SAFETY DECALS 2.. 539 114557 1 V-BELT 3.. 532 187256 3 BLADE, BAGGING 4.. 532 187297 1 BELT SHIELD, LT 5.. 532 188187 1 BELT SHIELD, RT 6.. 539 112057 3 HOUSING, CUTTER 7.. 539 107610 5 WHEEL, GAUGE 8.. 539 112171 3 PULLEY 9.. 532 196106 2 PULLEY, IDLER 10.. 532 196104 1 PULLEY, IDLER 11.. 539 112054 1 DEFLECTOR 12.. 522 629701 1 KEEPER, BELT 13.. 539 110462 1 ROD, HINGE 14.. 539 112050 1 BEARING 15.. 510 220002...
MOWER DECK / CUTTING DECK ITEM PART NO. QTY. QTY. DESCRIPTION 1.. 522 744401 1 DECK w/ SAFETY DECALS 2.. 539 114557 1 V-BELT 3.. 532 187256 3 BLADE, BAGGING 4.. 532 187297 1 BELT SHIELD, LT 5.. 532 188187 1 BELT SHIELD, RT 6.. 539 112057 3 HOUSING, CUTTER 7.. 539 107610 5 WHEEL, GAUGE 8.. 539 112171 3 PULLEY 9.. 532 196106 2 PULLEY, IDLER 10.. 532 196104 1 PULLEY, IDLER 11.. 539 112054 1 DEFLECTOR 12.. 522 629701 1 KEEPER, BELT 13.. 539 110462 1 ROD, HINGE 14.. 539 112050 1 BEARING 15.. 510 220002...


