

Parts List
Page 21
... WHIZLK 30.. 539 103433 1 HCS ½-13 x 3¼ 31.. 539 990799 3 RHSNB 5/16-18 x 5/8 32.. 532 193003 3 BOLT 7/16 BLADE 33.. 539 107608 2 BOLT, SHOULDER 34.. 539 107630 ��12 SCREW, WSH HEAD 35.. 539 107590 3 NUT 9/16 TOP CENTER LOCK 36.. 539... RETAINER, U TYPE 5/16-18 48.. 539 976998 1 ZERK 21 DESCRIPTION 1.. 581 505401 1 DECK w/ SAFETY DECALS 2.. 539 104335 1 BELT, DECK 3.. 510 417901 3 BLADE, 21" 4.. 539 131898 3 HOUSING ASSEMBLY 5.. 539 103427 1 BUSHING, PIVOT 6.. 539 112169 2 BUSHING, IDLER 7.. 539 132728 3 PULLEY, IDLER 8.. 539 113300 3 PULLEY...
... WHIZLK 30.. 539 103433 1 HCS ½-13 x 3¼ 31.. 539 990799 3 RHSNB 5/16-18 x 5/8 32.. 532 193003 3 BOLT 7/16 BLADE 33.. 539 107608 2 BOLT, SHOULDER 34.. 539 107630 ��12 SCREW, WSH HEAD 35.. 539 107590 3 NUT 9/16 TOP CENTER LOCK 36.. 539... RETAINER, U TYPE 5/16-18 48.. 539 976998 1 ZERK 21 DESCRIPTION 1.. 581 505401 1 DECK w/ SAFETY DECALS 2.. 539 104335 1 BELT, DECK 3.. 510 417901 3 BLADE, 21" 4.. 539 131898 3 HOUSING ASSEMBLY 5.. 539 103427 1 BUSHING, PIVOT 6.. 539 112169 2 BUSHING, IDLER 7.. 539 132728 3 PULLEY, IDLER 8.. 539 113300 3 PULLEY...

Parts List
Page 25
... HEIGHT ADJUST 14.. 539 132187 ���1 ��� DECAL, SERVICE 15.. 532 429196 ���2 DECAL, HUSQVARNA 16.. 532 428676 ���2 DECAL, CROWN H 17.. 581 513701 1 DECAL, M-ZT61 18.. 574 841103 1 DECAL, CONSOLE...103333 ���2 ��� DECAL, MOTION CONTROL 4.. 539 913010 ���1 ��� DECAL, BLADE WARNING 5.. 539 105744 ���1 ��� DECAL, DANGER BLT DRIVE 6.. 539 105743 ���2 �...
... HEIGHT ADJUST 14.. 539 132187 ���1 ��� DECAL, SERVICE 15.. 532 429196 ���2 DECAL, HUSQVARNA 16.. 532 428676 ���2 DECAL, CROWN H 17.. 581 513701 1 DECAL, M-ZT61 18.. 574 841103 1 DECAL, CONSOLE...103333 ���2 ��� DECAL, MOTION CONTROL 4.. 539 913010 ���1 ��� DECAL, BLADE WARNING 5.. 539 105744 ���1 ��� DECAL, DANGER BLT DRIVE 6.. 539 105743 ���2 �...

Parts List
Page 29
ACCESSORIES ITEM PART NO. DESCRIPTION 5.. 539 990208 2 RHSNB 5/16-18 x 1 GR5 6.. 539 990316 7 RHSNB 5/16-18 x ¾ GR5 7.. 539 990717 9 NUT 5/16-18 NYLOC 8.. 539 990692 1 WASHER 5/16 29 QTY. QTY. DESCRIPTION 1.. 521 981601 3 BLADE, 21" GATOR 2.. 539 113313 1 BAFFLE, LEFT 3.. 539 113315 1 BAFFLE, RIGHT 4.. 539 113327 1 MULCH CAP ITEM PART NO.
ACCESSORIES ITEM PART NO. DESCRIPTION 5.. 539 990208 2 RHSNB 5/16-18 x 1 GR5 6.. 539 990316 7 RHSNB 5/16-18 x ¾ GR5 7.. 539 990717 9 NUT 5/16-18 NYLOC 8.. 539 990692 1 WASHER 5/16 29 QTY. QTY. DESCRIPTION 1.. 521 981601 3 BLADE, 21" GATOR 2.. 539 113313 1 BAFFLE, LEFT 3.. 539 113315 1 BAFFLE, RIGHT 4.. 539 113327 1 MULCH CAP ITEM PART NO.

Operation Manual
Page 3
... Towing 16 Spark Arrestor 16 Rollover Protection System (ROPS 17 CONTROLS 18 Control Locations 18 Motion Control Levers 19 Parking Brake 20 Ignition Switch 20 Blade Switch 20 Throttle Control 21 Hour Meter 21 Fuel Shut Off Valve 21 Tracking Knob 22 Fuses 22 Cutting Height Adjuster 23 Seat Adjustment Lever... Adjusting the Mower Deck 42 Leveling deck 42 Anti-scalp Rollers 43 Caster Wheels 43 Hardware 43 Cleaning 44 ZT-3400 Powertrain 44 LUBRICATION 45 Lubrication Schedule 45 Wheel and Deck Zerks 46 Front Wheel Mount 46 Front Wheel Bearings 46 Deck Spindle 46 Transaxle (...
... Towing 16 Spark Arrestor 16 Rollover Protection System (ROPS 17 CONTROLS 18 Control Locations 18 Motion Control Levers 19 Parking Brake 20 Ignition Switch 20 Blade Switch 20 Throttle Control 21 Hour Meter 21 Fuel Shut Off Valve 21 Tracking Knob 22 Fuses 22 Cutting Height Adjuster 23 Seat Adjustment Lever... Adjusting the Mower Deck 42 Leveling deck 42 Anti-scalp Rollers 43 Caster Wheels 43 Hardware 43 Cleaning 44 ZT-3400 Powertrain 44 LUBRICATION 45 Lubrication Schedule 45 Wheel and Deck Zerks 46 Front Wheel Mount 46 Front Wheel Bearings 46 Deck Spindle 46 Transaxle (...

Operation Manual
Page 8
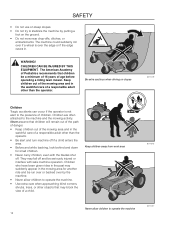
Rotating blades, keep away from the machine Use on slopes no greater than 10° No passengers Whole body exposure to thrown objects Severing of fingers and ... open or remove safety shields while engine is running Careful backing up, watch for other people Careful going forward, watch for other people Moving sharp blades under cover Battery acid is corrosive, explosive and flammable Warning! SYMBOLS AND DECALS Read Operator's Manual Shut off engine and remove key before performing any...
Rotating blades, keep away from the machine Use on slopes no greater than 10° No passengers Whole body exposure to thrown objects Severing of fingers and ... open or remove safety shields while engine is running Careful backing up, watch for other people Careful going forward, watch for other people Moving sharp blades under cover Battery acid is corrosive, explosive and flammable Warning! SYMBOLS AND DECALS Read Operator's Manual Shut off engine and remove key before performing any...

Operation Manual
Page 9
...down and behind before turning. • Never leave a running machine unattended. Always turn off engine and wait for your safety. Shut off blades, set parking brake, stop before cleaning the machine, removing the grass catcher, or unclogging the discharge guard. 8011-512 Read the operator's ...manual before starting . • It is clear of bystanders before dismounting. • Disengage blades when not mowing. SAFETY Safety Instructions These instructions are mowing and can provide help in case of injury or accident. • Do not...
...down and behind before turning. • Never leave a running machine unattended. Always turn off engine and wait for your safety. Shut off blades, set parking brake, stop before cleaning the machine, removing the grass catcher, or unclogging the discharge guard. 8011-512 Read the operator's ...manual before starting . • It is clear of bystanders before dismounting. • Disengage blades when not mowing. SAFETY Safety Instructions These instructions are mowing and can provide help in case of injury or accident. • Do not...

Operation Manual
Page 11
...machine to roll over accidents, which can affect the stability of injury if an accident does happen. If the tires lose traction, disengage the blades and proceed slowly straight down hills with grass catchers or other hidden objects. Ask your retailer for holes, ruts, bumps, rocks, or other...steel toe caps. • Always wear approved protective glasses or a full visor when assembling or driving. • Always wear gloves when handling the blades. • Never wear loose clothing that you feel uneasy on the slopes slow and gradual. Do not drive up and down , not side to...
...machine to roll over accidents, which can affect the stability of injury if an accident does happen. If the tires lose traction, disengage the blades and proceed slowly straight down hills with grass catchers or other hidden objects. Ask your retailer for holes, ruts, bumps, rocks, or other...steel toe caps. • Always wear approved protective glasses or a full visor when assembling or driving. • Always wear gloves when handling the blades. • Never wear loose clothing that you feel uneasy on the slopes slow and gradual. Do not drive up and down , not side to...
Operation Manual
Page 12
... than the operator. Keep children out of the mowing area and in the mowing area for small children. • Never carry children, even with the blades shut off and be a minimum of 16 years of Pediatrics recommends that children be seriously injured or interfere with safe machine operation. They may suddenly...
... than the operator. Keep children out of the mowing area and in the mowing area for small children. • Never carry children, even with the blades shut off and be a minimum of 16 years of Pediatrics recommends that children be seriously injured or interfere with safe machine operation. They may suddenly...

Operation Manual
Page 14
... and avoid running . • Check grass catcher components and the discharge guard frequently and replace with overly high engine speeds. Wrap the blade or wear gloves, and use extra caution when servicing them. • Check brake operation frequently. Adjust and service as required. •.... SAFETY General Maintenance • Never operate machine in a closed area. • Keep all nuts and bolts, especially those fastening the blade attachments, are properly tightened and torqued. 14 Never drive the machine in an enclosed space 8011-515 CAUTION! Clean oil or fuel spillage and...
... and avoid running . • Check grass catcher components and the discharge guard frequently and replace with overly high engine speeds. Wrap the blade or wear gloves, and use extra caution when servicing them. • Check brake operation frequently. Adjust and service as required. •.... SAFETY General Maintenance • Never operate machine in a closed area. • Keep all nuts and bolts, especially those fastening the blade attachments, are properly tightened and torqued. 14 Never drive the machine in an enclosed space 8011-515 CAUTION! Clean oil or fuel spillage and...
Operation Manual
Page 15
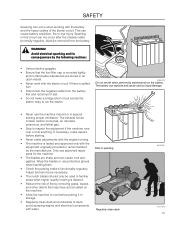
...cap is mounted tightly and no flammable substances are sharp and can cause cuts and gashes. Adjust and service as necessary. • The mulch blades should only be used in familiar areas when higher quality mowing is desired. • Reduce the risk of deck, avoid spraying engine and ...Never make adjustments with the engine running. • The machine is tested and approved only with water. Wrap the blades or use approved repair parts for the machine. • The blades are stored in this circuit can not occur after the chassis cable (normally negative, black) is removed from the ...
...cap is mounted tightly and no flammable substances are sharp and can cause cuts and gashes. Adjust and service as necessary. • The mulch blades should only be used in familiar areas when higher quality mowing is desired. • Reduce the risk of deck, avoid spraying engine and ...Never make adjustments with the engine running. • The machine is tested and approved only with water. Wrap the blades or use approved repair parts for the machine. • The blades are stored in this circuit can not occur after the chassis cable (normally negative, black) is removed from the ...

Operation Manual
Page 18
... release 18 Hour meter 9. Ignition switch 8. Tracking knob 4. Park brake 3. CONTROLS This operator's manual describes the Husqvarna Zero Turn Rider. Hydro releases levers 6. Transmission from the engine is regulated and thereby the direction and speed. Blade switch 11. Control Locations 4 3 2 5 1 12 6 11 7 8 9 10 1. The rider is fitted with a four-stroke overhead valve...
... release 18 Hour meter 9. Ignition switch 8. Tracking knob 4. Park brake 3. CONTROLS This operator's manual describes the Husqvarna Zero Turn Rider. Hydro releases levers 6. Transmission from the engine is regulated and thereby the direction and speed. Blade switch 11. Control Locations 4 3 2 5 1 12 6 11 7 8 9 10 1. The rider is fitted with a four-stroke overhead valve...
Operation Manual
Page 20
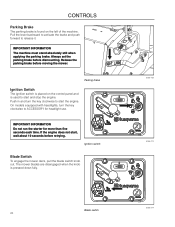
...and turn the key clockwise to start , wait about 10 seconds before retrying. IMPORTANT INFORMATION Do not run the starter for headlight use. Blade switch 20 8058-182 8058-214 8058-214 If the engine does not start the engine. Parking brake Ignition Switch The ignition switch is...of the machine. On models equipped with headlights, turn the key clockwise to ACCESSORY for more than five seconds each time. The mower blades are disengaged when the knob is used to release it. Release the parking brake before dismounting. IMPORTANT INFORMATION The machine must stand absolutely ...
...and turn the key clockwise to start , wait about 10 seconds before retrying. IMPORTANT INFORMATION Do not run the starter for headlight use. Blade switch 20 8058-182 8058-214 8058-214 If the engine does not start the engine. Parking brake Ignition Switch The ignition switch is...of the machine. On models equipped with headlights, turn the key clockwise to ACCESSORY for more than five seconds each time. The mower blades are disengaged when the knob is used to release it. Release the parking brake before dismounting. IMPORTANT INFORMATION The machine must stand absolutely ...
Operation Manual
Page 21
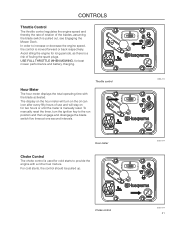
.... Avoid idling the engine for long periods, as there is a risk of use and will turn the ignition key to provide the engine with the blade activated. To manually reset the timer, turn on the hour meter will stay on for two hours or until the meter is used for best... mower performance and battery charging. USE FULL THROTTLE WHEN MOWING, for cold starts to the run position and then engage and disengage the blade switch five times at one second intervals. Hour meter Choke Control The choke control is manually reset. In order to increase or decrease the engine...
.... Avoid idling the engine for long periods, as there is a risk of use and will turn the ignition key to provide the engine with the blade activated. To manually reset the timer, turn on the hour meter will stay on for two hours or until the meter is used for best... mower performance and battery charging. USE FULL THROTTLE WHEN MOWING, for cold starts to the run position and then engage and disengage the blade switch five times at one second intervals. Hour meter Choke Control The choke control is manually reset. In order to increase or decrease the engine...

Operation Manual
Page 25
... becomes comfortable with the machine. As long as concrete or blacktop PRIOR to attempting to idle, disengage the parking brake but do not engage the blades at this time. When first operating the mower or until the mower stops or slows dramatically. Steering To move the mower under its own power...
... becomes comfortable with the machine. As long as concrete or blacktop PRIOR to attempting to idle, disengage the parking brake but do not engage the blades at this time. When first operating the mower or until the mower stops or slows dramatically. Steering To move the mower under its own power...

Operation Manual
Page 26
... Maintenance section. 3. Roll bar in the fuel tank. 4. The following conditions must be fulfilled before the engine can be started: • The blade switch for engaging the mower blades must be depressed. • The parking brake must be on. • Both steering controls must be in the raised and locked position and...
... Maintenance section. 3. Roll bar in the fuel tank. 4. The following conditions must be fulfilled before the engine can be started: • The blade switch for engaging the mower blades must be depressed. • The parking brake must be on. • Both steering controls must be in the raised and locked position and...

Operation Manual
Page 27
Set mower deck to the locked (outer) neutral position. Move the steering controls outward to the transport position 4. Press the control for disengaging the mower deck 8058-214 Place controls in neutral position 8058-226 27 Activate the parking brake. Sit on the seat. 2. Raise the mower deck to the transport position by pressing the blade switch down. 8058-225 5. Disengage the mower blades by setting the lift pedal fully forward. 3. OPERATION Starting the Engine 1.
Set mower deck to the locked (outer) neutral position. Move the steering controls outward to the transport position 4. Press the control for disengaging the mower deck 8058-214 Place controls in neutral position 8058-226 27 Activate the parking brake. Sit on the seat. 2. Raise the mower deck to the transport position by pressing the blade switch down. 8058-225 5. Disengage the mower blades by setting the lift pedal fully forward. 3. OPERATION Starting the Engine 1.
Operation Manual
Page 30
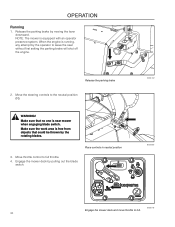
OPERATION Running 1. When the engine is running, any attempt by pulling out the blade switch. 8058-182 8058-266 8058-216 Engage the mower deck and move throttle to leave the ...brake will shut off the engine. Move the steering controls to full throttle. 4. NOTE: The mower is near mower when engaging blade switch. Make sure the work area is free from objects that no one is equipped with an operator presence system. Release the parking... operator to full. 30 Move throttle control to the neutral position (N). Release the parking brake by the rotating blades. WARNING!
OPERATION Running 1. When the engine is running, any attempt by pulling out the blade switch. 8058-182 8058-266 8058-216 Engage the mower deck and move throttle to leave the ...brake will shut off the engine. Move the steering controls to full throttle. 4. NOTE: The mower is near mower when engaging blade switch. Make sure the work area is free from objects that no one is equipped with an operator presence system. Release the parking... operator to full. 30 Move throttle control to the neutral position (N). Release the parking brake by the rotating blades. WARNING!
Operation Manual
Page 32
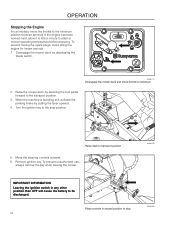
... pedal forward to the transport position. 3. Raise deck to attain a normal operating temperature before stopping. Remove ignition key. Raise the mower deck by depressing the blade switch. 8058-214 Disengage the mower deck and move the throttle to the minimum position (tortoise symbol). Move the steering controls outward. 6. To prevent fouling...
... pedal forward to the transport position. 3. Raise deck to attain a normal operating temperature before stopping. Remove ignition key. Raise the mower deck by depressing the blade switch. 8058-214 Disengage the mower deck and move the throttle to the minimum position (tortoise symbol). Move the steering controls outward. 6. To prevent fouling...
Operation Manual
Page 33
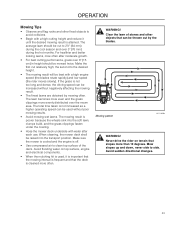
...15 cm) in height should be thrown out by mowing often. When cleaning, the mower deck shall be best with a high engine speed (the blades rotate rapidly) and low speed (the rider moves slowly). Make the first cut to side. Never drive the rider on top surface, engine and ...electrical components. • When the mulching kit is used without negatively affecting the mowing result. • The finest lawns are obtained by the blades. For healthier and better looking lawns, mow often after each use. OPERATION Mowing Tips • Observe and flag rocks and other objects that can...
...15 cm) in height should be thrown out by mowing often. When cleaning, the mower deck shall be best with a high engine speed (the blades rotate rapidly) and low speed (the rider moves slowly). Make the first cut to side. Never drive the rider on top surface, engine and ...electrical components. • When the mulching kit is used without negatively affecting the mowing result. • The finest lawns are obtained by the blades. For healthier and better looking lawns, mow often after each use. OPERATION Mowing Tips • Observe and flag rocks and other objects that can...
Operation Manual
Page 35
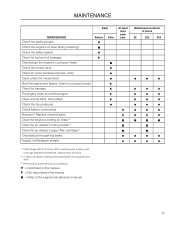
... cooling air intake Check the mower deck Check for loose hardware (screws, nuts) Clean under the mower deck Start the engine and blades, listen for unusual sounds Check for damage Thoroughly clean around the engine Clean around belts, belt pulleys Check the tire pressures Check battery... connections Sharpen3)/ Replace mower blades Clean the engine's cooling air intake 2) Clean the air cleaner's foam pre-filter 2) Clean the air cleaner's paper filter cartridge 2) Check...
... cooling air intake Check the mower deck Check for loose hardware (screws, nuts) Clean under the mower deck Start the engine and blades, listen for unusual sounds Check for damage Thoroughly clean around the engine Clean around belts, belt pulleys Check the tire pressures Check battery... connections Sharpen3)/ Replace mower blades Clean the engine's cooling air intake 2) Clean the air cleaner's foam pre-filter 2) Clean the air cleaner's paper filter cartridge 2) Check...


