
Operation Manual
Page 8
...TRANSPORT" in safe operating condition. ✓ Ensure Operator Presence System and Reverse Operation System (ROS) are routed properly around pulleys and inside all belt keepers. ✓ Check wiring. See that follow to -rear for shipping purposes. Ensure tractor is properly leveled side-to-side/ front-to ...the Service and Adjustments section of this manual. See "TO LEVEL MOWER" in flated for replacing motion and mower blade drive belts in the Service and Adjustments section of this manual. ✓CHECKLIST BEFORE YOU OPERATE YOUR NEW TRACTOR, WE WISH TO ENSURE THAT...
...TRANSPORT" in safe operating condition. ✓ Ensure Operator Presence System and Reverse Operation System (ROS) are routed properly around pulleys and inside all belt keepers. ✓ Check wiring. See that follow to -rear for shipping purposes. Ensure tractor is properly leveled side-to-side/ front-to ...the Service and Adjustments section of this manual. See "TO LEVEL MOWER" in flated for replacing motion and mower blade drive belts in the Service and Adjustments section of this manual. ✓CHECKLIST BEFORE YOU OPERATE YOUR NEW TRACTOR, WE WISH TO ENSURE THAT...
Operation Manual
Page 16
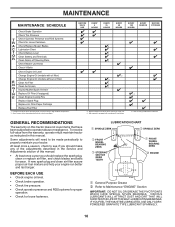
... Fasteners A Check/Replace Mower Blades C Lubrication Chart T Check Battery Level O Clean Battery and Terminals R Clean Debris off Steering Plate Check Mower Levelness Check V-Belts Check Engine Oil Level Change Engine Oil (models with maintenance-free battery. 1, 2 2 2 5 - IF YOU FEEL THEY MUST BE LUBRICATED, USE ONLY ...• At least once a year you should replace the spark plug, clean or replace air filter, and check blades and belts for wear. To receive full value from the warranty, operator must maintain tractor as instructed in dirty or dusty conditions. Not required if...
... Fasteners A Check/Replace Mower Blades C Lubrication Chart T Check Battery Level O Clean Battery and Terminals R Clean Debris off Steering Plate Check Mower Levelness Check V-Belts Check Engine Oil Level Change Engine Oil (models with maintenance-free battery. 1, 2 2 2 5 - IF YOU FEEL THEY MUST BE LUBRICATED, USE ONLY ...• At least once a year you should replace the spark plug, clean or replace air filter, and check blades and belts for wear. To receive full value from the warranty, operator must maintain tractor as instructed in dirty or dusty conditions. Not required if...
Operation Manual
Page 18
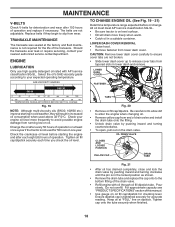
... TABS Fig. 20 • Remove oil fill cap/dipstick. For approximate capacity see "PRODUCT SPECIFICATIONS" section of the transaxle. Replace belts if they will drain more frequently to avoid possible engine damage from tapered slots in the locked position as shown. • Remove the drain...tabs from running low on dipstick. Do not overfill. Tighten cap onto the tube securely when finished. 18 MAINTENANCE V-BELTS Check V-belts for deterioration and wear after 100 hours of operation or at least once a year if the tractor is tightened securely for accurate reading....
... TABS Fig. 20 • Remove oil fill cap/dipstick. For approximate capacity see "PRODUCT SPECIFICATIONS" section of the transaxle. Replace belts if they will drain more frequently to avoid possible engine damage from tapered slots in the locked position as shown. • Remove the drain...tabs from running low on dipstick. Do not overfill. Tighten cap onto the tube securely when finished. 18 MAINTENANCE V-BELTS Check V-belts for deterioration and wear after 100 hours of operation or at least once a year if the tractor is tightened securely for accurate reading....
Operation Manual
Page 19
...;lter becomes clogged, obstructing fuel flow to remove dirt and stubborn dried gum fibers. Debris can restrict clutch/brake pedal shaft movement, causing belt slip and loss of dirt and chaff to overheating. See Fig. 23.
...;lter becomes clogged, obstructing fuel flow to remove dirt and stubborn dried gum fibers. Debris can restrict clutch/brake pedal shaft movement, causing belt slip and loss of dirt and chaff to overheating. See Fig. 23.
Operation Manual
Page 20
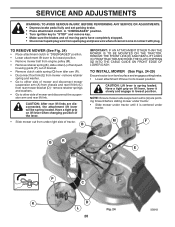
... is spring loaded. Have a tight grip on level surface and engage parking brake. • Lower attachment lift lever to its lowest position. • Remove mower belt from engine pulley (M). • Remove retainer spring (K), slide collar (L) off and push housing guide (P) out of the lever. • Slide mower out from rear mower...
... is spring loaded. Have a tight grip on level surface and engage parking brake. • Lower attachment lift lever to its lowest position. • Remove mower belt from engine pulley (M). • Remove retainer spring (K), slide collar (L) off and push housing guide (P) out of the lever. • Slide mower out from rear mower...
Operation Manual
Page 21
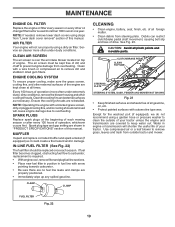
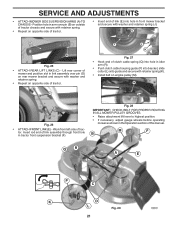
...(R). • Push clutch cable housing guide (P) into bracket, slide collar (L) onto guide and secure with retainer spring (K). • Install belt on opposite side of link (E) into hole in link assembly over pin (B) on outside of tractor chassis and secure with retainer spring. ... • ATTACH MOWER SIDE SUSPENSION ARMS (A) TO CHASSIS - M F B Q R A E P K C D L 21 Fig. 29 Fig. 28 IMPORTANT: CHECK BELT FOR PROPER ROUTING IN ALL MOWER PULLEY GROOVES. • Raise attachment lift lever to highest position. • If necessary, adjust gauge wheels before operating mower...
...(R). • Push clutch cable housing guide (P) into bracket, slide collar (L) onto guide and secure with retainer spring (K). • Install belt on opposite side of link (E) into hole in link assembly over pin (B) on outside of tractor chassis and secure with retainer spring. ... • ATTACH MOWER SIDE SUSPENSION ARMS (A) TO CHASSIS - M F B Q R A E P K C D L 21 Fig. 29 Fig. 28 IMPORTANT: CHECK BELT FOR PROPER ROUTING IN ALL MOWER PULLEY GROOVES. • Raise attachment lift lever to highest position. • If necessary, adjust gauge wheels before operating mower...
Operation Manual
Page 23
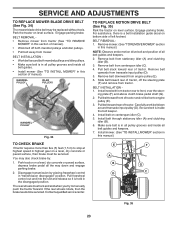
... the steering plate (F) and remove from transaxle input pulley (D). 5. The rear wheels must be serviced. BELT REMOVAL 1. Remove belt from mower. Remove belt upwards from tractor. Be sure belt is held in the disengaged position. Install belt through stationary idler (A) and clutching idler (B). 6. Install mower. (See "TO INSTALL MOWER" section in this manual.) E F A B D G C Fig. 35...
... the steering plate (F) and remove from transaxle input pulley (D). 5. The rear wheels must be serviced. BELT REMOVAL 1. Remove belt from mower. Remove belt upwards from tractor. Be sure belt is held in the disengaged position. Install belt through stationary idler (A) and clutching idler (B). 6. Install mower. (See "TO INSTALL MOWER" section in this manual.) E F A B D G C Fig. 35...
Operation Manual
Page 26
... connected. Store in a clean, dry area. • Clean entire tractor. (See "CLEANING" in the Maintenance section of this manual.) • Inspect and replace belts, if necessary. (See belt replacement instructions in the Service and Adjustments section of this manual.) • After cleaning, leave cables disconnected and place cables where they cannot come...
... connected. Store in a clean, dry area. • Clean entire tractor. (See "CLEANING" in the Maintenance section of this manual.) • Inspect and replace belts, if necessary. (See belt replacement instructions in the Service and Adjustments section of this manual.) • After cleaning, leave cables disconnected and place cables where they cannot come...
Operation Manual
Page 28
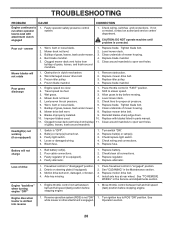
... ignition key to slower speed. 3. Check wiring, switches and connections. Tighten blade bolt. 2. Replace blade mandrel. 5. Replace mower drive belt. 3. Place throttle control in clutch mechanism. 2. Check tires for proper air pressure. 6. Headlight(s) not working (if so equipped) ...See "CLEANING" in "disengaged" position. 2. Clogged mower deck vent holes from buildup 11. Replace blade. Mower drive belt worn. 8. Replace mower drive belt. 9. Bad battery cell(s). 2. Axle key missing. 1. See while mower or other attachment is corrected. Travel speed too...
... ignition key to slower speed. 3. Check wiring, switches and connections. Tighten blade bolt. 2. Replace blade mandrel. 5. Replace mower drive belt. 3. Place throttle control in clutch mechanism. 2. Check tires for proper air pressure. 6. Headlight(s) not working (if so equipped) ...See "CLEANING" in "disengaged" position. 2. Clogged mower deck vent holes from buildup 11. Replace blade. Mower drive belt worn. 8. Replace mower drive belt. 9. Bad battery cell(s). 2. Axle key missing. 1. See while mower or other attachment is corrected. Travel speed too...


