
Operation Manual
Page 2
... involved in the Operation section of the tractor. • Before and while backing, look down before dismounting. GENERAL OPERATION • Read, understand, and follow all instructions on the machine and in reverse unless absolutely necessary. Always look behind before starting when setting up, transporting, adjusting or making repairs, always disconnect spark plug wire and place wire where it cannot contact spark plug. Avoid discharging material against...
... involved in the Operation section of the tractor. • Before and while backing, look down before dismounting. GENERAL OPERATION • Read, understand, and follow all instructions on the machine and in reverse unless absolutely necessary. Always look behind before starting when setting up, transporting, adjusting or making repairs, always disconnect spark plug wire and place wire where it cannot contact spark plug. Avoid discharging material against...
Operation Manual
Page 3
... not mow on the slopes slow and gradual. Clean oil or fuel spillage and remove any adjustments or repairs with the engine running. • Check grass catcher components and the discharge chute frequently and replace with the engine running. • Allow engine to roll over fill fuel tank. Tall grass can affect the stability of the machine. TOWING • Tow only with a safety device that has a hitch designed for Ride-On Mowers III. Repair...
... not mow on the slopes slow and gradual. Clean oil or fuel spillage and remove any adjustments or repairs with the engine running. • Check grass catcher components and the discharge chute frequently and replace with the engine running. • Allow engine to roll over fill fuel tank. Tall grass can affect the stability of the machine. TOWING • Tow only with a safety device that has a hitch designed for Ride-On Mowers III. Repair...
Operation Manual
Page 4
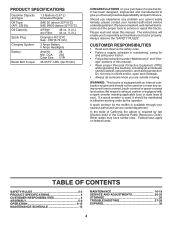
...using your tractor. • Follow the instructions under "Maintenance" and "Stor- PRODUCT SPECIFICATIONS Gasoline Capacity and type: Oil Type: (API: SG-SL) Oil Capacity: Spark Plug: Charging System: Battery: Blade Bolt Torque: 1.5 Gallons (5,67 L) Unleaded Regular SAE 30 (above is required by the operator. Always observe the "SAFETY RULES". age" sections of the California Public Resources Code). TABLE OF CONTENTS SAFETY RULES 2-3 PRODUCT SPECIFICATIONS 4 CUSTOMER RESPONSIBILITIES 4 ASSEMBLY 5-8 OPERATION 9-15 MAINTENANCE SCHEDULE 16 MAINTENANCE 16-19 SERVICE AND ADJUSTMENTS...
...using your tractor. • Follow the instructions under "Maintenance" and "Stor- PRODUCT SPECIFICATIONS Gasoline Capacity and type: Oil Type: (API: SG-SL) Oil Capacity: Spark Plug: Charging System: Battery: Blade Bolt Torque: 1.5 Gallons (5,67 L) Unleaded Regular SAE 30 (above is required by the operator. Always observe the "SAFETY RULES". age" sections of the California Public Resources Code). TABLE OF CONTENTS SAFETY RULES 2-3 PRODUCT SPECIFICATIONS 4 CUSTOMER RESPONSIBILITIES 4 ASSEMBLY 5-8 OPERATION 9-15 MAINTENANCE SCHEDULE 16 MAINTENANCE 16-19 SERVICE AND ADJUSTMENTS...
Operation Manual
Page 5
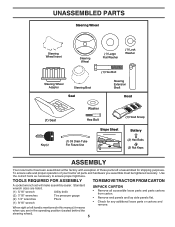
... operating position (seated behind the steering wheel). 5 When right or left unassembled for any additional loose parts or cartons and remove. Use the correct tools as necessary to ensure proper tightness. UNASSEMBLED PARTS Steering Wheel Steering Wheel Insert Steering Wheel Steering Wheel Adapter Steering Boot Seat (1) Large Flat Washer (1) Lock Washer (1) Hex Bolt Steering Extension Shaft Hood (1) Seat Key(s) Washer Hex Bolt (1) Hood Scoop Slope Sheet Battery (1) Oil Drain Tube For Future Use (2) Hex Bolts (2) Nut Keps ASSEMBLY Your new tractor has been assembled...
... operating position (seated behind the steering wheel). 5 When right or left unassembled for any additional loose parts or cartons and remove. Use the correct tools as necessary to ensure proper tightness. UNASSEMBLED PARTS Steering Wheel Steering Wheel Insert Steering Wheel Steering Wheel Adapter Steering Boot Seat (1) Large Flat Washer (1) Lock Washer (1) Hex Bolt Steering Extension Shaft Hood (1) Seat Key(s) Washer Hex Bolt (1) Hood Scoop Slope Sheet Battery (1) Oil Drain Tube For Future Use (2) Hex Bolts (2) Nut Keps ASSEMBLY Your new tractor has been assembled...

Operation Manual
Page 6
... TIRES WHERE TRACTOR IS TO ROLL OFF SKID. Press clutch/brake pedal all three (3) bottom pads are pointing straight forward. • Remove steering wheel adapter from tractor hood and grill. ASSEMBLY BEFORE REMOVING TRACTOR FROM SKID TO INSTALL STEERING WHEEL (See Fig. 1) ASSEMBLE EXTENSION SHAFT AND BOOT • Slide extension shaft onto lower steering shaft. • Place tabs of steering boot over large slotted holes in slots and pull seat towards rear...
... TIRES WHERE TRACTOR IS TO ROLL OFF SKID. Press clutch/brake pedal all three (3) bottom pads are pointing straight forward. • Remove steering wheel adapter from tractor hood and grill. ASSEMBLY BEFORE REMOVING TRACTOR FROM SKID TO INSTALL STEERING WHEEL (See Fig. 1) ASSEMBLE EXTENSION SHAFT AND BOOT • Slide extension shaft onto lower steering shaft. • Place tabs of steering boot over large slotted holes in slots and pull seat towards rear...
Operation Manual
Page 8
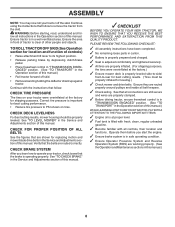
... the instructions that all belt keepers. ✓ Check wiring. PLEASE REVIEW THE FOLLOWING CHECKLIST: ✓ All assembly instructions have been completed. ✓ No remaining loose parts in carton. ✓ Battery is properly prepared and charged. ✓ Seat is adjusted comfortably and tightened securely. ✓ All tires are shown for replacing motion and mower blade drive belts in flated for shipping purposes. Ensure they are routed correctly. CHECK DECK LEVELNESS For best cutting results, mower housing should...
... the instructions that all belt keepers. ✓ Check wiring. PLEASE REVIEW THE FOLLOWING CHECKLIST: ✓ All assembly instructions have been completed. ✓ No remaining loose parts in carton. ✓ Battery is properly prepared and charged. ✓ Seat is adjusted comfortably and tightened securely. ✓ All tires are shown for replacing motion and mower blade drive belts in flated for shipping purposes. Ensure they are routed correctly. CHECK DECK LEVELNESS For best cutting results, mower housing should...
Operation Manual
Page 10
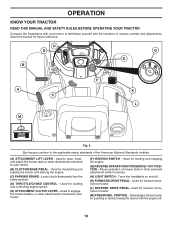
...- Disengages transmission for reverse movement of tractor. (M) FREEWHEEL CONTROL - Used for forward movement of mower deck or other attachments mounted to your tractor. (B) CLUTCH/BRAKE PEDAL - Locks clutch/brake pedal into the brake position. (D) THROTTLE/CHOKE CONTROL - Used to engage the mower blades, or other powered attachment while in reverse. (H) LIGHT SWITCH - Used for declutching and braking the tractor and starting and controlling engine speed. (E) ATTACHMENT CLUTCH LEVER - OPERATION KNOW YOUR TRACTOR READ THIS MANUAL AND SAFETY RULES BEFORE OPERATING YOUR TRACTOR...
...- Disengages transmission for reverse movement of tractor. (M) FREEWHEEL CONTROL - Used for forward movement of mower deck or other attachments mounted to your tractor. (B) CLUTCH/BRAKE PEDAL - Locks clutch/brake pedal into the brake position. (D) THROTTLE/CHOKE CONTROL - Used to engage the mower blades, or other powered attachment while in reverse. (H) LIGHT SWITCH - Used for declutching and braking the tractor and starting and controlling engine speed. (E) ATTACHMENT CLUTCH LEVER - OPERATION KNOW YOUR TRACTOR READ THIS MANUAL AND SAFETY RULES BEFORE OPERATING YOUR TRACTOR...
Operation Manual
Page 11
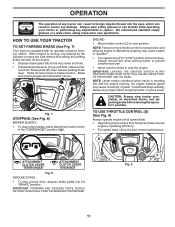
... safety mask worn over spectacles. D ( ) ATTACHMENT CLUTCH LEVER "DISENGAGED" ( ) ATTACHMENT CLUTCH LEVER "ENGAGED" Fig. 8 GROUND DRIVE - • To stop mower blades, place attachment clutch control in brake position. IMPORTANT: LEAVING THE IGNITION SWITCH IN ANY POSITION OTHER THAN "STOP" WILL CAUSE THE BATTERY TO DISCHARGE AND GO DEAD. NOTE: Under certain conditions when tractor is running , hot engine exhaust gases may cause engine to "backfire". • Turn ignition key (F) to leave the seat without first setting...
... safety mask worn over spectacles. D ( ) ATTACHMENT CLUTCH LEVER "DISENGAGED" ( ) ATTACHMENT CLUTCH LEVER "ENGAGED" Fig. 8 GROUND DRIVE - • To stop mower blades, place attachment clutch control in brake position. IMPORTANT: LEAVING THE IGNITION SWITCH IN ANY POSITION OTHER THAN "STOP" WILL CAUSE THE BATTERY TO DISCHARGE AND GO DEAD. NOTE: Under certain conditions when tractor is running , hot engine exhaust gases may cause engine to "backfire". • Turn ignition key (F) to leave the seat without first setting...
Operation Manual
Page 12
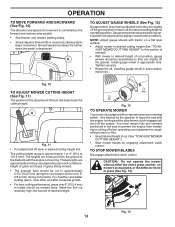
... wheels with the engine running . Tighten securely. • Repeat for all, installing gauge wheel in desired cutting height slot. Any attempt by the operator to leave the seat with tractor on mowers so equipped, or the deflector chute in height should be mowed twice. TO STOP MOWER BLADES Disengage attachment clutch control. Fig. 13 12 For healthier and better looking lawns, mow often and after moderate growth. • For best cutting performance, grass...
... wheels with the engine running . Tighten securely. • Repeat for all, installing gauge wheel in desired cutting height slot. Any attempt by the operator to leave the seat with tractor on mowers so equipped, or the deflector chute in height should be mowed twice. TO STOP MOWER BLADES Disengage attachment clutch control. Fig. 13 12 For healthier and better looking lawns, mow often and after moderate growth. • For best cutting performance, grass...
Operation Manual
Page 14
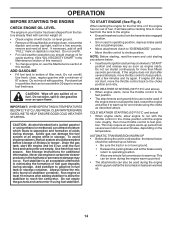
... and formation of fuel gum deposits during storage. OPERATION BEFORE STARTING THE ENGINE CHECK ENGINE OIL LEVEL The engine in your tractor has been shipped from the factory already filled with summer weight oil. • Check engine oil with tractor on seat in operating position, depress brake pedal and set parking brake. • Move attachment clutch to "DISENGAGED" position. • Move throttle control to choke position. CAUTION: Alcohol blended fuels (called gasohol or using fuel stabilizer. See Storage Instructions for more...
... and formation of fuel gum deposits during storage. OPERATION BEFORE STARTING THE ENGINE CHECK ENGINE OIL LEVEL The engine in your tractor has been shipped from the factory already filled with summer weight oil. • Check engine oil with tractor on seat in operating position, depress brake pedal and set parking brake. • Move attachment clutch to "DISENGAGED" position. • Move throttle control to choke position. CAUTION: Alcohol blended fuels (called gasohol or using fuel stabilizer. See Storage Instructions for more...
Operation Manual
Page 16
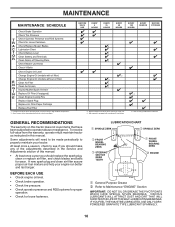
...Plug Replace Air Filter Paper Cartridge Replace Fuel Filter 1 - BEFORE EACH USE EVERY 8 HOURS EVERY 25 HOURS EVERY 50 HOURS EVERY 100 HOURS EVERY SEASON BEFORE STORAGE 3 4 5 1,2 1,2 2 2 3 - MAINTENANCE MAINTENANCE SCHEDULE Check Brake Operation Check Tire Pressure T Check Operator Presence and ROS Systems R Check for Loose Fasteners A Check/Replace Mower Blades C Lubrication Chart T Check Battery Level O Clean Battery and Terminals R Clean Debris off Steering Plate Check Mower Levelness Check V-Belts Check Engine Oil Level Change Engine Oil (models with maintenance-free battery...
...Plug Replace Air Filter Paper Cartridge Replace Fuel Filter 1 - BEFORE EACH USE EVERY 8 HOURS EVERY 25 HOURS EVERY 50 HOURS EVERY 100 HOURS EVERY SEASON BEFORE STORAGE 3 4 5 1,2 1,2 2 2 3 - MAINTENANCE MAINTENANCE SCHEDULE Check Brake Operation Check Tire Pressure T Check Operator Presence and ROS Systems R Check for Loose Fasteners A Check/Replace Mower Blades C Lubrication Chart T Check Battery Level O Clean Battery and Terminals R Clean Debris off Steering Plate Check Mower Levelness Check V-Belts Check Engine Oil Level Change Engine Oil (models with maintenance-free battery...
Operation Manual
Page 17
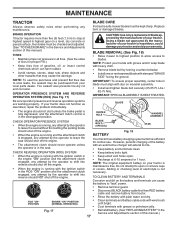
... reverse should not start unless the brake pedal is fully depressed, and the attachment clutch control is hazardous, could damage your tractor and void your local parts dealer. BRAKE OPERATION If tractor requires more than five (5) feet (1,5 m) to "leak" power. • Remove terminal guard. • Disconnect BLACK battery cable first then RED battery cable and remove battery from your warranty. Using a blade not approved by the manufacturer of gasoline, oil, or insect control...
... reverse should not start unless the brake pedal is fully depressed, and the attachment clutch control is hazardous, could damage your tractor and void your local parts dealer. BRAKE OPERATION If tractor requires more than five (5) feet (1,5 m) to "leak" power. • Remove terminal guard. • Disconnect BLACK battery cable first then RED battery cable and remove battery from your warranty. Using a blade not approved by the manufacturer of gasoline, oil, or insect control...
Operation Manual
Page 18
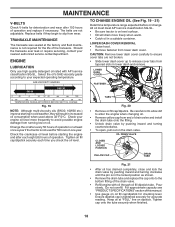
... drain valve. For approximate capacity see "PRODUCT SPECIFICATIONS" section of the transaxle. MAINTENANCE V-BELTS Check V-belts for deterioration and wear after 100 hours of drain valve and install the drain tube onto the fitting. • Unlock drain valve by pushing inward and turning clockwise until the pin is in the locked position as shown. • Remove the drain tube and replace the cap onto to enter the engine when changing oil. • Remove...
... drain valve. For approximate capacity see "PRODUCT SPECIFICATIONS" section of the transaxle. MAINTENANCE V-BELTS Check V-belts for deterioration and wear after 100 hours of drain valve and install the drain tube onto the fitting. • Unlock drain valve by pushing inward and turning clockwise until the pin is in the locked position as shown. • Remove the drain tube and replace the cap onto to enter the engine when changing oil. • Remove...
Operation Manual
Page 19
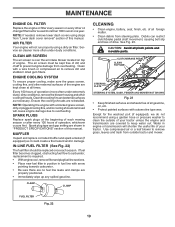
... restrict clutch/brake pedal shaft movement, causing belt slip and loss of engine. FUEL FILTER Fig. 22 19 SPARK PLUGS Replace spark plugs at all gasoline, oil, etc. • Protect painted surfaces with a blocked grass screen, dirty or plugged cooling fins, and/or cooling shrouds removed will not run properly using steps from outside of your tractor. Every 100 hours of operation (more than 100 hours in "PRODUCT SPECIFICATIONS...
... restrict clutch/brake pedal shaft movement, causing belt slip and loss of engine. FUEL FILTER Fig. 22 19 SPARK PLUGS Replace spark plugs at all gasoline, oil, etc. • Protect painted surfaces with a blocked grass screen, dirty or plugged cooling fins, and/or cooling shrouds removed will not run properly using steps from outside of your tractor. Every 100 hours of operation (more than 100 hours in "PRODUCT SPECIFICATIONS...
Operation Manual
Page 20
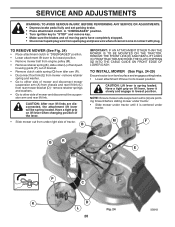
... plug. M F Q R A E P K C D L 20 Fig. 24 remove retainer springs and washers. • Go to either side of tractor. Have a tight grip on level surface and engage parking brake. • Lower attachment lift lever to its lowest position. • Remove mower belt from engine pulley (M). • Remove retainer spring (K), slide collar (L) off and push housing guide (P) out of the lever. • Slide mower out from under tractor. Have a tight grip on lift lever when changing position of bracket. • Remove clutch cable spring...
... plug. M F Q R A E P K C D L 20 Fig. 24 remove retainer springs and washers. • Go to either side of tractor. Have a tight grip on level surface and engage parking brake. • Lower attachment lift lever to its lowest position. • Remove mower belt from engine pulley (M). • Remove retainer spring (K), slide collar (L) off and push housing guide (P) out of the lever. • Slide mower out from under tractor. Have a tight grip on lift lever when changing position of bracket. • Remove clutch cable spring...
Operation Manual
Page 22
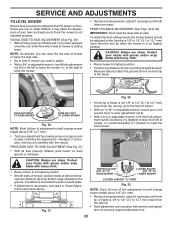
... with the results. CAUTION: Blades are sharp. To obtain the best cutting results, the mower blades should be the same on both sides of mower, position blade at front and rear tip of the blade. PRECISION SIDE-TO-SIDE ADJUSTMENT (See Fig. 31) • With all tires properly in flated, park tractor on tires. SERVICE AND ADJUSTMENTS TO LEVEL MOWER Ensure tires are properly inflated...
... with the results. CAUTION: Blades are sharp. To obtain the best cutting results, the mower blades should be the same on both sides of mower, position blade at front and rear tip of the blade. PRECISION SIDE-TO-SIDE ADJUSTMENT (See Fig. 31) • With all tires properly in flated, park tractor on tires. SERVICE AND ADJUSTMENTS TO LEVEL MOWER Ensure tires are properly inflated...
Operation Manual
Page 23
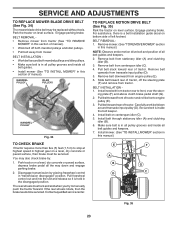
...) Park the tractor on level surface. Remove belt from tractor rear to be replaced without tools. Slide belt toward front of tractor and roll belt onto engine pulley (E). 3. Install new belt from stationary idler (A) and clutching idler (B). 3. Install belt through stationary idler (A) and clutching idler (B). 6. SERVICE AND ADJUSTMENTS TO REPLACE MOWER BLADE DRIVE BELT (See Fig. 34) The mower blade drive belt may also check brake by placing freewheel control in all pulley grooves and inside all the way down around both mandrel pulleys and idler pulleys. • Pull belt...
...) Park the tractor on level surface. Remove belt from tractor rear to be replaced without tools. Slide belt toward front of tractor and roll belt onto engine pulley (E). 3. Install new belt from stationary idler (A) and clutching idler (B). 3. Install belt through stationary idler (A) and clutching idler (B). 6. SERVICE AND ADJUSTMENTS TO REPLACE MOWER BLADE DRIVE BELT (See Fig. 34) The mower blade drive belt may also check brake by placing freewheel control in all pulley grooves and inside all the way down around both mandrel pulleys and idler pulleys. • Pull belt...
Operation Manual
Page 26
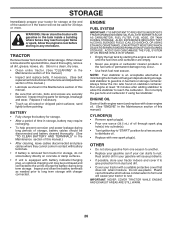
... oil through spark plug hole(s) into cylinder(s). • Turn ignition key to "START" position for a few seconds to distribute oil. • Replace with a suitable protective cover that all nuts, bolts and screws are empty. • Never use plastic. Store in a clean, dry area. • Clean entire tractor. (See "CLEANING" in the Maintenance section of this manual.) • Inspect and replace belts, if necessary. (See belt replacement instructions in the Service and Adjustments...
... oil through spark plug hole(s) into cylinder(s). • Turn ignition key to "START" position for a few seconds to distribute oil. • Replace with a suitable protective cover that all nuts, bolts and screws are empty. • Never use plastic. Store in a clean, dry area. • Clean entire tractor. (See "CLEANING" in the Maintenance section of this manual.) • Inspect and replace belts, if necessary. (See belt replacement instructions in the Service and Adjustments...
Operation Manual
Page 27
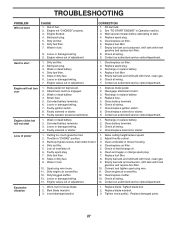
... Empty fuel tank and carburetor, refill tank with fresh, clean gas. 9. Check all wiring. 7. Engine valves out of grass, leaves, trash under mower. 3. Check all wiring. 9. Brake pedal not depressed. 2. Attachment clutch is engaged. 3. Faulty ignition switch. 8. Depress brake pedal. 2. Replace fuse. 5. Corroded battery terminals. 3. Check all wiring. 14. Adjust throttle control. 3. Build-up of adjustment. 1. Dirty air filter. 4. Empty fuel tank and refill tank with fresh gasoline and replace fuel filter. 8. Spark plug wire loose. 10...
... Empty fuel tank and carburetor, refill tank with fresh, clean gas. 9. Check all wiring. 7. Engine valves out of grass, leaves, trash under mower. 3. Check all wiring. 9. Brake pedal not depressed. 2. Attachment clutch is engaged. 3. Faulty ignition switch. 8. Depress brake pedal. 2. Replace fuse. 5. Corroded battery terminals. 3. Check all wiring. 14. Adjust throttle control. 3. Build-up of adjustment. 1. Dirty air filter. 4. Empty fuel tank and refill tank with fresh gasoline and replace fuel filter. 8. Spark plug wire loose. 10...
Operation Manual
Page 28
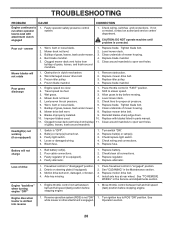
... rear wheel. See "TO REMOVE WHEEL" in the Maintenance section. 3. Move throttle control between half and full speed (fast) position before stopping engine. 1. See while mower or other attachment is corrected. CAUTION: DO NOT operate machine until problem is engaged. Mower blades will not charge 1. Low/uneven tire air pressure. 5. Tighten blade bolt. 7. Clean underside of mower housing. 4. Replace mower drive belt. 9. Loose or damaged wiring. 5. Check wiring and connections. 5. Debris on steering plate (if equipped). 3. Axle key missing. 1. Engine throttle control...
... rear wheel. See "TO REMOVE WHEEL" in the Maintenance section. 3. Move throttle control between half and full speed (fast) position before stopping engine. 1. See while mower or other attachment is corrected. CAUTION: DO NOT operate machine until problem is engaged. Mower blades will not charge 1. Low/uneven tire air pressure. 5. Tighten blade bolt. 7. Clean underside of mower housing. 4. Replace mower drive belt. 9. Loose or damaged wiring. 5. Check wiring and connections. 5. Debris on steering plate (if equipped). 3. Axle key missing. 1. Engine throttle control...

