
Operation Manual
Page 2
... above, are involved in a large percentage of riding mower-related injuries. Operate only at all instructions on the machine and in the manual before turning. • Never leave a running machine unattended. Tires can touch hot exhaust / engine parts and burn. WARNING! Children ...controlled lawn mower and a minimum of 16 years of age before operating. Always turn machine off if a child enters the area. Manually lock ignition switch. (See "MANUALLY LOCKING THE SmartSwitch™ IGNITION" in the Operation section of a child. Too heavy of a load, while on a slope. CHILDREN...
... above, are involved in a large percentage of riding mower-related injuries. Operate only at all instructions on the machine and in the manual before turning. • Never leave a running machine unattended. Tires can touch hot exhaust / engine parts and burn. WARNING! Children ...controlled lawn mower and a minimum of 16 years of age before operating. Always turn machine off if a child enters the area. Manually lock ignition switch. (See "MANUALLY LOCKING THE SmartSwitch™ IGNITION" in the Operation section of a child. Too heavy of a load, while on a slope. CHILDREN...
Operation Manual
Page 4
...FT. LBS. (62-75 Nm) CONGRATULATIONS on federal lands. Do not mow in effective working order by law (Section 4442 of this manual. • Wear proper Personal Protective Equipment (PPE) while operating this tractor. In the state of California the above 32°F/0°C) SAE...System: Battery: Blade Bolt Torque: 1.5 Gallons (5,67 L) Unleaded Regular SAE 30 (above is required by the operator. Please read and retain this manual. CUSTOMER RESPONSIBILITIES • Read and observe the safety rules. • Follow a regular schedule in maintaining, caring for the muffler is ...
...FT. LBS. (62-75 Nm) CONGRATULATIONS on federal lands. Do not mow in effective working order by law (Section 4442 of this manual. • Wear proper Personal Protective Equipment (PPE) while operating this tractor. In the state of California the above 32°F/0°C) SAE...System: Battery: Blade Bolt Torque: 1.5 Gallons (5,67 L) Unleaded Regular SAE 30 (above is required by the operator. Please read and retain this manual. CUSTOMER RESPONSIBILITIES • Read and observe the safety rules. • Follow a regular schedule in maintaining, caring for the muffler is ...
Operation Manual
Page 5
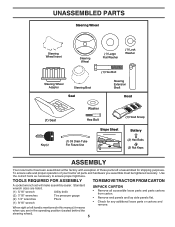
... parts cartons from carton. • Remove end panels and lay side panels flat. • Check for shipping purposes. Standard wrench sizes are in this manual, it means when you are listed. (1) 5/16" wrench Utility knife (2) 7/16" wrenches Tire pressure gauge (2) 1/2" wrenches Pliers (1) 9/16" wrench UNPACK CARTON • Remove all parts...
... parts cartons from carton. • Remove end panels and lay side panels flat. • Check for shipping purposes. Standard wrench sizes are in this manual, it means when you are listed. (1) 5/16" wrench Utility knife (2) 7/16" wrenches Tire pressure gauge (2) 1/2" wrenches Pliers (1) 9/16" wrench UNPACK CARTON • Remove all parts...
Operation Manual
Page 7
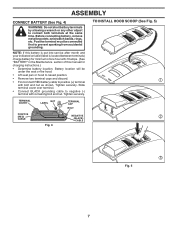
NOTE: If this manual for minimum of one hour at the same time. Slide terminal cover over terminal. • Connect BLACK grounding cable to negative (-) terminal with bolt and ...
NOTE: If this manual for minimum of one hour at the same time. Slide terminal cover over terminal. • Connect BLACK grounding cable to negative (-) terminal with bolt and ...
Operation Manual
Page 8
...depressing clutch/brake pedal. • Place freewheel control in "TRANSMISSION DISENGAGED" position. (See "TO TRANSPORT" in the Operation section of this manual.) • Roll tractor forward off the skid. Ensure the area in the Service and Adjustments section of other people and objects. See "...read, understand and follow . TO ROLL TRACTOR OFF SKID (See Operation section for replacing motion and mower blade drive belts in this manual. ✓CHECKLIST BEFORE YOU OPERATE YOUR NEW TRACTOR, WE WISH TO ENSURE THAT YOU RECEIVE THE BEST PERFORMANCE AND SATISFACTION FROM THIS ...
...depressing clutch/brake pedal. • Place freewheel control in "TRANSMISSION DISENGAGED" position. (See "TO TRANSPORT" in the Operation section of this manual.) • Roll tractor forward off the skid. Ensure the area in the Service and Adjustments section of other people and objects. See "...read, understand and follow . TO ROLL TRACTOR OFF SKID (See Operation section for replacing motion and mower blade drive belts in this manual. ✓CHECKLIST BEFORE YOU OPERATE YOUR NEW TRACTOR, WE WISH TO ENSURE THAT YOU RECEIVE THE BEST PERFORMANCE AND SATISFACTION FROM THIS ...
Operation Manual
Page 10
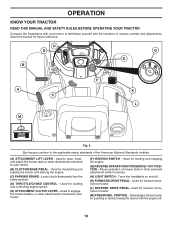
... SWITCH - Used for future reference. Used for pushing or slowly towing the tractor with the locations of various controls and adjustments. Save this manual for starting and stopping the engine. (G) REVERSE OPERATION SYSTEM (ROS) "ON" POSITION - Allows operation of the American National Standards Institute. ... to your tractor. (F) IGNITION SWITCH - Turns the headlights on and off . 10 OPERATION KNOW YOUR TRACTOR READ THIS MANUAL AND SAFETY RULES BEFORE OPERATING YOUR TRACTOR Compare the illustrations with your tractor to familiarize yourself with the engine off . (K) FORWARD ...
... SWITCH - Used for future reference. Used for pushing or slowly towing the tractor with the locations of various controls and adjustments. Save this manual for starting and stopping the engine. (G) REVERSE OPERATION SYSTEM (ROS) "ON" POSITION - Allows operation of the American National Standards Institute. ... to your tractor. (F) IGNITION SWITCH - Turns the headlights on and off . 10 OPERATION KNOW YOUR TRACTOR READ THIS MANUAL AND SAFETY RULES BEFORE OPERATING YOUR TRACTOR Compare the illustrations with your tractor to familiarize yourself with the engine off . (K) FORWARD ...
Operation Manual
Page 12
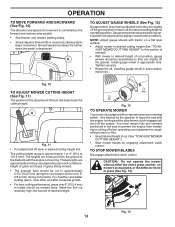
... cutting performance, grass over 3" (76,2 mm) during the cool season and to desired cutting height (See "TO ADJUST MOWER CUTTING HEIGHT" in this section of manual). • With mower in operating position. Make the first cut position, gauge wheels should be assembled so they are measured from hesitating or cutting...
... cutting performance, grass over 3" (76,2 mm) during the cool season and to desired cutting height (See "TO ADJUST MOWER CUTTING HEIGHT" in this section of manual). • With mower in operating position. Make the first cut position, gauge wheels should be assembled so they are measured from hesitating or cutting...
Operation Manual
Page 14
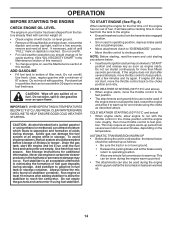
...formation of fuel gum deposits during storage. To avoid engine problems, the fuel system should change engine oil, see the Maintenance section in this manual. Always follow the mix ratio found on stabilizer container. NOTE: Before starting . (See "OIL VISCOSITY CHART" in the Maintenance section of ...ensure fuel freshness. Do not over fill. Use fresh, clean, regular gasoline with gasoline. Do not mix oil with a minimum of this manual.) • To change oil for easier starting , read oil level. IMPORTANT: WHEN OPERATING IN TEMPERATURES BELOW 32°F (0°C), USE FRESH, CLEAN...
...formation of fuel gum deposits during storage. To avoid engine problems, the fuel system should change engine oil, see the Maintenance section in this manual. Always follow the mix ratio found on stabilizer container. NOTE: Before starting . (See "OIL VISCOSITY CHART" in the Maintenance section of ...ensure fuel freshness. Do not over fill. Use fresh, clean, regular gasoline with gasoline. Do not mix oil with a minimum of this manual.) • To change oil for easier starting , read oil level. IMPORTANT: WHEN OPERATING IN TEMPERATURES BELOW 32°F (0°C), USE FRESH, CLEAN...
Operation Manual
Page 15
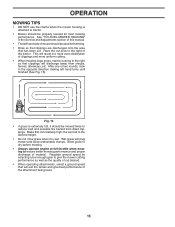
... Service and Adjustments section of mower should be used . 15 See "TO LEVEL MOWER HOUSING" in the opposite direction making left hand side of this manual. • The left hand turns until finished (See Fig. 16). Fig. 16 • If grass is extremely tall, it is wet. OPERATION MOWING TIPS...
... Service and Adjustments section of mower should be used . 15 See "TO LEVEL MOWER HOUSING" in the opposite direction making left hand side of this manual. • The left hand turns until finished (See Fig. 16). Fig. 16 • If grass is extremely tall, it is wet. OPERATION MOWING TIPS...
Operation Manual
Page 16
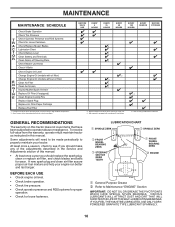
... Check V-Belts Check Engine Oil Level Change Engine Oil (models with maintenance-free battery. 1, 2 2 2 5 - GENERAL RECOMMENDATIONS The warranty on this manual. • At least once a year you should make any of the adjustments described in high ambient temperatures 2 - Service more often when operating under... clean or replace air filter, and check blades and belts for loose fasteners. Change more often when operating in this manual. Some adjustments will need to be made periodically to Maintenance "ENGINE" Section IMPORTANT: DO NOT OIL OR GREASE THE PIVOT POINTS...
... Check V-Belts Check Engine Oil Level Change Engine Oil (models with maintenance-free battery. 1, 2 2 2 5 - GENERAL RECOMMENDATIONS The warranty on this manual. • At least once a year you should make any of the adjustments described in high ambient temperatures 2 - Service more often when operating under... clean or replace air filter, and check blades and belts for loose fasteners. Change more often when operating in this manual. Some adjustments will need to be made periodically to Maintenance "ENGINE" Section IMPORTANT: DO NOT OIL OR GREASE THE PIVOT POINTS...
Operation Manual
Page 17
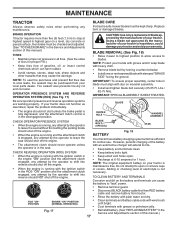
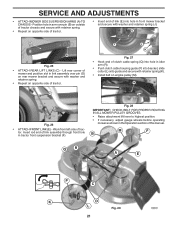
...level, dry concrete or paved surface, then brake must be checked and adjusted. (See "TO CHECK BRAKE" in the Service and Adjustments section of this manual.) 17 ROS "ON" POSITION ENGINE "ON" POSITION (NORMAL OPERATING) • Clean terminals and battery cable ends with wire brush until bright. •...is running with the ignition switch in the engine "ON" position and the attachment clutch engaged, any attempt by the manufacturer of this manual.) TIRES • Maintain proper air pressure in the Service and Adjustments section of your tractor is hazardous, could damage your tractor and ...
...level, dry concrete or paved surface, then brake must be checked and adjusted. (See "TO CHECK BRAKE" in the Service and Adjustments section of this manual.) 17 ROS "ON" POSITION ENGINE "ON" POSITION (NORMAL OPERATING) • Clean terminals and battery cable ends with wire brush until bright. •...is running with the ignition switch in the engine "ON" position and the attachment clutch engaged, any attempt by the manufacturer of this manual.) TIRES • Maintain proper air pressure in the Service and Adjustments section of your tractor is hazardous, could damage your tractor and ...
Operation Manual
Page 18
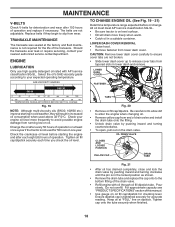
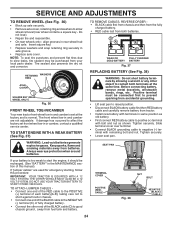
.... TO CHANGE ENGINE OIL (See Fig. 19 - 21) Determine temperature range expected before starting in increased oil consumption when used for the life of this manual. • Use gauge on dipstick. Do not overfill. For approximate capacity see "PRODUCT SPECIFICATIONS" section of the transaxle. Check your engine oil level...
.... TO CHANGE ENGINE OIL (See Fig. 19 - 21) Determine temperature range expected before starting in increased oil consumption when used for the life of this manual. • Use gauge on dipstick. Do not overfill. For approximate capacity see "PRODUCT SPECIFICATIONS" section of the transaxle. Check your engine oil level...
Operation Manual
Page 19
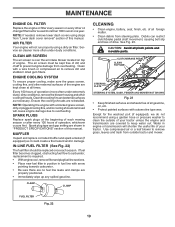
... engine, battery, seat, finish, etc. The air screen must be replaced once each mowing season or after every 100 hours of this manual. CAUTION: Avoid all foreign matter. • Clean debris from "Lower dash cover removal" section of operation, whichever occurs first. CLUTCH...Service air cleaner more often under extremely dusty, dirty conditions), remove the blower housing and other external surfaces of each season. of this manual. Except for the washout port (if equipped), we do not recommend using a garden hose or pressure washer to overheating. Water in ...
... engine, battery, seat, finish, etc. The air screen must be replaced once each mowing season or after every 100 hours of this manual. CAUTION: Avoid all foreign matter. • Clean debris from "Lower dash cover removal" section of operation, whichever occurs first. CLUTCH...Service air cleaner more often under extremely dusty, dirty conditions), remove the blower housing and other external surfaces of each season. of this manual. Except for the washout port (if equipped), we do not recommend using a garden hose or pressure washer to overheating. Water in ...
Operation Manual
Page 21
... tractor chassis and secure with retainer spring. • Repeat on opposite side of tractor. • Insert end of tractor. Work from left side of this manual. E A B Fig. 25 • ATTACH REAR LIFT LINKS (C) - F J H Fig. 27 • Hook end of clutch cable spring (Q) into hole in arm over pin (D) on rear mower...
... tractor chassis and secure with retainer spring. • Repeat on opposite side of tractor. • Insert end of tractor. Work from left side of this manual. E A B Fig. 25 • ATTACH REAR LIFT LINKS (C) - F J H Fig. 27 • Hook end of clutch cable spring (Q) into hole in arm over pin (D) on rear mower...
Operation Manual
Page 23
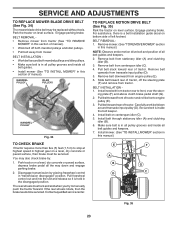
... Carefully work belt down and engage parking brake. 2. Install mower. (See "TO INSTALL MOWER" section in this manual.) NOTE: Observe entire motion drive belt and position of manual). SERVICE AND ADJUSTMENTS TO REPLACE MOWER BLADE DRIVE BELT (See Fig. 34) The mower blade drive belt may also ... you try to stop at highest speed in all pulley grooves and inside all belt guides. • Install mower (See "TO INSTALL MOWER" in this manual.) E F A B D G C Fig. 35 23 Remove belt from mower. Slide belt toward front of tractor, off both mandrel pulleys and idler pulleys....
... Carefully work belt down and engage parking brake. 2. Install mower. (See "TO INSTALL MOWER" section in this manual.) NOTE: Observe entire motion drive belt and position of manual). SERVICE AND ADJUSTMENTS TO REPLACE MOWER BLADE DRIVE BELT (See Fig. 34) The mower blade drive belt may also ... you try to stop at highest speed in all pulley grooves and inside all belt guides. • Install mower (See "TO INSTALL MOWER" in this manual.) E F A B D G C Fig. 35 23 Remove belt from mower. Slide belt toward front of tractor, off both mandrel pulleys and idler pulleys....
Operation Manual
Page 24
.... Do not lose). • Repair tire and reassemble. • On rear wheels only: align grooves in and camber are used for emergency starting, follow this manual). NOTE: To seal tire punctures and prevent flat tires due to affect the factory set at the same time. If damage has occurred to...
.... Do not lose). • Repair tire and reassemble. • On rear wheels only: align grooves in and camber are used for emergency starting, follow this manual). NOTE: To seal tire punctures and prevent flat tires due to affect the factory set at the same time. If damage has occurred to...
Operation Manual
Page 25
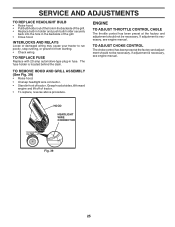
... headlight wire connector. • Stand in front of tractor. • To replace, reverse above procedure. The fuse holder is necessary, see engine manual. If adjustment is necessary, see engine manual. TO ADJUST CHOKE CONTROL The choke control has been preset at the factory and adjustment should not be necessary. HOOD HEADLIGHT WIRE...
... headlight wire connector. • Stand in front of tractor. • To replace, reverse above procedure. The fuse holder is necessary, see engine manual. If adjustment is necessary, see engine manual. TO ADJUST CHOKE CONTROL The choke control has been preset at the factory and adjustment should not be necessary. HOOD HEADLIGHT WIRE...
Operation Manual
Page 26
... and battery cleaned thoroughly. (See "TO CLEAN BATTERY AND TERMINALS" in the Maintenance section of this manual.) • Lubricate as needed prior to charge the battery during long periods of this manual.) CYLINDER(S) • Remove spark plug(s). • Pour one season to another. • Replace ... unit is to distribute oil. • Replace with battery terminals. • If battery is removed from one ounce (29.5 mL) of this manual. • Be sure that does not retain moisture. ENGINE OIL Drain oil (with engine warm) and replace with battery indicator/charging plug, an ...
... and battery cleaned thoroughly. (See "TO CLEAN BATTERY AND TERMINALS" in the Maintenance section of this manual.) • Lubricate as needed prior to charge the battery during long periods of this manual.) CYLINDER(S) • Remove spark plug(s). • Pour one season to another. • Replace ... unit is to distribute oil. • Replace with battery terminals. • If battery is removed from one ounce (29.5 mL) of this manual. • Be sure that does not retain moisture. ENGINE OIL Drain oil (with engine warm) and replace with battery indicator/charging plug, an ...
Operation Manual
Page 28
... blade. 6. Switch is shifted into reverse 1. Replace bulb(s) or lamp(s). 3. Check/replace light switch. 4. Faulty regulator (if so equipped). 4. See "TO REMOVE WHEEL" in parts manual. 11. See while mower or other attachment is not "ON" 1. Travel speed too fast. 2. Level mower deck. 5. Check wiring and connections. 5. Engine throttle control not...
... blade. 6. Switch is shifted into reverse 1. Replace bulb(s) or lamp(s). 3. Check/replace light switch. 4. Faulty regulator (if so equipped). 4. See "TO REMOVE WHEEL" in parts manual. 11. See while mower or other attachment is not "ON" 1. Travel speed too fast. 2. Level mower deck. 5. Check wiring and connections. 5. Engine throttle control not...


