
Parts List
Page 3
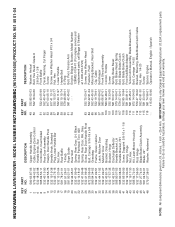
inches. 1 inch = 25.4 mm. Failure to do so could be hazardous, damage your lawn mower and void your warranty. MODEL NUMBER HU725AWD/BBC (96143010400) PRODUCT NO. 961 45 01-04 KEY ... Deflector Handle Bracket, LH Handle Bracket, RH Screw, Dogpoint 3/8-16 x 1-1/8 Spring, Hinge Nut, Hex Kit, Lawn Mower Housing Rod, Hinge Blade Brake/Clutch Assembly Blade, 22" Washer, Hardened KEY PART NO. NO. 49 532 85 02-63 50... English / Spanish 3 NOTE: All component dimensions given in U.S. IMPORTANT: Use only Original Equipment Manufacturer (O.E.M.) replacement parts. HUSQVARNA LAWN MOWER -
inches. 1 inch = 25.4 mm. Failure to do so could be hazardous, damage your lawn mower and void your warranty. MODEL NUMBER HU725AWD/BBC (96143010400) PRODUCT NO. 961 45 01-04 KEY ... Deflector Handle Bracket, LH Handle Bracket, RH Screw, Dogpoint 3/8-16 x 1-1/8 Spring, Hinge Nut, Hex Kit, Lawn Mower Housing Rod, Hinge Blade Brake/Clutch Assembly Blade, 22" Washer, Hardened KEY PART NO. NO. 49 532 85 02-63 50... English / Spanish 3 NOTE: All component dimensions given in U.S. IMPORTANT: Use only Original Equipment Manufacturer (O.E.M.) replacement parts. HUSQVARNA LAWN MOWER -
Parts List
Page 5
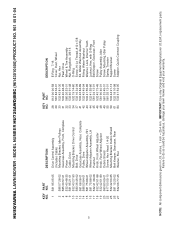
... Coupling 5 NOTE: All component dimensions given in U.S. IMPORTANT: Use only Original Equipment Manufacturer (O.E.M.) replacement parts. Failure to do so could be hazardous, damage your lawn mower and void your warranty. MODEL NUMBER HU725AWD/BBC (96143010400) PRODUCT NO. 961 45 01-04 KEY PART NO. NO. 1 581 95 05-05 2 586 07... Wheel Adjuster Knob, Rear Wheel Adjuster Debris Shield Screw, Hex Head 1/4-20 Mounting Bracket, Debris Shield Belt Keeper, Gearcase, Rear Washer, Flat KEY PART NO. HUSQVARNA LAWN MOWER -
... Coupling 5 NOTE: All component dimensions given in U.S. IMPORTANT: Use only Original Equipment Manufacturer (O.E.M.) replacement parts. Failure to do so could be hazardous, damage your lawn mower and void your warranty. MODEL NUMBER HU725AWD/BBC (96143010400) PRODUCT NO. 961 45 01-04 KEY PART NO. NO. 1 581 95 05-05 2 586 07... Wheel Adjuster Knob, Rear Wheel Adjuster Debris Shield Screw, Hex Head 1/4-20 Mounting Bracket, Debris Shield Belt Keeper, Gearcase, Rear Washer, Flat KEY PART NO. HUSQVARNA LAWN MOWER -

Operation Manual
Page 2
...the handle when the engine (motor) is running machine unattended. Stop blade when crossing gravel surfaces. • Do not operate the mower without proper guards, plates, grass catcher or other reproductive harm. Tragic accidents can occur if the operator is available through your nearest ...Always wear substantial footwear with an internal combustion engine and should be a minimum of 12 year of age before operating a pedestrian controlled lawn mower and a minimum of 16 years of age before cleaning the machine, removing the grass catcher, or unclogging the discharge chute. •...
...the handle when the engine (motor) is running machine unattended. Stop blade when crossing gravel surfaces. • Do not operate the mower without proper guards, plates, grass catcher or other reproductive harm. Tragic accidents can occur if the operator is available through your nearest ...Always wear substantial footwear with an internal combustion engine and should be a minimum of 12 year of age before operating a pedestrian controlled lawn mower and a minimum of 16 years of age before cleaning the machine, removing the grass catcher, or unclogging the discharge chute. •...
Operation Manual
Page 3
... the application, operation, maintenance or parts for the cause. Poor footing could lose your product: • Visit our website: www.husqvarna.com • Call Us Toll Free: 1-800-487-5951 TABLE OF CONTENTS SAFETY RULES 2-3 MAINTENANCE 12-15 PRODUCT SPECIFICATIONS 4 SERVICE...machine in handling gasoline. Vibration is in safe working condition. • Never tamper with manufacturer's recommended parts, when necessary. • Mower blades are subject to vibrate abnormally, stop the engine (motor) and check immediately for your footing or balance. • Do not mow...
... the application, operation, maintenance or parts for the cause. Poor footing could lose your product: • Visit our website: www.husqvarna.com • Call Us Toll Free: 1-800-487-5951 TABLE OF CONTENTS SAFETY RULES 2-3 MAINTENANCE 12-15 PRODUCT SPECIFICATIONS 4 SERVICE...machine in handling gasoline. Vibration is in safe working condition. • Never tamper with manufacturer's recommended parts, when necessary. • Mower blades are subject to vibrate abnormally, stop the engine (motor) and check immediately for your footing or balance. • Do not mow...
Operation Manual
Page 4
SERIAL NUMBER DATE OF PURCHASE THE MODEL AND SERIAL NUMBERS WILL BE FOUND ON A DECAL ATTACHED TO THE REAR OF THE LAWN MOWER HOUSING. PRODUCT SPECIFICATIONS Gasoline Capacity and Type: 1.6 Quarts (1.51 Liters) (Unleaded Regular Only) Oil Type (API SJ-SN): SAE 30 (... RECORD BOTH SERIAL NUMBER AND DATE OF PURCHASE AND KEEP IN A SAFE PLACE FOR FUTURE REFERENCE. Ithasbeendesigned,engineeredandmanufactured to service or repair this lawn mower. lbs. (47-54 Nm) CUSTOMER RESPONSIBILITIES • Read and observe the safety rules. • Follow a regular schedule in maintaining, caring...
SERIAL NUMBER DATE OF PURCHASE THE MODEL AND SERIAL NUMBERS WILL BE FOUND ON A DECAL ATTACHED TO THE REAR OF THE LAWN MOWER HOUSING. PRODUCT SPECIFICATIONS Gasoline Capacity and Type: 1.6 Quarts (1.51 Liters) (Unleaded Regular Only) Oil Type (API SJ-SN): SAE 30 (... RECORD BOTH SERIAL NUMBER AND DATE OF PURCHASE AND KEEP IN A SAFE PLACE FOR FUTURE REFERENCE. Ithasbeendesigned,engineeredandmanufactured to service or repair this lawn mower. lbs. (47-54 Nm) CUSTOMER RESPONSIBILITIES • Read and observe the safety rules. • Follow a regular schedule in maintaining, caring...

Operation Manual
Page 5
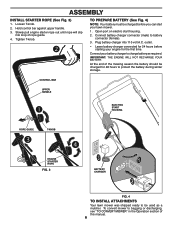
... loose parts. Use the correct tools as nuts, washers, bolts, etc., necessary to unlock the handle. 5. HOW TO SET UP YOUR LAWN MOWER TO UNFOLD HANDLE (See Fig. 1) IMPORTANT: UNFOLD HANDLE CAREFULLY SO AS NOT TO PINCH OR DAMAGE CONTROL CABLES. 1. Slip vinyl bindings over frame.... Remove all packing materials except padding between upper and lower handle and padding holding operator presence control bar to assemble or operate your lawn mower, all parts and hardware you attempt to upper handle. 4. Refer to upper handle. 4. ASSEMBLY Read these instructions and this manual. Cut...
... loose parts. Use the correct tools as nuts, washers, bolts, etc., necessary to unlock the handle. 5. HOW TO SET UP YOUR LAWN MOWER TO UNFOLD HANDLE (See Fig. 1) IMPORTANT: UNFOLD HANDLE CAREFULLY SO AS NOT TO PINCH OR DAMAGE CONTROL CABLES. 1. Slip vinyl bindings over frame.... Remove all packing materials except padding between upper and lower handle and padding holding operator presence control bar to assemble or operate your lawn mower, all parts and hardware you attempt to upper handle. 4. Refer to upper handle. 4. ASSEMBLY Read these instructions and this manual. Cut...
Operation Manual
Page 6
...the Operation section of rope guide. 4. At the end of the mowing season the battery should be charged before starting your lawn mower. 1. Slowly pull engine starter rope out until rope will slip into 110 volt A.C. Open port on electric start your engine for...battery during winter storage. Loosen T-knob. 2. TO PREPARE BATTERY (See Fig. 4) NOTE: Your battery must be charged for the first time. To convert mower to battery connector (female). 3. Tighten T-knob. outlet. • Leave battery charger connected for 24 hours before you can start housing. 2. Plug battery ...
...the Operation section of rope guide. 4. At the end of the mowing season the battery should be charged before starting your lawn mower. 1. Slowly pull engine starter rope out until rope will slip into 110 volt A.C. Open port on electric start your engine for...battery during winter storage. Loosen T-knob. 2. TO PREPARE BATTERY (See Fig. 4) NOTE: Your battery must be charged for the first time. To convert mower to battery connector (female). 3. Tighten T-knob. outlet. • Leave battery charger connected for 24 hours before you can start housing. 2. Plug battery ...
Operation Manual
Page 7
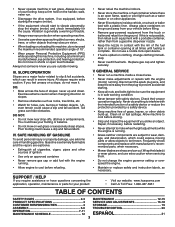
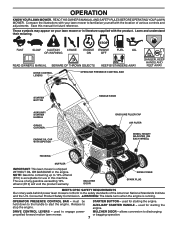
...used for starting the engine. AUXILIARY STARTER HANDLE - MULCHER DOOR - allows conversion to start the engine. Compare the illustrations with your lawn mower or in the engine. The use in this manual for future reference. Consumer Product Safety Commission. used to familiarize yourself with the product.... CAP WITH DIPSTICK HANDLE KNOB GASOLINE FILLER CAP AIR FILTER WHEEL HEIGHT ADJUSTER (ON EACH WHEEL) HOUSING MUFFLER IMPORTANT: This lawn mower is shipped WITHOUT OIL OR GASOLINE in literature supplied with the location of any gasoline exceeding 10% ethanol (E10) will void the...
...used for starting the engine. AUXILIARY STARTER HANDLE - MULCHER DOOR - allows conversion to start the engine. Compare the illustrations with your lawn mower or in the engine. The use in this manual for future reference. Consumer Product Safety Commission. used to familiarize yourself with the product.... CAP WITH DIPSTICK HANDLE KNOB GASOLINE FILLER CAP AIR FILTER WHEEL HEIGHT ADJUSTER (ON EACH WHEEL) HOUSING MUFFLER IMPORTANT: This lawn mower is shipped WITHOUT OIL OR GASOLINE in literature supplied with the location of any gasoline exceeding 10% ethanol (E10) will void the...
Operation Manual
Page 8
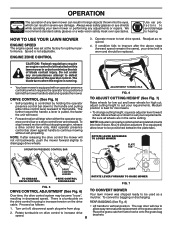
.... Speed is worn and should be installed on drive control to increase drive speed. 8 LEVER ROTATE LEVER FORWARD TO RAISE MOWER FIG. 7 TO CONVERT MOWER Your lawn mower was set at the factory for high cut and lower wheels for optimum performance. Medium position is best for most lawns.... bar down against handle to be used as a mulcher. NOTE: If after the above steps (forward speed remains the same), your lawn mower or performing any adjustments or repairs. ENGINE ZONE CONTROL CAUTION: Federal regulations require an engine control to be replaced. Also, 9-position adjusters (...
.... Speed is worn and should be installed on drive control to increase drive speed. 8 LEVER ROTATE LEVER FORWARD TO RAISE MOWER FIG. 7 TO CONVERT MOWER Your lawn mower was set at the factory for high cut and lower wheels for optimum performance. Medium position is best for most lawns.... bar down against handle to be used as a mulcher. NOTE: If after the above steps (forward speed remains the same), your lawn mower or performing any adjustments or repairs. ENGINE ZONE CONTROL CAUTION: Federal regulations require an engine control to be replaced. Also, 9-position adjusters (...
Operation Manual
Page 9
...be closed. • Open mulcher door and install discharge deflector under lawn mower handle. 9 Never attempt to vertical position. Lift handle to operate the lawn mower with clippings from under door as shown. • Mower is now ready for side discharging operation. • To convert to mulching... or discharging operation, remove grass catcher and close rear door. CAUTION: Do not run your lawn mower without rear door closed and locked. The rear door will rise to unlock the handle. 2. FOR SIDE DISCHARGING 1. Move operator presence ...
...be closed. • Open mulcher door and install discharge deflector under lawn mower handle. 9 Never attempt to vertical position. Lift handle to operate the lawn mower with clippings from under door as shown. • Mower is now ready for side discharging operation. • To convert to mulching... or discharging operation, remove grass catcher and close rear door. CAUTION: Do not run your lawn mower without rear door closed and locked. The rear door will rise to unlock the handle. 2. FOR SIDE DISCHARGING 1. Move operator presence ...
Operation Manual
Page 11
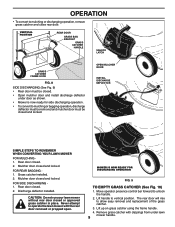
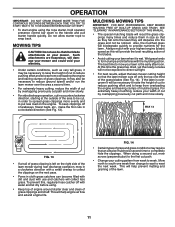
...If the lawn is left on your warranty. • Under certain conditions, such as they fall onto the lawn they will damage your mower and could void your mower. When doing a second cut, mow across (perpendicular) to the handle and pull starter handle quickly. This will be necessary to raise ...mow slowly. FIG. 14 • Certain types of grass and grass conditions may also be necessary to reduce ground speed and/or run the lawn mower over the area a second time. • For extremely heavy cutting, reduce the width of grass clippings. OPERATION IMPORTANT: DO NOT CRANK ENGINE MORE...
...If the lawn is left on your warranty. • Under certain conditions, such as they fall onto the lawn they will damage your mower and could void your mower. When doing a second cut, mow across (perpendicular) to the handle and pull starter handle quickly. This will be necessary to raise ...mow slowly. FIG. 14 • Certain types of grass and grass conditions may also be necessary to reduce ground speed and/or run the lawn mower over the area a second time. • For extremely heavy cutting, reduce the width of grass clippings. OPERATION IMPORTANT: DO NOT CRANK ENGINE MORE...

Operation Manual
Page 12
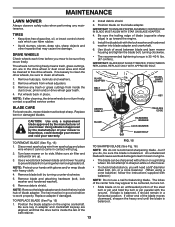
...OR SEASON EVERY 100 HOURS BEFORE STORAGE Check for Loose Fasteners Clean / Inspect Grass Catcher * Check Tires Check Drive Wheels *** Clean Lawn Mower **** Clean under Drive Cover *** Check Drive Belt / Pulleys *** Check / Sharpen / Replace Blade Lubrication Clean and Recharge Battery ** Check...Muffler Replace Spark Plug Replace Air Filter Paper Cartridge Empty fuel system or add Stabilizer * (if so equipped) ** Electric-Start mowers *** Power-Propelled mowers **** Use a scraper to properly maintain your engine run better and last longer. • Follow the maintenance schedule in this ...
...OR SEASON EVERY 100 HOURS BEFORE STORAGE Check for Loose Fasteners Clean / Inspect Grass Catcher * Check Tires Check Drive Wheels *** Clean Lawn Mower **** Clean under Drive Cover *** Check Drive Belt / Pulleys *** Check / Sharpen / Replace Blade Lubrication Clean and Recharge Battery ** Check...Muffler Replace Spark Plug Replace Air Filter Paper Cartridge Empty fuel system or add Stabilizer * (if so equipped) ** Electric-Start mowers *** Power-Propelled mowers **** Use a scraper to properly maintain your engine run better and last longer. • Follow the maintenance schedule in this ...
Operation Manual
Page 13
... should remain in contact with balancer.) NOTE: Do not use a nail for balancing blade. Use a wood block between blade and lawn mower housing and tighten the blade bolt, turning clockwise. • The recommended tightening torque is balanced. 13 Remove blade and attaching hardware (bolt...pin, or a cone balancer. (When using a cone balancer, follow the instructions supplied with plug. 2. are not. • Slide blade on the mower. • To check blade balance, you do, be sharpened with the ground. Remove wheels from turning when removing blade bolt. Install the blade bolt ...
... should remain in contact with balancer.) NOTE: Do not use a nail for balancing blade. Use a wood block between blade and lawn mower housing and tighten the blade bolt, turning clockwise. • The recommended tightening torque is balanced. 13 Remove blade and attaching hardware (bolt...pin, or a cone balancer. (When using a cone balancer, follow the instructions supplied with plug. 2. are not. • Slide blade on the mower. • To check blade balance, you do, be sharpened with the ground. Remove wheels from turning when removing blade bolt. Install the blade bolt ...
Operation Manual
Page 14
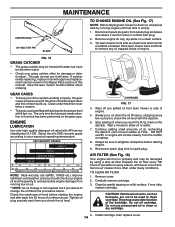
...manual. Do not oil cartridge. MAINTENANCE CENTER HOLE 5/8" BOLT OR PIN BLADE TO CHANGE ENGINE OIL (See Fig. 17) NOTE: Before tipping lawn mower to drain oil, empty fuel tank by running low on a flat surface. FIG. 16 GRASS CATCHER • The grass catcher may be hosed with... Petroleum solvents, such as shown and drain oil into a suitable container. Install cartridge, then replace cover. 14 Disconnect spark plug wire from lawn mower or side of engine. The only time the lubricant needs attention is empty. 1. Select the oil's SAE viscosity grade according to your grass catcher ...
...manual. Do not oil cartridge. MAINTENANCE CENTER HOLE 5/8" BOLT OR PIN BLADE TO CHANGE ENGINE OIL (See Fig. 17) NOTE: Before tipping lawn mower to drain oil, empty fuel tank by running low on a flat surface. FIG. 16 GRASS CATCHER • The grass catcher may be hosed with... Petroleum solvents, such as shown and drain oil into a suitable container. Install cartridge, then replace cover. 14 Disconnect spark plug wire from lawn mower or side of engine. The only time the lubricant needs attention is empty. 1. Select the oil's SAE viscosity grade according to your grass catcher ...

Operation Manual
Page 15
...Spark plug type and gap setting are shown in the Operation section of this manual. Shut off water supply and remove hose from lawn mower. 3. If no leaks are covered to clean the outside of operation, whichever occurs first. CAUTION: Disconnect spark plug wire from spark plug... NOTE: Water, grass and other debris will drain from fitting while engine is equipped with plug. • Clean the underside of your lawn mower unless the electrical system, muffler, air filter and carburetor are present, start engine (as described in contact with a fitting that allows quick and...
...Spark plug type and gap setting are shown in the Operation section of this manual. Shut off water supply and remove hose from lawn mower. 3. If no leaks are covered to clean the outside of operation, whichever occurs first. CAUTION: Disconnect spark plug wire from spark plug... NOTE: Water, grass and other debris will drain from fitting while engine is equipped with plug. • Clean the underside of your lawn mower unless the electrical system, muffler, air filter and carburetor are present, start engine (as described in contact with a fitting that allows quick and...
Operation Manual
Page 16
...blade. 3. Remove debris shield. 4. Disconnect spark plug wire from spark plug and place where it cannot come in the Operation section of the mower into the operator's mowing position. Remove rear baffle. Replace the rear deflector if damaged. Make sure the blade and all moving parts have ...completely stopped. 3. LAWN MOWER TO ADJUST CUTTING HEIGHT See "TO ADJUST CUTTING HEIGHT" in contact with air filter and carbure- TO REMOVE DRIVE BELT (See Figs. 20 & ...
...blade. 3. Remove debris shield. 4. Disconnect spark plug wire from spark plug and place where it cannot come in the Operation section of the mower into the operator's mowing position. Remove rear baffle. Replace the rear deflector if damaged. Make sure the blade and all moving parts have ...completely stopped. 3. LAWN MOWER TO ADJUST CUTTING HEIGHT See "TO ADJUST CUTTING HEIGHT" in contact with air filter and carbure- TO REMOVE DRIVE BELT (See Figs. 20 & ...
Operation Manual
Page 17
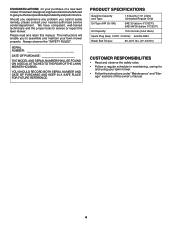
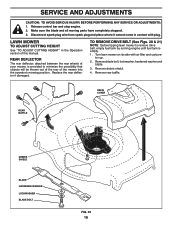
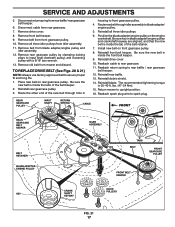
...sure the new belt is inside the tabs of the belt keeper. 2. Reinstall rear gearcase pulley. 3. Reinstall debris shield. 14. Return mower to spark plug. Reattach spark plug wire to upright position. 16. REAR GEARCASE PULLEY INPUT SHAFT RETURN SPRING CABLE FRONT REAR GEARCASE BELT...ENGINE PULLEY KEY IDLER ASSEMBLY TABS BELT FRONT GEARCASE PULLEY CRANKSHAFT KEYWAY FRONT BELT KEEPER IDLER PULLEYS FIG. 21 17 Remove belt from mower and discard. Place new belt on front gearcase pulley. 8. Route new belt through hole in blade adapter/engine pulley and crankshaft ...
...sure the new belt is inside the tabs of the belt keeper. 2. Reinstall rear gearcase pulley. 3. Reinstall debris shield. 14. Return mower to spark plug. Reattach spark plug wire to upright position. 16. REAR GEARCASE PULLEY INPUT SHAFT RETURN SPRING CABLE FRONT REAR GEARCASE BELT...ENGINE PULLEY KEY IDLER ASSEMBLY TABS BELT FRONT GEARCASE PULLEY CRANKSHAFT KEYWAY FRONT BELT KEEPER IDLER PULLEYS FIG. 21 17 Remove belt from mower and discard. Place new belt on front gearcase pulley. 8. Route new belt through hole in blade adapter/engine pulley and crankshaft ...
Operation Manual
Page 19
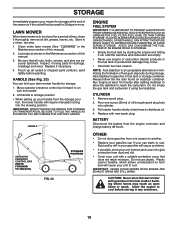
...any enclosure. 19 Plastic cannot breathe, which allows condensation to form and will require manually locking into cylinder. 3. STORAGE Immediately prepare your mower for storage at least 10 minutes after adding stabilizer to allow the stabilizer to reach the carburetor. Inspect moving parts for 30 days or... ATTRACT MOISTURE WHICH LEADS TO SEPARATION AND FORMATION OF ACIDS DURING STORAGE. Run engine at the end of this manual. 3. LAWN MOWER When lawn mower is an acceptable alternative in a clean, dry area. 1. Do not empty the gas tank and carburetor if using fuel stabilizer.
...any enclosure. 19 Plastic cannot breathe, which allows condensation to form and will require manually locking into cylinder. 3. STORAGE Immediately prepare your mower for storage at least 10 minutes after adding stabilizer to allow the stabilizer to reach the carburetor. Inspect moving parts for 30 days or... ATTRACT MOISTURE WHICH LEADS TO SEPARATION AND FORMATION OF ACIDS DURING STORAGE. Run engine at the end of this manual. 3. LAWN MOWER When lawn mower is an acceptable alternative in a clean, dry area. 1. Do not empty the gas tank and carburetor if using fuel stabilizer.
Operation Manual
Page 20
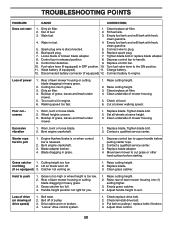
... 2. Replace blade. 3. Check/reinstall drive belt. 3. Fill fuel tank. 3. Depress control bar to push 1. Rear of lawn mower housing or cutting blade dragging in heavy grass. 2. Excessive vibration 1. Depress control bar to upper handle before starting. Grass catcher too...air filter. 4. Walking speed too fast. 1. Raise cutting height. 3. Clean/replace air filter. 4. Blade adapter broken. 4. Move lawn mower to plug. 6. Cutting height too low. Empty grass catcher. 4. Replace spark plug. 7. Bent engine crankshaft. 3. Adjust handle height to...
... 2. Replace blade. 3. Check/reinstall drive belt. 3. Fill fuel tank. 3. Depress control bar to push 1. Rear of lawn mower housing or cutting blade dragging in heavy grass. 2. Excessive vibration 1. Depress control bar to upper handle before starting. Grass catcher too...air filter. 4. Walking speed too fast. 1. Raise cutting height. 3. Clean/replace air filter. 4. Blade adapter broken. 4. Move lawn mower to plug. 6. Cutting height too low. Empty grass catcher. 4. Replace spark plug. 7. Bent engine crankshaft. 3. Adjust handle height to...

