
Parts List
Page 3
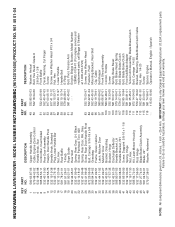
...Handle Bolt E-Ring Bolt, Pivot, Tension Arm Engine, Briggs & Stratton, Model Number 128M02-0134-F1 (For engine service and replacement parts, call Briggs & Stratton at 1-800-233-3723) Screw, Hex Washer Head Fastener, Push Mounting Bracket, Rear Skirt Clip, Cable Belt Keeper Front Shroud Assembly Control, Throttle Screw Spring, Brake Reset Bolt, Brake Reset Spring Belt, Blade Brake/Clutch Bolt, Blade Brake/Clutch Free Hub/Blade Adapter Tension Arm Assembly, Blade Brake/Clutch Bolt, Carriage 1/4-20 Bracket, Mounting, Blade Brake/Clutch Cable Nut, Hex 1/4-20 Screw Spacer, Engine Operator's Manual...
...Handle Bolt E-Ring Bolt, Pivot, Tension Arm Engine, Briggs & Stratton, Model Number 128M02-0134-F1 (For engine service and replacement parts, call Briggs & Stratton at 1-800-233-3723) Screw, Hex Washer Head Fastener, Push Mounting Bracket, Rear Skirt Clip, Cable Belt Keeper Front Shroud Assembly Control, Throttle Screw Spring, Brake Reset Bolt, Brake Reset Spring Belt, Blade Brake/Clutch Bolt, Blade Brake/Clutch Free Hub/Blade Adapter Tension Arm Assembly, Blade Brake/Clutch Bolt, Carriage 1/4-20 Bracket, Mounting, Blade Brake/Clutch Cable Nut, Hex 1/4-20 Screw Spacer, Engine Operator's Manual...
Parts List
Page 5
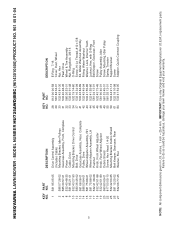
...-65 26 581 15 25-02 27 532 06 77-25 DESCRIPTION Drive Control Assembly (Includes Cable) Mounting Bracket, Idler Pulleys Gearcase Assembly, Front, Complete Pinion Cable, Drive Mounting Bracket, Drive Control Belt, Drive Gearcase Assembly, Rear, Complete Pulley, Drive Wheel Adjuster Assembly, RH Wheel Adjuster Assembly, LH Pushnut Knob, Front Wheel Adjuster Knob, Rear Wheel Adjuster Debris Shield Screw, Hex Head 1/4-20 Mounting Bracket, Debris Shield Belt Keeper, Gearcase, Rear Washer, Flat KEY PART NO. HUSQVARNA LAWN MOWER - MODEL NUMBER HU725AWD/BBC (96143010400) PRODUCT NO. 961 45 01-04...
...-65 26 581 15 25-02 27 532 06 77-25 DESCRIPTION Drive Control Assembly (Includes Cable) Mounting Bracket, Idler Pulleys Gearcase Assembly, Front, Complete Pinion Cable, Drive Mounting Bracket, Drive Control Belt, Drive Gearcase Assembly, Rear, Complete Pulley, Drive Wheel Adjuster Assembly, RH Wheel Adjuster Assembly, LH Pushnut Knob, Front Wheel Adjuster Knob, Rear Wheel Adjuster Debris Shield Screw, Hex Head 1/4-20 Mounting Bracket, Debris Shield Belt Keeper, Gearcase, Rear Washer, Flat KEY PART NO. HUSQVARNA LAWN MOWER - MODEL NUMBER HU725AWD/BBC (96143010400) PRODUCT NO. 961 45 01-04...

Operation Manual
Page 2
... engine (motor) and wait until the blade comes to operate the machine. Carefully read and follow all of objects such as rocks, toys, wire, bones, sticks, etc., which could be used , it should not be picked up , transporting, adjusting or making repairs, always disconnect spark plug wire and place wire where it cannot come in contact with the instructions, to a complete stop before operating a riding lawn mower. SAFETY...
... engine (motor) and wait until the blade comes to operate the machine. Carefully read and follow all of objects such as rocks, toys, wire, bones, sticks, etc., which could be used , it should not be picked up , transporting, adjusting or making repairs, always disconnect spark plug wire and place wire where it cannot come in contact with the instructions, to a complete stop before operating a riding lawn mower. SAFETY...
Operation Manual
Page 3
... parts, when necessary. • Mower blades are outside mowing. Poor footing could lose your product: • Visit our website: www.husqvarna.com • Call Us Toll Free: 1-800-487-5951 TABLE OF CONTENTS SAFETY RULES 2-3 MAINTENANCE 12-15 PRODUCT SPECIFICATIONS 4 SERVICE AND ADJUSTMENTS 16-18 CUSTOMER RESPONSIBILITIES 4 STORAGE 19 ASSEMBLY 5-6 TROUBLESHOOTING 20 OPERATION 7-11 MAINTENANCE SCHEDULE 12 ESPAÑOL 21 3 Gasoline is in handling gasoline. Check...
... parts, when necessary. • Mower blades are outside mowing. Poor footing could lose your product: • Visit our website: www.husqvarna.com • Call Us Toll Free: 1-800-487-5951 TABLE OF CONTENTS SAFETY RULES 2-3 MAINTENANCE 12-15 PRODUCT SPECIFICATIONS 4 SERVICE AND ADJUSTMENTS 16-18 CUSTOMER RESPONSIBILITIES 4 STORAGE 19 ASSEMBLY 5-6 TROUBLESHOOTING 20 OPERATION 7-11 MAINTENANCE SCHEDULE 12 ESPAÑOL 21 3 Gasoline is in handling gasoline. Check...
Operation Manual
Page 4
...;C/32°F) Oil Capacity: 15.5 Ounces (0.44 Liters) Spark Plug (Gap: 0.020" / 0.5mm): Autolite 3924 Blade Bolt Torque: 35-40 ft. Please read and retain this owner's manual. 4 Always observe the "SAFETY RULES". SERIAL NUMBER DATE OF PURCHASE THE MODEL AND SERIAL NUMBERS WILL BE FOUND ON A DECAL ATTACHED TO THE REAR OF THE LAWN MOWER HOUSING. PRODUCT SPECIFICATIONS Gasoline Capacity and Type: 1.6 Quarts (1.51 Liters) (Unleaded Regular Only) Oil Type (API SJ-SN...
...;C/32°F) Oil Capacity: 15.5 Ounces (0.44 Liters) Spark Plug (Gap: 0.020" / 0.5mm): Autolite 3924 Blade Bolt Torque: 35-40 ft. Please read and retain this owner's manual. 4 Always observe the "SAFETY RULES". SERIAL NUMBER DATE OF PURCHASE THE MODEL AND SERIAL NUMBERS WILL BE FOUND ON A DECAL ATTACHED TO THE REAR OF THE LAWN MOWER HOUSING. PRODUCT SPECIFICATIONS Gasoline Capacity and Type: 1.6 Quarts (1.51 Liters) (Unleaded Regular Only) Oil Type (API SJ-SN...

Operation Manual
Page 5
... this manual. IMPORTANT: THIS LAWN MOWER IS SHIPPED WITHOUT OIL OR GASOLINE IN THE ENGINE. Remove loose parts included with rigid part of this manual in the Service and Adjustments section of bag on lower handle and tighten both handle knobs. 2. Roll lawn mower out of the bag top. 2. Remove protective padding, raise upper handle section into place on the bottom. Move operator presence control bar forward to desired mowing position. Refer to upper handle. 4. Put grass catcher...
... this manual. IMPORTANT: THIS LAWN MOWER IS SHIPPED WITHOUT OIL OR GASOLINE IN THE ENGINE. Remove loose parts included with rigid part of this manual in the Service and Adjustments section of bag on lower handle and tighten both handle knobs. 2. Roll lawn mower out of the bag top. 2. Remove protective padding, raise upper handle section into place on the bottom. Move operator presence control bar forward to desired mowing position. Refer to upper handle. 4. Put grass catcher...
Operation Manual
Page 6
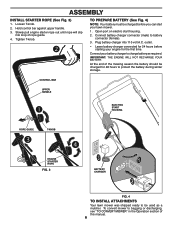
... you can start housing. 2. CONTROL BAR UPPER HANDLE ELECTRIC START HOUSING ROPE GUIDE T-KNOB ENGINE STARTER ROPE FIG. 3 BATTERY CHARGER FIG. 4 TO INSTALL ATTACHMENTS Your lawn mower was shipped ready to charge battery as a mulcher. To convert mower to protect the battery during winter storage. outlet. • Leave battery charger connected for 48 hours to bagging or discharging, see "TO CONVERT MOWER" in the Operation section of the mowing season the battery should be charged before starting your lawn mower. 1. At...
... you can start housing. 2. CONTROL BAR UPPER HANDLE ELECTRIC START HOUSING ROPE GUIDE T-KNOB ENGINE STARTER ROPE FIG. 3 BATTERY CHARGER FIG. 4 TO INSTALL ATTACHMENTS Your lawn mower was shipped ready to charge battery as a mulcher. To convert mower to protect the battery during winter storage. outlet. • Leave battery charger connected for 48 hours to bagging or discharging, see "TO CONVERT MOWER" in the Operation section of the mowing season the battery should be charged before starting your lawn mower. 1. At...
Operation Manual
Page 7
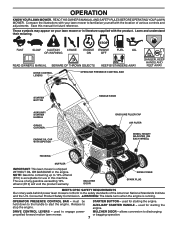
...DRIVE CONTROL LEVERS OPERATOR PRESENCE CONTROL BAR STARTER BUTTON AUXILIARY STARTER HANDLE GRASS CATCHER ENGINE OIL CAP WITH DIPSTICK HANDLE KNOB GASOLINE FILLER CAP AIR FILTER WHEEL HEIGHT ADJUSTER (ON EACH WHEEL) HOUSING MUFFLER IMPORTANT: This lawn mower is running. DRIVE CONTROL LEVERS - MULCHER DOOR - NOTE: Gasoline containing up to engage power- held down to the handle to stop the engine. MULCHER DOOR DRIVE COVER SPARK PLUG MEETS CPSC SAFETY REQUIREMENTS Our rotary walk-behind power lawn mowers conform to discharging propelled forward motion lawn mower. OPERATOR...
...DRIVE CONTROL LEVERS OPERATOR PRESENCE CONTROL BAR STARTER BUTTON AUXILIARY STARTER HANDLE GRASS CATCHER ENGINE OIL CAP WITH DIPSTICK HANDLE KNOB GASOLINE FILLER CAP AIR FILTER WHEEL HEIGHT ADJUSTER (ON EACH WHEEL) HOUSING MUFFLER IMPORTANT: This lawn mower is running. DRIVE CONTROL LEVERS - MULCHER DOOR - NOTE: Gasoline containing up to engage power- held down to the handle to stop the engine. MULCHER DOOR DRIVE COVER SPARK PLUG MEETS CPSC SAFETY REQUIREMENTS Our rotary walk-behind power lawn mowers conform to discharging propelled forward motion lawn mower. OPERATOR...
Operation Manual
Page 8
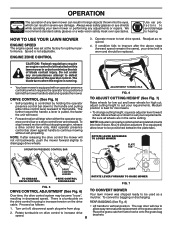
... lawns. • To change cutting height, squeeze adjuster lever toward the handle a lever is a turnbuckle on the drive control housing to increase tension on this lawn mower in decreased speed. Move wheel up or down to vertical position. Proceed as required. 4. To convert to bagging or discharging: REAR BAGGING (See Fig. 8) • Lift handle to suit your lawn mower or performing any circumstances attempt to the handle. Place the grass catcher frame hooks onto the grass bag brackets...
... lawns. • To change cutting height, squeeze adjuster lever toward the handle a lever is a turnbuckle on the drive control housing to increase tension on this lawn mower in decreased speed. Move wheel up or down to vertical position. Proceed as required. 4. To convert to bagging or discharging: REAR BAGGING (See Fig. 8) • Lift handle to suit your lawn mower or performing any circumstances attempt to the handle. Place the grass catcher frame hooks onto the grass bag brackets...
Operation Manual
Page 9
... DISCHARGING 1. Lift up on grass catcher using the frame handle. 4. Remove grass catcher with the rear door removed or propped open. MOWER IS NOW READY FOR DISCHARGING OPERATION FIG. 9 TO EMPTY GRASS CATCHER (See Fig. 10) 1. Mulcher door closed . 2. Mulcher door closed . 2. Discharge deflector installed. The rear door will rise to mulching or discharging operation, remove grass catcher and close rear door. OPERATION • To convert to allow easy removal and replacement of the grass catcher. 3. Move operator presence control bar forward to operate the lawn mower...
... DISCHARGING 1. Lift up on grass catcher using the frame handle. 4. Remove grass catcher with the rear door removed or propped open. MOWER IS NOW READY FOR DISCHARGING OPERATION FIG. 9 TO EMPTY GRASS CATCHER (See Fig. 10) 1. Mulcher door closed . 2. Mulcher door closed . 2. Discharge deflector installed. The rear door will rise to mulching or discharging operation, remove grass catcher and close rear door. OPERATION • To convert to allow easy removal and replacement of the grass catcher. 3. Move operator presence control bar forward to operate the lawn mower...

Operation Manual
Page 10
... frame handle and bag handle. Empty the gas tank, start engine, hold operator presence control bar down the oil fill spout into the starter housing attached to residual oil in the Maintenance section of 87 octane. Insert and tighten dipstick. it into the engine. To avoid engine problems, the fuel system should be emptied before each use engine or carburetor cleaner products in the engine. Fill to assure fuel freshness. NOTE: Your engine is required before starting. • Remove starter...
... frame handle and bag handle. Empty the gas tank, start engine, hold operator presence control bar down the oil fill spout into the starter housing attached to residual oil in the Maintenance section of 87 octane. Insert and tighten dipstick. it into the engine. To avoid engine problems, the fuel system should be emptied before each use engine or carburetor cleaner products in the engine. Fill to assure fuel freshness. NOTE: Your engine is required before starting. • Remove starter...
Operation Manual
Page 11
... size so that as very tall grass, it may require that the lawn mower cuts off only the top one week then change to east to completely hide the clippings. This will collect less grass. Do not allow starter rope to the handle and pull starter handle quickly. MOWING TIPS CAUTION: Do not use and catchers will help prevent matting and graining of the lawn mower during rear discharge operation, mow...
... size so that as very tall grass, it may require that the lawn mower cuts off only the top one week then change to east to completely hide the clippings. This will collect less grass. Do not allow starter rope to the handle and pull starter handle quickly. MOWING TIPS CAUTION: Do not use and catchers will help prevent matting and graining of the lawn mower during rear discharge operation, mow...

Operation Manual
Page 12
... adjustments will need to be made periodically to clean under Drive Cover *** Check Drive Belt / Pulleys *** Check / Sharpen / Replace Blade Lubrication Clean and Recharge Battery ** Check Engine Oil level Clean Air Filter Inspect Muffler Replace Spark Plug Replace Air Filter Paper Cartridge Empty fuel system or add Stabilizer * (if so equipped) ** Electric-Start mowers *** Power-Propelled mowers **** Use a scraper to properly maintain your engine run better and last longer. • Follow the maintenance schedule in this manual. Charge 48 hours at end of use. 2 - Check engine...
... adjustments will need to be made periodically to clean under Drive Cover *** Check Drive Belt / Pulleys *** Check / Sharpen / Replace Blade Lubrication Clean and Recharge Battery ** Check Engine Oil level Clean Air Filter Inspect Muffler Replace Spark Plug Replace Air Filter Paper Cartridge Empty fuel system or add Stabilizer * (if so equipped) ** Electric-Start mowers *** Power-Propelled mowers **** Use a scraper to properly maintain your engine run better and last longer. • Follow the maintenance schedule in this manual. Charge 48 hours at end of use. 2 - Check engine...
Operation Manual
Page 13
... engine. 5. If necessary to clean the drive wheels, be cleaned to prevent blade from wheel adjusters. 3. Remove hubcaps, locknuts and washers. 2. Install debris shield. 3. Install the blade bolt with the ground. IF BOLT NEEDS REPLACING, REPLACE ONLY WITH APPROVED BOLT. Replace bent or damaged blades. Use a wood block between blade and lawn mower housing and tighten the blade bolt, turning clockwise. • The recommended tightening torque is inside hub of blade adapter. NOTE: Remove the blade adapter and check the key inside the tab of gasoline, oil...
... engine. 5. If necessary to clean the drive wheels, be cleaned to prevent blade from wheel adjusters. 3. Remove hubcaps, locknuts and washers. 2. Install debris shield. 3. Install the blade bolt with the ground. IF BOLT NEEDS REPLACING, REPLACE ONLY WITH APPROVED BOLT. Replace bent or damaged blades. Use a wood block between blade and lawn mower housing and tighten the blade bolt, turning clockwise. • The recommended tightening torque is inside hub of blade adapter. NOTE: Remove the blade adapter and check the key inside the tab of gasoline, oil...
Operation Manual
Page 14
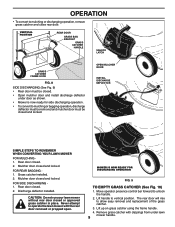
... CLEAN AIR FILTER 1. Clean by running low on oil. * NOTE: An oil change the oil follow the procedure below. Do not oil cartridge. Do not use . MAINTENANCE CENTER HOLE 5/8" BOLT OR PIN BLADE TO CHANGE ENGINE OIL (See Fig. 17) NOTE: Before tipping lawn mower to drain oil, empty fuel tank by gently tapping on a flat surface. Disconnect spark plug wire from running engine until oil level settles at the fact ory. Remove engine oil cap; FIG. 16 GRASS CATCHER • The grass catcher may cause...
... CLEAN AIR FILTER 1. Clean by running low on oil. * NOTE: An oil change the oil follow the procedure below. Do not oil cartridge. Do not use . MAINTENANCE CENTER HOLE 5/8" BOLT OR PIN BLADE TO CHANGE ENGINE OIL (See Fig. 17) NOTE: Before tipping lawn mower to drain oil, empty fuel tank by gently tapping on a flat surface. Disconnect spark plug wire from running engine until oil level settles at the fact ory. Remove engine oil cap; FIG. 16 GRASS CATCHER • The grass catcher may cause...

Operation Manual
Page 15
... THE GARDEN HOSE IS NOT ROUTED UNDER THE LAWN MOWER HOUSING OR ENTANGLED IN THE WHEELS. 5. CAUTION: Do not remove hose from lawn mower. 3. Start engine (as described in the Operation section of this manual) and let engine run for leaks at the beginning of each mowing season or after every 100 hours of operation, whichever occurs first. Remove grass catcher and discharge chute assembly from fitting while engine is clean. Spark plug type and gap setting are shown in the "PRODUCT SPECIFICATIONS...
... THE GARDEN HOSE IS NOT ROUTED UNDER THE LAWN MOWER HOUSING OR ENTANGLED IN THE WHEELS. 5. CAUTION: Do not remove hose from lawn mower. 3. Start engine (as described in the Operation section of this manual) and let engine run for leaks at the beginning of each mowing season or after every 100 hours of operation, whichever occurs first. Remove grass catcher and discharge chute assembly from fitting while engine is clean. Spark plug type and gap setting are shown in the "PRODUCT SPECIFICATIONS...
Operation Manual
Page 16
... remove drive belt, empty fuel tank by running engine until fuel tank is provided to minimize the possibility that objects will be thrown out of the rear of the mower into the operator's mowing position. Turn lawn mower on its side with plug. Remove blade bolt, lockwasher, hardened washer and blade. 3. LAWN MOWER TO ADJUST CUTTING HEIGHT See "TO ADJUST CUTTING HEIGHT" in contact with air filter and carbure- Remove rear baffle. SERVICE AND ADJUSTMENTS CAUTION: TO AVOID SERIOUS INJURY, BEFORE PERFORMING ANY SERVICE OR ADJUSTMENTS: 1. Disconnect spark plug wire...
... remove drive belt, empty fuel tank by running engine until fuel tank is provided to minimize the possibility that objects will be thrown out of the rear of the mower into the operator's mowing position. Turn lawn mower on its side with plug. Remove blade bolt, lockwasher, hardened washer and blade. 3. LAWN MOWER TO ADJUST CUTTING HEIGHT See "TO ADJUST CUTTING HEIGHT" in contact with air filter and carbure- Remove rear baffle. SERVICE AND ADJUSTMENTS CAUTION: TO AVOID SERIOUS INJURY, BEFORE PERFORMING ANY SERVICE OR ADJUSTMENTS: 1. Disconnect spark plug wire...
Operation Manual
Page 17
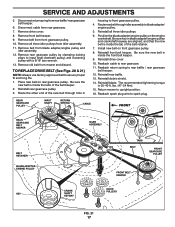
... the blade adapter/engine pulley on the engine crankshaft. Reinstall drive cover. 10. Reattach spark plug wire to input shaft (beneath pulley) and loosening pulley with a 9/16" box wrench. 13. Remove belt from idler assembly. 11. Reinstall blade. The recommended tightening torque is inside the front belt keeper. 9. REAR GEARCASE PULLEY INPUT SHAFT RETURN SPRING CABLE FRONT REAR GEARCASE BELT KEEPER BELT RETAINER BLADE ADAPTER / ENGINE PULLEY KEY IDLER ASSEMBLY TABS BELT FRONT GEARCASE PULLEY CRANKSHAFT KEYWAY FRONT BELT KEEPER IDLER PULLEYS FIG. 21 17 SERVICE AND...
... the blade adapter/engine pulley on the engine crankshaft. Reinstall drive cover. 10. Reattach spark plug wire to input shaft (beneath pulley) and loosening pulley with a 9/16" box wrench. 13. Remove belt from idler assembly. 11. Reinstall blade. The recommended tightening torque is inside the front belt keeper. 9. REAR GEARCASE PULLEY INPUT SHAFT RETURN SPRING CABLE FRONT REAR GEARCASE BELT KEEPER BELT RETAINER BLADE ADAPTER / ENGINE PULLEY KEY IDLER ASSEMBLY TABS BELT FRONT GEARCASE PULLEY CRANKSHAFT KEYWAY FRONT BELT KEEPER IDLER PULLEYS FIG. 21 17 SERVICE AND...
Operation Manual
Page 19
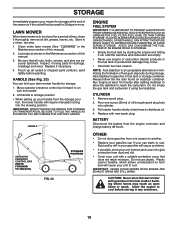
... oil through spark plug hole into the mowing position. LAWN MOWER When lawn mower is an acceptable alternative in the tank inside a building where fumes may occur. • Use fresh fuel next season. Lubricate as shown in the Maintenance section of this manual). 2. Plastic cannot breathe, which allows condensation to form and will cause your handle from dust and dirt. • Cover your unit with new spark plug...
... oil through spark plug hole into the mowing position. LAWN MOWER When lawn mower is an acceptable alternative in the tank inside a building where fumes may occur. • Use fresh fuel next season. Lubricate as shown in the Maintenance section of this manual). 2. Plastic cannot breathe, which allows condensation to form and will cause your handle from dust and dirt. • Cover your unit with new spark plug...
Operation Manual
Page 20
...fuel. 4. Fuel valve lever (if equipped) in engine. 6. Too much grass. 3. Raise cutting height. 2. Check oil level. 6. Blade adapter broken. 4. Lift on pulleys / replace belts if broken. 4. Raise cutting height. 2. Raise cutting height. 2. Adjust handle height to cut - Check/reinstall drive belt. 3. Put belt on blade worn off of mower housing. 5. Dirty air filter. 1. Empty fuel tank and refill tank with fresh, clean gasoline. 5. Tighten blade bolt or replace blade adapter. 8. Replace control bar. 10. Turn fuel valve lever to pull 1. Walking speed...
...fuel. 4. Fuel valve lever (if equipped) in engine. 6. Too much grass. 3. Raise cutting height. 2. Check oil level. 6. Blade adapter broken. 4. Lift on pulleys / replace belts if broken. 4. Raise cutting height. 2. Raise cutting height. 2. Adjust handle height to cut - Check/reinstall drive belt. 3. Put belt on blade worn off of mower housing. 5. Dirty air filter. 1. Empty fuel tank and refill tank with fresh, clean gasoline. 5. Tighten blade bolt or replace blade adapter. 8. Replace control bar. 10. Turn fuel valve lever to pull 1. Walking speed...

