
Parts List
Page 3
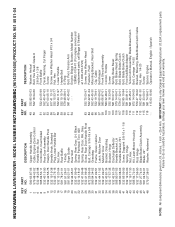
... Hub/Blade Adapter Tension Arm Assembly, Blade Brake/Clutch Bolt, Carriage 1/4-20 Bracket, Mounting, Blade Brake/Clutch Cable Nut, Hex 1/4-20 Screw Spacer, Engine Operator's Manual, English / Spanish 3 NOTE: All component dimensions given in U.S. IMPORTANT: Use only Original Equipment Manufacturer (O.E.M.) replacement parts. inches. 1 inch = 25.4 mm. NO. 1 580 63 87-06... (96143010400) PRODUCT NO. 961 45 01-04 KEY PART NO. Failure to do so could be hazardous, damage your lawn mower and void your warranty. HUSQVARNA LAWN MOWER -
... Hub/Blade Adapter Tension Arm Assembly, Blade Brake/Clutch Bolt, Carriage 1/4-20 Bracket, Mounting, Blade Brake/Clutch Cable Nut, Hex 1/4-20 Screw Spacer, Engine Operator's Manual, English / Spanish 3 NOTE: All component dimensions given in U.S. IMPORTANT: Use only Original Equipment Manufacturer (O.E.M.) replacement parts. inches. 1 inch = 25.4 mm. NO. 1 580 63 87-06... (96143010400) PRODUCT NO. 961 45 01-04 KEY PART NO. Failure to do so could be hazardous, damage your lawn mower and void your warranty. HUSQVARNA LAWN MOWER -

Operation Manual
Page 2
... forest-covered, brushcovered or grass-covered land unless the engine's exhaust system is equipped with an internal combustion engine and should be maintained in the manual(s) before starting when setting up and thrown by the operator. Never assume that children be used on the machine and in effective working order by...
... forest-covered, brushcovered or grass-covered land unless the engine's exhaust system is equipped with an internal combustion engine and should be maintained in the manual(s) before starting when setting up and thrown by the operator. Never assume that children be used on the machine and in effective working order by...
Operation Manual
Page 4
Ithasbeendesigned,engineeredandmanufactured to give you to service or repair this manual. SERIAL NUMBER DATE OF PURCHASE THE MODEL AND SERIAL NUMBERS WILL BE FOUND ON A DECAL ATTACHED TO THE REAR OF THE LAWN MOWER HOUSING. Please ... Type: 1.6 Quarts (1.51 Liters) (Unleaded Regular Only) Oil Type (API SJ-SN): SAE 30 (above 0°C/32°F); CONGRATULATIONS on your purchase of this owner's manual. 4 Should you experience any problem you cannot easily remedy, please contact your lawn mower. • Follow the instructions under "Maintenance" and "Storage" sections of a new...
Ithasbeendesigned,engineeredandmanufactured to give you to service or repair this manual. SERIAL NUMBER DATE OF PURCHASE THE MODEL AND SERIAL NUMBERS WILL BE FOUND ON A DECAL ATTACHED TO THE REAR OF THE LAWN MOWER HOUSING. Please ... Type: 1.6 Quarts (1.51 Liters) (Unleaded Regular Only) Oil Type (API SJ-SN): SAE 30 (above 0°C/32°F); CONGRATULATIONS on your purchase of this owner's manual. 4 Should you experience any problem you cannot easily remedy, please contact your lawn mower. • Follow the instructions under "Maintenance" and "Storage" sections of a new...

Operation Manual
Page 5
... new lawn mower has been assembled at the factory with mower. 2. Remove loose parts included with the exception of this manual in its entirety before using. ASSEMBLY Read these instructions and this manual. IMPORTANT: THIS LAWN MOWER IS SHIPPED WITHOUT OIL OR GASOLINE IN THE ENGINE. Move operator presence control bar forward...
... new lawn mower has been assembled at the factory with mower. 2. Remove loose parts included with the exception of this manual in its entirety before using. ASSEMBLY Read these instructions and this manual. IMPORTANT: THIS LAWN MOWER IS SHIPPED WITHOUT OIL OR GASOLINE IN THE ENGINE. Move operator presence control bar forward...
Operation Manual
Page 6
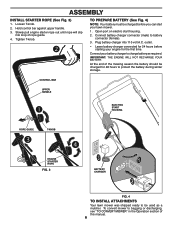
... for 24 hours before you can start housing. 2. Connect battery charger connector (male) to protect the battery during winter storage. At the end of this manual. 6 Slowly pull engine starter rope out until rope will slip into 110 volt A.C. ASSEMBLY INSTALL STARTER ROPE (See Fig. 3) 1. Loosen T-knob. 2. IMPORTANT: THE ENGINE WILL...
... for 24 hours before you can start housing. 2. Connect battery charger connector (male) to protect the battery during winter storage. At the end of this manual. 6 Slowly pull engine starter rope out until rope will slip into 110 volt A.C. ASSEMBLY INSTALL STARTER ROPE (See Fig. 3) 1. Loosen T-knob. 2. IMPORTANT: THE ENGINE WILL...
Operation Manual
Page 7
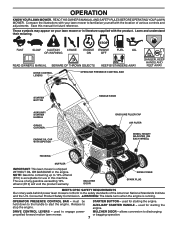
READ THIS OWNER'S MANUAL AND SAFETY RULES BEFORE OPERATING YOUR LAWN MOWER. Learn and understand their meaning. NOTE: Gasoline containing up to 10% ethanol (E10) is acceptable for starting ... the engine. Release to the safety standards of various controls and adjustments. DRIVE CONTROL LEVERS - Compare the illustrations with your lawn mower or in this manual for starting the engine. The use in literature supplied with the location of the American National Standards Institute and the U.S. used for future reference. WARNING...
READ THIS OWNER'S MANUAL AND SAFETY RULES BEFORE OPERATING YOUR LAWN MOWER. Learn and understand their meaning. NOTE: Gasoline containing up to 10% ethanol (E10) is acceptable for starting ... the engine. Release to the safety standards of various controls and adjustments. DRIVE CONTROL LEVERS - Compare the illustrations with your lawn mower or in this manual for starting the engine. The use in literature supplied with the location of the American National Standards Institute and the U.S. used for future reference. WARNING...

Operation Manual
Page 10
... ENGINE • To stop engine, release operator presence control bar. NOTE: Initial oil fill requires only 13.5 oz. (0.38 Liters) due to bottom of this manual. IMPORTANT: • Check oil level before storage of acids during the initial use . Add oil if needed. ENGINE OIL CAP OPERATOR PRESENCE CONTROL BAR (MOVE...
... ENGINE • To stop engine, release operator presence control bar. NOTE: Initial oil fill requires only 13.5 oz. (0.38 Liters) due to bottom of this manual. IMPORTANT: • Check oil level before storage of acids during the initial use . Add oil if needed. ENGINE OIL CAP OPERATOR PRESENCE CONTROL BAR (MOVE...
Operation Manual
Page 11
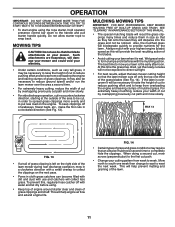
... from overloading the engine and leaving clumps of cut by overlapping previously cut path. • Change your mower. SEE "CLEANING" IN MAINTENANCE SECTION OF THIS MANUAL. • The special mulching blade will recut the grass clippings many times and reduce them in size so that the lawn mower cuts off only...
... from overloading the engine and leaving clumps of cut by overlapping previously cut path. • Change your mower. SEE "CLEANING" IN MAINTENANCE SECTION OF THIS MANUAL. • The special mulching blade will recut the grass clippings many times and reduce them in size so that the lawn mower cuts off only...

Operation Manual
Page 12
Service more often when mowing in sandy soil. 4 - Charge 48 hours at end of this manual. GENERAL RECOMMENDATIONS The warranty on this manual. At least once a season, check to see if you should make any of the adjustments described in dirty or dusty conditions. 3 - Check for ... MAINTENANCE SECTION 12 And after each 5 hours of use. 2 - To receive full value from the warranty, operator must maintain mower as instructed in this manual. • At least once a year, replace the spark plug, clean or replace air filter element and check blade for wear. MAINTENANCE BEFORE EACH USE ...
Service more often when mowing in sandy soil. 4 - Charge 48 hours at end of this manual. GENERAL RECOMMENDATIONS The warranty on this manual. At least once a season, check to see if you should make any of the adjustments described in dirty or dusty conditions. 3 - Check for ... MAINTENANCE SECTION 12 And after each 5 hours of use. 2 - To receive full value from the warranty, operator must maintain mower as instructed in this manual. • At least once a year, replace the spark plug, clean or replace air filter element and check blade for wear. MAINTENANCE BEFORE EACH USE ...
Operation Manual
Page 14
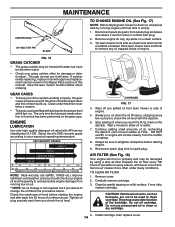
.... 2. Select the oil's SAE viscosity grade according to your engine oil level frequently to avoid possible engine damage from lawn mower or side of this manual. CONTAINER FIG. 17 4. Wait a minute to allow oil to spark plug. AIR FILTER (See Fig. 18) Your engine will wear. Remove cover. 2. CAUTION: Petroleum solvents...
.... 2. Select the oil's SAE viscosity grade according to your engine oil level frequently to avoid possible engine damage from lawn mower or side of this manual. CONTAINER FIG. 17 4. Wait a minute to allow oil to spark plug. AIR FILTER (See Fig. 18) Your engine will wear. Remove cover. 2. CAUTION: Petroleum solvents...

Operation Manual
Page 15
...from fitting while engine is running. CAUTION: Do not remove hose from fitting. CLEAN THE UNDERSIDE OF YOUR MOWER AFTER EACH USE. To use this manual. WARNING: Do not engage the drive system during the washout process. 2. Water in engine can result in shortened engine life. A clogged engine ...Turn on water supply and check for a full minute to keep trash from mower. Start engine (as described in the Operation section of this manual) and let engine run for leaks at the beginning of each mowing season or after every 100 hours of operation, whichever occurs first. WATER WASHOUT...
...from fitting while engine is running. CAUTION: Do not remove hose from fitting. CLEAN THE UNDERSIDE OF YOUR MOWER AFTER EACH USE. To use this manual. WARNING: Do not engage the drive system during the washout process. 2. Water in engine can result in shortened engine life. A clogged engine ...Turn on water supply and check for a full minute to keep trash from mower. Start engine (as described in the Operation section of this manual) and let engine run for leaks at the beginning of each mowing season or after every 100 hours of operation, whichever occurs first. WATER WASHOUT...
Operation Manual
Page 16
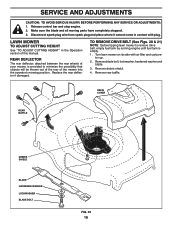
... the rear deflector if damaged. Remove blade bolt, lockwasher, hardened washer and blade. 3. REAR DEFLECTOR The rear deflector, attached between the rear wheels of this manual. Release control bar and stop engine. 2.
... the rear deflector if damaged. Remove blade bolt, lockwasher, hardened washer and blade. 3. REAR DEFLECTOR The rear deflector, attached between the rear wheels of this manual. Release control bar and stop engine. 2.
Operation Manual
Page 19
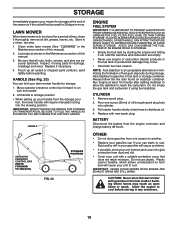
... the stabilizer to reach the carburetor. Store in any enclosure. 19 Touch up your can starts to be used for a period of this manual. 3. Lift handle to storage position. • When setting up all rusted or chipped paint surfaces; IMPORTANT: WHEN FOLDING THE HANDLE FOR STORAGE...before storing in a clean, dry area. 1. HANDLE (See Fig. 23) You can if your handle from one ounce (29 ml) of this manual). 2. Move operator presence control bar forward to distribute oil. 4. ALCOHOL BLENDED FUELS (CALLED GASOHOL OR USING ETHANOL OR METHANOL) CAN ATTRACT MOISTURE WHICH LEADS...
... the stabilizer to reach the carburetor. Store in any enclosure. 19 Touch up your can starts to be used for a period of this manual. 3. Lift handle to storage position. • When setting up all rusted or chipped paint surfaces; IMPORTANT: WHEN FOLDING THE HANDLE FOR STORAGE...before storing in a clean, dry area. 1. HANDLE (See Fig. 23) You can if your handle from one ounce (29 ml) of this manual). 2. Move operator presence control bar forward to distribute oil. 4. ALCOHOL BLENDED FUELS (CALLED GASOHOL OR USING ETHANOL OR METHANOL) CAN ATTRACT MOISTURE WHICH LEADS...


