
Owners Manual
Page 2
... for this manual. MEETS CPSC SAFETY REQUIREMENTS Husqvarna rotary walk-behind before starting. • Do not put hands or feet near drop-offs, ditches or embankments. Safe Operation Practices for Walk-Behind Mowers IMPORTANT: THIS CUTTING MACHINE IS CAPABLE OF ...Battery posts, terminals and related accessories contain lead and lead compounds, chemicals known to give you cannot easily remedy, please contact your lawn mower properly. Stop machine if anyone . GENERAL OPERATION • Read, understand, and follow all times. • Only allow responsible individuals...
... for this manual. MEETS CPSC SAFETY REQUIREMENTS Husqvarna rotary walk-behind before starting. • Do not put hands or feet near drop-offs, ditches or embankments. Safe Operation Practices for Walk-Behind Mowers IMPORTANT: THIS CUTTING MACHINE IS CAPABLE OF ...Battery posts, terminals and related accessories contain lead and lead compounds, chemicals known to give you cannot easily remedy, please contact your lawn mower properly. Stop machine if anyone . GENERAL OPERATION • Read, understand, and follow all times. • Only allow responsible individuals...
Owners Manual
Page 3
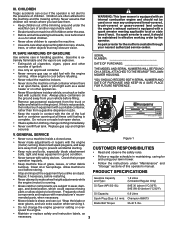
... with an internal combustion engine and should be thrown. If a spark arrester is complete. A spark arrester for the muffler is available through your lawn mower. • Follow the instructions under the watchful care of this is equipped with the engine (motor) running. GENERAL SERVICE • Never run ...;C/32°F); SERIAL NUMBER DATE OF PURCHASE THE MODEL AND SERIAL NUMBERS WILL BE FOUND ON A DECAL ATTACHED TO THE REAR OF THE LAWN MOWER HOUSING. Allow engine to cool before storing. • Stop and inspect the equipment if you last saw them. • Keep children ...
... with an internal combustion engine and should be thrown. If a spark arrester is complete. A spark arrester for the muffler is available through your lawn mower. • Follow the instructions under the watchful care of this is equipped with the engine (motor) running. GENERAL SERVICE • Never run ...;C/32°F); SERIAL NUMBER DATE OF PURCHASE THE MODEL AND SERIAL NUMBERS WILL BE FOUND ON A DECAL ATTACHED TO THE REAR OF THE LAWN MOWER HOUSING. Allow engine to cool before storing. • Stop and inspect the equipment if you last saw them. • Keep children ...
Owners Manual
Page 4
... proper operation of those parts left unassembled for a few minutes. Make sure the frame handle is outside of bag on your new lawn mower. Vinyl bindings for shipping purposes. Frame handle 3. TABLE OF CONTENTS SAFETY RULES 2-3 PRODUCT SPECIFICATIONS 3 CUSTOMER RESPONSIBILITIES 3 SAFETY AND INSTRUCTIONAL...GRASS CATCHER 3 1. Use the correct tools as nuts, washers, bolts, etc., necessary to familiarize yourself with the exception of your lawn mower to complete the assembly have been 2 shipped. Put grass catcher frame into grass bag with rigid part of the bag top (...
... proper operation of those parts left unassembled for a few minutes. Make sure the frame handle is outside of bag on your new lawn mower. Vinyl bindings for shipping purposes. Frame handle 3. TABLE OF CONTENTS SAFETY RULES 2-3 PRODUCT SPECIFICATIONS 3 CUSTOMER RESPONSIBILITIES 3 SAFETY AND INSTRUCTIONAL...GRASS CATCHER 3 1. Use the correct tools as nuts, washers, bolts, etc., necessary to familiarize yourself with the exception of your lawn mower to complete the assembly have been 2 shipped. Put grass catcher frame into grass bag with rigid part of the bag top (...
Owners Manual
Page 5
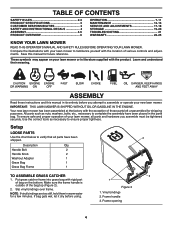
... in the Operation section of carton and check carton thorougly for your mowing comfort. Roll lawn mower out of this manual. 4 Figure 3 1. LIFT UP LIFT UP 2 3 HOW TO SET UP YOUR LAWN MOWER TO UNFOLD HANDLE IMPORTANT: UNFOLD HANDLE CAREFULLY SO AS NOT TO PINCH OR DAMAGE CONTROL CABLES.... 1. MOWING POSITION 1 TO REMOVE LAWN MOWER FROM CARTON 1. Insert handle bolt through handle and bracket and secure with mower. 2. Your handles may be used as a ...
... in the Operation section of carton and check carton thorougly for your mowing comfort. Roll lawn mower out of this manual. 4 Figure 3 1. LIFT UP LIFT UP 2 3 HOW TO SET UP YOUR LAWN MOWER TO UNFOLD HANDLE IMPORTANT: UNFOLD HANDLE CAREFULLY SO AS NOT TO PINCH OR DAMAGE CONTROL CABLES.... 1. MOWING POSITION 1 TO REMOVE LAWN MOWER FROM CARTON 1. Insert handle bolt through handle and bracket and secure with mower. 2. Your handles may be used as a ...

Owners Manual
Page 7
... DRIVE CONTROL Figure 6 1. Hold operator presence control bar down to minimize the risk of the operator control. Do not under any lawn mower can result in order to the handle and pulling either the operator presence control bar or a drive control lever are released. The ...spark plug wire from plug. 2. Drive control levers Figure 8 1. NOTE: If after the above steps (forward speed remains the same), your lawn mower or performing any adjustments or repairs. Speed is running . Drive control levers DRIVE CONTROL ADJUSTMENT Over time, the drive control system may become ...
... DRIVE CONTROL Figure 6 1. Hold operator presence control bar down to minimize the risk of the operator control. Do not under any lawn mower can result in order to the handle and pulling either the operator presence control bar or a drive control lever are released. The ...spark plug wire from plug. 2. Drive control levers Figure 8 1. NOTE: If after the above steps (forward speed remains the same), your lawn mower or performing any adjustments or repairs. Speed is running . Drive control levers DRIVE CONTROL ADJUSTMENT Over time, the drive control system may become ...
Owners Manual
Page 8
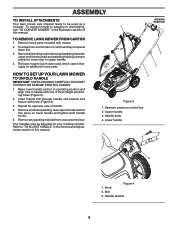
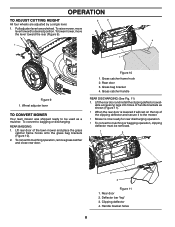
...2. Grass bag bracket 4. Rear door 2. Deflector bar "leg" 3. Handle bracket holes 8 To lower mower, move lever forward to desired position. Wheel adjuster lever TO CONVERT MOWER Your lawn mower was shipped ready to mulching operation, remove grass catcher and close rear door. To convert to be removed... 1. Grass catcher handle REAR DISCHARGING (See Fig. 11) 1. To raise mower, move the lever toward wheel. Lift rear door of the clipping deflector and secure it will rest on the top of the lawn mower and place the grass catcher frame hooks onto the grass bag brackets (Figure ...
...2. Grass bag bracket 4. Rear door 2. Deflector bar "leg" 3. Handle bracket holes 8 To lower mower, move lever forward to desired position. Wheel adjuster lever TO CONVERT MOWER Your lawn mower was shipped ready to mulching operation, remove grass catcher and close rear door. To convert to be removed... 1. Grass catcher handle REAR DISCHARGING (See Fig. 11) 1. To raise mower, move the lever toward wheel. Lift rear door of the clipping deflector and secure it will rest on the top of the lawn mower and place the grass catcher frame hooks onto the grass bag brackets (Figure ...

Owners Manual
Page 10
... engine, a small amount of smoke may be present during the initial use of grass clippings. NOTE: Your engine is equipped with clippings from under lawn mower handle. 3. Bag handle 2. No priming or choking is left on the next pass. • Pores in moist, heavy grass, clumps of cut...unnecessary wear. Do not allow starter rope to the handle and pull starter handle quickly. Reduce ground speed (pushing speed) and/or run the lawn mower over the area a second time. • For extremely heavy cutting, reduce the width of cut by overlapping previously cut to reduce pushing ...
... engine, a small amount of smoke may be present during the initial use of grass clippings. NOTE: Your engine is equipped with clippings from under lawn mower handle. 3. Bag handle 2. No priming or choking is left on the next pass. • Pores in moist, heavy grass, clumps of cut...unnecessary wear. Do not allow starter rope to the handle and pull starter handle quickly. Reduce ground speed (pushing speed) and/or run the lawn mower over the area a second time. • For extremely heavy cutting, reduce the width of cut by overlapping previously cut to reduce pushing ...

Owners Manual
Page 11
... will be exposed to direct sunlight. • For best results, adjust the lawn mower cutting height so that the lawn mower cuts off only the top onethird of the grass blades (Figure 16). Mow north...as this time the grass has dried, yet the newly cut path and mow slowly. If the lawn is overgrown it is the early afternoon. Wet grass tends to week. At this will not be...week to form clumps and interferes with your highest engine (blade) speed as they fall onto the lawn they will help prevent matting and graining of mulched grass. This will disperse into the grass and not...
... will be exposed to direct sunlight. • For best results, adjust the lawn mower cutting height so that the lawn mower cuts off only the top onethird of the grass blades (Figure 16). Mow north...as this time the grass has dried, yet the newly cut path and mow slowly. If the lawn is overgrown it is the early afternoon. Wet grass tends to week. At this will not be...week to form clumps and interferes with your highest engine (blade) speed as they fall onto the lawn they will help prevent matting and graining of mulched grass. This will disperse into the grass and not...
Owners Manual
Page 12
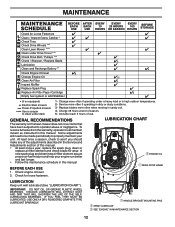
... a season, check to see if you should make any of the adjustments described in the Service and Adjustments section of this lawn mower does not cover items that have been subjected to operator abuse or negligence. Check for wear. IF YOU FEEL THEY MUST BE... ONLY A DRY, POWDERED GRAPHITE TYPE LUBRICANT SPARINGLY. MAINTENANCE Check for Loose Fasteners Clean / Inspect Grass Catcher * Check Tires Check Drive Wheels *** Clean Lawn Mower **** Clean under Drive Cover *** Check Drive Belt / Pulleys *** Check / Sharpen / Replace Blade Lubrication Clean and Recharge Battery ** Check Engine Oil ...
... a season, check to see if you should make any of the adjustments described in the Service and Adjustments section of this lawn mower does not cover items that have been subjected to operator abuse or negligence. Check for wear. IF YOU FEEL THEY MUST BE... ONLY A DRY, POWDERED GRAPHITE TYPE LUBRICANT SPARINGLY. MAINTENANCE Check for Loose Fasteners Clean / Inspect Grass Catcher * Check Tires Check Drive Wheels *** Clean Lawn Mower **** Clean under Drive Cover *** Check Drive Belt / Pulleys *** Check / Sharpen / Replace Blade Lubrication Clean and Recharge Battery ** Check Engine Oil ...

Owners Manual
Page 13
... WHEELS Check rear drive wheels each time you mow to clean drive wheels, check both rear wheels. Replace bent or damaged blades. 4. Turn lawn mower on the engine crankshaft. TO REPLACE BLADE 1. Debris shield 5. Blade bolt lbs. Using a blade not approved by the manufacturer of the belt... and dust cover area and must be sure they move freely. Be sure key in contact with plug. 2. Lock washer 11. MAINTENANCE LAWN MOWER Always observe safety rules when performing any maintenance. TIRES • Keep tires free of blade adapter. If necessary to be kept sharp. ...
... WHEELS Check rear drive wheels each time you mow to clean drive wheels, check both rear wheels. Replace bent or damaged blades. 4. Turn lawn mower on the engine crankshaft. TO REPLACE BLADE 1. Debris shield 5. Blade bolt lbs. Using a blade not approved by the manufacturer of the belt... and dust cover area and must be sure they move freely. Be sure key in contact with plug. 2. Lock washer 11. MAINTENANCE LAWN MOWER Always observe safety rules when performing any maintenance. TIRES • Keep tires free of blade adapter. If necessary to be kept sharp. ...

Owners Manual
Page 14
...twice a season. • The gear case is if service has been performed on oil. If either end of continuous use. Give the lawn mower model number when ordering. Select the oil's SAE viscosity grade according to an unthreaded portion of operation or at the factory. Check the ... sharpened with balancer.) NOTE: Do not use it should check your engine oil level frequently to the proper level at least once a year if the lawn mower is balanced (Figure 18). 1 2 3 Figure 18 1. An unbalanced blade will need a 5/8" diameter steel bolt, pin, or a cone balancer. (When using a cone...
...twice a season. • The gear case is if service has been performed on oil. If either end of continuous use. Give the lawn mower model number when ordering. Select the oil's SAE viscosity grade according to an unthreaded portion of operation or at the factory. Check the ... sharpened with balancer.) NOTE: Do not use it should check your engine oil level frequently to the proper level at least once a year if the lawn mower is balanced (Figure 18). 1 2 3 Figure 18 1. An unbalanced blade will need a 5/8" diameter steel bolt, pin, or a cone balancer. (When using a cone...

Owners Manual
Page 15
... 100 hours of the cartridge. Loosen the fastener that holds the cover. Install the filter and pre-cleaner into a suitable container. Tip lawn mower on its side as kerosene, are not to be washed and reused. 1. Stop adding oil when you reach the FULL mark on a...To loosen debris, gently tap the filter on startup. 8. Container 3 5 4 1. MAINTENANCE TO CHANGE ENGINE OIL NOTE: Before tipping lawn mower to the filter. 6. Rock lawn mower back and forth to clean cartridge. Service air cleaner more often under dusty conditions. The pre-cleaner can be used to remove any...
... 100 hours of the cartridge. Loosen the fastener that holds the cover. Install the filter and pre-cleaner into a suitable container. Tip lawn mower on its side as kerosene, are not to be washed and reused. 1. Stop adding oil when you reach the FULL mark on a...To loosen debris, gently tap the filter on startup. 8. Container 3 5 4 1. MAINTENANCE TO CHANGE ENGINE OIL NOTE: Before tipping lawn mower to the filter. 6. Rock lawn mower back and forth to clean cartridge. Service air cleaner more often under dusty conditions. The pre-cleaner can be used to remove any...
Owners Manual
Page 16
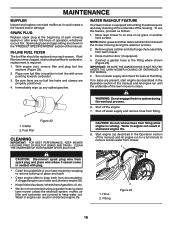
.... • Keep finished surfaces / wheels free of gasoline, oil, etc. • We do not recommend using a garden hose to clean lawn mower unless the electrical system, muffler, air filter and carburetor are shown in the "PRODUCT SPECIFICATIONS" section of this manual) and let engine run until... the underside of the lawn mower is clean. 1 1 2 1. Immediately wipe up of grass and trash. • Clean engine often to the fitting where shown (Figure 23)....
.... • Keep finished surfaces / wheels free of gasoline, oil, etc. • We do not recommend using a garden hose to clean lawn mower unless the electrical system, muffler, air filter and carburetor are shown in the "PRODUCT SPECIFICATIONS" section of this manual) and let engine run until... the underside of the lawn mower is clean. 1 1 2 1. Immediately wipe up of grass and trash. • Clean engine often to the fitting where shown (Figure 23)....
Owners Manual
Page 17
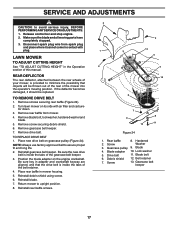
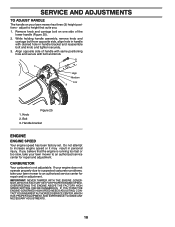
REAR DEFLECTOR The rear deflector, attached between the rear wheels of your mower, is provided to upright position. 8. Turn lawn mower on its side with plug. Be sure key in mower housing. 5. Reinstall debris shield using screw. 6. Reinstall rear baffle screws. 2 1 3 2 2 13 5 4 12 6 7 8 9 10 11 Figure ... that objects will be replaced. Blade 4. Belt retainer 7. Make sure the blade and all moving parts have completely stopped. 3. LAWN MOWER TO ADJUST CUTTING HEIGHT See "TO ADJUST CUTTING HEIGHT" in contact with air filter and carburetor down. 3. NOTE: Always use ...
REAR DEFLECTOR The rear deflector, attached between the rear wheels of your mower, is provided to upright position. 8. Turn lawn mower on its side with plug. Be sure key in mower housing. 5. Reinstall debris shield using screw. 6. Reinstall rear baffle screws. 2 1 3 2 2 13 5 4 12 6 7 8 9 10 11 Figure ... that objects will be replaced. Blade 4. Belt retainer 7. Make sure the blade and all moving parts have completely stopped. 3. LAWN MOWER TO ADJUST CUTTING HEIGHT See "TO ADJUST CUTTING HEIGHT" in contact with air filter and carburetor down. 3. NOTE: Always use ...
Owners Manual
Page 18
... knob. 2 1 High Medium Low 3 Figure 25 1. If your engine does not operate properly due to suspected carburetor problems, take your lawn mower has three (3) height positions - Knob 2. Do not attempt to an authorized service center for repair and adjustment. Handle bracket ENGINE ENGINE SPEED...AND EXPERIENCE TO MAKE ANY NECESSARY ADJUSTMENTS. 18 Bolt 3. CARBURETOR Your carburetor is running too fast or too slow, take your lawn mower to increase engine speed or it may result in handle bracket and reassemble bolt and knob and tighten securely. 3. SERVICE AND ADJUSTMENTS...
... knob. 2 1 High Medium Low 3 Figure 25 1. If your engine does not operate properly due to suspected carburetor problems, take your lawn mower has three (3) height positions - Knob 2. Do not attempt to an authorized service center for repair and adjustment. Handle bracket ENGINE ENGINE SPEED...AND EXPERIENCE TO MAKE ANY NECESSARY ADJUSTMENTS. 18 Bolt 3. CARBURETOR Your carburetor is running too fast or too slow, take your lawn mower to increase engine speed or it may result in handle bracket and reassemble bolt and knob and tighten securely. 3. SERVICE AND ADJUSTMENTS...
Owners Manual
Page 19
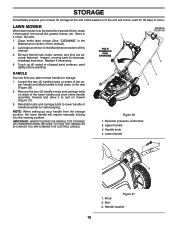
...Bolt 3. Handle bracket 19 Be sure that all dirt, grease, leaves, etc. Inspect moving parts for storage. 1. Clean entire lawn mower (See "CLEANING" in a clean, dry area. 1. sand lightly before painting. 1 FOLD FORWARD FOR STORAGE MOWING POSITION 2 HANDLE You can fold ...your lawn mower handle for damage, breakage and wear. Loosen the two (2) handle knobs on mower (Figure 27). 3. Lower handle 2 1 3 Figure 27 1. LAWN MOWER When lawn mower is to be used for 30 days or more. IMPORTANT: WHEN FOLDING THE...
...Bolt 3. Handle bracket 19 Be sure that all dirt, grease, leaves, etc. Inspect moving parts for storage. 1. Clean entire lawn mower (See "CLEANING" in a clean, dry area. 1. sand lightly before painting. 1 FOLD FORWARD FOR STORAGE MOWING POSITION 2 HANDLE You can fold ...your lawn mower handle for damage, breakage and wear. Loosen the two (2) handle knobs on mower (Figure 27). 3. Lower handle 2 1 3 Figure 27 1. LAWN MOWER When lawn mower is to be used for 30 days or more. IMPORTANT: WHEN FOLDING THE...
Owners Manual
Page 20
... • Do not store gasoline from dust and dirt. • Cover your can starts to rust. IMPORTANT: NEVER COVER MOWER WHILE ENGINE AND EXHAUST AREAS ARE STILL WARM. CAUTION: Never store the lawn mower with clean engine oil. (See "ENGINE" in the tank inside a building where fumes may occur. • Use fresh fuel...
... • Do not store gasoline from dust and dirt. • Cover your can starts to rust. IMPORTANT: NEVER COVER MOWER WHILE ENGINE AND EXHAUST AREAS ARE STILL WARM. CAUTION: Never store the lawn mower with clean engine oil. (See "ENGINE" in the tank inside a building where fumes may occur. • Use fresh fuel...

Owners Manual
Page 21
...2. Depress control bar to pull 1. not filling 2. Handle height position not right for you. 1. Check oil level. 6. Buildup of lawn mower housing one (1) setting higher. 3. Contact a qualified service center. 3. Spark plug wire is disconnected. 5. Walking speed too fast. 1..... Belt off . (if so equipped) 3. Fuel valve lever (if equipped) in released position. 8. Replace Fuse. Clean underside of lawn mower housing or cutting blade dragging in engine. 6. Excessive vibration 1. Lift on pulleys/replace belts if broken. 4. Raise cutting height. 2. ...
...2. Depress control bar to pull 1. not filling 2. Handle height position not right for you. 1. Check oil level. 6. Buildup of lawn mower housing one (1) setting higher. 3. Contact a qualified service center. 3. Spark plug wire is disconnected. 5. Walking speed too fast. 1..... Belt off . (if so equipped) 3. Fuel valve lever (if equipped) in released position. 8. Replace Fuse. Clean underside of lawn mower housing or cutting blade dragging in engine. 6. Excessive vibration 1. Lift on pulleys/replace belts if broken. 4. Raise cutting height. 2. ...
Parts List
Page 3
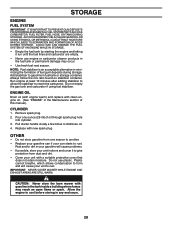
...532 19 79-91 97 581 11 53-02 99 585 66 87-02 115 584 29 94-01 - - 115 63 43-32 DESCRIPTION Kit, Lawn Mower Housing Blade Adapter / Pulley Blade, 22" Washer, Hardened Washer, Helical Screw, Machine, Hex Head 3/8-24 x 1-3/8 Grade 8 Front Baffle ...'s Manual, English / French 3 NOTE: All component dimensions given in U.S. Failure to do so could be hazardous, damage your lawn mower and void your warranty. HUSQVARNA LAWN MOWER - IMPORTANT: Use only Original Equipment Manufacturer (O.E.M.) replacement parts. MODEL NUMBER HD775HW (96143008603) PRODUCT NO. 961 43 00-86 KEY PART NO.
...532 19 79-91 97 581 11 53-02 99 585 66 87-02 115 584 29 94-01 - - 115 63 43-32 DESCRIPTION Kit, Lawn Mower Housing Blade Adapter / Pulley Blade, 22" Washer, Hardened Washer, Helical Screw, Machine, Hex Head 3/8-24 x 1-3/8 Grade 8 Front Baffle ...'s Manual, English / French 3 NOTE: All component dimensions given in U.S. Failure to do so could be hazardous, damage your lawn mower and void your warranty. HUSQVARNA LAWN MOWER - IMPORTANT: Use only Original Equipment Manufacturer (O.E.M.) replacement parts. MODEL NUMBER HD775HW (96143008603) PRODUCT NO. 961 43 00-86 KEY PART NO.
Parts List
Page 5
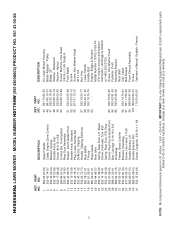
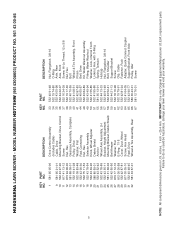
inches. 1 inch = 25.4 mm. MODEL NUMBER HD775HW (96143008603) PRODUCT NO. 961 43 00-86 5 KEY PART NO. HUSQVARNA LAWN MOWER - Failure to do so could be hazardous, damage your lawn mower and void your warranty. NO. 33 532 40 91-48 34 532 19 74-80 35 532 43 05-98 36 532 44 22-07 ...
inches. 1 inch = 25.4 mm. MODEL NUMBER HD775HW (96143008603) PRODUCT NO. 961 43 00-86 5 KEY PART NO. HUSQVARNA LAWN MOWER - Failure to do so could be hazardous, damage your lawn mower and void your warranty. NO. 33 532 40 91-48 34 532 19 74-80 35 532 43 05-98 36 532 44 22-07 ...


