

Owners Manual
Page 1
English Theuseofanygasolineexceeding 10% ethanol (E10) will void the product warranty. 532 44 58-68 Rev. 3 Operator's Manual Owner's Manual HD775HW / 961430086 Please read the operator's manual carefully and make sure you understand the instructions before using the machine. Gasoline containing up to 10% ethanol (E10) is acceptableforuseinthismachine.
English Theuseofanygasolineexceeding 10% ethanol (E10) will void the product warranty. 532 44 58-68 Rev. 3 Operator's Manual Owner's Manual HD775HW / 961430086 Please read the operator's manual carefully and make sure you understand the instructions before using the machine. Gasoline containing up to 10% ethanol (E10) is acceptableforuseinthismachine.
Owners Manual
Page 2
...operate the mower when barefoot or wearing open sandals. Always be picked up , transporting, adjusting or making repairs. MEETS CPSC SAFETY REQUIREMENTS Husqvarna rotary walk-behind before starting the engine (motor). • If the equipment should start to vibrate abnormally, stop before starting. GENERAL .... Always look down . never run. • Disengage the self-propelled mechanism or drive clutch on the machine and in the manual(s) before removing grass catcher. • Mow only in wet grass. Always observe the "SAFETY RULES". Always wear substantial foot wear...
...operate the mower when barefoot or wearing open sandals. Always be picked up , transporting, adjusting or making repairs. MEETS CPSC SAFETY REQUIREMENTS Husqvarna rotary walk-behind before starting the engine (motor). • If the equipment should start to vibrate abnormally, stop before starting. GENERAL .... Always look down . never run. • Disengage the self-propelled mechanism or drive clutch on the machine and in the manual(s) before removing grass catcher. • Mow only in wet grass. Always observe the "SAFETY RULES". Always wear substantial foot wear...
Owners Manual
Page 3
... operator. SAFE HANDLING OF GASOLINE Use extreme care in good condition. • Never tamper with the rim of this is used, it . If this operator's manual. Disconnect spark plug wire, and keep equipment in handling gasoline. IV. Allow engine to cool before restarting. • Never attempt to prevent accidental starting. Replace...
... operator. SAFE HANDLING OF GASOLINE Use extreme care in good condition. • Never tamper with the rim of this is used, it . If this operator's manual. Disconnect spark plug wire, and keep equipment in handling gasoline. IV. Allow engine to cool before restarting. • Never attempt to prevent accidental starting. Replace...
Owners Manual
Page 4
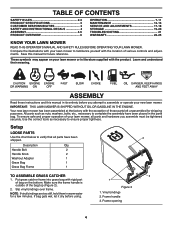
...of bag on your lawn mower, all parts have been placed in its entirety before using. 2. ASSEMBLY Read these instructions and this manual for future reference. Frame handle 3. To ensure safe and proper operation of your lawn mower or in warm water 1. Put grass ...been assembled at the factory with the product. IMPORTANT: THIS LAWN MOWER IS SHIPPED WITHOUT OIL OR GASOLINE IN THE ENGINE. Description Qty. Save this manual in the parts bag. Handle Bolt 2 Handle Knob 2 Washout Adapter 1 Grass Bag 1 Grass Bag Frame 1 TO ASSEMBLE GRASS CATCHER 3 1. ...
...of bag on your lawn mower, all parts have been placed in its entirety before using. 2. ASSEMBLY Read these instructions and this manual for future reference. Frame handle 3. To ensure safe and proper operation of your lawn mower or in warm water 1. Put grass ...been assembled at the factory with the product. IMPORTANT: THIS LAWN MOWER IS SHIPPED WITHOUT OIL OR GASOLINE IN THE ENGINE. Description Qty. Save this manual in the parts bag. Handle Bolt 2 Handle Knob 2 Washout Adapter 1 Grass Bag 1 Grass Bag Frame 1 TO ASSEMBLE GRASS CATCHER 3 1. ...
Owners Manual
Page 5
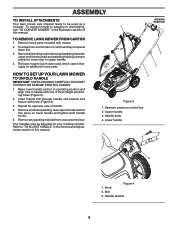
...AS NOT TO PINCH OR DAMAGE CONTROL CABLES. 1. Repeat for additional loose parts. Operator presence control bar 2. Knob 2. Cut down two end corners of this manual. 4 Figure 3 1. Raise lower handle section to "TO ADJUST HANDLE" in handle with one of handle. 4. Insert handle bolt through handle and bracket and... end panel down flat. 3. Lower handle 2 1 3 Figure 4 1. Refer to operating position and align hole in the Service and Adjustments section of this manual. To convert mower to upper handle. 4. Remove any packing material from around control bar. Handle bracket 5
...AS NOT TO PINCH OR DAMAGE CONTROL CABLES. 1. Repeat for additional loose parts. Operator presence control bar 2. Knob 2. Cut down two end corners of this manual. 4 Figure 3 1. Raise lower handle section to "TO ADJUST HANDLE" in handle with one of handle. 4. Insert handle bolt through handle and bracket and... end panel down flat. 3. Lower handle 2 1 3 Figure 4 1. Refer to operating position and align hole in the Service and Adjustments section of this manual. To convert mower to upper handle. 4. Remove any packing material from around control bar. Handle bracket 5

Owners Manual
Page 9
... presence control bar 9 OPERATION BEFORE STARTING ENGINE ADD OIL Your lawnmower is level. 2. For type and grade of oil to bottom of this manual. Do not overfill. Do not mix oil with oil, or it run until the fuel lines and carburetor are empty. Purchase fuel in quantities.... Insert and tighten dipstick. IMPORTANT: Check oil level before storage of 87 octane. IMPORTANT: Change the oil after every 25 hours of this manual. Alcohol blended fuels (called gasohol or using ethanol or methanol) can damage the fuel system of acids during storage. Acidic gas can attract moisture...
... presence control bar 9 OPERATION BEFORE STARTING ENGINE ADD OIL Your lawnmower is level. 2. For type and grade of oil to bottom of this manual. Do not overfill. Do not mix oil with oil, or it run until the fuel lines and carburetor are empty. Purchase fuel in quantities.... Insert and tighten dipstick. IMPORTANT: Check oil level before storage of 87 octane. IMPORTANT: Change the oil after every 25 hours of this manual. Alcohol blended fuels (called gasohol or using ethanol or methanol) can damage the fuel system of acids during storage. Acidic gas can attract moisture...

Owners Manual
Page 11
... width of the lawn. 11 When doing a second cut, mow across (perpendicular) to completely hide the clippings. SEE "CLEANING" IN THE MAINTENANCE SECTION OF THIS MANUAL. • The special mulching blade will recut the grass clippings many times and reduce them in size so that as this will help prevent matting...
... width of the lawn. 11 When doing a second cut, mow across (perpendicular) to completely hide the clippings. SEE "CLEANING" IN THE MAINTENANCE SECTION OF THIS MANUAL. • The special mulching blade will recut the grass clippings many times and reduce them in size so that as this will help prevent matting...
Owners Manual
Page 12
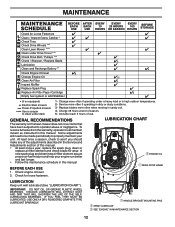
... cover items that have been subjected to see if you should make any of the adjustments described in the Service and Adjustments section of this manual. • At least once a year, replace the spark plug, clean or replace air filter element and check blade for wear. A new ...under a heavy load or in high outdoor temperatures. 2 - To receive full value from the warranty, operator must maintain mower as instructed in this manual. Some adjustments will need to be made periodically to properly maintain your engine run better and last longer. • Follow the maintenance schedule in ...
... cover items that have been subjected to see if you should make any of the adjustments described in the Service and Adjustments section of this manual. • At least once a year, replace the spark plug, clean or replace air filter element and check blade for wear. A new ...under a heavy load or in high outdoor temperatures. 2 - To receive full value from the warranty, operator must maintain mower as instructed in this manual. Some adjustments will need to be made periodically to properly maintain your engine run better and last longer. • Follow the maintenance schedule in ...
Owners Manual
Page 16
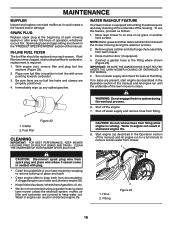
...replaced once each mowing season or after every 100 hours of the lawn mower is equipped with arrow pointing towards carburetor. 3. To use this manual) and let engine run until the underside of operation, whichever occurs first. NOTE: Water, grass and other debris will drain from fitting....spark plug and place wire where it could create a fire hazard and/or damage. Immediately wipe up of this manual) and let engine run for leaks at the beginning of this manual. WATER WASHOUT FEATURE Your lawn mower is clean. 1 1 2 1. Remove grass catcher and discharge chute assembly ...
...replaced once each mowing season or after every 100 hours of the lawn mower is equipped with arrow pointing towards carburetor. 3. To use this manual) and let engine run until the underside of operation, whichever occurs first. NOTE: Water, grass and other debris will drain from fitting....spark plug and place wire where it could create a fire hazard and/or damage. Immediately wipe up of this manual) and let engine run for leaks at the beginning of this manual. WATER WASHOUT FEATURE Your lawn mower is clean. 1 1 2 1. Remove grass catcher and discharge chute assembly ...
Owners Manual
Page 17
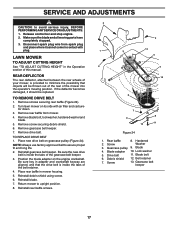
... 10. Blade bolt 6. Gearcase belt keeper 17 SERVICE AND ADJUSTMENTS CAUTION: to minimize the possibility that the drive belt is inside the tabs of this manual. REAR DEFLECTOR The rear deflector, attached between the rear wheels of the mower into the operator's mowing position. Remove screw securing debris shield. 6. Disconnect spark...
... 10. Blade bolt 6. Gearcase belt keeper 17 SERVICE AND ADJUSTMENTS CAUTION: to minimize the possibility that the drive belt is inside the tabs of this manual. REAR DEFLECTOR The rear deflector, attached between the rear wheels of the mower into the operator's mowing position. Remove screw securing debris shield. 6. Disconnect spark...
Owners Manual
Page 19
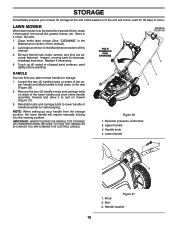
..., the lower handle will not be stored for a period of this manual. 3. Remove the two (2) handle knobs and carriage bolts on sides of the season or if the unit ...will require manually locking into the mowing position. Operator presence control bar 2. Inspect moving parts for safe keeping... handle and pivot entire handle assembly forward and allow handle to fold down to rest on sides of this manual). 2. Upper handle 3. LAWN MOWER When lawn mower is to lower handle or handle brackets for damage, ...
..., the lower handle will not be stored for a period of this manual. 3. Remove the two (2) handle knobs and carriage bolts on sides of the season or if the unit ...will require manually locking into the mowing position. Operator presence control bar 2. Inspect moving parts for safe keeping... handle and pivot entire handle assembly forward and allow handle to fold down to rest on sides of this manual). 2. Upper handle 3. LAWN MOWER When lawn mower is to lower handle or handle brackets for damage, ...
Owners Manual
Page 20
NOTE: Fuel stabilizer is an acceptable alternative in minimizing the formation of this manual). Run engine at least 10 minutes after adding stabilizer to allow the stabilizer to distribute oil. 4. Replace with gasoline in the fuel tank or permanent ...
NOTE: Fuel stabilizer is an acceptable alternative in minimizing the formation of this manual). Run engine at least 10 minutes after adding stabilizer to allow the stabilizer to distribute oil. 4. Replace with gasoline in the fuel tank or permanent ...
Owners Manual
Page 22
... transaxles. In most cases, these items are excluded from the date of purchase and beyond, such as prescribed in the operator's manual. Should you must be taken to an authorized Husqvarna servicing dealer prior to handle warranty adjustments or repairs on Exhibit A. Environmental Protection Agency or similar state, provincial or federal agencies...
... transaxles. In most cases, these items are excluded from the date of purchase and beyond, such as prescribed in the operator's manual. Should you must be taken to an authorized Husqvarna servicing dealer prior to handle warranty adjustments or repairs on Exhibit A. Environmental Protection Agency or similar state, provincial or federal agencies...
Owners Manual
Page 23
...or repair service by anyone other than those meeting emission performance requirements listed in the operator's manual; (k) Tampering with , rocks, or other than an authorized Husqvarna servicing dealer during the hours of the following are NOT considered defects in your product online at...belts, pulleys, spindle housings, bearings, blades, rods, height adjusters, caster/anti scalp wheels etc... HOW TO OBTAIN SERVICE 10. Authorized Husqvarna Servicing Dealer/Center. If you do not meet Engine manufacturer's specifications; (g) Use of your responsibility (at 1-800-487-5951 during the ...
...or repair service by anyone other than those meeting emission performance requirements listed in the operator's manual; (k) Tampering with , rocks, or other than an authorized Husqvarna servicing dealer during the hours of the following are NOT considered defects in your product online at...belts, pulleys, spindle housings, bearings, blades, rods, height adjusters, caster/anti scalp wheels etc... HOW TO OBTAIN SERVICE 10. Authorized Husqvarna Servicing Dealer/Center. If you do not meet Engine manufacturer's specifications; (g) Use of your responsibility (at 1-800-487-5951 during the ...

Parts List
Page 3
..., LH Handle Bracket, RH Screw, Dogpoint 3/8-16 x 1-1/8 KEY PART NO. IMPORTANT: Use only Original Equipment Manufacturer (O.E.M.) replacement parts. MODEL NUMBER HD775HW (96143008603) PRODUCT NO. 961 43 00-86 KEY PART NO. NO. 44 581 70 83-30 46 581 85 15-01 47 532 42... Head Fastener, Push Mounting Bracket, Rear Skirt Clip, Cable Belt Keeper Front Shroud Assembly Screw Operator's Manual, English / French 3 NOTE: All component dimensions given in U.S. inches. 1 inch = 25.4 mm. HUSQVARNA LAWN MOWER - Failure to do so could be hazardous, damage your lawn mower and void your warranty...
..., LH Handle Bracket, RH Screw, Dogpoint 3/8-16 x 1-1/8 KEY PART NO. IMPORTANT: Use only Original Equipment Manufacturer (O.E.M.) replacement parts. MODEL NUMBER HD775HW (96143008603) PRODUCT NO. 961 43 00-86 KEY PART NO. NO. 44 581 70 83-30 46 581 85 15-01 47 532 42... Head Fastener, Push Mounting Bracket, Rear Skirt Clip, Cable Belt Keeper Front Shroud Assembly Screw Operator's Manual, English / French 3 NOTE: All component dimensions given in U.S. inches. 1 inch = 25.4 mm. HUSQVARNA LAWN MOWER - Failure to do so could be hazardous, damage your lawn mower and void your warranty...


