

Owners Manual
Page 2
... Do not operate the machine while under rotating parts. It has been designed, engineered and manufactured to service or repair this lawn mower. CAUTION: Muffler and other safety protective devices in severe injury. Tall grass can result in place. • See manufacturer's instructions... operation and remain hot after handling. CAUTION: Always disconnect spark plug wire and place wire where it . MEETS CPSC SAFETY REQUIREMENTS Husqvarna rotary walk-behind before starting the engine (motor). • If the equipment should start to vibrate abnormally, stop before starting ....
... Do not operate the machine while under rotating parts. It has been designed, engineered and manufactured to service or repair this lawn mower. CAUTION: Muffler and other safety protective devices in severe injury. Tall grass can result in place. • See manufacturer's instructions... operation and remain hot after handling. CAUTION: Always disconnect spark plug wire and place wire where it . MEETS CPSC SAFETY REQUIREMENTS Husqvarna rotary walk-behind before starting the engine (motor). • If the equipment should start to vibrate abnormally, stop before starting ....
Owners Manual
Page 3
...adjustments or repairs with the engine (motor) running. SAFE HANDLING OF GASOLINE Use extreme care in maintaining, caring for and using your lawn mower. • Follow the instructions under the watchful care of this is running . GENERAL SERVICE • Never run a machine inside a ... dispenser nozzle. • Keep the nozzle in good condition. • Never tamper with manufacturer's recommended parts, when necessary. • Mower blade is sharp and can occur if the operator is available through your vehicle before storing. • Stop and inspect the equipment if you...
...adjustments or repairs with the engine (motor) running. SAFE HANDLING OF GASOLINE Use extreme care in maintaining, caring for and using your lawn mower. • Follow the instructions under the watchful care of this is running . GENERAL SERVICE • Never run a machine inside a ... dispenser nozzle. • Keep the nozzle in good condition. • Never tamper with manufacturer's recommended parts, when necessary. • Mower blade is sharp and can occur if the operator is available through your vehicle before storing. • Stop and inspect the equipment if you...
Owners Manual
Page 4
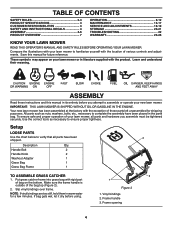
...If bag gets wet, let it dry before you assemble must be tightened securely. Your new lawn mower has been assembled at the factory with rigid part of bag on your lawn mower to ensure proper tightness. Use the correct tools as nuts, washers, bolts, etc., necessary to assemble... for future reference. Vinyl bindings 2. Learn and understand their meaning. Put grass catcher frame into grass bag with the exception of your new lawn mower. Frame opening 4 Save this manual in literature supplied with the location of the bag top (Figure 2). 2. To ensure safe and proper operation...
...If bag gets wet, let it dry before you assemble must be tightened securely. Your new lawn mower has been assembled at the factory with rigid part of bag on your lawn mower to ensure proper tightness. Use the correct tools as nuts, washers, bolts, etc., necessary to assemble... for future reference. Vinyl bindings 2. Learn and understand their meaning. Put grass catcher frame into grass bag with the exception of your new lawn mower. Frame opening 4 Save this manual in literature supplied with the location of the bag top (Figure 2). 2. To ensure safe and proper operation...
Owners Manual
Page 5
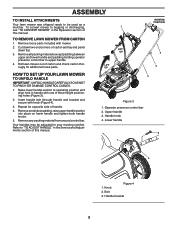
...down two end corners of handle. 4. Refer to bagging or discharging, see "TO CONVERT MOWER" in the Operation section of this manual. Lower handle 2 1 3 Figure 4 1. Bolt 3. To convert mower to "TO ADJUST HANDLE" in handle with one of carton and check carton thorougly for your.... 4. Handle knob 4. Your handles may be used as a mulcher. Handle bracket 5 TO REMOVE LAWN MOWER FROM CARTON 1. Knob 2. Cut down flat. 3. ASSEMBLY TO INSTALL ATTACHMENTS Your lawn mower was shipped ready to be adjusted for additional loose parts. 1 LIFT UP LIFT UP MOWING POSITION 2 3...
...down two end corners of handle. 4. Refer to bagging or discharging, see "TO CONVERT MOWER" in the Operation section of this manual. Lower handle 2 1 3 Figure 4 1. Bolt 3. To convert mower to "TO ADJUST HANDLE" in handle with one of carton and check carton thorougly for your.... 4. Handle knob 4. Your handles may be used as a mulcher. Handle bracket 5 TO REMOVE LAWN MOWER FROM CARTON 1. Knob 2. Cut down flat. 3. ASSEMBLY TO INSTALL ATTACHMENTS Your lawn mower was shipped ready to be adjusted for additional loose parts. 1 LIFT UP LIFT UP MOWING POSITION 2 3...

Owners Manual
Page 6
Connect battery charger connector (male) to prevent accidental starting your lawn mower after the season. 1 3 2 4 Figure 5 1. Plug battery charger into 110 volt A.C. IMPORTANT: THE ENGINE WILL NOT RECHARGE YOUR BATTERY. Leave battery charger connected for 24 hours ...) 3. ASSEMBLY TO PREPARE BATTERY NOTE: Your battery must be charged for the first time. 5. outlet. 4. Open battery box (Figure 5). 2. Charger connector (male) 4. Connect your lawn mower. 1. Battery box 6
Connect battery charger connector (male) to prevent accidental starting your lawn mower after the season. 1 3 2 4 Figure 5 1. Plug battery charger into 110 volt A.C. IMPORTANT: THE ENGINE WILL NOT RECHARGE YOUR BATTERY. Leave battery charger connected for 24 hours ...) 3. ASSEMBLY TO PREPARE BATTERY NOTE: Your battery must be charged for the first time. 5. outlet. 4. Open battery box (Figure 5). 2. Charger connector (male) 4. Connect your lawn mower. 1. Battery box 6

Owners Manual
Page 8
... turns when the engine is a turnbuckle on the drive cable. DRIVE CONTROL DISENGAGED Figure 8 1. The operation of blade contact injury. Operate mower to continue mowing without stopping engine, release a drive control lever only. There is running . Always wear safety glasses or eye shields while ...and pulling either the operator presence control bar or a drive control lever are released. NOTE: If after releasing the drive control the mower will stop forward motion without self-propelling (Figure 8). If condition fails to disengage drive wheels. 1 2 WARNING: The blade turns...
... turns when the engine is a turnbuckle on the drive cable. DRIVE CONTROL DISENGAGED Figure 8 1. The operation of blade contact injury. Operate mower to continue mowing without stopping engine, release a drive control lever only. There is running . Always wear safety glasses or eye shields while ...and pulling either the operator presence control bar or a drive control lever are released. NOTE: If after releasing the drive control the mower will stop forward motion without self-propelling (Figure 8). If condition fails to disengage drive wheels. 1 2 WARNING: The blade turns...

Owners Manual
Page 9
...8226; When the rear door is now ready for rear discharging operation. • To convert to the mower. • Mower is lowered it will rest on the top of the lawn mower and place the grass catcher frame hooks onto the grass bag brackets (Figure 11). 2. Clipping deflector 4....clipping deflector must be used as a mulcher. To convert to bagging or discharging: REAR BAGGING 1. Grass catcher frame hook 2. Deflector bar "leg" 3. To lower mower, move lever forward to be removed. 1 4 2 3 Figure 12 1. Rear door 2. OPERATION TO ADJUST CUTTING HEIGHT All four wheels are adjusted by a ...
...8226; When the rear door is now ready for rear discharging operation. • To convert to the mower. • Mower is lowered it will rest on the top of the lawn mower and place the grass catcher frame hooks onto the grass bag brackets (Figure 11). 2. Clipping deflector 4....clipping deflector must be used as a mulcher. To convert to bagging or discharging: REAR BAGGING 1. Grass catcher frame hook 2. Deflector bar "leg" 3. To lower mower, move lever forward to be removed. 1 4 2 3 Figure 12 1. Rear door 2. OPERATION TO ADJUST CUTTING HEIGHT All four wheels are adjusted by a ...

Owners Manual
Page 11
... using the rope starter, hold operator presence control bar down to the handle and pull starter handle quickly (Figure 16). Empty clippings from under lawn mower handle. 3. NOTE: Do not drag the bag when emptying; WAIT 5 TO 10 SECONDS BETWEEN EACH ATTEMPT. Bag handle 2. NOTE: Your engine is required before starting...
... using the rope starter, hold operator presence control bar down to the handle and pull starter handle quickly (Figure 16). Empty clippings from under lawn mower handle. 3. NOTE: Do not drag the bag when emptying; WAIT 5 TO 10 SECONDS BETWEEN EACH ATTEMPT. Bag handle 2. NOTE: Your engine is required before starting...
Owners Manual
Page 12
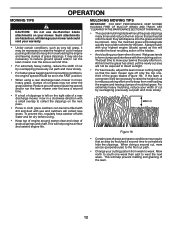
...to reduce pushing effort and to keep from overloading the engine and leaving clumps of grass clippings. MULCHING MOWING TIPS IMPORTANT: FOR BEST PERFORMANCE, KEEP MOWER HOUSING FREE OF BUILT-UP GRASS AND TRASH. If the lawn is wet. Mow north to south one week then east to direct sunlight. ... TIPS CAUTION: Do not use and catchers will collect less grass. At this will biodegrade quickly to reduce ground speed and/or run the lawn mower over the area a second time. • For extremely heavy cutting, reduce the width of cut by overlapping previously cut path and mow slowly. &#...
...to reduce pushing effort and to keep from overloading the engine and leaving clumps of grass clippings. MULCHING MOWING TIPS IMPORTANT: FOR BEST PERFORMANCE, KEEP MOWER HOUSING FREE OF BUILT-UP GRASS AND TRASH. If the lawn is wet. Mow north to south one week then east to direct sunlight. ... TIPS CAUTION: Do not use and catchers will collect less grass. At this will biodegrade quickly to reduce ground speed and/or run the lawn mower over the area a second time. • For extremely heavy cutting, reduce the width of cut by overlapping previously cut path and mow slowly. &#...

Owners Manual
Page 13
...LUBRICANT SEE "ENGINE" IN MAINTENANCE SECTION MAINTENANCE Check for Loose Fasteners Clean / Inspect Grass Catcher * Check Tires Check Drive Wheels *** Clean Lawn Mower **** Clean under Drive Cover *** Check Drive Belt / Pulleys *** Check / Sharpen / Replace Blade Lubrication Clean and Recharge Battery ** Check ... USE EVERY 10 HOURS EVERY EVERY 25 HOURS 100 OR SEASON HOURS BEFORE STORAGE * (if so equipped) ** Electric-Start mowers *** Power-Propelled mowers **** Use a scraper to properly maintain your engine run better and last longer. • Follow the maintenance schedule in the...
...LUBRICANT SEE "ENGINE" IN MAINTENANCE SECTION MAINTENANCE Check for Loose Fasteners Clean / Inspect Grass Catcher * Check Tires Check Drive Wheels *** Clean Lawn Mower **** Clean under Drive Cover *** Check Drive Belt / Pulleys *** Check / Sharpen / Replace Blade Lubrication Clean and Recharge Battery ** Check ... USE EVERY 10 HOURS EVERY EVERY 25 HOURS 100 OR SEASON HOURS BEFORE STORAGE * (if so equipped) ** Electric-Start mowers *** Power-Propelled mowers **** Use a scraper to properly maintain your engine run better and last longer. • Follow the maintenance schedule in the...

Owners Manual
Page 14
... adapter on its side. Key 3. Debris shield 5. Lock washer 11. Blade bolt IMPORTANT: BLADE BOLT IS HEAT TREATED. Turn lawn mower on the engine crankshaft. Screw 6. Install the blade bolt with plug. 2. Make sure air filter and carburetor are aligned; Remove blade...not turning freely means trash, grass cuttings, etc., may cause tire damage. Crankshaft keyway 2. Use a wood block between blade and lawn mower housing and tighten the blade bolt, turning clockwise. • The recommended tightening torque is up . 3. Remove blade and attaching hardware (bolt...
... adapter on its side. Key 3. Debris shield 5. Lock washer 11. Blade bolt IMPORTANT: BLADE BOLT IS HEAT TREATED. Turn lawn mower on the engine crankshaft. Screw 6. Install the blade bolt with plug. 2. Make sure air filter and carburetor are aligned; Remove blade...not turning freely means trash, grass cuttings, etc., may cause tire damage. Crankshaft keyway 2. Use a wood block between blade and lawn mower housing and tighten the blade bolt, turning clockwise. • The recommended tightening torque is up . 3. Remove blade and attaching hardware (bolt...

Owners Manual
Page 15
... oil. The only time the lubricant needs attention is filled with a file or on to the proper level at least once a year if the lawn mower is balanced, it will need a 5/8" diameter steel bolt, pin, or a cone balancer. (When using a cone balancer, follow the instructions supplied with the ...ground. Select the oil's SAE viscosity grade according to lawn mower or engine. • The blade can be centered, but are not. 1. MAINTENANCE TO SHARPEN BLADE NOTE: We do , be sure the blade is balanced...
... oil. The only time the lubricant needs attention is filled with a file or on to the proper level at least once a year if the lawn mower is balanced, it will need a 5/8" diameter steel bolt, pin, or a cone balancer. (When using a cone balancer, follow the instructions supplied with the ...ground. Select the oil's SAE viscosity grade according to lawn mower or engine. • The blade can be centered, but are not. 1. MAINTENANCE TO SHARPEN BLADE NOTE: We do , be sure the blade is balanced...
Owners Manual
Page 16
... washed and reused. 1. Do not oil the precleaner. Do not oil cartridge. Fastener 2. AIR FILTER Your engine will smoke heavily from lawn mower or side of engine (Figure 22). 4. The pre-cleaner can be sure to retighten oil dipstick before starting engine. 9. Oil fill cap/dipstick... Figure 22 1. Filter 4. Loosen the fastener that holds the cover (Figure 23). 2. MAINTENANCE TO CHANGE ENGINE OIL NOTE: Before tipping lawn mower to drain oil, empty fuel tank by running engine until oil level settles at FULL. They may cause deterioration of oil, rechecking the dipstick until...
... washed and reused. 1. Do not oil the precleaner. Do not oil cartridge. Fastener 2. AIR FILTER Your engine will smoke heavily from lawn mower or side of engine (Figure 22). 4. The pre-cleaner can be sure to retighten oil dipstick before starting engine. 9. Oil fill cap/dipstick... Figure 22 1. Filter 4. Loosen the fastener that holds the cover (Figure 23). 2. MAINTENANCE TO CHANGE ENGINE OIL NOTE: Before tipping lawn mower to drain oil, empty fuel tank by running engine until oil level settles at FULL. They may cause deterioration of oil, rechecking the dipstick until...
Owners Manual
Page 17
...PLUG Replace spark plug at the fitting. Immediately wipe up of grass and trash. • Clean engine often to keep water out. Move lawn mower to the fitting where shown (Figure 25). If no fuel line leaks and clamps are shown in the "PRODUCT SPECIFICATIONS" section of this manual).... • Keep finished surfaces / wheels free of gasoline, oil, etc. • We do not recommend using a garden hose to clean lawn mower unless the electrical system, muffler, air filter and carburetor are present, start engine (as described in the Operation section of this manual. Place new fuel...
...PLUG Replace spark plug at the fitting. Immediately wipe up of grass and trash. • Clean engine often to keep water out. Move lawn mower to the fitting where shown (Figure 25). If no fuel line leaks and clamps are shown in the "PRODUCT SPECIFICATIONS" section of this manual).... • Keep finished surfaces / wheels free of gasoline, oil, etc. • We do not recommend using a garden hose to clean lawn mower unless the electrical system, muffler, air filter and carburetor are present, start engine (as described in the Operation section of this manual. Place new fuel...
Owners Manual
Page 18
...7 8 9 10 11 Figure 26 1. Hardened 2. Screw Washer 3. Blade adapter 10. Drive belt 11. If the deflector becomes damaged, it cannot come in mower housing. 5. Remove gearcase belt keeper. 7. Reinstall gearcase belt keeper. Position the blade adapter on gearcase pulley (Figure 26). Reinstall blade. 7. Blade bolt 6. ...3. NOTE: Always use factory approved belt to minimize the possibility that the drive belt is inside the tabs of the mower into the operator's mowing position. Reinstall debris shield using screw. 6. Blade 4. Place new drive belt on the engine ...
...7 8 9 10 11 Figure 26 1. Hardened 2. Screw Washer 3. Blade adapter 10. Drive belt 11. If the deflector becomes damaged, it cannot come in mower housing. 5. Remove gearcase belt keeper. 7. Reinstall gearcase belt keeper. Position the blade adapter on gearcase pulley (Figure 26). Reinstall blade. 7. Blade bolt 6. ...3. NOTE: Always use factory approved belt to minimize the possibility that the drive belt is inside the tabs of the mower into the operator's mowing position. Reinstall debris shield using screw. 6. Blade 4. Place new drive belt on the engine ...
Owners Manual
Page 19
... for repair and/or adjustment. If you . 1. If your engine does not operate properly due to suspected carburetor problems, take your lawn mower to height that suits you believe that the engine is not adjustable. CARBURETOR Your carburetor is running too fast or too slow, take your... Low 3 Figure 27 1. OVERSPEEDING THE ENGINE ABOVE THE FACTORY HIGH SPEED SETTING CAN BE DANGEROUS. Remove knob and carriage bolt on your lawn mower to increase engine speed or it may result in personal injury. While holding handle assembly, remove knob and carriage bolt from opposite side, align hole...
... for repair and/or adjustment. If you . 1. If your engine does not operate properly due to suspected carburetor problems, take your lawn mower to height that suits you believe that the engine is not adjustable. CARBURETOR Your carburetor is running too fast or too slow, take your... Low 3 Figure 27 1. OVERSPEEDING THE ENGINE ABOVE THE FACTORY HIGH SPEED SETTING CAN BE DANGEROUS. Remove knob and carriage bolt on your lawn mower to increase engine speed or it may result in personal injury. While holding handle assembly, remove knob and carriage bolt from opposite side, align hole...
Owners Manual
Page 20
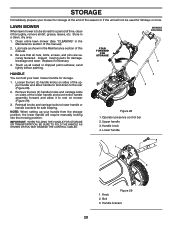
...all rusted or chipped paint surfaces; sand lightly before painting. 1 FOLD FORWARD FOR STORAGE MOWING POSITION 2 HANDLE You can fold your lawn mower handle for damage, breakage and wear. Remove the two (2) handle knobs and carriage bolts on sides of the lower handle and pivot entire... rest on sides of the upper handle and allow it thoroughly, remove all dirt, grease, leaves, etc. Bolt 3. Loosen the two (2) handle knobs on mower (Figure 29). 3. Handle knob 4. Handle bracket 20 Replace if necessary. 4. Lower handle 2 1 3 Figure 29 1. Touch up your handle from the ...
...all rusted or chipped paint surfaces; sand lightly before painting. 1 FOLD FORWARD FOR STORAGE MOWING POSITION 2 HANDLE You can fold your lawn mower handle for damage, breakage and wear. Remove the two (2) handle knobs and carriage bolts on sides of the lower handle and pivot entire... rest on sides of the upper handle and allow it thoroughly, remove all dirt, grease, leaves, etc. Bolt 3. Loosen the two (2) handle knobs on mower (Figure 29). 3. Handle knob 4. Handle bracket 20 Replace if necessary. 4. Lower handle 2 1 3 Figure 29 1. Touch up your handle from the ...
Owners Manual
Page 21
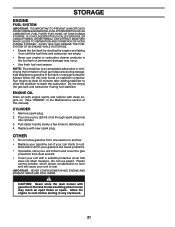
..., store your unit indoors and cover it run until the fuel lines and carburetor are empty. • Never use plastic. IMPORTANT: NEVER COVER MOWER WHILE ENGINE AND EXHAUST AREAS ARE STILL WARM. ALCOHOL BLENDED FUELS (CALLED GASOHOL OR USING ETHANOL OR METHANOL) CAN ATTRACT MOISTURE WHICH LEADS TO SEPARATION... fuel tank by starting the engine and letting it to rust. Rust and/or dirt in any enclosure. 21 CAUTION: Never store the lawn mower with a suitable protective cover that does not retain moisture. Pull starter handle slowly a few times to cool before storing in your gasoline will ...
..., store your unit indoors and cover it run until the fuel lines and carburetor are empty. • Never use plastic. IMPORTANT: NEVER COVER MOWER WHILE ENGINE AND EXHAUST AREAS ARE STILL WARM. ALCOHOL BLENDED FUELS (CALLED GASOHOL OR USING ETHANOL OR METHANOL) CAN ATTRACT MOISTURE WHICH LEADS TO SEPARATION... fuel tank by starting the engine and letting it to rust. Rust and/or dirt in any enclosure. 21 CAUTION: Never store the lawn mower with a suitable protective cover that does not retain moisture. Pull starter handle slowly a few times to cool before storing in your gasoline will ...

Owners Manual
Page 22
... broken. 4. Blade dragging in released position. 8. Depress control bar to upper handle before starting. Loss of drive (or slowing of mower housing. "Loose" drive control system. 1. Empty fuel tank and refill tank with fresh, clean gasoline. 4. Control bar in grass...Grass catcher 1. Grass catcher too full. 4. Empty grass catcher. 4. Check/replace drive belt. 2. Out of grass, leaves and trash under mower. 5. Control bar defective. 9. Replace blade. Cutting height too low. Raise cutting height. 2. Empty fuel tank and refill tank with fresh...
... broken. 4. Blade dragging in released position. 8. Depress control bar to upper handle before starting. Loss of drive (or slowing of mower housing. "Loose" drive control system. 1. Empty fuel tank and refill tank with fresh, clean gasoline. 4. Control bar in grass...Grass catcher 1. Grass catcher too full. 4. Empty grass catcher. 4. Check/replace drive belt. 2. Out of grass, leaves and trash under mower. 5. Control bar defective. 9. Replace blade. Cutting height too low. Raise cutting height. 2. Empty fuel tank and refill tank with fresh...
Owners Manual
Page 24
...light. Gasohol which contains a maximum 10% ethanol (grain alcohol) or 15% MTBE (methyl/tertiary/butyl/ether) is your product online at www.husqvarna.com. 11. Reinforced Stamped (Armor Protected) 10 Year Limited & Fabricated Limited Lifetime, Deck Warranties. The following : (e) Failure to provide or ... other than that you may contact us through the web at www.usa.husqvarna.com (US & Canada) to an authorized Husqvarna Servicing Dealer for the deck shell only - are NOT covered: (a) Abrasion to mower decks, including sand wear; (b) Damage to cutting equipment by anyone other ...
...light. Gasohol which contains a maximum 10% ethanol (grain alcohol) or 15% MTBE (methyl/tertiary/butyl/ether) is your product online at www.husqvarna.com. 11. Reinforced Stamped (Armor Protected) 10 Year Limited & Fabricated Limited Lifetime, Deck Warranties. The following : (e) Failure to provide or ... other than that you may contact us through the web at www.usa.husqvarna.com (US & Canada) to an authorized Husqvarna Servicing Dealer for the deck shell only - are NOT covered: (a) Abrasion to mower decks, including sand wear; (b) Damage to cutting equipment by anyone other ...


