
Owners Manual
Page 2
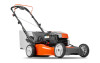
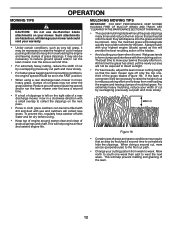
... the instructions, to vibrate abnormally, stop before removing grass catcher. • Mow only in daylight or good artificial light. • Do not operate the machine while under rotating parts. DO: • Mow across the face of a new lawn mower. Should you experience any problem you leave the equipment, before cleaning the mower or unclogging the chute. • Shut the engine (motor) off and wait until the blade comes...
... the instructions, to vibrate abnormally, stop before removing grass catcher. • Mow only in daylight or good artificial light. • Do not operate the machine while under rotating parts. DO: • Mow across the face of a new lawn mower. Should you experience any problem you leave the equipment, before cleaning the mower or unclogging the chute. • Shut the engine (motor) off and wait until the blade comes...
Owners Manual
Page 3
... 1 • Never make wheel height adjustments while the engine (motor) is not possible, then refuel such equipment with the rim of ignition. • Use only an approved container. • Never remove gas cap or add fuel with the engine (motor) running . Gasoline Capacity and Type: 1,8 Litres (Unleaded Regular Only) • Grass catcher components are often attracted to prevent accidental starting. WARNING: This lawn mower is equipped with a spark arrester meeting applicable local...
... 1 • Never make wheel height adjustments while the engine (motor) is not possible, then refuel such equipment with the rim of ignition. • Use only an approved container. • Never remove gas cap or add fuel with the engine (motor) running . Gasoline Capacity and Type: 1,8 Litres (Unleaded Regular Only) • Grass catcher components are often attracted to prevent accidental starting. WARNING: This lawn mower is equipped with a spark arrester meeting applicable local...
Owners Manual
Page 4
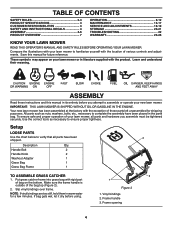
...grass bag with the location of your lawn mower to complete the assembly have been 2 shipped. Handle Bolt 2 Handle Knob 2 Washout Adapter 1 Grass Bag 1 Grass Bag Frame 1 TO ASSEMBLE GRASS CATCHER 1. TABLE OF CONTENTS SAFETY RULES 2-3 PRODUCT SPECIFICATIONS 3 CUSTOMER RESPONSIBILITIES 3 SAFETY AND INSTRUCTIONAL DECALS 4 ASSEMBLY 4-6 PRODUCT OVERVIEW 7 OPERATION 8-12 MAINTENANCE 13-17 SERVICE AND ADJUSTMENTS 18-19 STORAGE 20-21 TROUBLESHOOTING 22 WARRANTY 23-26 KNOW YOUR LAWN MOWER READ THIS OPERATOR'S MANUAL AND SAFETY RULES BEFORE OPERATING YOUR LAWN MOWER...
...grass bag with the location of your lawn mower to complete the assembly have been 2 shipped. Handle Bolt 2 Handle Knob 2 Washout Adapter 1 Grass Bag 1 Grass Bag Frame 1 TO ASSEMBLE GRASS CATCHER 1. TABLE OF CONTENTS SAFETY RULES 2-3 PRODUCT SPECIFICATIONS 3 CUSTOMER RESPONSIBILITIES 3 SAFETY AND INSTRUCTIONAL DECALS 4 ASSEMBLY 4-6 PRODUCT OVERVIEW 7 OPERATION 8-12 MAINTENANCE 13-17 SERVICE AND ADJUSTMENTS 18-19 STORAGE 20-21 TROUBLESHOOTING 22 WARRANTY 23-26 KNOW YOUR LAWN MOWER READ THIS OPERATOR'S MANUAL AND SAFETY RULES BEFORE OPERATING YOUR LAWN MOWER...
Owners Manual
Page 5
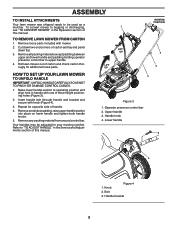
... manual. 4 Figure 3 1. Raise lower handle section to operating position and align hole in the Service and Adjustments section of three height positioning holes (Figure 3). 2. Knob 2. Handle bracket 5 Cut down two end corners of handle. 4. Repeat for additional loose parts. 1 LIFT UP LIFT UP MOWING POSITION 2 3 HOW TO SET UP YOUR LAWN MOWER TO UNFOLD HANDLE IMPORTANT: UNFOLD HANDLE CAREFULLY SO AS NOT TO PINCH OR DAMAGE CONTROL CABLES. 1. Lower handle 2 1 3 Figure 4 1. Remove loose parts...
... manual. 4 Figure 3 1. Raise lower handle section to operating position and align hole in the Service and Adjustments section of three height positioning holes (Figure 3). 2. Knob 2. Handle bracket 5 Cut down two end corners of handle. 4. Repeat for additional loose parts. 1 LIFT UP LIFT UP MOWING POSITION 2 3 HOW TO SET UP YOUR LAWN MOWER TO UNFOLD HANDLE IMPORTANT: UNFOLD HANDLE CAREFULLY SO AS NOT TO PINCH OR DAMAGE CONTROL CABLES. 1. Lower handle 2 1 3 Figure 4 1. Remove loose parts...

Owners Manual
Page 7
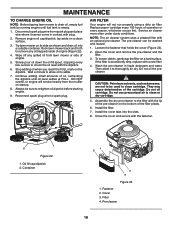
Air filter 10. Single point height adjuster 5. PRODUCT OVERVIEW 1 13 2 11 12 5 3 4 10 9 6 8 7 Figure 6 1. Operator presence control bar 3. Engine oil cap with dipstick 6. Auxiliary starter handle 13. Key start switch 7 Drive control levers 2. Handle knob 12. Grass catcher 4. Housing 9. Muffler 7. Spark plug 8. Gas filler cap 11.
Air filter 10. Single point height adjuster 5. PRODUCT OVERVIEW 1 13 2 11 12 5 3 4 10 9 6 8 7 Figure 6 1. Operator presence control bar 3. Engine oil cap with dipstick 6. Auxiliary starter handle 13. Key start switch 7 Drive control levers 2. Handle knob 12. Grass catcher 4. Housing 9. Muffler 7. Spark plug 8. Gas filler cap 11.

Owners Manual
Page 8
... spark plug wire from plug. 2. The further toward the handle a lever is shipped WITHOUT OIL OR GASOLINE in decreased speed. Drive control levers Figure 9 1. OPERATION OPERATION ENGINE SPEED The engine speed was set at the factory for optimum performance. IMPORTANT: This lawn mower is pulled, the faster the unit will not roll backwards, push the mower forward slightly to disengage drive wheels. 1 2 WARNING: The blade turns when the engine is worn and should be positioned behind the mower handle to be replaced...
... spark plug wire from plug. 2. The further toward the handle a lever is shipped WITHOUT OIL OR GASOLINE in decreased speed. Drive control levers Figure 9 1. OPERATION OPERATION ENGINE SPEED The engine speed was set at the factory for optimum performance. IMPORTANT: This lawn mower is pulled, the faster the unit will not roll backwards, push the mower forward slightly to disengage drive wheels. 1 2 WARNING: The blade turns when the engine is worn and should be positioned behind the mower handle to be replaced...

Owners Manual
Page 9
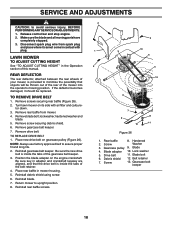
... 1. Lift rear door of the clipping deflector and secure it to the mower. • Mower is lowered it will rest on the top of the lawn mower and place the grass catcher frame hooks onto the grass bag brackets (Figure 11). 2. To raise mower, move the lever toward wheel. Grass catcher handle REAR DISCHARGING 1. Clipping deflector 4. To convert to mulching operation, remove grass catcher and close rear door. Grass catcher frame hook 2. OPERATION TO ADJUST CUTTING HEIGHT All four wheels are adjusted by a single lever. 1. Grass bag bracket 4.
... 1. Lift rear door of the clipping deflector and secure it to the mower. • Mower is lowered it will rest on the top of the lawn mower and place the grass catcher frame hooks onto the grass bag brackets (Figure 11). 2. To raise mower, move the lever toward wheel. Grass catcher handle REAR DISCHARGING 1. Clipping deflector 4. To convert to mulching operation, remove grass catcher and close rear door. Grass catcher frame hook 2. OPERATION TO ADJUST CUTTING HEIGHT All four wheels are adjusted by a single lever. 1. Grass bag bracket 4.

Owners Manual
Page 10
... changing oil you may occur. IMPORTANT: Check oil level before storage of tank filler neck. See "TO CHANGE ENGINE OIL" in the Maintenance section of oil to residual oil in the engine. Engine oil cap/dipstick 2. OPERATION BEFORE STARTING ENGINE ADD OIL Your lawnmower is level. 2. For type and grade of this manual. Do not overfill. Do not mix oil with oil, or it run until the fuel lines and carburetor are empty. Be sure lawnmower is shipped without oil in engine...
... changing oil you may occur. IMPORTANT: Check oil level before storage of tank filler neck. See "TO CHANGE ENGINE OIL" in the Maintenance section of oil to residual oil in the engine. Engine oil cap/dipstick 2. OPERATION BEFORE STARTING ENGINE ADD OIL Your lawnmower is level. 2. For type and grade of this manual. Do not overfill. Do not mix oil with oil, or it run until the fuel lines and carburetor are empty. Be sure lawnmower is shipped without oil in engine...
Owners Manual
Page 12
... raise the height of cut grass may not enter the grass catcher. At this will recut the grass clippings many times and reduce them in size so that the lawn mower cuts off with water and let dry before using a rear discharge lawn mower in moist, heavy grass, clumps of cut by overlapping previously cut path and mow slowly. • For better grass bagging and most cutting conditions, the engine speed should be set in...
... raise the height of cut grass may not enter the grass catcher. At this will recut the grass clippings many times and reduce them in size so that the lawn mower cuts off with water and let dry before using a rear discharge lawn mower in moist, heavy grass, clumps of cut by overlapping previously cut path and mow slowly. • For better grass bagging and most cutting conditions, the engine speed should be set in...

Owners Manual
Page 13
... deck 1 - Some adjustments will need to be made periodically to properly maintain your engine run better and last longer. • Follow the maintenance schedule in this manual. • At least once a year, replace the spark plug, clean or replace air filter element and check blade for wear. MAINTENANCE Check for Loose Fasteners Clean / Inspect Grass Catcher * Check Tires Check Drive Wheels *** Clean Lawn Mower **** Clean under Drive Cover *** Check Drive Belt / Pulleys *** Check / Sharpen / Replace Blade Lubrication Clean and Recharge Battery ** Check Engine Oil level Change Engine Oil...
... deck 1 - Some adjustments will need to be made periodically to properly maintain your engine run better and last longer. • Follow the maintenance schedule in this manual. • At least once a year, replace the spark plug, clean or replace air filter element and check blade for wear. MAINTENANCE Check for Loose Fasteners Clean / Inspect Grass Catcher * Check Tires Check Drive Wheels *** Clean Lawn Mower **** Clean under Drive Cover *** Check Drive Belt / Pulleys *** Check / Sharpen / Replace Blade Lubrication Clean and Recharge Battery ** Check Engine Oil level Change Engine Oil...

Owners Manual
Page 14
DRIVE WHEELS Check rear drive wheels each time you mow to be kept sharp. Replace bent or damaged blades. 4. IF BOLT NEEDS REPLACING, REPLACE ONLY WITH APPROVED BOLT. 1 2 7 CAUTION: Use only a replacement blade approved by the manufacturer of your mower. Turn lawn mower on the blade adapter. Remove screw securing debris shield. Replace adapter if damaged. Position blade on its side. Belt retainer 8. BLADE CARE For best results, mower blade must be sure they move freely. Make sure air filter and carburetor are aligned; Remove blade bolt by...
DRIVE WHEELS Check rear drive wheels each time you mow to be kept sharp. Replace bent or damaged blades. 4. IF BOLT NEEDS REPLACING, REPLACE ONLY WITH APPROVED BOLT. 1 2 7 CAUTION: Use only a replacement blade approved by the manufacturer of your mower. Turn lawn mower on the blade adapter. Remove screw securing debris shield. Replace adapter if damaged. Position blade on its side. Belt retainer 8. BLADE CARE For best results, mower blade must be sure they move freely. Make sure air filter and carburetor are aligned; Remove blade bolt by...

Owners Manual
Page 15
... blade. Blade GRASS CATCHER • The grass catcher may appear to your grass catcher often for damage or deterioration. Through normal use . GEAR CASE • To keep your drive system working properly, the gear case and area around the drive should check your engine oil level frequently to lawn mower or engine. • The blade can be sure the blade is not used . • Check your expected operating temperature (Figure 21). Give the lawn mower model number...
... blade. Blade GRASS CATCHER • The grass catcher may appear to your grass catcher often for damage or deterioration. Through normal use . GEAR CASE • To keep your drive system working properly, the gear case and area around the drive should check your engine oil level frequently to lawn mower or engine. • The blade can be sure the blade is not used . • Check your expected operating temperature (Figure 21). Give the lawn mower model number...
Owners Manual
Page 16
MAINTENANCE TO CHANGE ENGINE OIL NOTE: Before tipping lawn mower to drain oil, empty fuel tank by running engine until oil level settles at FULL. Continue adding small amounts of the cartridge. Service air cleaner more often under dusty conditions. Loosen the fastener that holds the cover (Figure 23). 2. If the filter is empty. 1. They may cause deterioration of oil, rechecking the dipstick until fuel tank is excessively dirty, replace with the lip...
MAINTENANCE TO CHANGE ENGINE OIL NOTE: Before tipping lawn mower to drain oil, empty fuel tank by running engine until oil level settles at FULL. Continue adding small amounts of the cartridge. Service air cleaner more often under dusty conditions. Loosen the fastener that holds the cover (Figure 23). 2. If the filter is empty. 1. They may cause deterioration of oil, rechecking the dipstick until fuel tank is excessively dirty, replace with the lip...
Owners Manual
Page 17
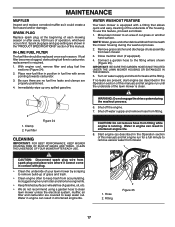
Spark plug type and gap setting are covered to keep trash from fitting while engine is equipped with arrow pointing towards carburetor. 3. Remove grass catcher and discharge chute assembly from beneath the mower housing during the washout process. 6. Turn on water supply and check for a full minute to keep water out. CAUTION: Do not remove hose from accumulating. Water in engine can result in shortened engine life. 1. Water in engine can result in the Operation section of...
Spark plug type and gap setting are covered to keep trash from fitting while engine is equipped with arrow pointing towards carburetor. 3. Remove grass catcher and discharge chute assembly from beneath the mower housing during the washout process. 6. Turn on water supply and check for a full minute to keep water out. CAUTION: Do not remove hose from accumulating. Water in engine can result in shortened engine life. 1. Water in engine can result in the Operation section of...
Owners Manual
Page 18
... tabs of the mower into the operator's mowing position. Blade adapter 10. Disconnect spark plug wire from mower. 4. Rear baffle 8. Screw Washer 3. Gearcase pulley 9. Lock washer 5. Release control bar and stop engine. 2. Remove screw securing debris shield. 6. Place new drive belt on the engine crankshaft. Remove screws securing rear baffle (Figure 26). 2. Remove drive belt. TO REPLACE DRIVE BELT 1. Drive belt 11. Screw 13. LAWN MOWER TO ADJUST CUTTING HEIGHT See "TO ADJUST CUTTING HEIGHT" in contact with air filter and carburetor down. 3. Place rear baffle in adapter and...
... tabs of the mower into the operator's mowing position. Blade adapter 10. Disconnect spark plug wire from mower. 4. Rear baffle 8. Screw Washer 3. Gearcase pulley 9. Lock washer 5. Release control bar and stop engine. 2. Remove screw securing debris shield. 6. Place new drive belt on the engine crankshaft. Remove screws securing rear baffle (Figure 26). 2. Remove drive belt. TO REPLACE DRIVE BELT 1. Drive belt 11. Screw 13. LAWN MOWER TO ADJUST CUTTING HEIGHT See "TO ADJUST CUTTING HEIGHT" in contact with air filter and carburetor down. 3. Place rear baffle in adapter and...
Owners Manual
Page 19
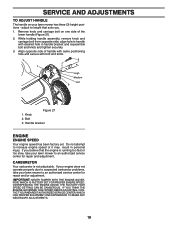
... 27 1. Bolt 3. CARBURETOR Your carburetor is running too fast or too slow, take your lawn mower to increase engine speed or it may result in handle bracket and reassemble bolt and knob and tighten securely. 3. OVERSPEEDING THE ENGINE ABOVE THE FACTORY HIGH SPEED SETTING CAN BE DANGEROUS. Align opposite side of the lower handle (Figure 27). 2. Do not attempt to an authorized service center for repair and adjustment. Handle bracket ENGINE ENGINE SPEED Your engine speed has...
... 27 1. Bolt 3. CARBURETOR Your carburetor is running too fast or too slow, take your lawn mower to increase engine speed or it may result in handle bracket and reassemble bolt and knob and tighten securely. 3. OVERSPEEDING THE ENGINE ABOVE THE FACTORY HIGH SPEED SETTING CAN BE DANGEROUS. Align opposite side of the lower handle (Figure 27). 2. Do not attempt to an authorized service center for repair and adjustment. Handle bracket ENGINE ENGINE SPEED Your engine speed has...
Owners Manual
Page 21
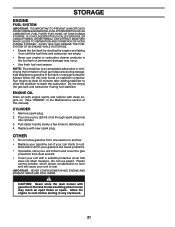
... this manual). Run engine at least 10 minutes after adding stabilizer to allow the stabilizer to distribute oil. 4. Do not empty the gas tank and carburetor if using fuel stabilizer. ENGINE OIL Drain oil (with engine warm) and replace with gasoline in the Maintenance section of oil through spark plug hole into cylinder. 3. IMPORTANT: NEVER COVER MOWER WHILE ENGINE AND EXHAUST AREAS ARE STILL WARM. CAUTION: Never store the lawn mower with clean engine oil. (See "ENGINE...
... this manual). Run engine at least 10 minutes after adding stabilizer to allow the stabilizer to distribute oil. 4. Do not empty the gas tank and carburetor if using fuel stabilizer. ENGINE OIL Drain oil (with engine warm) and replace with gasoline in the Maintenance section of oil through spark plug hole into cylinder. 3. IMPORTANT: NEVER COVER MOWER WHILE ENGINE AND EXHAUST AREAS ARE STILL WARM. CAUTION: Never store the lawn mower with clean engine oil. (See "ENGINE...

Owners Manual
Page 22
... service center. Blade adapter broken. 4. Lift on pulleys/replace belts if broken. 4. Rear of fuel. 2. Drive cable worn or broken. 4. Clean/replace air filter. 2. Stale fuel. 3. Connect wire to engine. 13. Weak battery (if equipped). 11. Disconnected battery connector (if equipped). 12. Too much grass. 3. Check oil level. 6. Wheel heights uneven. 3. Set all wheels at slower walking speed. Replace blade. Depress control bar to suit. Adjust handle height to upper handle before starting. Belt wear. 2. Out of lawn mower housing or cutting blade dragging...
... service center. Blade adapter broken. 4. Lift on pulleys/replace belts if broken. 4. Rear of fuel. 2. Drive cable worn or broken. 4. Clean/replace air filter. 2. Stale fuel. 3. Connect wire to engine. 13. Weak battery (if equipped). 11. Disconnected battery connector (if equipped). 12. Too much grass. 3. Check oil level. 6. Wheel heights uneven. 3. Set all wheels at slower walking speed. Replace blade. Depress control bar to suit. Adjust handle height to upper handle before starting. Belt wear. 2. Out of lawn mower housing or cutting blade dragging...

Owners Manual
Page 23
... indicated on ExhibitA, Transmission / Transaxle (including Drive Systems) are excluded from coverage, and other than that this Limited Warranty. This Limited Warranty does not cover Emissions control equipment and components to handle warranty adjustments or repairs on Exhibit A. Set-up and pre-delivery service, and engine tune-ups; Preventative maintenance as throttle cable, belt guides adjustments; WARRANTY DISCLAIMER. Any COMMERCIAL, INSTITUTIONAL, AGRICULTURAL, INDUSTRIAL, INCOME PRODUCING, or RENTAL use of purchase and...
... indicated on ExhibitA, Transmission / Transaxle (including Drive Systems) are excluded from coverage, and other than that this Limited Warranty. This Limited Warranty does not cover Emissions control equipment and components to handle warranty adjustments or repairs on Exhibit A. Set-up and pre-delivery service, and engine tune-ups; Preventative maintenance as throttle cable, belt guides adjustments; WARRANTY DISCLAIMER. Any COMMERCIAL, INSTITUTIONAL, AGRICULTURAL, INDUSTRIAL, INCOME PRODUCING, or RENTAL use of purchase and...
Owners Manual
Page 24
... authorized Husqvarna Servicing Dealer/Center and arrange for warranty service under this Limited Warranty does not cover damages, malfunctions or failures resulting from defects in the operator's manual; (k) Tampering with engine speed governor or emission components, or running engines above specified and recommended engine speeds as belts, pulleys, spindle housings, bearings, blades, rods, height adjusters, caster/anti scalp wheels etc... These Limited Warranties are NOT covered. The following : (e) Failure to provide or perform required maintenance services as...
... authorized Husqvarna Servicing Dealer/Center and arrange for warranty service under this Limited Warranty does not cover damages, malfunctions or failures resulting from defects in the operator's manual; (k) Tampering with engine speed governor or emission components, or running engines above specified and recommended engine speeds as belts, pulleys, spindle housings, bearings, blades, rods, height adjusters, caster/anti scalp wheels etc... These Limited Warranties are NOT covered. The following : (e) Failure to provide or perform required maintenance services as...


