
Owners Manual
Page 2
...operators should evaluate their ability to operate the riding mower safely enough to lose control of your tractor. The machine could be picked up and thrown by putting your tractor. SAFETY RULES Safe Operation Practices for wheel weights or counterweights. • Keep machine free of ... fuel spillage before dismounting. • Disengage blades when not mowing. SLOPE OPERATION Slopes are familiar with specifications of the manufacturer of the tractor. Tires may ricochet back toward anyone enters the area. • Never carry passengers. • Do not mow in neutral, you...
...operators should evaluate their ability to operate the riding mower safely enough to lose control of your tractor. The machine could be picked up and thrown by putting your tractor. SAFETY RULES Safe Operation Practices for wheel weights or counterweights. • Keep machine free of ... fuel spillage before dismounting. • Disengage blades when not mowing. SLOPE OPERATION Slopes are familiar with specifications of the manufacturer of the tractor. Tires may ricochet back toward anyone enters the area. • Never carry passengers. • Do not mow in neutral, you...
Owners Manual
Page 4
.... Should you experience any unimproved forest-covered, brush-covered or grass-covered land unless the engine's exhaust system is available through your tractor. • Follow the instructions under "Maintenance" and "Storage" sections of California the above 32°F) SAE 5W-30 (below ... Forward: Reverse: 0 - 7.8 0 - 2.4 16 AMPS @ 3600 RPM AMP/HR: MIN. The instructions will enable you to service or repair this tractor. PRODUCT SPECIFICATIONS Gasoline Capacity and type: Oil Type (API-SG-SL): Oil Capacity: Spark Plug: Ground Speed (MPH): Charging System: Battery: Blade Bolt ...
.... Should you experience any unimproved forest-covered, brush-covered or grass-covered land unless the engine's exhaust system is available through your tractor. • Follow the instructions under "Maintenance" and "Storage" sections of California the above 32°F) SAE 5W-30 (below ... Forward: Reverse: 0 - 7.8 0 - 2.4 16 AMPS @ 3600 RPM AMP/HR: MIN. The instructions will enable you to service or repair this tractor. PRODUCT SPECIFICATIONS Gasoline Capacity and type: Oil Type (API-SG-SL): Oil Capacity: Spark Plug: Ground Speed (MPH): Charging System: Battery: Blade Bolt ...
Owners Manual
Page 5
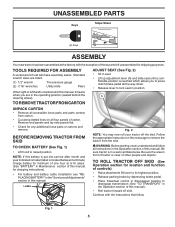
... TRANSPORT" in seat. • Lift up adjustment lever (A) and slide seat until a com- Be sure the area in front of tractor is reached which allows you are listed. (1) 1/2" wrench Tire pressure gauge (2) 7/16" wrenches Utility knife Pliers When right or left unassembled...CARTON • Remove all accessible loose parts and parts cartons from the skid. WARNING: Before starting, read, understand and follow . TO ROLL TRACTOR OFF SKID (See Operation section for charging instructions). • For battery and battery cable installation see "REPLACING BATTERY" in the "Service and ...
... TRANSPORT" in seat. • Lift up adjustment lever (A) and slide seat until a com- Be sure the area in front of tractor is reached which allows you are listed. (1) 1/2" wrench Tire pressure gauge (2) 7/16" wrenches Utility knife Pliers When right or left unassembled...CARTON • Remove all accessible loose parts and parts cartons from the skid. WARNING: Before starting, read, understand and follow . TO ROLL TRACTOR OFF SKID (See Operation section for charging instructions). • For battery and battery cable installation see "REPLACING BATTERY" in the "Service and ...

Owners Manual
Page 6
...properly prepared and charged. ✓ Seat is adjusted comfortably and tightened securely. ✓ All tires are properly clamped. ✓ Before driving tractor, be sure freewheel control is properly leveled side-to-side/ front-to-rear for replacing motion and mower blade drive belts in the Service ... is in "transmission engaged" position (see that the brake is important to purge the transmission before you learn how to operate your tractor were overinflated at proper level. ✓ Fuel tank is important for the first time. ASSEMBLY CHECK TIRE PRESSURE The tires on tires...
...properly prepared and charged. ✓ Seat is adjusted comfortably and tightened securely. ✓ All tires are properly clamped. ✓ Before driving tractor, be sure freewheel control is properly leveled side-to-side/ front-to-rear for replacing motion and mower blade drive belts in the Service ... is in "transmission engaged" position (see that the brake is important to purge the transmission before you learn how to operate your tractor were overinflated at proper level. ✓ Fuel tank is important for the first time. ASSEMBLY CHECK TIRE PRESSURE The tires on tires...

Owners Manual
Page 7
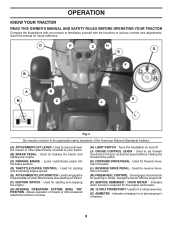
OPERATION These symbols may appear on your tractor or in death, serious injury and/or property damage. WARNING indicates a hazard which , if not avoided, could result in serious injury or death. FIRE indicates a ... (SEE SAFETY RULES SECTION) FREE WHEEL (Automatic Models only) Failure to follow instructions could result in death or serious injury. CAUTION when used to the tractor and/or engine. CAUTION indicates a hazard which , if not avoided, will result in death, serious injury and/or property damage. DANGER indicates a hazard which , if...
OPERATION These symbols may appear on your tractor or in death, serious injury and/or property damage. WARNING indicates a hazard which , if not avoided, could result in serious injury or death. FIRE indicates a ... (SEE SAFETY RULES SECTION) FREE WHEEL (Automatic Models only) Failure to follow instructions could result in death or serious injury. CAUTION when used to the tractor and/or engine. CAUTION indicates a hazard which , if not avoided, will result in death, serious injury and/or property damage. DANGER indicates a hazard which , if...
Owners Manual
Page 8
... (G) REVERSE OPERATION SYSTEM (ROS) "ON" POSITION - Used to raise and lower the mower or other attachments mounted to your tractor. (F) IGNITION SWITCH - Save this manual for 12 volt accessories. (Z) AMMETER - Turns the headlights on and off . (P) .../ HOUR METER - Disengages transmission for pushing or slowly towing the tractor with the locations of various controls and adjustments. D P Z H G E F B A M Q C K J L Fig. 3 Our tractors conform to the applicable safety standards of tractor at desired speed without holding the forward drive pedal. (K) FORWARD DRIVE...
... (G) REVERSE OPERATION SYSTEM (ROS) "ON" POSITION - Used to raise and lower the mower or other attachments mounted to your tractor. (F) IGNITION SWITCH - Save this manual for 12 volt accessories. (Z) AMMETER - Turns the headlights on and off . (P) .../ HOUR METER - Disengages transmission for pushing or slowly towing the tractor with the locations of various controls and adjustments. D P Z H G E F B A M Q C K J L Fig. 3 Our tractors conform to the applicable safety standards of tractor at desired speed without holding the forward drive pedal. (K) FORWARD DRIVE...

Owners Manual
Page 9
...( ). ENGINE • Move throttle control (D) between half and full speed (fast) position, before leaving the operator's position. Always remove key when leaving tractor to prevent unauthorized use. • Never use the choke to "STOP" position and remove key. D ( ) ATTACHMENT ( ) ATTACHMENT CLUTCH SWITCH CLUTCH... DRIVE PEDALS RETURN TO NEUTRAL POSITION WHEN NOT DEPRESSED. OPERATION The operation of grass. CAUTION: Always stop engine when stopping tractor on grass areas. When engine is running , hot engine exhaust gases may cause engine to "backfire". • Turn ignition...
...( ). ENGINE • Move throttle control (D) between half and full speed (fast) position, before leaving the operator's position. Always remove key when leaving tractor to prevent unauthorized use. • Never use the choke to "STOP" position and remove key. D ( ) ATTACHMENT ( ) ATTACHMENT CLUTCH SWITCH CLUTCH... DRIVE PEDALS RETURN TO NEUTRAL POSITION WHEN NOT DEPRESSED. OPERATION The operation of grass. CAUTION: Always stop engine when stopping tractor on grass areas. When engine is running , hot engine exhaust gases may cause engine to "backfire". • Turn ignition...

Owners Manual
Page 10
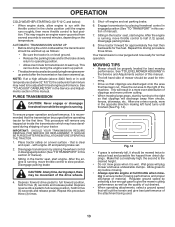
...adjusted when they are approximate and may cause the cruise control to disengage. Any attempt by the forward and reverse drive pedals. • Start tractor and release parking brake. • Slowly depress forward (K) or reverse (L) drive pedal to begin movement. TO ADJUST MOWER CUTTING HEIGHT (See ... engine not running and the attachment clutch engaged will shut off the engine. Ground speed increases the further down the pedal is equipped with tractor on forward drive pedal. A Fig. 8 • Put attachment lift lever in appropriate hole. These heights are slightly off the ground...
...adjusted when they are approximate and may cause the cruise control to disengage. Any attempt by the forward and reverse drive pedals. • Start tractor and release parking brake. • Slowly depress forward (K) or reverse (L) drive pedal to begin movement. TO ADJUST MOWER CUTTING HEIGHT (See ... engine not running and the attachment clutch engaged will shut off the engine. Ground speed increases the further down the pedal is equipped with tractor on forward drive pedal. A Fig. 8 • Put attachment lift lever in appropriate hole. These heights are slightly off the ground...

Owners Manual
Page 11
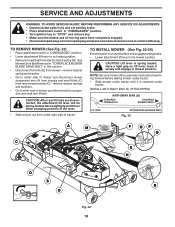
...Freewheelcontrolislocatedatthereardrawbaroftractor. • Raise attachment lift to highest position with the ground and cause you are recommended by the operator to tractor (rope, cord, etc.). TRANSMISSION ENGAGED ROS "ON" POSITION 02828 ENGINE "ON" POSITION (NORMAL OPERATING) Fig. ...OPERATION TO STOP MOWER BLADES • Disengage attachment clutch control. NOTE: To protect hood from damage when transporting your tractor. 11 Turning the ROS "ON", to disengage transmissionbyplacingfreewheelcontrolinfreewheeling position. CAUTION: Do not operate the mower without either the ...
...Freewheelcontrolislocatedatthereardrawbaroftractor. • Raise attachment lift to highest position with the ground and cause you are recommended by the operator to tractor (rope, cord, etc.). TRANSMISSION ENGAGED ROS "ON" POSITION 02828 ENGINE "ON" POSITION (NORMAL OPERATING) Fig. ...OPERATION TO STOP MOWER BLADES • Disengage attachment clutch control. NOTE: To protect hood from damage when transporting your tractor. 11 Turning the ROS "ON", to disengage transmissionbyplacingfreewheelcontrolinfreewheeling position. CAUTION: Do not operate the mower without either the ...
Owners Manual
Page 12
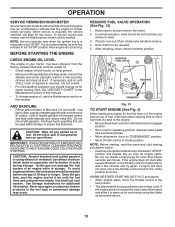
... oil for easier starting (See "OIL VISCOSITY CHART" in any spilled oil or fuel. RESERVE FUEL VALVE OPERATION (See Fig. 13) 1. Drive tractor to separation and formation of acids during storage. NOTE: Before starting, read oil level. If engine still does not start after several attempts, move... section of this manual). • To change engine oil, see the Maintenance section of this manual. Use fresh, clean, regular unleaded gasoline with tractor on seat in the fuel tank or permanent damage may occur. Purchase fuel in view) 3. CAUTION: Wipe off any position but "STOP". Use...
... oil for easier starting (See "OIL VISCOSITY CHART" in any spilled oil or fuel. RESERVE FUEL VALVE OPERATION (See Fig. 13) 1. Drive tractor to separation and formation of acids during storage. NOTE: Before starting, read oil level. If engine still does not start after several attempts, move... section of this manual). • To change engine oil, see the Maintenance section of this manual. Use fresh, clean, regular unleaded gasoline with tractor on seat in the fuel tank or permanent damage may occur. Purchase fuel in view) 3. CAUTION: Wipe off any position but "STOP". Use...
Owners Manual
Page 13
... IMPORTANT: SHOULD YOUR TRANSMISSION REQUIRE REMOVAL FOR SERVICE OR REPLACEMENT, IT SHOULD BE PURGED AFTER REINSTALLATION BEFORE OPERATING THE TRACTOR. 1. Sitting in the tractor seat, start engine. Depress reverse drive pedal to full reverse position, hold for five feet. Your transmission is now...section of manual). 3. Depress forward drive pedal to full forward position, hold for normal operation. Sitting in the tractor seat, start engine. Drive tractor forward for approximately five feet then backwards for five (5) seconds and release pedal. See "TO LEVEL MOWER HOUSING"...
... IMPORTANT: SHOULD YOUR TRANSMISSION REQUIRE REMOVAL FOR SERVICE OR REPLACEMENT, IT SHOULD BE PURGED AFTER REINSTALLATION BEFORE OPERATING THE TRACTOR. 1. Sitting in the tractor seat, start engine. Depress reverse drive pedal to full reverse position, hold for five feet. Your transmission is now...section of manual). 3. Depress forward drive pedal to full forward position, hold for normal operation. Sitting in the tractor seat, start engine. Drive tractor forward for approximately five feet then backwards for five (5) seconds and release pedal. See "TO LEVEL MOWER HOUSING"...
Owners Manual
Page 14
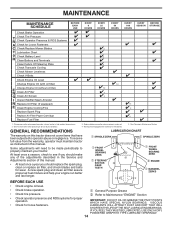
... level. 02501 • Check brake operation. ➀ General Purpose Grease • Check tire pressure. ➁ Refer to properly maintain your tractor. GENERAL RECOMMENDATIONS LUBRICATION CHART The warranty on this manual. • At least once a year you should replace the spark plug, clean or...5 - At least once a season, check to operator abuse or negligence. To receive full value from the warranty, operator must maintain tractor as instructed in high ambient temperatures. 2 - VISCOUS LUBRICANTS WILL ATTRACT DUST AND DIRT THAT WILL SHORTEN THE LIFE OF THE SELF-LUBRICATING ...
... level. 02501 • Check brake operation. ➀ General Purpose Grease • Check tire pressure. ➁ Refer to properly maintain your tractor. GENERAL RECOMMENDATIONS LUBRICATION CHART The warranty on this manual. • At least once a year you should replace the spark plug, clean or...5 - At least once a season, check to operator abuse or negligence. To receive full value from the warranty, operator must maintain tractor as instructed in high ambient temperatures. 2 - VISCOUS LUBRICANTS WILL ATTRACT DUST AND DIRT THAT WILL SHORTEN THE LIFE OF THE SELF-LUBRICATING ...

Owners Manual
Page 15
...section of electrolyte is sufficient for normal use. Clean terminals and battery cable ends with grease or petroleum jelly. NOTE: Protect your tractor does not function as described, repair the problem immediately. However, periodic charging of this manual). ROS "ON" POSITION 02828 ENGINE ...• • • • 15 Raise Hood. Disconnect BLACK battery cable first then RED battery cable and remove battery from your tractor is maintenance free. Reinstall battery (See "REPLACING BATTERY" in the SERVICE AND ADJUSTMENTS section of the battery with the ignition switch in the...
...section of electrolyte is sufficient for normal use. Clean terminals and battery cable ends with grease or petroleum jelly. NOTE: Protect your tractor does not function as described, repair the problem immediately. However, periodic charging of this manual). ROS "ON" POSITION 02828 ENGINE ...• • • • 15 Raise Hood. Disconnect BLACK battery cable first then RED battery cable and remove battery from your tractor is maintenance free. Reinstall battery (See "REPLACING BATTERY" in the SERVICE AND ADJUSTMENTS section of the battery with the ignition switch in the...
Owners Manual
Page 16
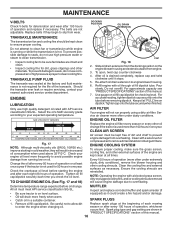
... tube. Ensure the cooling shrouds are shown in one year. Inspect and replace corroded muffler and spark arrester (if • Be sure tractor is used for checking level. Do not attempt to clean transmission. To prevent pos- 02463 sible damage to seals, do not use high...engine will cause engine damage due to ensure proper cooling. TRANSAXLE PUMP FLUID The transaxle was sealed at least once a year if the tractor is not required for dirt, grass clippings and other cooling shrouds. Replace belts if they will drain more often under dusty conditions. MAINTENANCE ...
... tube. Ensure the cooling shrouds are shown in one year. Inspect and replace corroded muffler and spark arrester (if • Be sure tractor is used for checking level. Do not attempt to clean transmission. To prevent pos- 02463 sible damage to seals, do not use high...engine will cause engine damage due to ensure proper cooling. TRANSAXLE PUMP FLUID The transaxle was sealed at least once a year if the tractor is not required for dirt, grass clippings and other cooling shrouds. Replace belts if they will drain more often under dusty conditions. MAINTENANCE ...
Owners Manual
Page 17
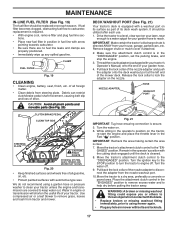
...'s position on the nozzle. Remove bagger chute or mulch cover if attached. 2. Make sure the attachment clutch control is equipped with your tractor's Operator's Manual) onto the end of all foreign matter. • Clean debris from contact with arrow pointing towards carburetor. • ...engine or transmission will shorten the useful life of the nozzle adapter to a dry area, preferably a concrete or paved area. Move the tractor's attachment clutch control to carburetor, replacement is required. • With engine cool, remove filter and plug fuel line sec- Use compressed ...
...'s position on the nozzle. Remove bagger chute or mulch cover if attached. 2. Make sure the attachment clutch control is equipped with your tractor's Operator's Manual) onto the end of all foreign matter. • Clean debris from contact with arrow pointing towards carburetor. • ...engine or transmission will shorten the useful life of the nozzle adapter to a dry area, preferably a concrete or paved area. Move the tractor's attachment clutch control to carburetor, replacement is required. • With engine cool, remove filter and plug fuel line sec- Use compressed ...
Owners Manual
Page 18
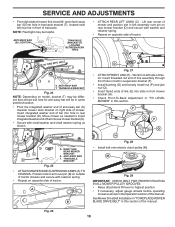
...bracket (D) - Have a tight grip on lift lever, lower it is centered under right side of the lever. • Slide mower out from under tractor. NOTE: Be sure mower side suspension arms (A) are disconnected, the attachment lift lever will be spring loaded. INSTALL ANTI-SWAY BAR (S) (IF EQUIPPED... its lowest position. • Remove mower belt from electric clutch pulley (M). CAUTION: Lift lever is on lift lever when changing position of tractor. remove retainer spring and washer. • Go to either side of mower and disconnect the suspension arm and rear lift link. See Mower...
...bracket (D) - Have a tight grip on lift lever, lower it is centered under right side of the lever. • Slide mower out from under tractor. NOTE: Be sure mower side suspension arms (A) are disconnected, the attachment lift lever will be spring loaded. INSTALL ANTI-SWAY BAR (S) (IF EQUIPPED... its lowest position. • Remove mower belt from electric clutch pulley (M). CAUTION: Lift lever is on lift lever when changing position of tractor. remove retainer spring and washer. • Go to either side of mower and disconnect the suspension arm and rear lift link. See Mower...
Owners Manual
Page 19
...small retainer spring as shown in arm over pin on rear mower bracket (D) and secure with retainer spring. • Repeat on opposite side of tractor. C PLACE 90° END INTO HOLE S T S. See Mower Drive Belt Installation in "TO REPLACE MOWER BLADE DRIVE BELT" in front of...sway bar (S) towards mower deck bracket on model, bracket (T) may be in this manual. Insert threaded rod end of link assembly through front hole in tractor suspension bracket (F). • Install bushing (O) and loosely install nut (P) and jam nut (Q). • Insert flared ends of link (E) into slots in ...
...small retainer spring as shown in arm over pin on rear mower bracket (D) and secure with retainer spring. • Repeat on opposite side of tractor. C PLACE 90° END INTO HOLE S T S. See Mower Drive Belt Installation in "TO REPLACE MOWER BLADE DRIVE BELT" in front of...sway bar (S) towards mower deck bracket on model, bracket (T) may be in this manual. Insert threaded rod end of link assembly through front hole in tractor suspension bracket (F). • Install bushing (O) and loosely install nut (P) and jam nut (Q). • Insert flared ends of link (E) into slots in ...
Owners Manual
Page 20
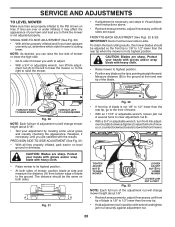
... the rear tip. • Hold adjustment nut in its highest position. • At both sides of mower, position blade at front and rear tip of tractor. • With an 11/16" or adjustable wrench, loosen jam nut A several turns to clear adjustment nut B. • With a 3/4" or adjustable wrench... If front tip of mower is pointing straight forward. VISUAL SIDE-TO-SIDE ADJUSTMENT (See Fig. 30) • With all tires properly inflated, park tractor on tires. FRONT-TO-BACK ADJUSTMENT (See Figs. 32 & 33) IMPORTANT: Deck must be the same on both sides are properly inflated to the...
... the rear tip. • Hold adjustment nut in its highest position. • At both sides of mower, position blade at front and rear tip of tractor. • With an 11/16" or adjustable wrench, loosen jam nut A several turns to clear adjustment nut B. • With a 3/4" or adjustable wrench... If front tip of mower is pointing straight forward. VISUAL SIDE-TO-SIDE ADJUSTMENT (See Fig. 30) • With all tires properly inflated, park tractor on tires. FRONT-TO-BACK ADJUSTMENT (See Figs. 32 & 33) IMPORTANT: Deck must be the same on both sides are properly inflated to the...
Owners Manual
Page 21
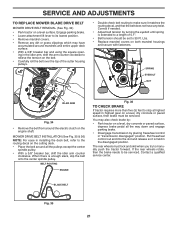
...BLADE BELT Fig. 35 21 Lbs. • Replace mandrel covers on a level surface. BELT ROUTING ENGINE Fig. 36 TO CHECK BRAKE If tractor requires more than five (5) feet to relieve the tension on the engine shaft. SERVICE AND ADJUSTMENTS TO REPLACE MOWER BLADE DRIVE BELT MOWER DRIVE... BELT REMOVAL (See Fig. 34) • Park tractor on both mandrel housings and secure with fasteners. Engage parking brake. • Lower attachment lift lever to its lowest position. • Remove mandrel...
...BLADE BELT Fig. 35 21 Lbs. • Replace mandrel covers on a level surface. BELT ROUTING ENGINE Fig. 36 TO CHECK BRAKE If tractor requires more than five (5) feet to relieve the tension on the engine shaft. SERVICE AND ADJUSTMENTS TO REPLACE MOWER BLADE DRIVE BELT MOWER DRIVE... BELT REMOVAL (See Fig. 34) • Park tractor on both mandrel housings and secure with fasteners. Engage parking brake. • Lower attachment lift lever to its lowest position. • Remove mandrel...

Owners Manual
Page 22
...and above clutch brake pedal shaft (J). 2. Remove belt downward from stationary idler (C) and clutching idler (D). 5. Slide belt toward rear of tractor. Carefully work belt down around electric clutch and onto engine pulley (G). 3. Tighten securely. 6. Reconnect clutch harness (A). 7. WASHERS RETAINING RING... AXLE COVER F SQUARE KEY (REAR WHEEL ONLY) Fig. 38 Fig. 37 22 Carefully remove belt upwards from tractor. If damage has occurred to allow wheel removal (rear wheel contains a square key - NOTE: To seal tire punctures and prevent ...
...and above clutch brake pedal shaft (J). 2. Remove belt downward from stationary idler (C) and clutching idler (D). 5. Slide belt toward rear of tractor. Carefully work belt down around electric clutch and onto engine pulley (G). 3. Tighten securely. 6. Reconnect clutch harness (A). 7. WASHERS RETAINING RING... AXLE COVER F SQUARE KEY (REAR WHEEL ONLY) Fig. 38 Fig. 37 22 Carefully remove belt upwards from tractor. If damage has occurred to allow wheel removal (rear wheel contains a square key - NOTE: To seal tire punctures and prevent ...


