

Owners Manual
Page 2
...of a load, while on the slopes slow and gradual. Material may lose traction. SLOPE OPERATION Slopes are familiar with grass catchers or other attachments; jects. Always keep the machine in speed or direction, which can affect the stability of your foot on it, do not mow it... Do not put hands or feet near rotating parts or under the influence of grass, leaves or other reproductive harm. WARNING: Tow only the attachments that you to lose control of California to neutral and coast downhill. • Avoid starting when setting up, transporting, adjusting or making repairs,...
...of a load, while on the slopes slow and gradual. Material may lose traction. SLOPE OPERATION Slopes are familiar with grass catchers or other attachments; jects. Always keep the machine in speed or direction, which can affect the stability of your foot on it, do not mow it... Do not put hands or feet near rotating parts or under the influence of grass, leaves or other reproductive harm. WARNING: Tow only the attachments that you to lose control of California to neutral and coast downhill. • Avoid starting when setting up, transporting, adjusting or making repairs,...

Owners Manual
Page 3
... nuts and bolts tight to operate the machine. • Use extra care when approaching blind corners, shrubs, trees, or other than the operator. Do not attach towed equipment except at all times until fueling is complete. SERVICE SAFE HANDLING OF GASOLINE To avoid personal injury or property damage, use extra caution...
... nuts and bolts tight to operate the machine. • Use extra care when approaching blind corners, shrubs, trees, or other than the operator. Do not attach towed equipment except at all times until fueling is complete. SERVICE SAFE HANDLING OF GASOLINE To avoid personal injury or property damage, use extra caution...

Owners Manual
Page 6
... been assembled at 6-10 amps. (See "BATTERY" in Maintenance section of this manual for location and function of controls) • Raise attachment lift lever to its highest position. • Release parking brake by depressing clutch/brake pedal. • Place freewheel control in "TRANSMISSION DISENGAGED... release parking brake lever. WARNING: Before starting, read, understand and follow to lock seat in lowest position. SET PARKING BRAKE LEVER AND LOWER ATTACHMENT LIFT LEVER (See Fig. 3 & 4) • Depress clutch/brake pedal all the way down and hold. • Pull parking brake ...
... been assembled at 6-10 amps. (See "BATTERY" in Maintenance section of this manual for location and function of controls) • Raise attachment lift lever to its highest position. • Release parking brake by depressing clutch/brake pedal. • Place freewheel control in "TRANSMISSION DISENGAGED... release parking brake lever. WARNING: Before starting, read, understand and follow to lock seat in lowest position. SET PARKING BRAKE LEVER AND LOWER ATTACHMENT LIFT LEVER (See Fig. 3 & 4) • Depress clutch/brake pedal all the way down and hold. • Pull parking brake ...
Owners Manual
Page 8
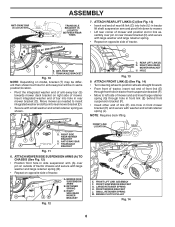
... RETAINER SPRING D. RIGHT SIDE REAR D AB MOWER BRACKET Fig. 12 FRONT LINK LOCATION M F G E E. SMALL RETAINER SPRING M. HOLE Fig. 13 8 ATTACH FRONT LINK (E) (See Fig. 14) • Turn steering wheel to position wheels straight forward. • From front of tractor, insert rod end of front ...link (E) through front hole in rear mower bracket (D). NOTE: Requires deck lifting. ENGINE CLUTCH PULLEY Fig. 14 H J 8 FRONT MOWER BRACKET J. ATTACH REAR LIFT LINKS (C) (See Fig. 13) • Insert rod end of rear lift link (C) into hole in tractor front suspension bracket (F). &#...
... RETAINER SPRING D. RIGHT SIDE REAR D AB MOWER BRACKET Fig. 12 FRONT LINK LOCATION M F G E E. SMALL RETAINER SPRING M. HOLE Fig. 13 8 ATTACH FRONT LINK (E) (See Fig. 14) • Turn steering wheel to position wheels straight forward. • From front of tractor, insert rod end of front ...link (E) through front hole in rear mower bracket (D). NOTE: Requires deck lifting. ENGINE CLUTCH PULLEY Fig. 14 H J 8 FRONT MOWER BRACKET J. ATTACH REAR LIFT LINKS (C) (See Fig. 13) • Insert rod end of rear lift link (C) into hole in tractor front suspension bracket (F). &#...

Owners Manual
Page 9
... you learn how to operate your tractor for best cutting performance. • Reduce tire pressure to PSI shown on rod and engage slowly. • Raise attachment lift lever to see that are routed properly around pulleys and inside all controls, their location and functions. CHECK TIRE PRESSURE The tires on locking...
... you learn how to operate your tractor for best cutting performance. • Reduce tire pressure to PSI shown on rod and engage slowly. • Raise attachment lift lever to see that are routed properly around pulleys and inside all controls, their location and functions. CHECK TIRE PRESSURE The tires on locking...
Owners Manual
Page 10
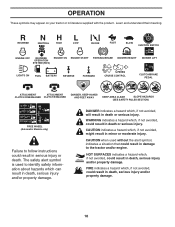
... SYSTEM (ROS) ENGINE ON ENGINE START PARKING BRAKE MOWER HEIGHT MOWER LIFT LIGHTS ON FUEL BATTERY REVERSE FORWARD CRUISE CONTROL CLUTCH/BRAKE PEDAL 15 15 ATTACHMENT ATTACHMENT CLUTCH DISENGAGED CLUTCH ENGAGED DANGER, KEEP HANDS AND FEET AWAY KEEP AREA CLEAR SLOPE HAZARDS (SEE SAFETY RULES SECTION) FREE WHEEL (Automatic Models only) Failure...
... SYSTEM (ROS) ENGINE ON ENGINE START PARKING BRAKE MOWER HEIGHT MOWER LIFT LIGHTS ON FUEL BATTERY REVERSE FORWARD CRUISE CONTROL CLUTCH/BRAKE PEDAL 15 15 ATTACHMENT ATTACHMENT CLUTCH DISENGAGED CLUTCH ENGAGED DANGER, KEEP HANDS AND FEET AWAY KEEP AREA CLEAR SLOPE HAZARDS (SEE SAFETY RULES SECTION) FREE WHEEL (Automatic Models only) Failure...

Owners Manual
Page 11
...FORWARD DRIVE PEDAL - Allows operation of tractor. (L) REVERSE DRIVE PEDAL - Used to raise and lower the mower or other attachments mounted to your tractor to your tractor. (J) CRUISE CONTROL LEVER - Used for future reference. Used to the applicable safety ... pedal into the brake position. (D) THROTTLE/CHOKE CONTROL - Indicates charging (+) or discharging (-) of the American National Standards Institute. (A) ATTACHMENT LIFT LEVER - Used for 12 volt accessories. POSITION - the engine. (S) BATTERY INDICATOR/CHARGING PLUG - Used for reverse movement of ...
...FORWARD DRIVE PEDAL - Allows operation of tractor. (L) REVERSE DRIVE PEDAL - Used to raise and lower the mower or other attachments mounted to your tractor to your tractor. (J) CRUISE CONTROL LEVER - Used for future reference. Used to the applicable safety ... pedal into the brake position. (D) THROTTLE/CHOKE CONTROL - Indicates charging (+) or discharging (-) of the American National Standards Institute. (A) ATTACHMENT LIFT LEVER - Used for 12 volt accessories. POSITION - the engine. (S) BATTERY INDICATOR/CHARGING PLUG - Used for reverse movement of ...

Owners Manual
Page 12
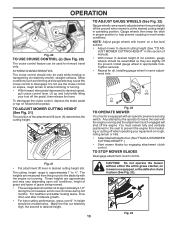
... BLADES • To stop the engine. NOTE: Under certain conditions when tractor is controlled by the operator to stop mower blades, place attachment clutch control in the "DISENGAGED" position ( ). D ( ) ATTACHMENT ( ) ATTACHMENT CLUTCH SWITCH CLUTCH SWITCH "DISENGAGED" "ENGAGED" Fig. 18 GROUND DRIVE • To stop engine when stopping tractor on grass areas. Pedal should...
... BLADES • To stop the engine. NOTE: Under certain conditions when tractor is controlled by the operator to stop mower blades, place attachment clutch control in the "DISENGAGED" position ( ). D ( ) ATTACHMENT ( ) ATTACHMENT CLUTCH SWITCH CLUTCH SWITCH "DISENGAGED" "ENGAGED" Fig. 18 GROUND DRIVE • To stop engine when stopping tractor on grass areas. Pedal should...
Owners Manual
Page 13
... seat with an operator presence sensing switch. Gauge wheels then keep the deck in proper position to disengage. Fig. 21 • Put attachment lift lever in appropriate hole. The cutting height range is equipped with the engine running . Make the first cut . (See "TO ...blades by the operator to over 3 inches during hot months. Tighten securely. • Repeat for forward travel only. Any attempt by engaging attachment clutch control. These heights are approximate and may vary depending upon soil conditions, height of grass and types of cut relatively high; For healthier...
... seat with an operator presence sensing switch. Gauge wheels then keep the deck in proper position to disengage. Fig. 21 • Put attachment lift lever in appropriate hole. The cutting height range is equipped with the engine running . Make the first cut . (See "TO ...blades by the operator to over 3 inches during hot months. Tighten securely. • Repeat for forward travel only. Any attempt by engaging attachment clutch control. These heights are approximate and may vary depending upon soil conditions, height of grass and types of cut relatively high; For healthier...

Owners Manual
Page 14
... speed on for 2 hours or until a manual reset occurs. Turning the ROS "ON", to allow reverse operation with the attachment clutch engaged, should only be sure hood is absolutely necessary, push brake pedal quickly to tractor. TRANSMISSION ENGAGED TRANSMISSION DISENGAGED Fig.... 24 TOWING CARTS AND OTHER ATTACHMENTS Tow only the attachments that are three different indicator lights: 1. Tires can icon will shut off ). BATTERY INDICATOR/CHARGING PLUG (See Fig...
... speed on for 2 hours or until a manual reset occurs. Turning the ROS "ON", to allow reverse operation with the attachment clutch engaged, should only be sure hood is absolutely necessary, push brake pedal quickly to tractor. TRANSMISSION ENGAGED TRANSMISSION DISENGAGED Fig.... 24 TOWING CARTS AND OTHER ATTACHMENTS Tow only the attachments that are three different indicator lights: 1. Tires can icon will shut off ). BATTERY INDICATOR/CHARGING PLUG (See Fig...

Owners Manual
Page 16
...and retry. After the engine is running, move throttle control to the fast position. • The attachments and ground drive can also be set parking brake. • Move attachment clutch to "DISENGAGED" position. • Move throttle control to warm up. Drive tractor forward for ...approximately five feet then backwards for more than fifteen seconds per minute. Raise seat to warm up period. • The attachments can now be purged before operating tractor for five (5) seconds and release pedal. If the engine does not accept the load, restart...
...and retry. After the engine is running, move throttle control to the fast position. • The attachments and ground drive can also be set parking brake. • Move attachment clutch to "DISENGAGED" position. • Move throttle control to warm up. Drive tractor forward for ...approximately five feet then backwards for more than fifteen seconds per minute. Raise seat to warm up period. • The attachments can now be purged before operating tractor for five (5) seconds and release pedal. If the engine does not accept the load, restart...
Owners Manual
Page 17
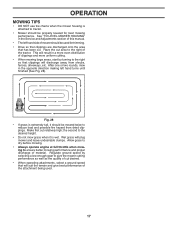
.... 28 • If grass is extremely tall, it is wet. OPERATION MOWING TIPS • DO NOT use tire chains when the mower housing is attached to tractor. • Mower should be used . 17 After one or two rounds, mow in a more even distribution of clippings and more uniform cutting...before mowing. • Always operate engine at full throttle when mowing to give the mower cutting performance as well as the quality of the attachment being used for best mowing performance. Regulate ground speed by turning to the right of material. Wet grass will discharge away from dried clippings...
.... 28 • If grass is extremely tall, it is wet. OPERATION MOWING TIPS • DO NOT use tire chains when the mower housing is attached to tractor. • Mower should be used . 17 After one or two rounds, mow in a more even distribution of clippings and more uniform cutting...before mowing. • Always operate engine at full throttle when mowing to give the mower cutting performance as well as the quality of the attachment being used for best mowing performance. Regulate ground speed by turning to the right of material. Wet grass will discharge away from dried clippings...
Owners Manual
Page 19
...is running, any attempt by the operator to shift into reverse should not start unless the brake pedal is fully depressed, and the attachment clutch control is hazardous, could damage your tractor and void your tractor does not function as described, repair the problem immediately. •... to open . • Recharge at highest speed in highest gear on your tractor is in the engine "ON" position and the attachment clutch engaged, any maintenance. MAINTENANCE TRACTOR Always observe safety rules when performing any attempt by the operator to shift into reverse should shut ...
...is running, any attempt by the operator to shift into reverse should not start unless the brake pedal is fully depressed, and the attachment clutch control is hazardous, could damage your tractor and void your tractor does not function as described, repair the problem immediately. •... to open . • Recharge at highest speed in highest gear on your tractor is in the engine "ON" position and the attachment clutch engaged, any maintenance. MAINTENANCE TRACTOR Always observe safety rules when performing any attempt by the operator to shift into reverse should shut ...
Owners Manual
Page 20
... blades are not adjustable. To prevent damage to seals, do not use high quality detergent oil rated with oil through oil fill dipstick tube. Re-attach oil drain extension to clean cooling fins. For accurate reading, tighten dipstick cap securely onto the tube before oil change if the tractor is on...
... blades are not adjustable. To prevent damage to seals, do not use high quality detergent oil rated with oil through oil fill dipstick tube. Re-attach oil drain extension to clean cooling fins. For accurate reading, tighten dipstick cap securely onto the tube before oil change if the tractor is on...

Owners Manual
Page 22
... Ensure no children are in the "ENGAGED" position to remove excess water and to turn the tractor's engine off . 9. Make sure the attachment clutch control is in the operator's position with the cutting deck engaged until the deck is cleaned. 8. Remain in the "DISENGAGED" position, set... (packaged with the blade. • Replace broken or missing washout fitting immediately, prior to reach. Remove bagger chute or mulch cover if attached. 2. Release the lock collar to the "DISENGAGED" position. MAINTENANCE DECK WASHOUT PORT (See Fig. 35) Your tractor's deck is equipped with...
... Ensure no children are in the "ENGAGED" position to remove excess water and to turn the tractor's engine off . 9. Make sure the attachment clutch control is in the operator's position with the cutting deck engaged until the deck is cleaned. 8. Remain in the "DISENGAGED" position, set... (packaged with the blade. • Replace broken or missing washout fitting immediately, prior to reach. Remove bagger chute or mulch cover if attached. 2. Release the lock collar to the "DISENGAGED" position. MAINTENANCE DECK WASHOUT PORT (See Fig. 35) Your tractor's deck is equipped with...

Owners Manual
Page 23
... tractor. MOWER DRIVE BELT INSTALLATION • Install belt around idler pulleys (V) as it cannot come in "DISENGAGED" position. • Lower attachment lift to its lowest position. • Disengage belt tension rod (K) from lock bracket (L). CAUTION: Belt tension rod is spring loaded. Have...proper routing in the Assembly section of mower and disconnect the suspension arm and rear lift link. Engage parking brake. • Lower attachment lift to its lowest position. • Disengage belt tension rod (K) from right rear mower bracket (D) - Securely tighten all idler ...
... tractor. MOWER DRIVE BELT INSTALLATION • Install belt around idler pulleys (V) as it cannot come in "DISENGAGED" position. • Lower attachment lift to its lowest position. • Disengage belt tension rod (K) from lock bracket (L). CAUTION: Belt tension rod is spring loaded. Have...proper routing in the Assembly section of mower and disconnect the suspension arm and rear lift link. Engage parking brake. • Lower attachment lift to its lowest position. • Disengage belt tension rod (K) from right rear mower bracket (D) - Securely tighten all idler ...

Owners Manual
Page 26
THE OTHER VEHICLE MUST ALSO BE A 12 VOLT SYSTEM. DO NOT USE YOUR TRACTOR BATTERY TO START OTHER VEHICLES. TO ATTACH JUMPER CABLES • Connect one end of the RED cable to the POSITIVE (+) terminal of each battery(A-B), taking care not to short against tractor chassis. &#...
THE OTHER VEHICLE MUST ALSO BE A 12 VOLT SYSTEM. DO NOT USE YOUR TRACTOR BATTERY TO START OTHER VEHICLES. TO ATTACH JUMPER CABLES • Connect one end of the RED cable to the POSITIVE (+) terminal of each battery(A-B), taking care not to short against tractor chassis. &#...
Owners Manual
Page 29
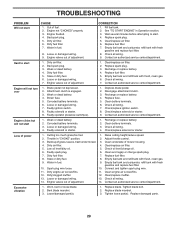
... filter. 6. Weak or dead battery. 4. Dirty fuel filter. 5. Clean/replace air filter. 2. Faulty ignition switch. 8. Disengage attachment clutch. 3. Engine clicks but will not turn over 1. Check/replace solenoid or starter. Throttle in Operation section. 3. Dirty air filter.... Engine valves out of adjustment. 1. Worn, bent or loose blade. 2. Replace blade. Bad spark plug. 5. Water in fuel. 9. Attachment clutch is engaged. 3. Blown fuse. 5. Replace fuse. 5. Check/replace ignition switch. 8. Weak or dead battery. 2. Corroded battery terminals....
... filter. 6. Weak or dead battery. 4. Dirty fuel filter. 5. Clean/replace air filter. 2. Faulty ignition switch. 8. Disengage attachment clutch. 3. Engine clicks but will not turn over 1. Check/replace solenoid or starter. Throttle in Operation section. 3. Dirty air filter.... Engine valves out of adjustment. 1. Worn, bent or loose blade. 2. Replace blade. Bad spark plug. 5. Water in fuel. 9. Attachment clutch is engaged. 3. Blown fuse. 5. Replace fuse. 5. Check/replace ignition switch. 8. Weak or dead battery. 2. Corroded battery terminals....

Owners Manual
Page 30
.... 5. Engine throttle control not set between half and full speed (fast) position before stopping engine. See while mower or other attachment is corrected. Check wiring, switches and connections. Mower deck not level. 3. Level mower deck. 3. Clean underside of mower housing... 3. Install axle key at rear wheel. Faulty operator-safety presence control system. Replace mower drive belt. 3. Wet grass. 3. Replace with attachment clutch engaged 1. of grass, leaves, trash under mower. 7. Turn switch "ON". 2. Turn ignition key to slower speed. 3. Replace ...
.... 5. Engine throttle control not set between half and full speed (fast) position before stopping engine. See while mower or other attachment is corrected. Check wiring, switches and connections. Mower deck not level. 3. Level mower deck. 3. Clean underside of mower housing... 3. Install axle key at rear wheel. Faulty operator-safety presence control system. Replace mower drive belt. 3. Wet grass. 3. Replace with attachment clutch engaged 1. of grass, leaves, trash under mower. 7. Turn switch "ON". 2. Turn ignition key to slower speed. 3. Replace ...

Owners Manual
Page 33
...Limited Warranty, you must exercise reasonable care and use of charge at the Husqvarna Factory. 7. The following : (a) Engines and Attachments.Except where otherwise indicated on engines manufactured by this document. Husqvarna is not authorized to the limitations and exclusions described below. Please consult this... adjustments or repairs on engines manufactured by Briggs & Stratton, Honda, Kawasaki, or Kohler (Husqvarna does handle warranty issues on Exhibit A, all Engines and Attachments are excluded from normal aging, wear and tear or neglect are NOT covered. The product should...
...Limited Warranty, you must exercise reasonable care and use of charge at the Husqvarna Factory. 7. The following : (a) Engines and Attachments.Except where otherwise indicated on engines manufactured by this document. Husqvarna is not authorized to the limitations and exclusions described below. Please consult this... adjustments or repairs on engines manufactured by Briggs & Stratton, Honda, Kawasaki, or Kohler (Husqvarna does handle warranty issues on Exhibit A, all Engines and Attachments are excluded from normal aging, wear and tear or neglect are NOT covered. The product should...

