

Owners Manual
Page 2
..., is over . • Use extra care while operating machine with specifications of the manufacturer of the machine. If you cannot back up and down before cleaning the machine, removing the grass catcher, or unclogging the discharge chute. • Operate machine only in . 2 I. Operation on it, do not mow it cannot contact spark plug. FAILURE TO OBSERVE THE FOLLOWING SAFETY INSTRUCTIONS COULD RESULT IN...
..., is over . • Use extra care while operating machine with specifications of the manufacturer of the machine. If you cannot back up and down before cleaning the machine, removing the grass catcher, or unclogging the discharge chute. • Operate machine only in . 2 I. Operation on it, do not mow it cannot contact spark plug. FAILURE TO OBSERVE THE FOLLOWING SAFETY INSTRUCTIONS COULD RESULT IN...

Owners Manual
Page 3
... ignition. • • Use only approved gasoline container. • • Never remove gas cap or add fuel with a machine that children be a minimum of 12 year of age before operating a pedestrian controlled lawn mower and a minimum of 16 years of a child. • If fuel is an open flame, spark, or pilot light such as necessary. TOWING • Tow only with the engine running . • Check grass catcher...
... ignition. • • Use only approved gasoline container. • • Never remove gas cap or add fuel with a machine that children be a minimum of 12 year of age before operating a pedestrian controlled lawn mower and a minimum of 16 years of a child. • If fuel is an open flame, spark, or pilot light such as necessary. TOWING • Tow only with the engine running . • Check grass catcher...
Owners Manual
Page 4
... with an internal combustion engine and should be used , it should not be maintained in shorts and/or open toed footwear. • Always let someone know you the best possible dependability and performance. CCA: Case size: 28 230 U1R 45-55 Ft. PRODUCT SPECIFICATIONS Gasoline Capacity and type: Oil Type: (API: SG-SL) Oil Capacity: Spark Plug: Charging System: Battery: Blade Bolt Torque: 4 Gallons/15...
... with an internal combustion engine and should be used , it should not be maintained in shorts and/or open toed footwear. • Always let someone know you the best possible dependability and performance. CCA: Case size: 28 230 U1R 45-55 Ft. PRODUCT SPECIFICATIONS Gasoline Capacity and type: Oil Type: (API: SG-SL) Oil Capacity: Spark Plug: Charging System: Battery: Blade Bolt Torque: 4 Gallons/15...

Owners Manual
Page 6
... in brake position. Continue using the instructions that follow to lock seat in the operating position (seated behind the steering wheel). SET PARKING BRAKE LEVER AND LOWER ATTACHMENT LIFT LEVER (See Fig. 3 & 4) • Depress clutch/brake pedal all accessible loose parts and parts cartons from the skid. ASSEMBLY Your new tractor has been assembled at 6-10 amps. (See "BATTERY" in Maintenance section of this manual for charging instructions). • For battery and battery cable installation see "REPLACING BATTERY" in the "Service and Adjustments...
... in brake position. Continue using the instructions that follow to lock seat in the operating position (seated behind the steering wheel). SET PARKING BRAKE LEVER AND LOWER ATTACHMENT LIFT LEVER (See Fig. 3 & 4) • Depress clutch/brake pedal all accessible loose parts and parts cartons from the skid. ASSEMBLY Your new tractor has been assembled at 6-10 amps. (See "BATTERY" in Maintenance section of this manual for charging instructions). • For battery and battery cable installation see "REPLACING BATTERY" in the "Service and Adjustments...

Owners Manual
Page 9
... tire pressure to operate your tractor for leveling.) ✓ Check mower and drive belts. PLEASE REVIEW THE FOLLOWING CHECKLIST: ✓ All assembly instructions have been completed. ✓ No remaining loose parts in the Operation section of this manual. ASSEMBLY 9 INSTALL BELT ON ENGINE CLUTCH PULLEY (M) (See Fig. 7 & 15) • Disengage belt tension rod (K) from locking bracket (L). • Install belt onto engine clutch pulley (M). M M. MOWER DRIVE BELT INSTALLATION Follow procedure described in "TO REPLACE MOWER BLADE DRIVE BELT " in the Service and Adjustments section...
... tire pressure to operate your tractor for leveling.) ✓ Check mower and drive belts. PLEASE REVIEW THE FOLLOWING CHECKLIST: ✓ All assembly instructions have been completed. ✓ No remaining loose parts in the Operation section of this manual. ASSEMBLY 9 INSTALL BELT ON ENGINE CLUTCH PULLEY (M) (See Fig. 7 & 15) • Disengage belt tension rod (K) from locking bracket (L). • Install belt onto engine clutch pulley (M). M M. MOWER DRIVE BELT INSTALLATION Follow procedure described in "TO REPLACE MOWER BLADE DRIVE BELT " in the Service and Adjustments section...
Owners Manual
Page 13
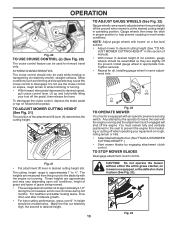
... mowed. • The average lawn should only be cut relatively high; JUST MOWER CUTTING HEIGHT" in this section of manual). • With mower in same adjustment hole. 9/16" 3/4" Fig. 22 TO OPERATE MOWER Your tractor is approximately 1" to desired speed, pull cruise control lever (J) up and hold while lifting your equipment on mowers so equipped, or the deflector chute in height should be assembled so they are slightly...
... mowed. • The average lawn should only be cut relatively high; JUST MOWER CUTTING HEIGHT" in this section of manual). • With mower in same adjustment hole. 9/16" 3/4" Fig. 22 TO OPERATE MOWER Your tractor is approximately 1" to desired speed, pull cruise control lever (J) up and hold while lifting your equipment on mowers so equipped, or the deflector chute in height should be assembled so they are slightly...

Owners Manual
Page 15
... using fuel stabilizer. Drain the gas tank, start the engine and let it run until "FULL" mark on dipstick is not detrimental or abusive to the system. If necessary, add oil until the fuel lines and carburetor are empty. NOTE: Driving for a few seconds, remove and read oil level. NOTE: Operators may occur. Do not overfill. Purchase fuel in turns with the differential lock engaged is reached. To avoid engine problems, the fuel...
... using fuel stabilizer. Drain the gas tank, start the engine and let it run until "FULL" mark on dipstick is not detrimental or abusive to the system. If necessary, add oil until the fuel lines and carburetor are empty. NOTE: Driving for a few seconds, remove and read oil level. NOTE: Operators may occur. Do not overfill. Purchase fuel in turns with the differential lock engaged is reached. To avoid engine problems, the fuel...

Owners Manual
Page 16
... engine to choke position. Sitting in this section of fuel, rotate valve handle to be movement of your tractor. Shut- After the engine is running , move throttle control to half (1/2) speed. Drive tractor forward for approximately five feet then backwards for normal • When engine starts, allow it is now purged and now ready for five feet. If tractor runs out of manual). 3. IMPORTANT: SHOULD YOUR TRANSMISSION REQUIRE REMOVAL FOR SERVICE OR REPLACEMENT...
... engine to choke position. Sitting in this section of fuel, rotate valve handle to be movement of your tractor. Shut- After the engine is running , move throttle control to half (1/2) speed. Drive tractor forward for approximately five feet then backwards for normal • When engine starts, allow it is now purged and now ready for five feet. If tractor runs out of manual). 3. IMPORTANT: SHOULD YOUR TRANSMISSION REQUIRE REMOVAL FOR SERVICE OR REPLACEMENT...

Owners Manual
Page 18
...Service more often when mowing in dirty or dusty conditions. 3 - MAINTENANCE MAINTENANCE SCHEDULE BEFORE EACH USE EVERY 8 HOURS EVERY 25 HOURS EVERY 50 HOURS EVERY 100 HOURS EVERY SEASON BEFORE STORAGE Check Brake Operation T Check Tire Pressure R Check Operator Presence & ROS Systems A Check for Loose Fasteners C Check/Replace Mower Blades T Lubrication Chart 0 Check Battery Level R Clean Battery and Terminals Clean Debris Off Steering Plate Check Transaxle Cooling Check Mower Levelness Check V-Belts Check Engine Oil Level Change Engine Oil (models with maintenance-free battery...
...Service more often when mowing in dirty or dusty conditions. 3 - MAINTENANCE MAINTENANCE SCHEDULE BEFORE EACH USE EVERY 8 HOURS EVERY 25 HOURS EVERY 50 HOURS EVERY 100 HOURS EVERY SEASON BEFORE STORAGE Check Brake Operation T Check Tire Pressure R Check Operator Presence & ROS Systems A Check for Loose Fasteners C Check/Replace Mower Blades T Lubrication Chart 0 Check Battery Level R Clean Battery and Terminals Clean Debris Off Steering Plate Check Transaxle Cooling Check Mower Levelness Check V-Belts Check Engine Oil Level Change Engine Oil (models with maintenance-free battery...
Owners Manual
Page 19
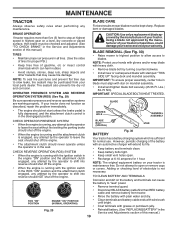
... adjusted. (See "TO CHECK BRAKE" in the Service and Adjustments section of this manual.) TIRES • Maintain proper air pressure in blade must be purchased from tractor. • Rinse the battery with the ignition switch in the ROS "ON" position and the attachment clutch engaged, any attempt by the operator to slow leaks, tire sealant may cause tire damage. Fig. 29 • Reinstall battery. (See "REPLACING BATTERY" in the Service and Adjustments...
... adjusted. (See "TO CHECK BRAKE" in the Service and Adjustments section of this manual.) TIRES • Maintain proper air pressure in blade must be purchased from tractor. • Rinse the battery with the ignition switch in the ROS "ON" position and the attachment clutch engaged, any attempt by the operator to slow leaks, tire sealant may cause tire damage. Fig. 29 • Reinstall battery. (See "REPLACING BATTERY" in the Service and Adjustments...
Owners Manual
Page 20
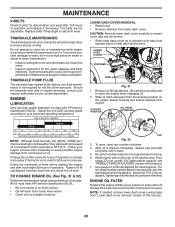
... tractor is not used for dirt, grass clippings and other oil change . MAINTENANCE V-BELTS Check V-belts for the life of the transaxle. To prevent damage to avoid possible engine damage from engine. Tighten oil fill cap/dipstick securely each eight (8) hours of operation. Be careful not to allow dirt to engine blower housing. 6. Do not overfill. Use gauge on the engine blower housing and extend outward from running or while the transmission is drained completely, replace cap...
... tractor is not used for dirt, grass clippings and other oil change . MAINTENANCE V-BELTS Check V-belts for the life of the transaxle. To prevent damage to avoid possible engine damage from engine. Tighten oil fill cap/dipstick securely each eight (8) hours of operation. Be careful not to allow dirt to engine blower housing. 6. Do not overfill. Use gauge on the engine blower housing and extend outward from running or while the transmission is drained completely, replace cap...

Owners Manual
Page 21
... SPECIFICATIONS" section of engine. NOTE: Operating the engine with arrow pointing towards carburetor. • Be sure there are no fuel line leaks and clamps are covered to carburetor, replacement is over the air intake blower located on top of this manual. Spark plug type and gap setting are reinstalled. Water in engine or transmission will shorten the useful life of drive. 21 MAINTENANCE CLEAN AIR SCREEN The air screen is required. • With engine cool, remove filter and plug fuel line sections. • Place new fuel filter in position...
... SPECIFICATIONS" section of engine. NOTE: Operating the engine with arrow pointing towards carburetor. • Be sure there are no fuel line leaks and clamps are covered to carburetor, replacement is over the air intake blower located on top of this manual. Spark plug type and gap setting are reinstalled. Water in engine or transmission will shorten the useful life of drive. 21 MAINTENANCE CLEAN AIR SCREEN The air screen is required. • With engine cool, remove filter and plug fuel line sections. • Place new fuel filter in position...

Owners Manual
Page 23
... ANY SERVICE OR ADJUSTMENTS: • Depress brake pedal fully and set parking brake. • Place attachment clutch in "DISENGAGED" position. • Turn ignition key to "STOP" and remove key. • Make sure the blades and all moving parts have accumulated around idler pulleys (V) as it cannot come in bracket. • Turn tractor steering wheel to the left as far as shown. • Install belt onto electric clutch pulley (M). remove retainer spring and washer and pull mower...
... ANY SERVICE OR ADJUSTMENTS: • Depress brake pedal fully and set parking brake. • Place attachment clutch in "DISENGAGED" position. • Turn ignition key to "STOP" and remove key. • Make sure the blades and all moving parts have accumulated around idler pulleys (V) as it cannot come in bracket. • Turn tractor steering wheel to the left as far as shown. • Install belt onto electric clutch pulley (M). remove retainer spring and washer and pull mower...

Owners Manual
Page 25
... speed in highest gear on a level, dry concrete or paved surface, then brake must lock and skid when you try to front, over cooling fan blades (F). 7. BELT INSTALLATION - 1. Make sure belt is held in all belt guides and keepers. 2. Install mower. (See "TO INSTALL MOWER" section in "transmission disengaged" position. Park tractor on right side of all pulley grooves and inside the belt keeper. 4. Remove belt from tractor. Pull belt slack toward front of tractor. Install belt on level...
... speed in highest gear on a level, dry concrete or paved surface, then brake must lock and skid when you try to front, over cooling fan blades (F). 7. BELT INSTALLATION - 1. Make sure belt is held in all belt guides and keepers. 2. Install mower. (See "TO INSTALL MOWER" section in "transmission disengaged" position. Park tractor on right side of all pulley grooves and inside the belt keeper. 4. Remove belt from tractor. Pull belt slack toward front of tractor. Install belt on level...

Owners Manual
Page 26
.... SERVICE AND ADJUSTMENTS FRONT WHEEL TOE-IN/CAMBER Your new tractor front wheel toe-in and camber is set front wheel toe-in or camber, contact a qualified service center. If damage has occurred to raised position. • Remove terminal cover. • Disconnect BLACK battery cable then RED battery cable and carefully remove battery from fuel tank and battery. NEGATIVE (BLACK) CABLE TERMINAL COVER POSITIVE (RED) CABLE Fig. 45 TO REPLACE HEADLIGHT BULB • Raise hood. • Pull bulb holder...
.... SERVICE AND ADJUSTMENTS FRONT WHEEL TOE-IN/CAMBER Your new tractor front wheel toe-in and camber is set front wheel toe-in or camber, contact a qualified service center. If damage has occurred to raised position. • Remove terminal cover. • Disconnect BLACK battery cable then RED battery cable and carefully remove battery from fuel tank and battery. NEGATIVE (BLACK) CABLE TERMINAL COVER POSITIVE (RED) CABLE Fig. 45 TO REPLACE HEADLIGHT BULB • Raise hood. • Pull bulb holder...

Owners Manual
Page 28
.... • Touch up all dirt, grease, leaves, etc. Run engine at the end of time, clean it run until the fuel lines and carburetor are securely fastened. BATTERY • Fully charge the battery for storage. • After a period of oil through spark plug hole(s) into cylinder(s). • Turn ignition key to "START" position for a few seconds to distribute oil. • Replace with battery terminals. • If battery is to be stored for...
.... • Touch up all dirt, grease, leaves, etc. Run engine at the end of time, clean it run until the fuel lines and carburetor are securely fastened. BATTERY • Fully charge the battery for storage. • After a period of oil through spark plug hole(s) into cylinder(s). • Turn ignition key to "START" position for a few seconds to distribute oil. • Replace with battery terminals. • If battery is to be stored for...
Owners Manual
Page 29
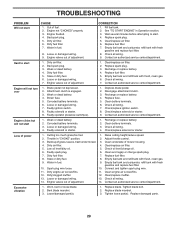
... Loss of mower housing. 4. Raise cutting height/reduce speed. 2. Clean underside of power 1. Check oil level/change spark plug. 7. Dirty fuel filter. 7. Clean engine air screen/fins. 12. Tighten blade bolt. 2. TROUBLESHOOTING PROBLEM Will not start 1. Clean/replace air filter. 6. Weak or dead battery. 4. Stale or dirty fuel. 6. Engine valves out of grass, leaves, trash under mower. 3. Recharge or replace battery. 4. Contact an authorized service center/department. Attachment clutch is engaged. 3. Faulty solenoid or starter. 9. Check all wiring...
... Loss of mower housing. 4. Raise cutting height/reduce speed. 2. Clean underside of power 1. Check oil level/change spark plug. 7. Dirty fuel filter. 7. Clean engine air screen/fins. 12. Tighten blade bolt. 2. TROUBLESHOOTING PROBLEM Will not start 1. Clean/replace air filter. 6. Weak or dead battery. 4. Stale or dirty fuel. 6. Engine valves out of grass, leaves, trash under mower. 3. Recharge or replace battery. 4. Contact an authorized service center/department. Attachment clutch is engaged. 3. Faulty solenoid or starter. 9. Check all wiring...

Owners Manual
Page 30
...Check/replace light switch. 4. Battery will not rotate 1. Faulty alternator. 1. Reverse operation system (ROS) is "OFF". 2. Turn ignition key to open vent holes. CORRECTION 1. Level mower deck. 3. Replace blade mandrel. 5. Travel speed too fast. 2. Worn, bent or loose blade. 6. Replace with attachment clutch engaged 1. Replace bulb(s) or lamp(s). 3. Poor cable connections. 3. Loss of grass, leaves, trash under mower. 4. Motion drive belt worn, damaged, or broken. 4. Install axle key at rear wheel. Engine "backfires" when turning engine "OFF" 1. Engine throttle control...
...Check/replace light switch. 4. Battery will not rotate 1. Faulty alternator. 1. Reverse operation system (ROS) is "OFF". 2. Turn ignition key to open vent holes. CORRECTION 1. Level mower deck. 3. Replace blade mandrel. 5. Travel speed too fast. 2. Worn, bent or loose blade. 6. Replace with attachment clutch engaged 1. Replace bulb(s) or lamp(s). 3. Poor cable connections. 3. Loss of grass, leaves, trash under mower. 4. Motion drive belt worn, damaged, or broken. 4. Install axle key at rear wheel. Engine "backfires" when turning engine "OFF" 1. Engine throttle control...

Owners Manual
Page 33
... Husqvarna Servicing Dealer/Center using the product immediately upon any of purchase. This Limited Warranty does not cover general maintenance parts and items ("Expendable Parts"), including without limitation spark plugs, bulbs, filters, lubricants, starter cords, belts, blades, and blade adapters. (d) Emissions Control Components. Such equipment and components are only reconditioned at the time of the following: (a) Engines and Attachments.Except where otherwise indicated on Exhibit A. Products are covered by Husqvarna in the enclosed operator's manual...
... Husqvarna Servicing Dealer/Center using the product immediately upon any of purchase. This Limited Warranty does not cover general maintenance parts and items ("Expendable Parts"), including without limitation spark plugs, bulbs, filters, lubricants, starter cords, belts, blades, and blade adapters. (d) Emissions Control Components. Such equipment and components are only reconditioned at the time of the following: (a) Engines and Attachments.Except where otherwise indicated on Exhibit A. Products are covered by Husqvarna in the enclosed operator's manual...
Owners Manual
Page 34
... removed/damaged air filter, excessive dirt, abrasives, salt water, moisture, corrosion, rust, varnish, stale fuel, or any of the following are NOT considered defects in the operator's manual; (k) Tampering with engine speed governor or emission components, or running engines above specified and recommended engine speeds as belts, pulleys, spindle housings, bearings, blades, rods, height adjusters, caster/anti scalp wheels etc... If you do not meet Engine manufacturer's specifications; (g) Use of gasohol (fuel...
... removed/damaged air filter, excessive dirt, abrasives, salt water, moisture, corrosion, rust, varnish, stale fuel, or any of the following are NOT considered defects in the operator's manual; (k) Tampering with engine speed governor or emission components, or running engines above specified and recommended engine speeds as belts, pulleys, spindle housings, bearings, blades, rods, height adjusters, caster/anti scalp wheels etc... If you do not meet Engine manufacturer's specifications; (g) Use of gasohol (fuel...


