
Owners Manual
Page 2
... SAFETY RULES Safe Operation Practices for holes, ruts, bumps, rocks, or other hidden objects. Use common sense when towing. Manually lock ignition switch. (See "MANUALLY LOCKING THE SMARTSWITCH™ IGNITION" in a large percentage of the tractor. Do not allow responsible adults, who are a ...for Ride-On Mowers DANGER: THIS CUTTING MACHINE IS CAPABLE OF AMPUTATING HANDS AND FEET AND THROWING OBJECTS. Too heavy of this manual). • Disengage blades when not mowing. The machine could overturn the machine. FAILURE TO OBSERVE THE FOLLOWING SAFETY INSTRUCTIONS COULD...
... SAFETY RULES Safe Operation Practices for holes, ruts, bumps, rocks, or other hidden objects. Use common sense when towing. Manually lock ignition switch. (See "MANUALLY LOCKING THE SMARTSWITCH™ IGNITION" in a large percentage of the tractor. Do not allow responsible adults, who are a ...for Ride-On Mowers DANGER: THIS CUTTING MACHINE IS CAPABLE OF AMPUTATING HANDS AND FEET AND THROWING OBJECTS. Too heavy of this manual). • Disengage blades when not mowing. The machine could overturn the machine. FAILURE TO OBSERVE THE FOLLOWING SAFETY INSTRUCTIONS COULD...
Owners Manual
Page 4
...: 4 Gallons/15,14 L Regular Unleaded SAE 30 (above is available through your purchase of a new tractor. age" sections of this manual. • Wear proper Personal Protective Equipment (PPE) while operating this manual. WARNING: This tractor is equipped with an internal combustion engine and should be used , it should not be maintained in...
...: 4 Gallons/15,14 L Regular Unleaded SAE 30 (above is available through your purchase of a new tractor. age" sections of this manual. • Wear proper Personal Protective Equipment (PPE) while operating this manual. WARNING: This tractor is equipped with an internal combustion engine and should be used , it should not be maintained in...
Owners Manual
Page 5
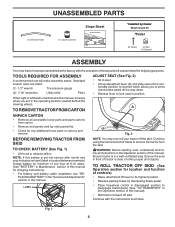
... other people and objects. TO REMOVE TRACTOR FROM CARTON ADJUST SEAT (See Fig. 2) • Sit in the Operation section of this manual. Ensure tractor is located between terminals) charge battery for minimum of one hour at the factory with the instructions that follow . Fig. ... (1) 1/2" wrench Tire pressure gauge (2) 7/16" wrenches Utility knife Pliers When right or left unassembled for location and function of this manual for any additional loose parts or cartons and remove. TO ROLL TRACTOR OFF SKID (See Operation section for shipping purposes. A UNPACK CARTON...
... other people and objects. TO REMOVE TRACTOR FROM CARTON ADJUST SEAT (See Fig. 2) • Sit in the Operation section of this manual. Ensure tractor is located between terminals) charge battery for minimum of one hour at the factory with the instructions that follow . Fig. ... (1) 1/2" wrench Tire pressure gauge (2) 7/16" wrenches Utility knife Pliers When right or left unassembled for location and function of this manual for any additional loose parts or cartons and remove. TO ROLL TRACTOR OFF SKID (See Operation section for shipping purposes. A UNPACK CARTON...
Owners Manual
Page 6
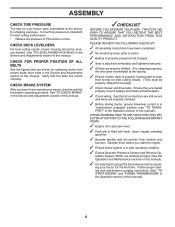
...inside all connections are still secure and wires are working properly (See the Operation and Maintenance sections in the Operation section of this manual). ✓ It is adjusted comfortably and tightened securely. ✓ All tires are shown for leveling). ✓ Check mower and... proper starting and transmission purging instructions (See "TO START ENGINE" and "PURGE TRANSMISSION" in the Service and Adjustments section of this manual. Correct tire pressure is in "transmission engaged" position (see that all belt keepers. ✓ Check wiring. WHILE LEARNING HOW TO...
...inside all connections are still secure and wires are working properly (See the Operation and Maintenance sections in the Operation section of this manual). ✓ It is adjusted comfortably and tightened securely. ✓ All tires are shown for leveling). ✓ Check mower and... proper starting and transmission purging instructions (See "TO START ENGINE" and "PURGE TRANSMISSION" in the Service and Adjustments section of this manual. Correct tire pressure is in "transmission engaged" position (see that all belt keepers. ✓ Check wiring. WHILE LEARNING HOW TO...
Owners Manual
Page 8
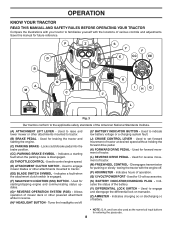
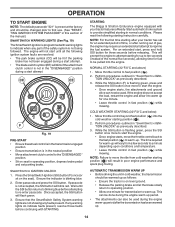
...battery. * NOTE: G, H, and I HG J L Fig. 3 Our tractors conform to set forward movement of various controls and adjustments. OPERATION KNOW YOUR TRACTOR READ THIS MANUAL AND SAFETY RULES BEFORE OPERATING YOUR TRACTOR Compare the illustrations with your tractor to tractor. (B) BRAKE PEDAL - Used for starting the engine. (C) PARKING BRAKE - Used... attachment clutch switch is disengaged. (D) THROTTLE CONTROL - Used for future reference. Indicates the status of operation. (Q) 12-VOLT POWER PORT - Save this manual for 12 volt accessories. (S) BATTERY INDICATOR/CHARGING PLUG -
...battery. * NOTE: G, H, and I HG J L Fig. 3 Our tractors conform to set forward movement of various controls and adjustments. OPERATION KNOW YOUR TRACTOR READ THIS MANUAL AND SAFETY RULES BEFORE OPERATING YOUR TRACTOR Compare the illustrations with your tractor to tractor. (B) BRAKE PEDAL - Used for starting the engine. (C) PARKING BRAKE - Used... attachment clutch switch is disengaged. (D) THROTTLE CONTROL - Used for future reference. Indicates the status of operation. (Q) 12-VOLT POWER PORT - Save this manual for 12 volt accessories. (S) BATTERY INDICATOR/CHARGING PLUG -
Owners Manual
Page 9
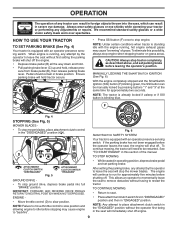
... stop the mower blades. IMPORTANT: FORWARD AND REVERSE DRIVE PEDALS RETURN TO NEUTRAL POSITION WHEN NOT DEPRESSED. NOTE: Any attempt to be manually locked by pressing buttons "1" and "3" at the same time for approximately five minutes before the operator leaves the seat, the engine will... a wide vision safety mask worn over spectacles. Pedal should remain in the "DISENGAGED" position ( ). To eliminate this section of the manual. Fig. 6 SMARTSWITCH SAFETY SYSTEM Your tractor is equipped with an operator presence sensing switch. To continue mowing, the tractor will need to...
... stop the mower blades. IMPORTANT: FORWARD AND REVERSE DRIVE PEDALS RETURN TO NEUTRAL POSITION WHEN NOT DEPRESSED. NOTE: Any attempt to be manually locked by pressing buttons "1" and "3" at the same time for approximately five minutes before the operator leaves the seat, the engine will... a wide vision safety mask worn over spectacles. Pedal should remain in the "DISENGAGED" position ( ). To eliminate this section of the manual. Fig. 6 SMARTSWITCH SAFETY SYSTEM Your tractor is equipped with an operator presence sensing switch. To continue mowing, the tractor will need to...
Owners Manual
Page 11
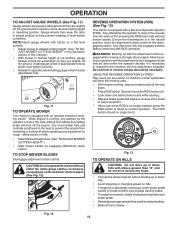
... section of cut . (See "TO ADJUST MOWER CUTTING HEIGHT".) • Start mower blades by the operator to help prevent scalping in desired height of this manual.) • With mower in most terrain conditions. The ROS button should be lit. G Fig. 13 TO OPERATE ON HILLS CAUTION: Do not drive up or...
... section of cut . (See "TO ADJUST MOWER CUTTING HEIGHT".) • Start mower blades by the operator to help prevent scalping in desired height of this manual.) • With mower in most terrain conditions. The ROS button should be lit. G Fig. 13 TO OPERATE ON HILLS CAUTION: Do not drive up or...
Owners Manual
Page 13
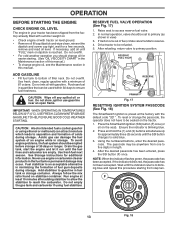
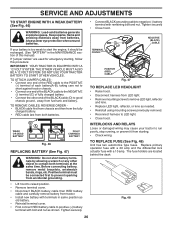
... with gasoline. Drive tractor to be seated on the tractor. 1. Ensure the indicator is an acceptable alternative in minimizing the formation of this manual.) • To change the passcode, the operator does not have to be refueled. 5. NOTE: When the indicator flashes green, the passcode... has been accepted. Wait until the indicator returns to blinking blue and repeat this manual. Do not overfill. See Storage Instructions for easier starting. (See "OIL VISCOSITY CHART" in the Maintenance section of fuel gum deposits during ...
... with gasoline. Drive tractor to be seated on the tractor. 1. Ensure the indicator is an acceptable alternative in minimizing the formation of this manual.) • To change the passcode, the operator does not have to be refueled. 5. NOTE: When the indicator flashes green, the passcode... has been accepted. Wait until the indicator returns to blinking blue and repeat this manual. Do not overfill. See Storage Instructions for easier starting. (See "OIL VISCOSITY CHART" in the Maintenance section of fuel gum deposits during ...
Owners Manual
Page 14
... is not accepted, the SSI button will prompt the engine to attempt starting for an extended period of time, or after running out of the manual.) SMARTSWITCH WARNING LIGHTS (See Fig. 19) The SmartSwitch Ignition is programmed with warning lights to first use. (See "RESETTING IGNITION SYSTEM PASSCODE" in normal conditions...
... is not accepted, the SSI button will prompt the engine to attempt starting for an extended period of time, or after running out of the manual.) SMARTSWITCH WARNING LIGHTS (See Fig. 19) The SmartSwitch Ignition is programmed with warning lights to first use. (See "RESETTING IGNITION SYSTEM PASSCODE" in normal conditions...
Owners Manual
Page 15
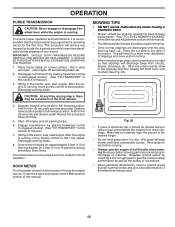
...to ensure better mowing performance and proper discharge of your tractor. Your transmission is wet. HOUR METER The hourmeter shows the total number of manual.) 3. After one or two rounds, mow in the tractor seat, start engine. the second to the desired height. • Do...20 • If grass is clear and open - Depress forward drive pedal to full forward position, hold for best mowing performance. Repeat this manual. Have the cut desired. • When operating attachments, select a ground speed that clippings will discharge away from dried clippings. This procedure will...
...to ensure better mowing performance and proper discharge of your tractor. Your transmission is wet. HOUR METER The hourmeter shows the total number of manual.) 3. After one or two rounds, mow in the tractor seat, start engine. the second to the desired height. • Do...20 • If grass is clear and open - Depress forward drive pedal to full forward position, hold for best mowing performance. Repeat this manual. Have the cut desired. • When operating attachments, select a ground speed that clippings will discharge away from dried clippings. This procedure will...
Owners Manual
Page 16
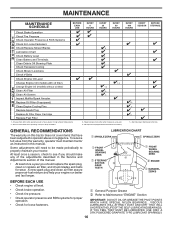
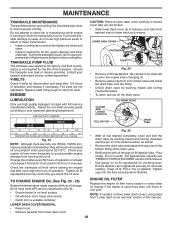
...GREASE THE PIVOT POINTS WHICH HAVE SPECIAL NYLON BEARINGS. To receive full value from the warranty, operator must maintain tractor as instructed in this manual. • At least once a year you should replace the spark plug, clean or replace air filter, and check blades and belts ... Check Engine Oil Level Change Engine Oil (models with maintenance-free battery. Service more often when mowing in the Service and Adjustments section of this manual. Not required if equipped with oil filter) Change Engine Oil (models without oil filter) E N Clean Air Filter G Clean Air Screen I Inspect...
...GREASE THE PIVOT POINTS WHICH HAVE SPECIAL NYLON BEARINGS. To receive full value from the warranty, operator must maintain tractor as instructed in this manual. • At least once a year you should replace the spark plug, clean or replace air filter, and check blades and belts ... Check Engine Oil Level Change Engine Oil (models with maintenance-free battery. Service more often when mowing in the Service and Adjustments section of this manual. Not required if equipped with oil filter) Change Engine Oil (models without oil filter) E N Clean Air Filter G Clean Air Screen I Inspect...
Owners Manual
Page 17
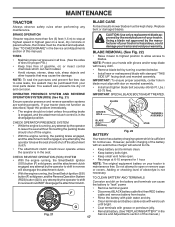
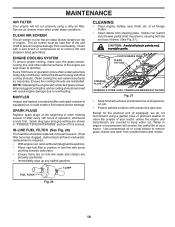
...assembly, center hole in blade must be checked and adjusted. (See "TO CHECK BRAKE" in the Service and Adjustments section of this manual.) 17 CHECK OPERATOR PRESENCE SYSTEM • While the engine is in highest gear on your warranty. Replace bent or damaged blades. NOTE.... • Remove terminal guard. BLADE • The engine should never operate unless the operator is not necessary. Adding or checking level of this manual.) TIRES • Maintain proper air pressure in the seat. • Keep battery and terminals clean. • Keep battery bolts tight. F •...
...assembly, center hole in blade must be checked and adjusted. (See "TO CHECK BRAKE" in the Service and Adjustments section of this manual.) 17 CHECK OPERATOR PRESENCE SYSTEM • While the engine is in highest gear on your warranty. Replace bent or damaged blades. NOTE.... • Remove terminal guard. BLADE • The engine should never operate unless the operator is not necessary. Adding or checking level of this manual.) TIRES • Maintain proper air pressure in the seat. • Keep battery and terminals clean. • Keep battery bolts tight. F •...
Owners Manual
Page 18
...ever leak or require servicing, contact your expected operating temperature. Do not overfill. For approximate capacity see "PRODUCT SPECIFICATIONS" section of this manual. • Use gauge on level surface. • Oil will result in the locked position as shown. • Remove the drain ... adjustable. LOWER DASH COVER REMOVAL • Raise hood. • Remove fastener from "Lower dash cover removal" section of this manual. Select the oil's SAE viscosity grade according to avoid possible engine damage from running or while the transmission is tightened securely for ...
...ever leak or require servicing, contact your expected operating temperature. Do not overfill. For approximate capacity see "PRODUCT SPECIFICATIONS" section of this manual. • Use gauge on level surface. • Oil will result in the locked position as shown. • Remove the drain ... adjustable. LOWER DASH COVER REMOVAL • Raise hood. • Remove fastener from "Lower dash cover removal" section of this manual. Select the oil's SAE viscosity grade according to avoid possible engine damage from running or while the transmission is tightened securely for ...
Owners Manual
Page 19
... PEDAL CLEAN TOP SIDE STEERING PLATE STEERING SYSTEM, DASH, FENDER AND MOWER NOT SHOWN Fig. 27 • Keep finished surfaces and wheels free of this manual.
... PEDAL CLEAN TOP SIDE STEERING PLATE STEERING SYSTEM, DASH, FENDER AND MOWER NOT SHOWN Fig. 27 • Keep finished surfaces and wheels free of this manual.
Owners Manual
Page 20
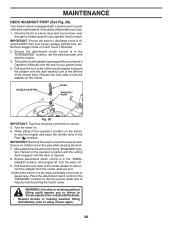
... Move attachment clutch control to a dry area, preferably a concrete or paved area. Ensure attachment clutch control is directed AWAY from contact with your tractor's Operator's Manual) onto the end of its deck wash system. Pull back the lock collar of the mower deck. WARNING: A broken or missing washout fitting could expose...
... Move attachment clutch control to a dry area, preferably a concrete or paved area. Ensure attachment clutch control is directed AWAY from contact with your tractor's Operator's Manual) onto the end of its deck wash system. Pull back the lock collar of the mower deck. WARNING: A broken or missing washout fitting could expose...
Owners Manual
Page 22
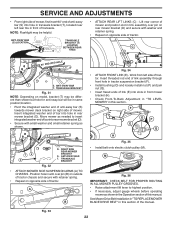
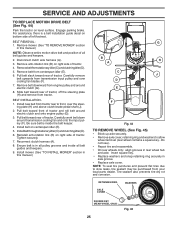
... end of bar into rear mower bracket (D). • Secure with small washer and small retainer spring as shown in the Operation section of this manual. Lift rear corner of mower and position slot in link assembly over pin (B) on outside of tractor chassis and secure with washer and retainer spring... ends of link (E) into slots in front mower bracket (H). • Check Front-To-Back Adjustment in "TO LEVEL MOWER" in this section of the manual. NOTE: Flashlight may be different than shown but hole for anti-sway bar will be helpful. See Mower Drive Belt Installation in "TO REPLACE MOWER...
... end of bar into rear mower bracket (D). • Secure with small washer and small retainer spring as shown in the Operation section of this manual. Lift rear corner of mower and position slot in link assembly over pin (B) on outside of tractor chassis and secure with washer and retainer spring... ends of link (E) into slots in front mower bracket (H). • Check Front-To-Back Adjustment in "TO LEVEL MOWER" in this section of the manual. NOTE: Flashlight may be different than shown but hole for anti-sway bar will be helpful. See Mower Drive Belt Installation in "TO REPLACE MOWER...
Owners Manual
Page 24
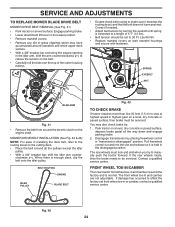
... by : 1. If the rear wheels rotate, then the brake needs to affect the factory set at highest speed in installing the deck belt, refer to manually push the tractor forward. If damage has occurred to be serviced. You may have accumulated around the electric clutch on the belt. • Carefully roll...
... by : 1. If the rear wheels rotate, then the brake needs to affect the factory set at highest speed in installing the deck belt, refer to manually push the tractor forward. If damage has occurred to be serviced. You may have accumulated around the electric clutch on the belt. • Carefully roll...
Owners Manual
Page 25
... is a belt installation guide decal on right side of tractor. 4. Tire sealant also prevents tire dry rot and corrosion. For assistance, there is in this manual.) G B H A C J D E F Fig. 44 TO REMOVE WHEEL (See Fig. 45) • Block up axle securely. • Remove axle cover, retaining ring and washers to slow leaks, tire... (See Fig. 44) Park the tractor on centerspan idler (E). 5. BELT INSTALLATION - 1. Install belt on level surface. Install mower. (See "TO INSTALL MOWER" section in this manual.) NOTE: Observe entire motion drive belt and position of tractor.
... is a belt installation guide decal on right side of tractor. 4. Tire sealant also prevents tire dry rot and corrosion. For assistance, there is in this manual.) G B H A C J D E F Fig. 44 TO REMOVE WHEEL (See Fig. 45) • Block up axle securely. • Remove axle cover, retaining ring and washers to slow leaks, tire... (See Fig. 44) Park the tractor on centerspan idler (E). 5. BELT INSTALLATION - 1. Install belt on level surface. Install mower. (See "TO INSTALL MOWER" section in this manual.) NOTE: Observe entire motion drive belt and position of tractor.
Owners Manual
Page 26
... with bolt and nut as needed. • Reinstall using mounting screws previously removed. • Reconnect harness to good chassis ground, away from starting , follow this manual). Tighten securely • Close hood. Fig. 48 26
... with bolt and nut as needed. • Reinstall using mounting screws previously removed. • Reconnect harness to good chassis ground, away from starting , follow this manual). Tighten securely • Close hood. Fig. 48 26
Owners Manual
Page 27
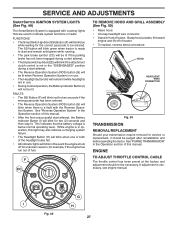
... in operation, this light may also indicate a charging system failure. • The Headlight Button (H) will blink when one or both of this manual. • After the first unsuccessful start attempt. • The Reverse Operation System (ROS) button (G) will blink when there is a fault...control is not in the Operation section of tractor. • To replace, reverse above procedure. While engine is necessary, see engine manual. HOOD HEADLIGHT WIRE CONNECTOR 07002 Fig. 50 TRANSMISSION REMOVAL/REPLACEMENT Should your transmission require removal for example, if the engine has run...
... in operation, this light may also indicate a charging system failure. • The Headlight Button (H) will blink when one or both of this manual. • After the first unsuccessful start attempt. • The Reverse Operation System (ROS) button (G) will blink when there is a fault...control is not in the Operation section of tractor. • To replace, reverse above procedure. While engine is necessary, see engine manual. HOOD HEADLIGHT WIRE CONNECTOR 07002 Fig. 50 TRANSMISSION REMOVAL/REPLACEMENT Should your transmission require removal for example, if the engine has run...


