
Owner Manual
Page 1
Operator's manual HUSQVARNA AUTOMOWER® 420/430X/440/450X EN, English Read the operator's manual carefully and make sure that you understand the instructions before you use the product.
Operator's manual HUSQVARNA AUTOMOWER® 420/430X/440/450X EN, English Read the operator's manual carefully and make sure that you understand the instructions before you use the product.

Owner Manual
Page 2
... 6 1.4 Symbols on the product 7 2 Safety 2.1 Safety definitions 8 2.2 General safety instructions 8 2.3 Safety instructions for operation 8 3 Installation 3.1 Presentation 11 3.2 Preparations 11 3.3 Charging station 12 3.4 Charging the battery 14 3.5 Boundary wire 14 3.6 Connecting the boundary wire 19 3.7 Installation of Conformity 64 4 Operation 4.1 Main switch 44 4.2 Start 44 4.3 Operating mode - Start 44 4.4 Operating mode Park 45 4.5 Stop 45 4.6 Switch off 45 4.7 Timer 45 4.8 Charge a flat battery 45 4.9 Adjust cutting height 46 5 Maintenance 5.1 Introduction -
... 6 1.4 Symbols on the product 7 2 Safety 2.1 Safety definitions 8 2.2 General safety instructions 8 2.3 Safety instructions for operation 8 3 Installation 3.1 Presentation 11 3.2 Preparations 11 3.3 Charging station 12 3.4 Charging the battery 14 3.5 Boundary wire 14 3.6 Connecting the boundary wire 19 3.7 Installation of Conformity 64 4 Operation 4.1 Main switch 44 4.2 Start 44 4.3 Operating mode - Start 44 4.4 Operating mode Park 45 4.5 Stop 45 4.6 Switch off 45 4.7 Timer 45 4.8 Charge a flat battery 45 4.9 Adjust cutting height 46 5 Maintenance 5.1 Introduction -

Owner Manual
Page 4
... set to the charging station. When the robotic lawnmower body hits an obstacle or approaches the boundary wire the robotic lawnmower reverses and selects a new direction. The disadvantage is a greater risk of the robotic lawnmower always passes the boundary wire by a specific distance before the mower turns around. The distance can be changed to adapt to the installation if required. 1.2.5 Finding the charging station The robotic lawnmower...
... set to the charging station. When the robotic lawnmower body hits an obstacle or approaches the boundary wire the robotic lawnmower reverses and selects a new direction. The disadvantage is a greater risk of the robotic lawnmower always passes the boundary wire by a specific distance before the mower turns around. The distance can be changed to adapt to the installation if required. 1.2.5 Finding the charging station The robotic lawnmower...
Owner Manual
Page 6
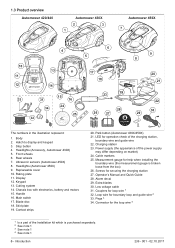
... (Automower 450X) 8. Rating plate 11. Blade disc 18. Screws for the loop wire 4 1 Is a part of the Installation kit which is broken loose from the box) 26. Connector for securing the charging station 27. Cutting system 14. Contact strips 20. Cable markers 25. Operator's Manual and Quick Guide 28. Body 2. Rear wheels 7. Chassis box with electronics, battery and motors 15. Park button (Automower 430X/450X) 21. Measurement gauge for operation check of the power...
... (Automower 450X) 8. Rating plate 11. Blade disc 18. Screws for the loop wire 4 1 Is a part of the Installation kit which is broken loose from the box) 26. Connector for securing the charging station 27. Cutting system 14. Contact strips 20. Cable markers 25. Operator's Manual and Quick Guide 28. Body 2. Rear wheels 7. Chassis box with electronics, battery and motors 15. Park button (Automower 430X/450X) 21. Measurement gauge for operation check of the power...

Owner Manual
Page 9
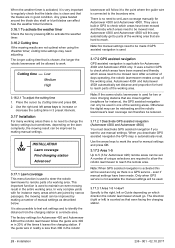
... cable before using the main switch when the robotic lawnmower is selected when you understand the instructions before it be stopped immediately. The PIN code contains four digits and is not in position 0. 236 - 001 - 02.10.2017 Safety - 9 Set the main switch in use during hours when the area is not permitted to keep your own risk. • Check that...
... cable before using the main switch when the robotic lawnmower is selected when you understand the instructions before it be stopped immediately. The PIN code contains four digits and is not in position 0. 236 - 001 - 02.10.2017 Safety - 9 Set the main switch in use during hours when the area is not permitted to keep your own risk. • Check that...

Owner Manual
Page 14
... outdoors, this must be used before the installation is buried. CAUTION: Place the low voltage cable and adjust the cutting height so that the blades can be combined so one part of the boundary wire is stapled down in electric shock, overheating or leakage of operation. WARNING: Only charge the robotic lawnmower using a charging station which is connected to charge the robotic lawnmower. Only the existing holes...
... outdoors, this must be used before the installation is buried. CAUTION: Place the low voltage cable and adjust the cutting height so that the blades can be combined so one part of the boundary wire is stapled down in electric shock, overheating or leakage of operation. WARNING: Only charge the robotic lawnmower using a charging station which is connected to charge the robotic lawnmower. Only the existing holes...

Owner Manual
Page 22
... the mower is not allowed to mow due to MAX (6 cm). The battery status shows the remaining battery charge. During the first week after a new installation, the cutting height must be lowered one step every week until the desired cutting height has been reached. After this menu, settings relating to the left. See Adjust cutting height on page 26. 22 - • The arrow keys are used to...
... the mower is not allowed to mow due to MAX (6 cm). The battery status shows the remaining battery charge. During the first week after a new installation, the cutting height must be lowered one step every week until the desired cutting height has been reached. After this menu, settings relating to the left. See Adjust cutting height on page 26. 22 - • The arrow keys are used to...
Owner Manual
Page 28
... days operating, the robotic lawnmower creates a map of manual settings as described below. Automower 430X and Automower 450X automatically set . When you want to the boundary wire. Any grass twisted around the blade disc shaft or blunt blades can be improved by making a number of the working area. Use the right and left arrow keys to increase or decrease the cutting time in 3 preset intervals. 3.17 Installation...
... days operating, the robotic lawnmower creates a map of manual settings as described below. Automower 430X and Automower 450X automatically set . When you want to the boundary wire. Any grass twisted around the blade disc shaft or blunt blades can be improved by making a number of the working area. Use the right and left arrow keys to increase or decrease the cutting time in 3 preset intervals. 3.17 Installation...

Owner Manual
Page 29
... examples in the charging station. 2. Use the number keys to the size of the following the guide wire toward the remote area. Select Disable and press OK. 3.17.3.5 Test: Area 1-5 To test the selected settings: 1. Place the robotic lawnmower in Yard layout examples on page 29. Use the down and the right/left right arrow keys followed by the new measured distance...
... examples in the charging station. 2. Use the number keys to the size of the following the guide wire toward the remote area. Select Disable and press OK. 3.17.3.5 Test: Area 1-5 To test the selected settings: 1. Place the robotic lawnmower in Yard layout examples on page 29. Use the down and the right/left right arrow keys followed by the new measured distance...

Owner Manual
Page 32
... boundary wire by a specific distance before it starts mowing. The distance the robotic lawnmower maintains from 1-9. Use the arrow keys to pass the boundary wire and press OK. 3.17.5.4 Exit angles Normally the robotic lawnmower leaves the charging station in the interval specifies the shortest distance to reverse out from the charging station before the mower turns around. The factory setting is 9. 3.17.5.7 Drive past wire The...
... boundary wire by a specific distance before it starts mowing. The distance the robotic lawnmower maintains from 1-9. Use the arrow keys to pass the boundary wire and press OK. 3.17.5.4 Exit angles Normally the robotic lawnmower leaves the charging station in the interval specifies the shortest distance to reverse out from the charging station before the mower turns around. The factory setting is 9. 3.17.5.7 Drive past wire The...
Owner Manual
Page 35
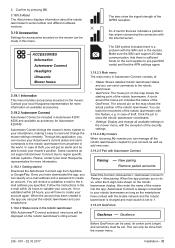
... robotic lawnmower coordinates. • Settings: Display and change the mower settings remotely. A circle around the house pin indicates the radius of the robotic lawnmower. 2. Follow the instructions in the world. Make sure the SIM card support 2G data communication, that the APN settings agree. 3.19.2.3 Main menu The main menu in the robotic lawnmower With Automower® Connect activated, new icons will have downloaded...
... robotic lawnmower coordinates. • Settings: Display and change the mower settings remotely. A circle around the house pin indicates the radius of the robotic lawnmower. 2. Follow the instructions in the world. Make sure the SIM card support 2G data communication, that the APN settings agree. 3.19.2.3 Main menu The main menu in the robotic lawnmower With Automower® Connect activated, new icons will have downloaded...
Owner Manual
Page 41
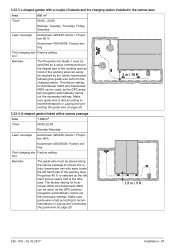
... largest part of the working area as a value corresponding to recommendations in Laying and connecting the guide wire on page 20. 3 m / 10 ft 3.23.4 U-shaped garden linked with a narrow passage Area 1 000 m2 Timer 08:00-22:00 Monday-Saturday Lawn coverage Automower 420/440: Guide 1 Proportion 40% Automower 430X/450X: Factory setting Find charging sta- 3.23.3 L-shaped garden with ease locate the...
... largest part of the working area as a value corresponding to recommendations in Laying and connecting the guide wire on page 20. 3 m / 10 ft 3.23.4 U-shaped garden linked with a narrow passage Area 1 000 m2 Timer 08:00-22:00 Monday-Saturday Lawn coverage Automower 420/440: Guide 1 Proportion 40% Automower 430X/450X: Factory setting Find charging sta- 3.23.3 L-shaped garden with ease locate the...

Owner Manual
Page 42
.... 42 - Installation 236 - 001 - 02.10.2017 As the right hand area is laid according to ensure that the robotic lawnmower can be used , as the GPS assisted navigation automatically carries out the necessary settings. Make sure guide wire is only a small part of the working area. The factory setting for Automower 430X and Automower 450X can with ease locate the charging station...
.... 42 - Installation 236 - 001 - 02.10.2017 As the right hand area is laid according to ensure that the robotic lawnmower can be used , as the GPS assisted navigation automatically carries out the necessary settings. Make sure guide wire is only a small part of the working area. The factory setting for Automower 430X and Automower 450X can with ease locate the charging station...
Owner Manual
Page 47
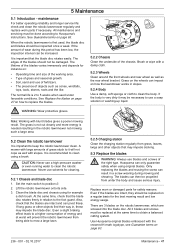
... right type. Husqvarna can impact on : • Operating time and size of the working area. • Type of grass and seasonal growth. • Soil, sand and use blades and screws of objects such as the rear wheel bracket. See Guarantee terms on the robotic lawnmower, which are screwed into the blade disc. Brush or wipe with a damp cloth. 5.2.3 Wheels Clean around the front wheels and rear wheel...
... right type. Husqvarna can impact on : • Operating time and size of the working area. • Type of grass and seasonal growth. • Soil, sand and use blades and screws of objects such as the rear wheel bracket. See Guarantee terms on the robotic lawnmower, which are screwed into the blade disc. Brush or wipe with a damp cloth. 5.2.3 Wheels Clean around the front wheels and rear wheel...

Owner Manual
Page 51
... has turned over. The robotic lawnmower is set to charge. The clock on mower from leaving the charging station. Free the mower Collision sensor prob- Wheel drive problem, Grass or other object is not correct. ed off was stopped. The alarm was activated because the mower ped was switched OFF. Mower lifted The alarm was activated because the mower was tilted. Needs manual charg- Place the robotic lawnmower in charging sta...
... has turned over. The robotic lawnmower is set to charge. The clock on mower from leaving the charging station. Free the mower Collision sensor prob- Wheel drive problem, Grass or other object is not correct. ed off was stopped. The alarm was activated because the mower ped was switched OFF. Mower lifted The alarm was activated because the mower was tilted. Needs manual charg- Place the robotic lawnmower in charging sta...
Owner Manual
Page 52
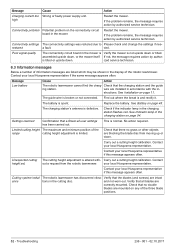
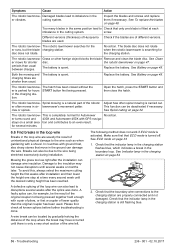
... cutting height adjustment is tilted or upside down . ized service technician. 6.3 Information messages Below a number of the robotic lawnmower. Message Low battery Cause Action The robotic lawnmower cannot find the charg- The guide wire is spent. Check if the indicator lamp in the display of information messages are blocking the blade disc from the robotic lawnmower. Message Cause Action Charging current too Wrong or faulty power...
... cutting height adjustment is tilted or upside down . ized service technician. 6.3 Information messages Below a number of the robotic lawnmower. Message Low battery Cause Action The robotic lawnmower cannot find the charg- The guide wire is spent. Check if the indicator lamp in the display of information messages are blocking the blade disc from the robotic lawnmower. Message Cause Action Charging current too Wrong or faulty power...
Owner Manual
Page 53
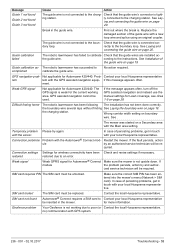
... and connecting the guide wire on a Secondary area with the Main area setting. Check that the guide wire is not working area. cording to the instructions, See Installation of persisting problems, get in touch with your local Husqvarna representative. No action required. Prob- ment. If the message appears often, turn off the GPS assisted navigation and instead use the manual settings for Automower 420/440...
... and connecting the guide wire on a Secondary area with the Main area setting. Check that the guide wire is not working area. cording to the instructions, See Installation of persisting problems, get in touch with your local Husqvarna representative. No action required. Prob- ment. If the message appears often, turn off the GPS assisted navigation and instead use the manual settings for Automower 420/440...

Owner Manual
Page 55
... steer the robotic lawnmower use of grass by the blade disc or around the motor shaft. See Timer on page 34. Long grass in relation Check that the blade disc rotates freely and easily. charging station. page 23. Replace all remote areas. (For Auto- Check that the correct How often? See Laying and connecting the guide wire on page 47. setting is entirely level. Increase the cutting height...
... steer the robotic lawnmower use of grass by the blade disc or around the motor shaft. See Timer on page 34. Long grass in relation Check that the blade disc rotates freely and easily. charging station. page 23. Replace all remote areas. (For Auto- Check that the correct How often? See Laying and connecting the guide wire on page 47. setting is entirely level. Increase the cutting height...
Owner Manual
Page 56
... robotic lawnmow- er turns round and 430X and Automower 450X with a shovel. To avoid this, always select the maximum cutting height the first weeks after the installation can , for example, be located by gradually halving the distance of lower quality than the original coupler has been used . Damaged blades lead to the charging station are usually the result of the loop wire...
... robotic lawnmow- er turns round and 430X and Automower 450X with a shovel. To avoid this, always select the maximum cutting height the first weeks after the installation can , for example, be located by gradually halving the distance of lower quality than the original coupler has been used . Damaged blades lead to the charging station are usually the result of the loop wire...

Owner Manual
Page 61
... Width, cm Height, cm Weight, kg 8 Technical data Automower 420 72 56 31 11,5 Automower 430X 72 56 31 13,2 Automower 440 72 56 31 12 Automower 450X 72 56 31 13,9 Electrical system Battery, Lithium-Ion Power supply, V/28 V DC Low voltage cable length, m Mean energy consumption at maximum use Charging current, A DC Average mowing time, min Average charging time, min Automower 420 18 V/3.2 Ah...
... Width, cm Height, cm Weight, kg 8 Technical data Automower 420 72 56 31 11,5 Automower 430X 72 56 31 13,2 Automower 440 72 56 31 12 Automower 450X 72 56 31 13,9 Electrical system Battery, Lithium-Ion Power supply, V/28 V DC Low voltage cable length, m Mean energy consumption at maximum use Charging current, A DC Average mowing time, min Average charging time, min Automower 420 18 V/3.2 Ah...

