

Operation Manual
Page 2
...European Community's Directive. Direct current. Always keep people and animals at an appropriate recycling facility. (Applies to the operator or others. trimmer heads with applicable EC directives. Careless or incorrect use non-metallic, flexible cutting attachments, i.e. Control panel • Rotation direction •...; Activate and deactivate button • SavE mode The machine is in accordance with trimmer line. 2 - Machines fitted with saw blades or grass blades can be deposited at least 15 meters from the machine....
...European Community's Directive. Direct current. Always keep people and animals at an appropriate recycling facility. (Applies to the operator or others. trimmer heads with applicable EC directives. Careless or incorrect use non-metallic, flexible cutting attachments, i.e. Control panel • Rotation direction •...; Activate and deactivate button • SavE mode The machine is in accordance with trimmer line. 2 - Machines fitted with saw blades or grass blades can be deposited at least 15 meters from the machine....

Operation Manual
Page 6
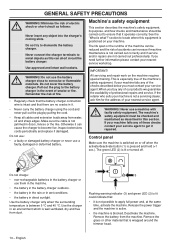
English WHAT IS WHAT? 3 1 21 2 11 13 14 15 1 17 16 12 8 6 18 15 19 4 7 5 20 21 What is what? 1 Trimmer head 2 Cutting attachment guard 3 Shaft 4 Loop handle 5 Power trigger 6 Keypad 7 Power trigger lockout 8 Battery 9 Cord 10 Battery charger 11 Operator′s manual 10 9 12 Handle adjustment 13 Battery indicator button 14 Battery status 15 Warning indicator (ERROR LED) 16 Rotation direction button 17 SavE button 18 Activate and deactivate button 19 Power on and warning indicator (ERROR LED) 20 Battery release buttons 21 4 mm hex key 6 -
English WHAT IS WHAT? 3 1 21 2 11 13 14 15 1 17 16 12 8 6 18 15 19 4 7 5 20 21 What is what? 1 Trimmer head 2 Cutting attachment guard 3 Shaft 4 Loop handle 5 Power trigger 6 Keypad 7 Power trigger lockout 8 Battery 9 Cord 10 Battery charger 11 Operator′s manual 10 9 12 Handle adjustment 13 Battery indicator button 14 Battery status 15 Warning indicator (ERROR LED) 16 Rotation direction button 17 SavE button 18 Activate and deactivate button 19 Power on and warning indicator (ERROR LED) 20 Battery release buttons 21 4 mm hex key 6 -
Operation Manual
Page 7
... machine. • Before using . Remove all loose objects, such as necessary. • Inspect the working order. Replace the trimmer head or trimmer guard if they have been given supervision or instruction concerning use of the appliance by accident. See the maintenance schedule. •...in the use of experience and knowledge, unless they do not play with this manual. Power tool use a machine that the trimmer head and trimmer guard are cracked. English - 7 Save all instructions. Check that all times. Some maintenance and service measures must always be ...
... machine. • Before using . Remove all loose objects, such as necessary. • Inspect the working order. Replace the trimmer head or trimmer guard if they have been given supervision or instruction concerning use of the appliance by accident. See the maintenance schedule. •...in the use of experience and knowledge, unless they do not play with this manual. Power tool use a machine that the trimmer head and trimmer guard are cracked. English - 7 Save all instructions. Check that all times. Some maintenance and service measures must always be ...

Operation Manual
Page 8
... do the job better and with medical implants to use common sense It is not under some circumstances interfere with the trimmer head. Impor tant WARNING! electromagnetic field during operation. A lawn trimmer can be beyond your common sense. Personal protective equipment cannot eliminate the risk of injury but it was designed. •...
... do the job better and with medical implants to use common sense It is not under some circumstances interfere with the trimmer head. Impor tant WARNING! electromagnetic field during operation. A lawn trimmer can be beyond your common sense. Personal protective equipment cannot eliminate the risk of injury but it was designed. •...
Operation Manual
Page 10
... doors, fences or the like. IMPORTANT! Never connect the charger terminals to ensure that : • it can increase if machine maintenance is wrapped around the trimmer head. 10 - The life span or the runtime of smoke or fire. Use the charger in the event of the machine can short circuit the...
... doors, fences or the like. IMPORTANT! Never connect the charger terminals to ensure that : • it can increase if machine maintenance is wrapped around the trimmer head. 10 - The life span or the runtime of smoke or fire. Use the charger in the event of the machine can short circuit the...
Operation Manual
Page 12
... will make the cord tougher so that the cutting equipment has stopped completely and remove the battery before use the recommended trimmer heads and trimmer lines. trimmer line. Different line lengths can be soaked in unnecessary vibrations. GENERAL SAFETY PRECAUTIONS Always remove the battery before you start any... IMPORTANT! Only use recommended ! This is because when clearing using a cord the engine must throw out the cord radially from the trimmer head and overcome the resistance of the grass being cleared. • The length of the cord is used to cut the cord to the...
... will make the cord tougher so that the cutting equipment has stopped completely and remove the battery before use the recommended trimmer heads and trimmer lines. trimmer line. Different line lengths can be soaked in unnecessary vibrations. GENERAL SAFETY PRECAUTIONS Always remove the battery before you start any... IMPORTANT! Only use recommended ! This is because when clearing using a cord the engine must throw out the cord radially from the trimmer head and overcome the resistance of the grass being cleared. • The length of the cord is used to cut the cord to the...

Operation Manual
Page 13
... bolt (2) on the opposite side of the shaft. Do not overtighten. • Now adjust the trimmer to give a comfortable working position. Bend the guard around the shaft and tighten it with the trimmer head. 2 1 A • Hang the trimmer guard on the hook on the shaft. • Slide the spacer into the slot in the...
... bolt (2) on the opposite side of the shaft. Do not overtighten. • Now adjust the trimmer to give a comfortable working position. Bend the guard around the shaft and tighten it with the trimmer head. 2 1 A • Hang the trimmer guard on the hook on the shaft. • Slide the spacer into the slot in the...
Operation Manual
Page 16
... the motor for dirt and cracks. Always remove the battery to impact or are not damaged or cracked. Replace the trimmer head or trimmer guard if they have been exposed to prevent the machine being inserted correctly. See technical data. • Insert the ...Husqvarna original battery in the machine. Press and hold the start the machine. • Only use the machine for . WARNING! Use the power trigger to use the machine without a guard nor with a defective guard. • All covers must be worn when necessary. • Check that the trimmer head and trimmer...
... the motor for dirt and cracks. Always remove the battery to impact or are not damaged or cracked. Replace the trimmer head or trimmer guard if they have been exposed to prevent the machine being inserted correctly. See technical data. • Insert the ...Husqvarna original battery in the machine. Press and hold the start the machine. • Only use the machine for . WARNING! Use the power trigger to use the machine without a guard nor with a defective guard. • All covers must be worn when necessary. • Check that the trimmer head and trimmer...
Operation Manual
Page 17
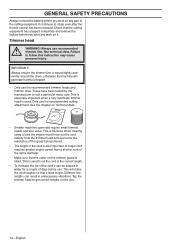
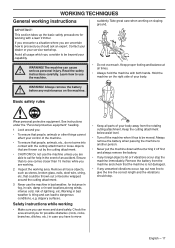
...on sloping ground. Basic safety rules Wear personal protective equipment. Safety instructions while working area. WORKING TECHNIQUES General working with a lawn trimmer. If you encounter a situation where you are working. 2 Inspect the working • Make sure you should stop the machine ...Keep all loose objects, such as stones, broken glass, nails, steel wire, string, etc. See instructions under the "Personal protective equipment" heading. 1 Look around you are thrown out by the cutting attachment. • CAUTION! Check the area around the cutting attachment. 3 Never ...
...on sloping ground. Basic safety rules Wear personal protective equipment. Safety instructions while working area. WORKING TECHNIQUES General working with a lawn trimmer. If you encounter a situation where you are working. 2 Inspect the working • Make sure you should stop the machine ...Keep all loose objects, such as stones, broken glass, nails, steel wire, string, etc. See instructions under the "Personal protective equipment" heading. 1 Look around you are thrown out by the cutting attachment. • CAUTION! Check the area around the cutting attachment. 3 Never ...

Operation Manual
Page 18
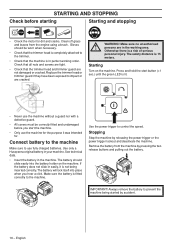
...WORKING TECHNIQUES • Release the power trigger after each working operation to save battery power. Never swing the machine around the trimmer head as this can be thrown up into the eyes causing blindness or serious injury. Release the power Rotation direction It is within...for thrown objects. ! Activate the function by default (green LED is the most optimum when trimming and gives longest runtime. The trimmer head always rotates clockwise by pressing the SavE button. Safety instructions after completing work • Make sure the cutting attachment has stopped before...
...WORKING TECHNIQUES • Release the power trigger after each working operation to save battery power. Never swing the machine around the trimmer head as this can be thrown up into the eyes causing blindness or serious injury. Release the power Rotation direction It is within...for thrown objects. ! Activate the function by default (green LED is the most optimum when trimming and gives longest runtime. The trimmer head always rotates clockwise by pressing the SavE button. Safety instructions after completing work • Make sure the cutting attachment has stopped before...
Operation Manual
Page 19
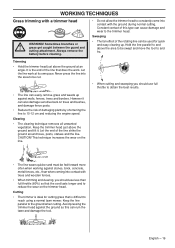
... than full throttle (80%) so that does the work at an angle. Always remove the battery before cleaning. • Do not allow the trimmer head to constantly come into contact with trees and wooden fences. • When trimming and clearing, you should use full throttle to be fed forward... more often when working against stones, brick, concrete, metal fences, etc., than when coming into contact with a trimmer head WARNING! Never press the line into the area to obtain the best results. • The line can easily remove grass and weeds up . Let...
... than full throttle (80%) so that does the work at an angle. Always remove the battery before cleaning. • Do not allow the trimmer head to constantly come into contact with trees and wooden fences. • When trimming and clearing, you should use full throttle to be fed forward... more often when working against stones, brick, concrete, metal fences, etc., than when coming into contact with a trimmer head WARNING! Never press the line into the area to obtain the best results. • The line can easily remove grass and weeds up . Let...
Operation Manual
Page 20
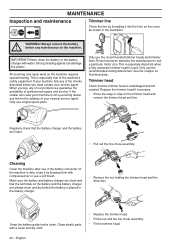
...charger are intact. • Pull out the line chute assembly. English This is dirty, clean it into the hole on the trimmer head and remove the trimmer head and line. If the retailer who sells your service agent. Only use . If the battery connector on Technical data. IMPORTANT! ...must contact your machine is placed in clips on the cover, as shown in the illustration. Only use the recommended cutting attachment. Trimmer head Check that the battery charger and the battery are always clean and dry before any of our products we guarantee the availability of...
...charger are intact. • Pull out the line chute assembly. English This is dirty, clean it into the hole on the trimmer head and remove the trimmer head and line. If the retailer who sells your service agent. Only use . If the battery connector on Technical data. IMPORTANT! ...must contact your machine is placed in clips on the cover, as shown in the illustration. Only use the recommended cutting attachment. Trimmer head Check that the battery charger and the battery are always clean and dry before any of our products we guarantee the availability of...
Operation Manual
Page 21
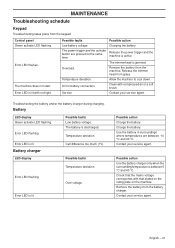
... power trigger and the activate button are between 5 °C and 40 °C. Dirt in surroundings where temperatures are pressed at the same time. Release the trimmer head from the machine. Allow the machine to cool down. The trimmerhead is lit Battery charger LED display Cell difference too much (1V). Temperature deviation. Contact...
... power trigger and the activate button are between 5 °C and 40 °C. Dirt in surroundings where temperatures are pressed at the same time. Release the trimmer head from the machine. Allow the machine to cool down. The trimmerhead is lit Battery charger LED display Cell difference too much (1V). Temperature deviation. Contact...

Operation Manual
Page 22
... Daily maintenance Clean the outside of the items are tight. X Check that the battery is undamaged and not cracked. X Check that the trimmer head is intact. Weekly maintenance X Monthly maintenance X 22 - Replace the guard if it has been exposed to impact or is not damaged. ... battery ! Most of the machine with a clean and dry cloth. X Check that must be performed on the machine. Replace the trimmer head if necessary. Check the connections between the battery and the machine and also check the connection between battery and the battery charger. X ...
... Daily maintenance Clean the outside of the items are tight. X Check that the battery is undamaged and not cracked. X Check that the trimmer head is intact. Weekly maintenance X Monthly maintenance X 22 - Replace the guard if it has been exposed to impact or is not damaged. ... battery ! Most of the machine with a clean and dry cloth. X Check that must be performed on the machine. Replace the trimmer head if necessary. Check the connections between the battery and the machine and also check the connection between battery and the battery charger. X ...

Operation Manual
Page 23
...Noise emissions in the environment measured as sound power (LWA) in conformity with trimmer head (original), left/right 536LiLX BLDC (brushless) 36V 5500 400 3 4,2 60 92 96 76 1,2/0,7 Use only a Husqvarna original BLi battery in the measurement result and the variations between different machines of... 3 dB (A). Approved accessories Trimmer head J-handle set Type T25B (Ø 2.0 mm line) J-handle...
...Noise emissions in the environment measured as sound power (LWA) in conformity with trimmer head (original), left/right 536LiLX BLDC (brushless) 36V 5500 400 3 4,2 60 92 96 76 1,2/0,7 Use only a Husqvarna original BLi battery in the measurement result and the variations between different machines of... 3 dB (A). Approved accessories Trimmer head J-handle set Type T25B (Ø 2.0 mm line) J-handle...


