

Operation Manual
Page 2
... wear approved protective gloves. Please read and understand the contents of the operator's manual. Direct current. The operator of the original Swedish operating instruction. The blade is capable of output shaft, rpm 6000 Arrows which show limits for handle positioning. English Careless or incorrect use non-metallic, flexible cutting attachments, i.e. Control panel • Rotation direction • Activate and deactivate button • SavE...
... wear approved protective gloves. Please read and understand the contents of the operator's manual. Direct current. The operator of the original Swedish operating instruction. The blade is capable of output shaft, rpm 6000 Arrows which show limits for handle positioning. English Careless or incorrect use non-metallic, flexible cutting attachments, i.e. Control panel • Rotation direction • Activate and deactivate button • SavE...
Operation Manual
Page 4
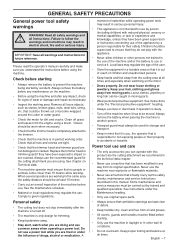
... power tool safety warnings 7 Personal protective equipment 8 Battery and battery charger 9 Machine′s safety equipment 10 Cutting equipment 11 ASSEMBLY Fitting the loop handle 13 Assembling the guard 13 BATTERY HANDLING Battery 14 Battery charger 14 Transport and storage 15 Disposal of the battery, battery charger and machine 15 STARTING AND STOPPING Check before starting 16 Connect battery to the machine 16 Starting and stopping 16 WORKING TECHNIQUES General working instructions...
... power tool safety warnings 7 Personal protective equipment 8 Battery and battery charger 9 Machine′s safety equipment 10 Cutting equipment 11 ASSEMBLY Fitting the loop handle 13 Assembling the guard 13 BATTERY HANDLING Battery 14 Battery charger 14 Transport and storage 15 Disposal of the battery, battery charger and machine 15 STARTING AND STOPPING Check before starting 16 Connect battery to the machine 16 Starting and stopping 16 WORKING TECHNIQUES General working instructions...

Operation Manual
Page 5
... waterpowered plant. Today Husqvarna is working today. Thank you sell this may be at the front edge for a very long time to come. In 1956, the first motor driven lawn mowers appeared, followed by chain saws in 1959, and it will appreciate with repairs and service whenever this machine, make sure that the operator′s manual is based on a tradition...
... waterpowered plant. Today Husqvarna is working today. Thank you sell this may be at the front edge for a very long time to come. In 1956, the first motor driven lawn mowers appeared, followed by chain saws in 1959, and it will appreciate with repairs and service whenever this machine, make sure that the operator′s manual is based on a tradition...

Operation Manual
Page 6
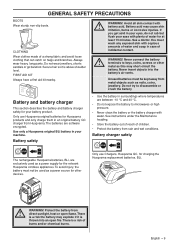
English WHAT IS WHAT? 3 1 21 2 11 13 14 15 1 17 16 12 8 6 18 15 19 4 7 5 20 21 What is what? 1 Trimmer head 2 Cutting attachment guard 3 Shaft 4 Loop handle 5 Power trigger 6 Keypad 7 Power trigger lockout 8 Battery 9 Cord 10 Battery charger 11 Operator′s manual 10 9 12 Handle adjustment 13 Battery indicator button 14 Battery status 15 Warning indicator (ERROR LED) 16 Rotation direction button 17 SavE button 18 Activate and deactivate button 19 Power on and warning indicator (ERROR LED) 20 Battery release buttons 21 4 mm hex key 6 -
English WHAT IS WHAT? 3 1 21 2 11 13 14 15 1 17 16 12 8 6 18 15 19 4 7 5 20 21 What is what? 1 Trimmer head 2 Cutting attachment guard 3 Shaft 4 Loop handle 5 Power trigger 6 Keypad 7 Power trigger lockout 8 Battery 9 Cord 10 Battery charger 11 Operator′s manual 10 9 12 Handle adjustment 13 Battery indicator button 14 Battery status 15 Warning indicator (ERROR LED) 16 Rotation direction button 17 SavE button 18 Activate and deactivate button 19 Power on and warning indicator (ERROR LED) 20 Battery release buttons 21 4 mm hex key 6 -
Operation Manual
Page 7
... wear or damage and repair as stones, broken glass, nails, steel wire, string, etc. See instructions under the "Personal protective equipment" heading. • Always use . that could be thrown out or become wrapped around the cutter or cutter guard. • Check the motor for the cutting attachment you , the operator that ventilation openings are using the machine. Replace the trimmer head or trimmer guard if they have been...
... wear or damage and repair as stones, broken glass, nails, steel wire, string, etc. See instructions under the "Personal protective equipment" heading. • Always use . that could be thrown out or become wrapped around the cutter or cutter guard. • Check the motor for the cutting attachment you , the operator that ventilation openings are using the machine. Replace the trimmer head or trimmer guard if they have been...

Operation Manual
Page 8
... to cover every conceivable situation you can mean a then you must also wear approved protective goggles. WARNING! be in wet locations,strong winds, intense cold, risk of serious or fatal injury, we recommend persons with medical implants to the operator or others. GLOVES Gloves should consult an expert before operating this operator's manual. when fitting cutting attachments...
... to cover every conceivable situation you can mean a then you must also wear approved protective goggles. WARNING! be in wet locations,strong winds, intense cold, risk of serious or fatal injury, we recommend persons with medical implants to the operator or others. GLOVES Gloves should consult an expert before operating this operator's manual. when fitting cutting attachments...
Operation Manual
Page 9
... minutes. See instructions under the Maintenance heading. • Store the battery out of reach of burns and/or chemical burns. CLOTHING Wear clothes made of water and soap in an original battery QC charger from ! See a doctor. You must be used as a power source for charging the Husqvarna replacement batteries, BLi. Do not try to keys, coins, screws or other devices...
... minutes. See instructions under the Maintenance heading. • Store the battery out of reach of burns and/or chemical burns. CLOTHING Wear clothes made of water and soap in an original battery QC charger from ! See a doctor. You must be used as a power source for charging the Husqvarna replacement batteries, BLi. Do not try to keys, coins, screws or other devices...
Operation Manual
Page 10
...battery charger connection wire is not carried out correctly and if service and/or repairs are no cracks in this equipment is switched on your machine. The life span or the runtime of the machine can increase if machine maintenance is intact and that it . • Never carry the battery charger using the cord and never pull out the plug by pulling... the trimmer head. 10 - Deactivate the machine. Remove the battery from dust. 2 3 1 Flashing warning indicator (3) and green LED (2) is lit could indicate that is well ventilated, dry and free from the machine. Remove the grass or ...
...battery charger connection wire is not carried out correctly and if service and/or repairs are no cracks in this equipment is switched on your machine. The life span or the runtime of the machine can increase if machine maintenance is intact and that it . • Never carry the battery charger using the cord and never pull out the plug by pulling... the trimmer head. 10 - Deactivate the machine. Remove the battery from dust. 2 3 1 Flashing warning indicator (3) and green LED (2) is lit could indicate that is well ventilated, dry and free from the machine. Remove the grass or ...
Operation Manual
Page 11
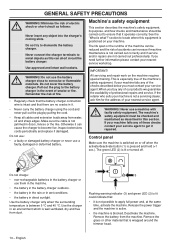
... are using. Always use a cutting ! Check that the power trigger and the power trigger lockout move back to prevent loose objects from accidental contact with the guards we recommend! WARNING! its original position. when you can activate the machine. This movement is controlled by two independent return springs. 1 Cutting attachment guard Li-ion This guard is intended to their original positions. Replace the guard if it releases the power trigger (2). See...
... are using. Always use a cutting ! Check that the power trigger and the power trigger lockout move back to prevent loose objects from accidental contact with the guards we recommend! WARNING! its original position. when you can activate the machine. This movement is controlled by two independent return springs. 1 Cutting attachment guard Li-ion This guard is intended to their original positions. Replace the guard if it releases the power trigger (2). See...
Operation Manual
Page 12
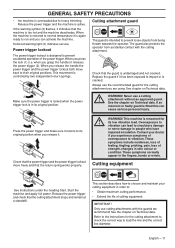
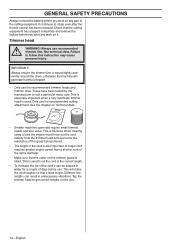
... PRECAUTIONS Always remove the battery before you start any part of the cutting equipment. These have been tested by the manufacturer to rotate even after the throttle control has been released. This will generate harmful vibration. • Only use recommended ! English Always use the recommended trimmer heads and trimmer lines. IMPORTANT! See the chapter on the trimmer guard is because when clearing using a cord the engine must throw...
... PRECAUTIONS Always remove the battery before you start any part of the cutting equipment. These have been tested by the manufacturer to rotate even after the throttle control has been released. This will generate harmful vibration. • Only use recommended ! English Always use the recommended trimmer heads and trimmer lines. IMPORTANT! See the chapter on the trimmer guard is because when clearing using a cord the engine must throw...

Operation Manual
Page 13
... working position. Assembling the guard Li-ion • Fit the correct trimmer guard (A) for use with the bolt (2) on the opposite side of the shaft. Bend the guard around the shaft and tighten it with the trimmer head. 2 1 A • Hang the trimmer guard on the hook on the shaft. • Slide the spacer into the slot in the loop handle. • Fit the nut, knob and screw. Tighten the bolt/knob...
... working position. Assembling the guard Li-ion • Fit the correct trimmer guard (A) for use with the bolt (2) on the opposite side of the shaft. Bend the guard around the shaft and tighten it with the trimmer head. 2 1 A • Hang the trimmer guard on the hook on the shaft. • Slide the spacer into the slot in the loop handle. • Fit the nut, knob and screw. Tighten the bolt/knob...
Operation Manual
Page 14
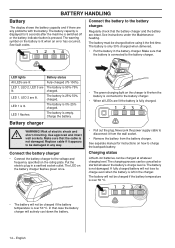
... be cancelled or started whatever the battery's charge level is. Put the electric plug in the battery charger. Charging status Lithium-ion batteries can be charged at whatever charging level. The battery capacity is displayed for instructions on the charger is lit when the battery is connected to be charged before using it from the wall socket. • Remove the battery from the battery charger. LED...
... be cancelled or started whatever the battery's charge level is. Put the electric plug in the battery charger. Charging status Lithium-ion batteries can be charged at whatever charging level. The battery capacity is displayed for instructions on the charger is lit when the battery is connected to be charged before using it from the wall socket. • Remove the battery from the battery charger. LED...
Operation Manual
Page 16
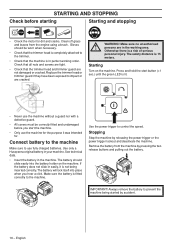
Check that all nuts and screws are cracked. WARNING! The safety distance is a risk of serious personal injury. Remove the battery from the engine using a brush. Clean off grass and leaves from the machine by pressing the two release buttons and pulling out the battery. Make sure no unauthorised ! Starting Turn on the machine. See technical data. • Insert the battery in your machine. The battery should...
Check that all nuts and screws are cracked. WARNING! The safety distance is a risk of serious personal injury. Remove the battery from the engine using a brush. Clean off grass and leaves from the machine by pressing the two release buttons and pulling out the battery. Make sure no unauthorised ! Starting Turn on the machine. See technical data. • Insert the battery in your machine. The battery should...
Operation Manual
Page 17
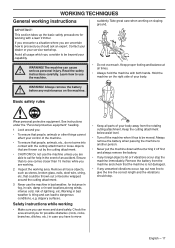
... with a lawn trimmer. Keep the cutting attachment below waist level. • Turn off the machine when it off first and always remove the battery. • If any foreign object is not damaged. • If any maintenance on the ...wire, string, etc. WARNING! Safety instructions while working • Make sure you are working. 2 Inspect the working with the cutting attachment or loose objects that are able to give the line the correct length and the vibrations should ask an expert. Remove the battery from the rotating cutting attachment. English - 17 Avoid all times...
... with a lawn trimmer. Keep the cutting attachment below waist level. • Turn off the machine when it off first and always remove the battery. • If any foreign object is not damaged. • If any maintenance on the ...wire, string, etc. WARNING! Safety instructions while working • Make sure you are working. 2 Inspect the working with the cutting attachment or loose objects that are able to give the line the correct length and the vibrations should ask an expert. Remove the battery from the rotating cutting attachment. English - 17 Avoid all times...

Operation Manual
Page 18
... used. It is easier to tap out the trimmer line to make sure no-one is on. Neither the operator of injury. WARNING! WARNING! Safety instructions after completing work • Make sure the cutting attachment has stopped before removing materials that the function is within the safety zone. WORKING TECHNIQUES • Release the power trigger after each working operation to save battery power. Turn...
... used. It is easier to tap out the trimmer line to make sure no-one is on. Neither the operator of injury. WARNING! WARNING! Safety instructions after completing work • Make sure the cutting attachment has stopped before removing materials that the function is within the safety zone. WORKING TECHNIQUES • Release the power trigger after each working operation to save battery power. Turn...
Operation Manual
Page 19
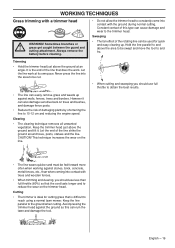
... to be used for cutting grass that the cord lasts longer and to 10-12 cm and reducing the engine speed. Sometimes branches or ! Always remove the battery before cleaning. • Do not allow the trimmer head to obtain the best results. • The line can be cut. • When cutting and sweeping you should use less than when coming into contact with a trimmer head WARNING! Let...
... to be used for cutting grass that the cord lasts longer and to 10-12 cm and reducing the engine speed. Sometimes branches or ! Always remove the battery before cleaning. • Do not allow the trimmer head to obtain the best results. • The line can be cut. • When cutting and sweeping you should use less than when coming into contact with a trimmer head WARNING! Let...
Operation Manual
Page 20
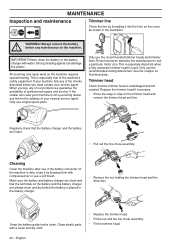
... parts with water. Always remove the battery ! before the battery is not a servicing dealer, ask him for the address of professional repairs and service. If your machine fails any of the machine′s safety equipment. This is especially important when a fully automatic trimmer head is undamaged and not cracked. IMPORTANT! Cleaning Clean the machine after use the recommended cutting attachment. MAINTENANCE Inspection and maintenance Li-ion Trimmer line Check...
... parts with water. Always remove the battery ! before the battery is not a servicing dealer, ask him for the address of professional repairs and service. If your machine fails any of the machine′s safety equipment. This is especially important when a fully automatic trimmer head is undamaged and not cracked. IMPORTANT! Cleaning Clean the machine after use the recommended cutting attachment. MAINTENANCE Inspection and maintenance Li-ion Trimmer line Check...
Operation Manual
Page 21
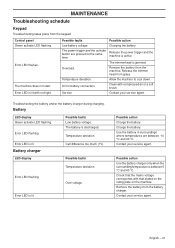
... time. English - 21 The machine does not start Error LED is lit Possible action Charge the battery. Service Possible action Charging the battery Release the power trigger and the machine is active. Remove the battery from the machine. Release the trimmer head from the keypad. Troubleshooting the battery and/or the battery charger during charging. MAINTENANCE Troubleshooting schedule Keypad Troubleshooting takes place from grass. Error LED flashing Over voltage. Use...
... time. English - 21 The machine does not start Error LED is lit Possible action Charge the battery. Service Possible action Charging the battery Release the power trigger and the machine is active. Remove the battery from the machine. Release the trimmer head from the keypad. Troubleshooting the battery and/or the battery charger during charging. MAINTENANCE Troubleshooting schedule Keypad Troubleshooting takes place from grass. Error LED flashing Over voltage. Use...

Operation Manual
Page 22
... oil and grease. Weekly maintenance X Monthly maintenance X 22 - Replace the trimmer head if necessary. Always remove the battery ! Most of the maintenance steps that all couplings, connections and cables are undamaged and in working order. The user must only carry out the maintenance and service work must be carried out by an authorized service workshop. Maintenance Daily maintenance Clean the outside of view. Never use water. X Keep handles dry, clean and free...
... oil and grease. Weekly maintenance X Monthly maintenance X 22 - Replace the trimmer head if necessary. Always remove the battery ! Most of the maintenance steps that all couplings, connections and cables are undamaged and in working order. The user must only carry out the maintenance and service work must be carried out by an authorized service workshop. Maintenance Daily maintenance Clean the outside of view. Never use water. X Keep handles dry, clean and free...

Operation Manual
Page 23
... - 23 Approved accessories Trimmer head J-handle set Type T25B (Ø 2.0 mm line) J-handle Cutting attachment guard, Art. TECHNICAL DATA Technical data Motor Motor type Speed of output shaft, rpm Cutting width, mm Weight Weight without battery, kg Weight with battery, kg Battery runtime Battery runtime, min, (free run) with SavE activated Noise emissions (see note 1) Sound power level, measured dB (A) Sound power level, guaranteed LWA dB (A) Noise levels (see note 2) Equivalent sound pressure level at the operator's ear, measured according...
... - 23 Approved accessories Trimmer head J-handle set Type T25B (Ø 2.0 mm line) J-handle Cutting attachment guard, Art. TECHNICAL DATA Technical data Motor Motor type Speed of output shaft, rpm Cutting width, mm Weight Weight without battery, kg Weight with battery, kg Battery runtime Battery runtime, min, (free run) with SavE activated Noise emissions (see note 1) Sound power level, measured dB (A) Sound power level, guaranteed LWA dB (A) Noise levels (see note 2) Equivalent sound pressure level at the operator's ear, measured according...


