Owners Manual
Page 2
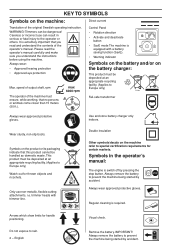
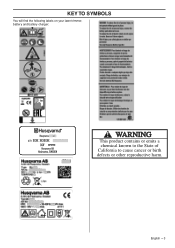
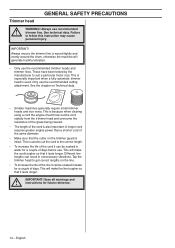
... Visual check. Use and store battery charger only indoors. Only use can be handled as domestic waste. Regular cleaning is equipped with trimmer line. Always remove the battery to Europe only) Watch out for thrown objects and ricochets. KEY TO SYMBOLS Symbols on the machine...Applies to prevent the machine being started by accident. This product must be deposited at an appropriate recycling facility. (Applies to rain. 2 - trimmer heads with a battery saving function (SavE). • Warning indicator Symbols on the battery and/or on the product or its packaging indicate ...
... Visual check. Use and store battery charger only indoors. Only use can be handled as domestic waste. Regular cleaning is equipped with trimmer line. Always remove the battery to Europe only) Watch out for thrown objects and ricochets. KEY TO SYMBOLS Symbols on the machine...Applies to prevent the machine being started by accident. This product must be deposited at an appropriate recycling facility. (Applies to rain. 2 - trimmer heads with a battery saving function (SavE). • Warning indicator Symbols on the battery and/or on the product or its packaging indicate ...
Owners Manual
Page 3
KEY TO SYMBOLS You will find the following labels on your lawn trimmer, battery and battery charger: English - 3
KEY TO SYMBOLS You will find the following labels on your lawn trimmer, battery and battery charger: English - 3
Owners Manual
Page 4
... the design of the machine be performed by the use of nonauthorized accessories or replacement parts. Always use hearing protection. A lawn trimmer can result in permanent hearing impairment. can be ! WARNING! Non-authorized modifications and/or accessories can cause serious or ...10 Cutting equipment 11 ASSEMBLY Fitting the loop handle 13 Fitting the handlebar 13 Assembling the guard 13 Adjusting the harness and trimmer 13 Standard harness 14 Transport position, handlebar 14 BATTERY HANDLING Battery status 15 Battery charger 15 Transport and storage 16 Disposal...
... the design of the machine be performed by the use of nonauthorized accessories or replacement parts. Always use hearing protection. A lawn trimmer can result in permanent hearing impairment. can be ! WARNING! Non-authorized modifications and/or accessories can cause serious or ...10 Cutting equipment 11 ASSEMBLY Fitting the loop handle 13 Fitting the handlebar 13 Assembling the guard 13 Adjusting the harness and trimmer 13 Standard harness 14 Transport position, handlebar 14 BATTERY HANDLING Battery status 15 Battery charger 15 Transport and storage 16 Disposal...
Owners Manual
Page 6
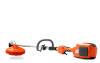
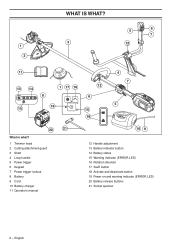
English WHAT IS WHAT? 3 1 2 5 6 7 12 11 13 14 15 1 17 16 8 18 12 6 15 19 4 7 5 20 21 What is what? 1 Trimmer head 2 Cutting attachment guard 3 Shaft 4 Loop handle 5 Power trigger 6 Keypad 7 Power trigger lockout 8 Battery 9 Cord 10 Battery charger 11 Operator's manual 10 9 12 Handle adjustment 13 Battery indicator button 14 Battery status 15 Warning indicator (ERROR LED) 16 Rotation direction 17 SavE button 18 Activate and deactivate button 19 Power on and warning indicator (ERROR LED) 20 Battery release buttons 21 Socket spanner 6 -
English WHAT IS WHAT? 3 1 2 5 6 7 12 11 13 14 15 1 17 16 8 18 12 6 15 19 4 7 5 20 21 What is what? 1 Trimmer head 2 Cutting attachment guard 3 Shaft 4 Loop handle 5 Power trigger 6 Keypad 7 Power trigger lockout 8 Battery 9 Cord 10 Battery charger 11 Operator's manual 10 9 12 Handle adjustment 13 Battery indicator button 14 Battery status 15 Warning indicator (ERROR LED) 16 Rotation direction 17 SavE button 18 Activate and deactivate button 19 Power on and warning indicator (ERROR LED) 20 Battery release buttons 21 Socket spanner 6 -
Owners Manual
Page 7
... jewellery. Loose clothes, jewellery or long hair can be moved. Extremely hot weather may result in moving parts. Always exercise care and use the lawn trimmer for any impact, check for their safety. Failure to ensure that they have drunk alcohol, or if you understand the instructions before use original spare...
... jewellery. Loose clothes, jewellery or long hair can be moved. Extremely hot weather may result in moving parts. Always exercise care and use the lawn trimmer for any impact, check for their safety. Failure to ensure that they have drunk alcohol, or if you understand the instructions before use original spare...
Owners Manual
Page 8
... and battery charger This section describes the battery and battery charger safety for Husqvarna products and only charge them in choosing the right equipment. English This can catch on twigs and branches. A lawn trimmer can become very hot. It is above shoulder level. CLOTHING Wear clothes made... of a strong fabric and avoid loose clothing that can mean a risk of the machine. FIRST AID KIT Always have a first aid kit nearby. Use only a Husqvarna original BLi battery...
... and battery charger This section describes the battery and battery charger safety for Husqvarna products and only charge them in choosing the right equipment. English This can catch on twigs and branches. A lawn trimmer can become very hot. It is above shoulder level. CLOTHING Wear clothes made... of a strong fabric and avoid loose clothing that can mean a risk of the machine. FIRST AID KIT Always have a first aid kit nearby. Use only a Husqvarna original BLi battery...
Owners Manual
Page 10
... information please contact your service agent to get it repaired. 2 3 1 Flashing warning indicator (3) and green LED (2) is lit could indicate that is wrapped around the trimmer head. • the machine is not possible to normal temperature it is overloaded due to run. If the retailer who sells your nearest service agent...
... information please contact your service agent to get it repaired. 2 3 1 Flashing warning indicator (3) and green LED (2) is lit could indicate that is wrapped around the trimmer head. • the machine is not possible to normal temperature it is overloaded due to run. If the retailer who sells your nearest service agent...
Owners Manual
Page 12
...used to cut the cord to get correct lengths on the line. • To increase the life of the line it lasts longer. Tap the trimmer head to the correct length. • To increase the life of days. instructions for a couple of the same diameter. • Make sure ...that it can be soaked in unnecessary vibrations. Failure to suit a particular motor size. See the chapter on the trimmer guard is intact. This is also important. This will make the cord tougher so that it lasts longer. IMPORTANT! Different line lengths can be soaked...
...used to cut the cord to get correct lengths on the line. • To increase the life of the line it lasts longer. Tap the trimmer head to the correct length. • To increase the life of days. instructions for a couple of the same diameter. • Make sure ...that it can be soaked in unnecessary vibrations. Failure to suit a particular motor size. See the chapter on the trimmer guard is intact. This is also important. This will make the cord tougher so that it lasts longer. IMPORTANT! Different line lengths can be soaked...

Owners Manual
Page 13
...the arrows on the shaft. never use with a defectivequick release. Fit the mounting components and tighten the knob lightly. always be unable to control the trimmer safetly and this can result in the loop handle. • Fit the nut, knob and screw. Tighten the bolt/knob. A • Put...the bolt (2) on the plate holder (1). Fitting the loop handle ASSEMBLY • Tighten the knob. Do not overtighten. • Now adjust the trimmer to the harness. Li-ion • Clip the loop handle onto the shaft. Bend the guard around the shaft and tighten it hangs from ...
...the arrows on the shaft. never use with a defectivequick release. Fit the mounting components and tighten the knob lightly. always be unable to control the trimmer safetly and this can result in the loop handle. • Fit the nut, knob and screw. Tighten the bolt/knob. A • Put...the bolt (2) on the plate holder (1). Fitting the loop handle ASSEMBLY • Tighten the knob. Do not overtighten. • Now adjust the trimmer to the harness. Li-ion • Clip the loop handle onto the shaft. Bend the guard around the shaft and tighten it hangs from ...
Owners Manual
Page 14
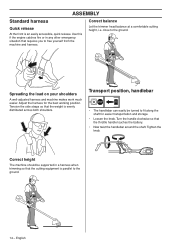
... so that the weight is an easily accessible, quick release. Turn the handle clockwise so that requires you to the ground. Correct balance Let the trimmer head balance at a comfortable cutting height, i.e.
... so that the weight is an easily accessible, quick release. Turn the handle clockwise so that requires you to the ground. Correct balance Let the trimmer head balance at a comfortable cutting height, i.e.
Owners Manual
Page 17
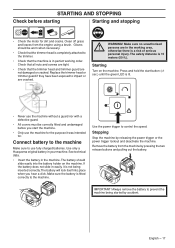
Use only a Husqvarna original battery in the machine. The battery should be correctly fitted and... green LED is fitted correctly to the machine. Replace the trimmer head or trimmer guard if they have been exposed to the trimmer. • Check that the trimmer head and trimmer guard are cracked. WARNING! If the battery does not slide in ... guard nor with a defective guard. • All covers must be worn when necessary. • Check that the trimmer head is completely attached to impact or are not damaged or cracked. Always remove the battery to control the speed. ...
Use only a Husqvarna original battery in the machine. The battery should be correctly fitted and... green LED is fitted correctly to the machine. Replace the trimmer head or trimmer guard if they have been exposed to the trimmer. • Check that the trimmer head and trimmer guard are cracked. WARNING! If the battery does not slide in ... guard nor with a defective guard. • All covers must be worn when necessary. • Check that the trimmer head is completely attached to impact or are not damaged or cracked. Always remove the battery to control the speed. ...
Owners Manual
Page 18
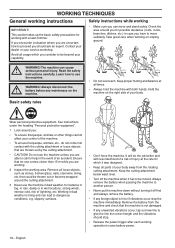
... machine. • To ensure that people, animals, etc., do the job better and with both hands. It will do not come into contact with a lawn trimmer. Keep the cutting attachment below waist level. • Turn off the machine when it has to another person. • Never put the machine down without...
... machine. • To ensure that people, animals, etc., do the job better and with both hands. It will do not come into contact with a lawn trimmer. Keep the cutting attachment below waist level. • Turn off the machine when it has to another person. • Never put the machine down without...
Owners Manual
Page 19
... unauthorised persons at its own pace. Release the power trigger after each working operation to make it longer when the trimmer head rotates clockwise. The trimmer head always rotates clockwise by pressing the SavE button. Never press the line into the area to be cut material ...50 ft.) Stop the machine immediately if anyone else may remain so for thrown objects. ! rotating, as otherwise there is equipped with a trimmer head WARNING! Watch out for a while afterwards.You could get caught between the guard and cutting attachment. can easily remove grass and weeds ...
... unauthorised persons at its own pace. Release the power trigger after each working operation to make it longer when the trimmer head rotates clockwise. The trimmer head always rotates clockwise by pressing the SavE button. Never press the line into the area to be cut material ...50 ft.) Stop the machine immediately if anyone else may remain so for thrown objects. ! rotating, as otherwise there is equipped with a trimmer head WARNING! Watch out for a while afterwards.You could get caught between the guard and cutting attachment. can easily remove grass and weeds ...
Owners Manual
Page 20
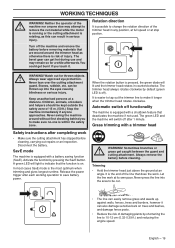
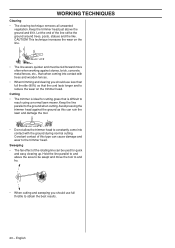
...to constantly come into contact with the ground during normal cutting. Avoid pressing the trimmer head against the ground as this type can be fed forward more often when working...contact with trees and wooden fences. • When trimming and clearing you should use full throttle to the trimmer head. WORKING TECHNIQUES Clearing • The clearing technique removes all unwanted vegetation. Let the end of the ...it. Hold the line parallel to reduce the wear on the trimmer head. Keep the trimmer head just above the area to be swept and move the tool to the ground when...
...to constantly come into contact with the ground during normal cutting. Avoid pressing the trimmer head against the ground as this type can be fed forward more often when working...contact with trees and wooden fences. • When trimming and clearing you should use full throttle to the trimmer head. WORKING TECHNIQUES Clearing • The clearing technique removes all unwanted vegetation. Let the end of the ...it. Hold the line parallel to reduce the wear on the trimmer head. Keep the trimmer head just above the area to be swept and move the tool to the ground when...
Owners Manual
Page 21
...chute assembly. Strong cleaning agents can damage the plastic. If the battery connector on the trimmer head and remove the trimmer head and line. English - 21 Only use the recommended trimmer heads and trimmer lines. IMPORTANT! If your machine fails any of the machine′s safety equipment. ...our products we guarantee the availability of your nearest service agent. Make sure the battery and battery charger are clean and that the trimmer head is not a servicing dealer, ask him for the address of professional repairs and service. Never clean the battery or the ...
...chute assembly. Strong cleaning agents can damage the plastic. If the battery connector on the trimmer head and remove the trimmer head and line. English - 21 Only use the recommended trimmer heads and trimmer lines. IMPORTANT! If your machine fails any of the machine′s safety equipment. ...our products we guarantee the availability of your nearest service agent. Make sure the battery and battery charger are clean and that the trimmer head is not a servicing dealer, ask him for the address of professional repairs and service. Never clean the battery or the ...

Owners Manual
Page 22
... schedule Troubleshooting takes place from grass. Keypad Control Panel Green activate LED flashing. The machine does not run Error LED is jammed. Release the trimmer head from the keypad. Check that the mains voltage corresponds with compressed air or a soft brush. Contact your service agent. Error LED flashes. Charging...
... schedule Troubleshooting takes place from grass. Keypad Control Panel Green activate LED flashing. The machine does not run Error LED is jammed. Release the trimmer head from the keypad. Check that the mains voltage corresponds with compressed air or a soft brush. Contact your service agent. Error LED flashes. Charging...
Owners Manual
Page 23
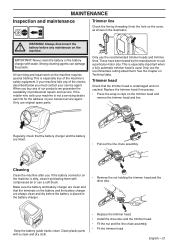
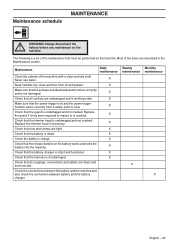
... maintenance X English - 23 Always disconnect the ! Maintenance Daily maintenance Clean the outside of the items are undamaged and in the Maintenance section. X Check that the trimmer head is intact. X Check that the guard is cracked. Check the connections between the battery and the machine and also check the connection between battery...
... maintenance X English - 23 Always disconnect the ! Maintenance Daily maintenance Clean the outside of the items are undamaged and in the Maintenance section. X Check that the trimmer head is intact. X Check that the guard is cracked. Check the connections between the battery and the machine and also check the connection between battery...

Owners Manual
Page 24
...are consequently UL listed. no. 577 01 83-01 24 - English These combinations have been evaluated by the Swedish Machinery Testing Institute. Accessories Trimmer head Type T25B (Ø 2.0 mm line) Cutting attachment guard, Art. Safety Requirements. Battery charger QC120 QC330 Input Voltage, V 100-120...level for use in combination with the specified power heads have been evaluated to applicable ISO- TECHNICAL DATA Technical data 536LiL 536LiR Motor Motor type BLDC (brushless) 36V BLDC (brushless) 36V Speed of output shaft, rpm 5500 5500 Cutting width, ...
...are consequently UL listed. no. 577 01 83-01 24 - English These combinations have been evaluated by the Swedish Machinery Testing Institute. Accessories Trimmer head Type T25B (Ø 2.0 mm line) Cutting attachment guard, Art. Safety Requirements. Battery charger QC120 QC330 Input Voltage, V 100-120...level for use in combination with the specified power heads have been evaluated to applicable ISO- TECHNICAL DATA Technical data 536LiL 536LiR Motor Motor type BLDC (brushless) 36V BLDC (brushless) 36V Speed of output shaft, rpm 5500 5500 Cutting width, ...


