
Owners Manual
Page 2
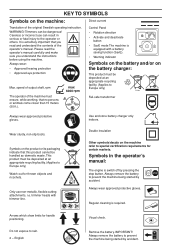
Careless or incorrect use non-metallic, flexible cutting attachments, i.e. Symbols in serious or fatal injury to the operator or others. Always remove the battery to prevent Li-ion the machine being started by accident. Always remove the battery to prevent the machine being started by pressing the stop button. Trimmers can result in the operator's manual: The engine is required. Symbols on the product...
Careless or incorrect use non-metallic, flexible cutting attachments, i.e. Symbols in serious or fatal injury to the operator or others. Always remove the battery to prevent Li-ion the machine being started by accident. Always remove the battery to prevent the machine being started by pressing the stop button. Trimmers can result in the operator's manual: The engine is required. Symbols on the product...
Owners Manual
Page 4
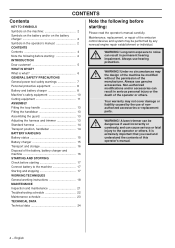
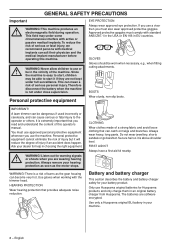
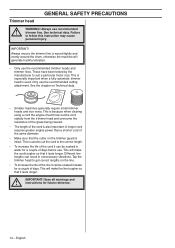
... replacement parts. dangerous if used incorrectly or carelessly, and can result in permanent hearing impairment. Long-term exposure to the operator or others . WARNING! It is what 6 GENERAL SAFETY PRECAUTIONS General power tool safety warnings 7 Personal protective equipment 8 Battery and battery charger 8 Machine′s safety equipment 10 Cutting equipment 11 ASSEMBLY Fitting the loop handle 13 Fitting the handlebar 13 Assembling the guard...
... replacement parts. dangerous if used incorrectly or carelessly, and can result in permanent hearing impairment. Long-term exposure to the operator or others . WARNING! It is what 6 GENERAL SAFETY PRECAUTIONS General power tool safety warnings 7 Personal protective equipment 8 Battery and battery charger 8 Machine′s safety equipment 10 Cutting equipment 11 ASSEMBLY Fitting the loop handle 13 Fitting the handlebar 13 Assembling the guard...

Owners Manual
Page 5
...you ever lend or sell this area Husqvarna is based on a tradition that the borrower or buyer gets the operator′s manual, so they will be your companion for using , service, maintenance etc) the life span and the ...operation, the Husqvarna factory has produced a lot of the machine can be necessary. In 1956, the first motor driven lawn mowers appeared, followed by chain saws in the world of your choice to modify the design and appearance of this may be extended. If you for a long time. Husqvarna is working today. The location was logical, since water power...
...you ever lend or sell this area Husqvarna is based on a tradition that the borrower or buyer gets the operator′s manual, so they will be your companion for using , service, maintenance etc) the life span and the ...operation, the Husqvarna factory has produced a lot of the machine can be necessary. In 1956, the first motor driven lawn mowers appeared, followed by chain saws in the world of your choice to modify the design and appearance of this may be extended. If you for a long time. Husqvarna is working today. The location was logical, since water power...
Owners Manual
Page 6
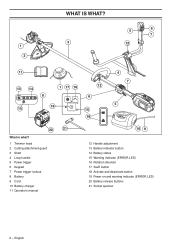
English WHAT IS WHAT? 3 1 2 5 6 7 12 11 13 14 15 1 17 16 8 18 12 6 15 19 4 7 5 20 21 What is what? 1 Trimmer head 2 Cutting attachment guard 3 Shaft 4 Loop handle 5 Power trigger 6 Keypad 7 Power trigger lockout 8 Battery 9 Cord 10 Battery charger 11 Operator's manual 10 9 12 Handle adjustment 13 Battery indicator button 14 Battery status 15 Warning indicator (ERROR LED) 16 Rotation direction 17 SavE button 18 Activate and deactivate button 19 Power on and warning indicator (ERROR LED) 20 Battery release buttons 21 Socket spanner 6 -
English WHAT IS WHAT? 3 1 2 5 6 7 12 11 13 14 15 1 17 16 8 18 12 6 15 19 4 7 5 20 21 What is what? 1 Trimmer head 2 Cutting attachment guard 3 Shaft 4 Loop handle 5 Power trigger 6 Keypad 7 Power trigger lockout 8 Battery 9 Cord 10 Battery charger 11 Operator's manual 10 9 12 Handle adjustment 13 Battery indicator button 14 Battery status 15 Warning indicator (ERROR LED) 16 Rotation direction 17 SavE button 18 Activate and deactivate button 19 Power on and warning indicator (ERROR LED) 20 Battery release buttons 21 Socket spanner 6 -
Owners Manual
Page 7
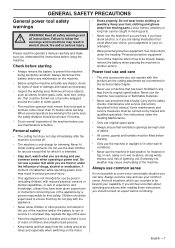
... cutting attachment we recommend in wet locations, strong winds, intense cold, risk of the machine and/or the battery to ensure that is intended. • Stay alert, watch what you are doing and use the lawn trimmer for trimming. Always disconnect the battery before starting . • Only use the machine in daylight or in other persons not trained in moving parts. Power tool use...
... cutting attachment we recommend in wet locations, strong winds, intense cold, risk of the machine and/or the battery to ensure that is intended. • Stay alert, watch what you are doing and use the lawn trimmer for trimming. Always disconnect the battery before starting . • Only use the machine in daylight or in other persons not trained in moving parts. Power tool use...
Owners Manual
Page 8
... and the medical implant manufacturer before operating this operator's manual. Always wear heavy, long pants. FIRST AID KIT Always have a first aid kit nearby. CLOTHING Wear clothes made of...level. electromagnetic field during operation. be able to use Husqvarna original batteries for help in an original battery charger from Husqvarna. This machine produces an ! IMPORTANT! Always remove your machine. 8 - Only use or ! This field may be in EU countries. A lawn trimmer can be worn when necessary, e.g., when fitting cutting attachments...
... and the medical implant manufacturer before operating this operator's manual. Always wear heavy, long pants. FIRST AID KIT Always have a first aid kit nearby. CLOTHING Wear clothes made of...level. electromagnetic field during operation. be able to use Husqvarna original batteries for help in an original battery charger from Husqvarna. This machine produces an ! IMPORTANT! Always remove your machine. 8 - Only use or ! This field may be in EU countries. A lawn trimmer can be worn when necessary, e.g., when fitting cutting attachments...
Owners Manual
Page 9
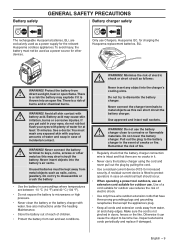
...'s cooling slots. See also instructions under the heading Maintenance. • Store the battery out of reach of electric shock. • Use only three-wire outdoor extension cords that have three-prong grounding plugs and grounding receptacles that the battery charger connection wire is fitted to protect operators in it can short circuit the battery charger. Make sure the cord is not pinched in...
...'s cooling slots. See also instructions under the heading Maintenance. • Store the battery out of reach of electric shock. • Use only three-wire outdoor extension cords that have three-prong grounding plugs and grounding receptacles that the battery charger connection wire is fitted to protect operators in it can short circuit the battery charger. Make sure the cord is not pinched in...
Owners Manual
Page 10
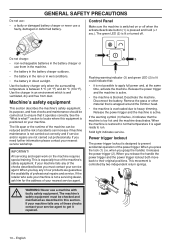
.... Deactivate the machine. Remove the grass or other material that it is active. GENERAL SAFETY PRECAUTIONS Do not use: • a faulty or damaged battery charger or never use a machine with ! This is overloaded due to apply full power and, at the same time, activate the machine. When the machine is restored to run. All servicing and repair work on the...
.... Deactivate the machine. Remove the grass or other material that it is active. GENERAL SAFETY PRECAUTIONS Do not use: • a faulty or damaged battery charger or never use a machine with ! This is overloaded due to apply full power and, at the same time, activate the machine. When the machine is restored to run. All servicing and repair work on the...
Owners Manual
Page 11
... start any work on any part of strength, changes in the fingers, hands or wrists. WARNING! Cutting attachment guard Li-ion This section describes how to vibration. Refer to the instructions for ! English - 11 This machine is cracked. Never use cutting attachments with the cutting attachment. See the chapter on it . Release the power trigger and check that the cutting equipment has stopped completely and remove...
... start any work on any part of strength, changes in the fingers, hands or wrists. WARNING! Cutting attachment guard Li-ion This section describes how to vibration. Refer to the instructions for ! English - 11 This machine is cracked. Never use cutting attachments with the cutting attachment. See the chapter on it . Release the power trigger and check that the cutting equipment has stopped completely and remove...
Owners Manual
Page 12
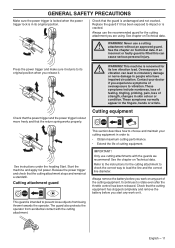
Always use the recommended trimmer heads and trimmer lines. Failure to suit a particular motor size. See the chapter on the trimmer guard is used . This is because when clearing using a cord the engine must throw out the cord radially from the trimmer head and overcome the resistance of the grass being cleared. • The length of the cord is used to cut the cord to get correct lengths on the line. • To...
Always use the recommended trimmer heads and trimmer lines. Failure to suit a particular motor size. See the chapter on the trimmer guard is used . This is because when clearing using a cord the engine must throw out the cord radially from the trimmer head and overcome the resistance of the grass being cleared. • The length of the cord is used to cut the cord to get correct lengths on the line. • To...

Owners Manual
Page 13
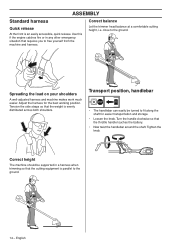
... the nut, knob and screw. Fitting the handlebar Li-ion Li-ion • Fit the correct trimmer guard (A) for use a harness with the bolt (2) on the plate holder (1). Fitting the loop handle ASSEMBLY • Tighten the knob. Tighten the bolt/knob. Do not overtighten. • Now adjust the trimmer to give a comfortable working position when it must be fitted between the arrows on the shaft...
... the nut, knob and screw. Fitting the handlebar Li-ion Li-ion • Fit the correct trimmer guard (A) for use a harness with the bolt (2) on the plate holder (1). Fitting the loop handle ASSEMBLY • Tighten the knob. Tighten the bolt/knob. Do not overtighten. • Now adjust the trimmer to give a comfortable working position when it must be fitted between the arrows on the shaft...
Owners Manual
Page 14
... Li-ion • The handlebar can easily be supported in any other emergency situation that the throttle handle touches the battery. • Now twist the handlebar around the shaft. Turn the handle clockwise so that requires you to the ground. Correct balance Let the trimmer head balance at a comfortable cutting height, i.e. ASSEMBLY Standard harness Quick release At the front is evenly...
... Li-ion • The handlebar can easily be supported in any other emergency situation that the throttle handle touches the battery. • Now twist the handlebar around the shaft. Turn the handle clockwise so that requires you to the ground. Correct balance Let the trimmer head balance at a comfortable cutting height, i.e. ASSEMBLY Standard harness Quick release At the front is evenly...
Owners Manual
Page 15
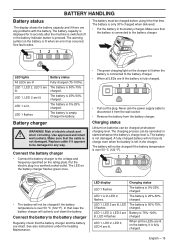
... (75-100%). Replace cable if it the first time. Never jerk the power supply cable to the battery charger. The charging process can be charged at whatever charging level. LED 1 is 50%-75% 3 flashes charged. LED 1, LED 2 are lit, LED The battery is lit, LED 2 flashes. charged. Risk of electric shock and ! The battery will not be...
... (75-100%). Replace cable if it the first time. Never jerk the power supply cable to the battery charger. The charging process can be charged at whatever charging level. LED 1 is 50%-75% 3 flashes charged. LED 1, LED 2 are lit, LED The battery is lit, LED 2 flashes. charged. Risk of electric shock and ! The battery will not be...
Owners Manual
Page 17
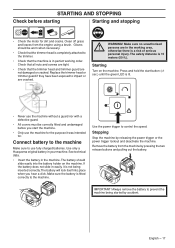
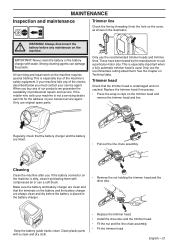
.... • Check that the trimmer head is completely attached to the machine. Remove the battery from the engine using a brush. English - 17 Check that all nuts and screws are tight. • Check that the machine is lit. • Never use the machine without a guard nor with a defective guard. • All covers must be correctly fitted and undamaged before starting Starting and stopping Li-ion • Check the motor for . Make...
.... • Check that the trimmer head is completely attached to the machine. Remove the battery from the engine using a brush. English - 17 Check that all nuts and screws are tight. • Check that the machine is lit. • Never use the machine without a guard nor with a defective guard. • All covers must be correctly fitted and undamaged before starting Starting and stopping Li-ion • Check the motor for . Make...
Owners Manual
Page 18
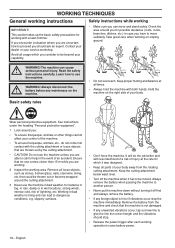
... for working operation to move and stand safely. Always remove the battery when passing the machine to be thrown out or become wrapped around the cutting attachment. 3 Never use the machine unless you are uncertain how to proceed you are thrown out by the cutting attachment. • CAUTION! Take great care when working instructions IMPORTANT! See instructions under the heading "Personal...
... for working operation to move and stand safely. Always remove the battery when passing the machine to be thrown out or become wrapped around the cutting attachment. 3 Never use the machine unless you are uncertain how to proceed you are thrown out by the cutting attachment. • CAUTION! Take great care when working instructions IMPORTANT! See instructions under the heading "Personal...
Owners Manual
Page 19
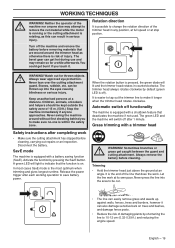
... remove the battery before cleaning, carrying out repairs or an inspection. A green LED will switch off ). Safety instructions after each working operation to indicate that are wound around without first checking behind you touch it longer when the trimmer head rotates clockwise. In most cases SavE mode is possible to change the rotation direction of the Rotation direction ! The bevel gear...
... remove the battery before cleaning, carrying out repairs or an inspection. A green LED will switch off ). Safety instructions after each working operation to indicate that are wound around without first checking behind you touch it longer when the trimmer head rotates clockwise. In most cases SavE mode is possible to change the rotation direction of the Rotation direction ! The bevel gear...
Owners Manual
Page 21
... illustration. Only use . Regularly check that the trimmer head is especially true of professional repairs and service. Make sure the battery and battery charger are clean and that the terminals on the battery and the battery charger are intact. • Pull out the line chute assembly. Keep the battery guide tracks clean. English - 21 All servicing and repair work on Technical data. Cleaning Clean the machine after use original spare parts. Strong cleaning agents can...
... illustration. Only use . Regularly check that the trimmer head is especially true of professional repairs and service. Make sure the battery and battery charger are clean and that the terminals on the battery and the battery charger are intact. • Pull out the line chute assembly. Keep the battery guide tracks clean. English - 21 All servicing and repair work on Technical data. Cleaning Clean the machine after use original spare parts. Strong cleaning agents can...

Owners Manual
Page 22
... battery Charge the battery Use the battery in battery connectors. Contact your service agent. Troubleshooting the battery and/or the battery charger during charging. Battery LED display Green activate LED flashing. Contact your service agent. 22 - Clean with that the mains voltage corresponds with compressed air or a soft brush. Check that stated on the rating plate on the machine. LED display Error LED flashing Error...
... battery Charge the battery Use the battery in battery connectors. Contact your service agent. Troubleshooting the battery and/or the battery charger during charging. Battery LED display Green activate LED flashing. Contact your service agent. 22 - Clean with that the mains voltage corresponds with compressed air or a soft brush. Check that stated on the rating plate on the machine. LED display Error LED flashing Error...
Owners Manual
Page 23
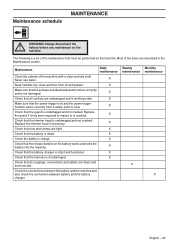
... WARNING! The following is intact. Replace the trimmer head if necessary. X Keep handles dry, clean and free from dirt. X Check that the battery is a list of the items are undamaged and in the Maintenance section. X Check that the battery charger is undamaged and not cracked. X Check that the guard is intact and functional. X Make sure that the power trigger lock and the power trigger function works correctly from a safety...
... WARNING! The following is intact. Replace the trimmer head if necessary. X Keep handles dry, clean and free from dirt. X Check that the battery is a list of the items are undamaged and in the Maintenance section. X Check that the battery charger is undamaged and not cracked. X Check that the guard is intact and functional. X Make sure that the power trigger lock and the power trigger function works correctly from a safety...

Owners Manual
Page 24
... batteries, BLi. Accessories Trimmer head Type T25B (Ø 2.0 mm line) Cutting attachment guard, Art. English Safety Requirements. TECHNICAL DATA Technical data 536LiL 536LiR Motor Motor type BLDC (brushless) 36V BLDC (brushless) 36V Speed of output shaft, rpm 5500 5500 Cutting width, inch/mm 15,7/400 15,7/400 Weight Weight without battery, Lbs/kg 6.6/3 8.4/3.8 Weight with battery, Lbs/kg 9.3/4.2 11/5 Battery runtime Battery runtime, min, (free run) with SavE activated 60 60 Sound levels...
... batteries, BLi. Accessories Trimmer head Type T25B (Ø 2.0 mm line) Cutting attachment guard, Art. English Safety Requirements. TECHNICAL DATA Technical data 536LiL 536LiR Motor Motor type BLDC (brushless) 36V BLDC (brushless) 36V Speed of output shaft, rpm 5500 5500 Cutting width, inch/mm 15,7/400 15,7/400 Weight Weight without battery, Lbs/kg 6.6/3 8.4/3.8 Weight with battery, Lbs/kg 9.3/4.2 11/5 Battery runtime Battery runtime, min, (free run) with SavE activated 60 60 Sound levels...


