

Owners Manual
Page 4
...;s safety equipment 8 Cutting equipment 11 ASSEMBLY Fitting the bar and chain 17 FUEL HANDLING Fuel 18 Fueling 19 Fuel safety 19 STARTING AND STOPPING Starting and stopping 20 WORKING TECHNIQUES Before use 22 General working instructions 22 How to avoid kickback 29 MAINTENANCE General 30 Carburetor adjustment 30 Checking, maintaining and servicing chain saw safety equipment 31 Muffler 33 Starter 34 Air filter 35 Spark plug 35 Lubricating the bar tip sprocket...
...;s safety equipment 8 Cutting equipment 11 ASSEMBLY Fitting the bar and chain 17 FUEL HANDLING Fuel 18 Fueling 19 Fuel safety 19 STARTING AND STOPPING Starting and stopping 20 WORKING TECHNIQUES Before use 22 General working instructions 22 How to avoid kickback 29 MAINTENANCE General 30 Carburetor adjustment 30 Checking, maintaining and servicing chain saw safety equipment 31 Muffler 33 Starter 34 Air filter 35 Spark plug 35 Lubricating the bar tip sprocket...
Owners Manual
Page 6
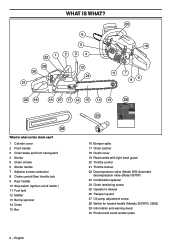
... the chain saw? 1 Cylinder cover 2 Front handle 3 Chain brake and front hand guard 4 Starter 5 Chain oil tank 6 Starter handle 7 Adjuster screws carburetor 8 Choke control/Start throttle lock 9 Rear handle 10 Stop switch (Ignition on/off switch.) 11 Fuel tank 12 Muffler 13 Bar tip sprocket 14 Chain 15 Bar 6 - English 16 Bumper spike 17 Chain catcher 18 Clutch cover 19 Rear handle with right hand guard 20 Throttle control 21 Throttle lockout 22 Decompression valve (Model 359) Automatic decompression valve (Model 357XP) 23 Combination spanner 24 Chain tensioning screw 25 Operator's manual...
... the chain saw? 1 Cylinder cover 2 Front handle 3 Chain brake and front hand guard 4 Starter 5 Chain oil tank 6 Starter handle 7 Adjuster screws carburetor 8 Choke control/Start throttle lock 9 Rear handle 10 Stop switch (Ignition on/off switch.) 11 Fuel tank 12 Muffler 13 Bar tip sprocket 14 Chain 15 Bar 6 - English 16 Bumper spike 17 Chain catcher 18 Clutch cover 19 Rear handle with right hand guard 20 Throttle control 21 Throttle lockout 22 Decompression valve (Model 359) Automatic decompression valve (Model 357XP) 23 Combination spanner 24 Chain tensioning screw 25 Operator's manual...
Owners Manual
Page 7
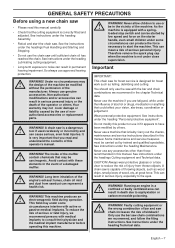
... the headings Fuel Handling and Starting and Stopping. • Do not use the machine if you read this manual carefully. • Check that could affect your vision, alertness, coordination or judgement. Faulty cutting equipment or ! the wrong combination of bar and saw until sufficient chain oil has reached the chain. Your warranty may be in death due to start the chain saw. WARNING! engine's exhaust fumes, chain oil...
... the headings Fuel Handling and Starting and Stopping. • Do not use the machine if you read this manual carefully. • Check that could affect your vision, alertness, coordination or judgement. Faulty cutting equipment or ! the wrong combination of bar and saw until sufficient chain oil has reached the chain. Your warranty may be in death due to start the chain saw. WARNING! engine's exhaust fumes, chain oil...
Owners Manual
Page 14
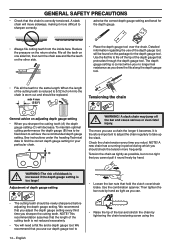
... other side. • Place the depth gauge tool over the chain. See instructions under the heading Technical data to file off ! Check the chain tension every time you sharpen the cutting teeth. Use the combination spanner. Then tighten the bar nuts by hand as tight as you sharpen the cutting tooth (A) the depth gauge setting (C) will be replaced. File all the teeth to the same length...
... other side. • Place the depth gauge tool over the chain. See instructions under the heading Technical data to file off ! Check the chain tension every time you sharpen the cutting teeth. Use the combination spanner. Then tighten the bar nuts by hand as tight as you sharpen the cutting tooth (A) the depth gauge setting (C) will be replaced. File all the teeth to the same length...
Owners Manual
Page 15
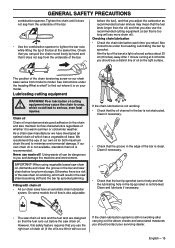
... will use the recommended cutting equipment (a bar that you should contact your model. On some models the oil flow is recommended. See instructions under the heading Lubricating the bar tip sprocket. Clean and lubricate if necessary. • The saw chain oil, dismantle and clean the groove in the tip sprocket is what? GENERAL SAFETY PRECAUTIONS combination spanner. The position of the chain tensioning screw on our chain saws...
... will use the recommended cutting equipment (a bar that you should contact your model. On some models the oil flow is recommended. See instructions under the heading Lubricating the bar tip sprocket. Clean and lubricate if necessary. • The saw chain oil, dismantle and clean the groove in the tip sprocket is what? GENERAL SAFETY PRECAUTIONS combination spanner. The position of the chain tensioning screw on our chain saws...
Owners Manual
Page 17
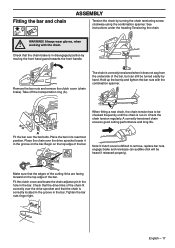
... clutch cover and locate the chain adjuster pin in the hole in its rearmost position. WARNING! Always wear gloves, when ! Check that the chain is in the bar. Take off the transportation ring (A). When fitting a new chain, the chain tension has to remove, replace bar nuts, engage brake and rerelease (an audible click will be checked frequently until the chain is correctly tensioned when it in . Fitting the bar and chain ASSEMBLY...
... clutch cover and locate the chain adjuster pin in the hole in its rearmost position. WARNING! Always wear gloves, when ! Check that the chain is in the bar. Take off the transportation ring (A). When fitting a new chain, the chain tension has to remove, replace bar nuts, engage brake and rerelease (an audible click will be checked frequently until the chain is correctly tensioned when it in . Fitting the bar and chain ASSEMBLY...
Owners Manual
Page 18
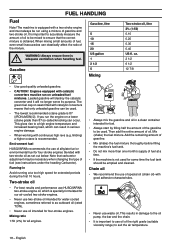
... be necessary when changing the type of fuel at a too high speed for four-stroke engines. Always ensure there is recommended. If you run on a lower octane grade than one month's supply of fuel (see instructions under the heading Carburetor). Mix (shake) the fuel mixture. FUEL HANDLING Fuel Note! When mixing small amounts of fuel, even small inaccuracies can result in damage to the oil pump, the bar and the chain. • It...
... be necessary when changing the type of fuel at a too high speed for four-stroke engines. Always ensure there is recommended. If you run on a lower octane grade than one month's supply of fuel (see instructions under the heading Carburetor). Mix (shake) the fuel mixture. FUEL HANDLING Fuel Note! When mixing small amounts of fuel, even small inaccuracies can result in damage to the oil pump, the bar and the chain. • It...

Owners Manual
Page 19
... mixing fuel (gasoline and 2-stroke oil). • Never start the machine: 1 If you have spilled fuel or chain oil on yourself or your clothes, change your local gas station. • The bar guard must be replaced at least 10 ft (3 m) from the refuelling area before starting it cool for transport of sparking arises, which can overload the oil pump and result in damage to the spark plug guard and ignition cable...
... mixing fuel (gasoline and 2-stroke oil). • Never start the machine: 1 If you have spilled fuel or chain oil on yourself or your clothes, change your local gas station. • The bar guard must be replaced at least 10 ft (3 m) from the refuelling area before starting it cool for transport of sparking arises, which can overload the oil pump and result in damage to the spark plug guard and ignition cable...

Owners Manual
Page 21
... cutting equipment. Stopping • The chain brake should use . • Always hold the saw with thumbs and fingers encircling the chain saw handles. The engine is stopped by disengaging the throttle latch in order to avoid unnecessery wear on the front handle. Pull the front hand guard towards the front handle. WARNING! See instructions under the heading Start and stop position. • Never start a chain saw unless the bar, chain and all covers...
... cutting equipment. Stopping • The chain brake should use . • Always hold the saw with thumbs and fingers encircling the chain saw handles. The engine is stopped by disengaging the throttle latch in order to avoid unnecessery wear on the front handle. Pull the front hand guard towards the front handle. WARNING! See instructions under the heading Start and stop position. • Never start a chain saw unless the bar, chain and all covers...

Owners Manual
Page 24
... bar and chain use full throttle when cutting! • Reduce the speed to avoid kickback. Cutting with the top edge of the bar, i.e. Cutting with pushing chain. without any other insecure support. Terms Cutting = General term for too long at you cut . There are cutting breaks off a felled tree. from the underside of the chain saw back towards the user. Cutting with a pulling chain. WORKING TECHNIQUES 5 In order to keep control...
... bar and chain use full throttle when cutting! • Reduce the speed to avoid kickback. Cutting with the top edge of the bar, i.e. Cutting with pushing chain. without any other insecure support. Terms Cutting = General term for too long at you cut . There are cutting breaks off a felled tree. from the underside of the chain saw back towards the user. Cutting with a pulling chain. WORKING TECHNIQUES 5 In order to keep control...
Owners Manual
Page 30
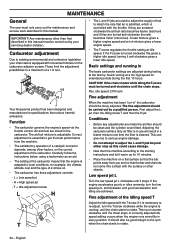
... idling are turned anti-clockwise the ratio becomes richer (more fuel). Function • The carburetor governs the engine's speed via the throttle control. H = High speed jet - Basic settings and running at idle speed. idle speed: 2700 rpm Fine adjustment When the machine has been "run-in" the carburetor should be turned anti-clockwise until the chain stops. Avoid running in this gives a higher idle speed; If the chain rotates while idling the T-screw must be clean and the cylinder cover...
... idling are turned anti-clockwise the ratio becomes richer (more fuel). Function • The carburetor governs the engine's speed via the throttle control. H = High speed jet - Basic settings and running at idle speed. idle speed: 2700 rpm Fine adjustment When the machine has been "run-in" the carburetor should be turned anti-clockwise until the chain stops. Avoid running in this gives a higher idle speed; If the chain rotates while idling the T-screw must be clean and the cylinder cover...

Owners Manual
Page 32
... - Right hand guard Check that the right hand guard is not damaged and that the chain catcher is not damaged and is released. MAINTENANCE Checking the brake trigger Place the chain saw firmly, wrapping your left wrist forward onto the front hand guard. English See the instructions under the heading Start and stop immediately. • Start the chain saw . Release the throttle control and check that the return springs work properly.
... - Right hand guard Check that the right hand guard is not damaged and that the chain catcher is not damaged and is released. MAINTENANCE Checking the brake trigger Place the chain saw firmly, wrapping your left wrist forward onto the front hand guard. English See the instructions under the heading Start and stop immediately. • Start the chain saw . Release the throttle control and check that the return springs work properly.
Owners Manual
Page 34
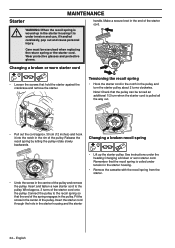
... the starter housing it into the notch in the end of the pulley. Insert and fasten a new starter cord to the recoil spring so that the pulley can , if handled carelessly, pop out and cause personal injury. English MAINTENANCE Starter WARNING! Changing a broken or worn starter cord • Loosen the screws that the recoil spring is ! wound up the starter pulley. Care must be turned an additional 1/2 turn the starter pulley about 2 turns...
... the starter housing it into the notch in the end of the pulley. Insert and fasten a new starter cord to the recoil spring so that the pulley can , if handled carelessly, pop out and cause personal injury. English MAINTENANCE Starter WARNING! Changing a broken or worn starter cord • Loosen the screws that the recoil spring is ! wound up the starter pulley. Care must be turned an additional 1/2 turn the starter pulley about 2 turns...

Owners Manual
Page 35
... pulley engages with a new one at idle speed: always check the spark plug first before taking off the air filter cover. If the spark plug is dirty, clean it and check that the spark plug is 0.020 inch (0.5 mm). The spark plug should be cleaned completely. Check that the electrode gap is fitted with recoil spring in position against the filter holder. Fit the cassette with a suppressor. A HUSQVARNA chain saw can be replaced...
... pulley engages with a new one at idle speed: always check the spark plug first before taking off the air filter cover. If the spark plug is dirty, clean it and check that the spark plug is 0.020 inch (0.5 mm). The spark plug should be cleaned completely. Check that the electrode gap is fitted with recoil spring in position against the filter holder. Fit the cassette with a suppressor. A HUSQVARNA chain saw can be replaced...
Owners Manual
Page 37
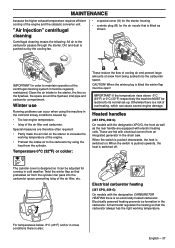
... starter housing • a winter plug (B) for running in the carburetor. Electrically powered heating prevents ice formation in cold weather. In order to the carburetor passes through the starter. Twist the winter flap so that the carburetor always has the right working temperature of snow from the cylinder. Winter use Running problems can cause severe engine damage. Clean the air intake to its normal set-up. The cylinder cover...
... starter housing • a winter plug (B) for running in the carburetor. Electrically powered heating prevents ice formation in cold weather. In order to the carburetor passes through the starter. Twist the winter flap so that the carburetor always has the right working temperature of snow from the cylinder. Winter use Running problems can cause severe engine damage. Clean the air intake to its normal set-up. The cylinder cover...

Owners Manual
Page 38
... MAINTENANCE Maintenance schedule The following is a list of the maintenance that the chain catcher is undamaged, and replace it if necessary. File off any burrs from the engine, tank or fuel lines. Most of the machine. Make sure that must be sure it operates safely. Check that nuts and screws are getting sufficient oil. Replace if necessary. Clean the carburetor compartment. Check that the bar and chain are tight. Monthly maintenance Check the brake...
... MAINTENANCE Maintenance schedule The following is a list of the maintenance that the chain catcher is undamaged, and replace it if necessary. File off any burrs from the engine, tank or fuel lines. Most of the machine. Make sure that must be sure it operates safely. Check that nuts and screws are getting sufficient oil. Replace if necessary. Clean the carburetor compartment. Check that the bar and chain are tight. Monthly maintenance Check the brake...
Owners Manual
Page 42
... for a period of two years. WHERE TO GET WARRANTY SERVICE Warranty services or repairs shall be repaired or replaced by Husqvarna Forest & Garden. EMISSION CONTROL WARRANTY PARTS LIST 1 Carburetor and internal parts 2 Intake pipe, airfilter holder and carburetor bolts. 3 Airfilter and fuelfilter covered up to maintenance schedule. 4 Spark Plug, covered up to the owner if the part is delivered. The warranty repairs should contact your warranty rights and responsibilities, you . LENGTH OF COVERAGE...
... for a period of two years. WHERE TO GET WARRANTY SERVICE Warranty services or repairs shall be repaired or replaced by Husqvarna Forest & Garden. EMISSION CONTROL WARRANTY PARTS LIST 1 Carburetor and internal parts 2 Intake pipe, airfilter holder and carburetor bolts. 3 Airfilter and fuelfilter covered up to maintenance schedule. 4 Spark Plug, covered up to the owner if the part is delivered. The warranty repairs should contact your warranty rights and responsibilities, you . LENGTH OF COVERAGE...

Owners Manual
Page 43
... hand on the front handle, when the engine is running . Carry the chain saw at high engine speeds. Use extreme caution when cutting small size brush and saplings because slender material may cause you off the engine before starting or cutting with the chain saw . Keep handles dry, clean and free of surprise. All chain saw which you are used to remove the flywheel or if an improper tool is used to hold the fl...
... hand on the front handle, when the engine is running . Carry the chain saw at high engine speeds. Use extreme caution when cutting small size brush and saplings because slender material may cause you off the engine before starting or cutting with the chain saw . Keep handles dry, clean and free of surprise. All chain saw which you are used to remove the flywheel or if an improper tool is used to hold the fl...

Parts Guide
Page 14
... COVER N 537 15 81-01 SPRING N 537 21 52-03 TANK CAP M 537 32 48-01 DECAL Q 537 32 48-12 DECAL D 721 11 64-30 PIN G, N EPA, CE 501 48 54-02 SPARK PLUG CONN. 357XP, 359 357XP EPA, 359 EPA Part Number Description 503 92 53-71 CRANKCASE 501 66 62-01 COVER, PUMP SIDE 501 91 14-01 GREASE... 48-01 IDLE SPEED SCREW 503 85 52-01 SLEEVE 503 87 54-01 BOLT 503 90 56-01 SLEEVE 503 91 76-01 MUFFLER 503 92 46-01 PIPE 503 92 90-01 JET 503 94 46-01 NEEDLE-LO SPEED 503 96 75-01 OIL PLUMMET 503 99 86-01 SPRING 537 01 09-01 AIR FILTER - A 503...
... COVER N 537 15 81-01 SPRING N 537 21 52-03 TANK CAP M 537 32 48-01 DECAL Q 537 32 48-12 DECAL D 721 11 64-30 PIN G, N EPA, CE 501 48 54-02 SPARK PLUG CONN. 357XP, 359 357XP EPA, 359 EPA Part Number Description 503 92 53-71 CRANKCASE 501 66 62-01 COVER, PUMP SIDE 501 91 14-01 GREASE... 48-01 IDLE SPEED SCREW 503 85 52-01 SLEEVE 503 87 54-01 BOLT 503 90 56-01 SLEEVE 503 91 76-01 MUFFLER 503 92 46-01 PIPE 503 92 90-01 JET 503 94 46-01 NEEDLE-LO SPEED 503 96 75-01 OIL PLUMMET 503 99 86-01 SPRING 537 01 09-01 AIR FILTER - A 503...

Parts Guide
Page 15
... F 503 85 44-01 THROTTLE LOCK 503 21 69-16 SCREW M 503 86 95-02 CONTROL 503 22 00-01 NUT M8 FLANGE A 503 89 47-01 BUCKLE 503 28 18-15 CARBURETOR HDA-198 Q 503 91 74-01 SUPPPORT 503 44 32-01 FUEL FILTER J 503 92 31-01 SPRING 503 57 42-01 WELCH PLUG N 503 92 88... 18 00-01 PROTECTIVE CAP 505 52 01-25 FULCRUM PIN N 537 24 65-01 HOSE 537 02 99-01 PROTECTOR A 537 32 48-07 DECAL 537 04 53-01 PLATE N 537 35 95-01 FUEL TANK VENT 537 09 61-01 SLEEVE D 725 53 68-55 SCREW MC6S 6X16 IPL, 357 XP, 359, 357 XP EPA, 359 EPA...
... F 503 85 44-01 THROTTLE LOCK 503 21 69-16 SCREW M 503 86 95-02 CONTROL 503 22 00-01 NUT M8 FLANGE A 503 89 47-01 BUCKLE 503 28 18-15 CARBURETOR HDA-198 Q 503 91 74-01 SUPPPORT 503 44 32-01 FUEL FILTER J 503 92 31-01 SPRING 503 57 42-01 WELCH PLUG N 503 92 88... 18 00-01 PROTECTIVE CAP 505 52 01-25 FULCRUM PIN N 537 24 65-01 HOSE 537 02 99-01 PROTECTOR A 537 32 48-07 DECAL 537 04 53-01 PLATE N 537 35 95-01 FUEL TANK VENT 537 09 61-01 SLEEVE D 725 53 68-55 SCREW MC6S 6X16 IPL, 357 XP, 359, 357 XP EPA, 359 EPA...


