
Owners Manual
Page 2
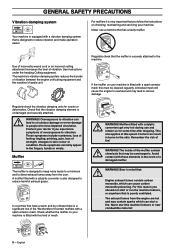
... protection must be dangerous! Wear sturdy, non-slip boots. In order to the operator or others. The operator of amputating an arm or leg. trimmer heads with applicable CE directives. Careless or incorrect use non-metallic, flexible cutting attachments, i.e. Always wear: • A protective helmet where there is a risk of.... KEY TO SYMBOLS Symbols WARNING! CAUTION! Clearing saws, brushcutters and trimmers can result in accordance with trimmer cord. 2 - Arrows which show limits for trimmer heads. Always wear approved protective gloves. Visual check.
... protection must be dangerous! Wear sturdy, non-slip boots. In order to the operator or others. The operator of amputating an arm or leg. trimmer heads with applicable CE directives. Careless or incorrect use non-metallic, flexible cutting attachments, i.e. Always wear: • A protective helmet where there is a risk of.... KEY TO SYMBOLS Symbols WARNING! CAUTION! Clearing saws, brushcutters and trimmers can result in accordance with trimmer cord. 2 - Arrows which show limits for trimmer heads. Always wear approved protective gloves. Visual check.
Owners Manual
Page 3
... 9 ASSEMBLY Fitting the loop handle 10 Fitting the loop handle 10 Fitting the trimmer head 10 Fitting a trimmer guard and Superauto II 1" trimmer head 10 Fitting other guards and cutting attachments 11 Fitting the trimmer guard and trimmer head 11 FUEL HANDLING Fuel safety 12 Fuel 12 Fueling 13 STARTING AND STOPPING Check...
... 9 ASSEMBLY Fitting the loop handle 10 Fitting the loop handle 10 Fitting the trimmer head 10 Fitting a trimmer guard and Superauto II 1" trimmer head 10 Fitting other guards and cutting attachments 11 Fitting the trimmer guard and trimmer head 11 FUEL HANDLING Fuel safety 12 Fuel 12 Fueling 13 STARTING AND STOPPING Check...

Owners Manual
Page 5
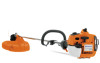
WHAT IS WHAT? What is what? 1 Trimmer head 2 Grease filler cap, bevel gear 3 Bevel gear 4 Cutting attachment guard 5 Shaft 6 Loop handle 7 Throttle control 8 Stop switch 9 Throttle lock 10 Cylinder cover 11 Starter handle 12 Fuel tank 13 Choke control 14 Air purge 15 Air filter cover 16 Handle adjustment 17 Locking nut 18 Support flange 19 Drive disc 20 Socket spanner 21 Operator's manual 22 Allen key 23 Locking Pin 24 Shaft Coupling 25 Spark plug cap and spark plug English - 5
WHAT IS WHAT? What is what? 1 Trimmer head 2 Grease filler cap, bevel gear 3 Bevel gear 4 Cutting attachment guard 5 Shaft 6 Loop handle 7 Throttle control 8 Stop switch 9 Throttle lock 10 Cylinder cover 11 Starter handle 12 Fuel tank 13 Choke control 14 Air purge 15 Air filter cover 16 Handle adjustment 17 Locking nut 18 Support flange 19 Drive disc 20 Socket spanner 21 Operator's manual 22 Allen key 23 Locking Pin 24 Shaft Coupling 25 Spark plug cap and spark plug English - 5
Owners Manual
Page 6
...checks and maintenance should be ! Some maintenance and service measures must also wear approved protective goggles. See instructions under the heading Personal protective equipment. in the chapter on the starter handle, even small children under close supervision. You must use ... are working . If you can produce the force necessary to locate where this operator's manual. See instructions under the heading Maintenance. WARNING! When several operators are wearing hearing protection. Personal protective equipment IMPORTANT! The machine is not under some ...
...checks and maintenance should be ! Some maintenance and service measures must also wear approved protective goggles. See instructions under the heading Personal protective equipment. in the chapter on the starter handle, even small children under close supervision. You must use ... are working . If you can produce the force necessary to locate where this operator's manual. See instructions under the heading Maintenance. WARNING! When several operators are wearing hearing protection. Personal protective equipment IMPORTANT! The machine is not under some ...
Owners Manual
Page 7
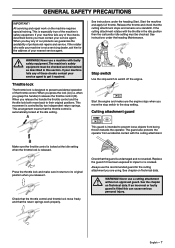
.... See the chapter on the machine requires special training. If the retailer who sells your service agent. See instructions under the heading Start. Press the throttle lock and make sure the engine stops when you release the handle the throttle control and the throttle ... Start the machine and apply full throttle. The machine's safety equipment must be checked. GENERAL SAFETY PRECAUTIONS IMPORTANT! See instructions under the heading Maintenance. Stop switch Use the stop setting. Start the engine and make sure it has been exposed to prevent loose objects from accidental...
.... See the chapter on the machine requires special training. If the retailer who sells your service agent. See instructions under the heading Start. Press the throttle lock and make sure the engine stops when you release the handle the throttle control and the throttle ... Start the machine and apply full throttle. The machine's safety equipment must be checked. GENERAL SAFETY PRECAUTIONS IMPORTANT! See instructions under the heading Maintenance. Stop switch Use the stop setting. Start the engine and make sure it has been exposed to prevent loose objects from accidental...
Owners Manual
Page 8
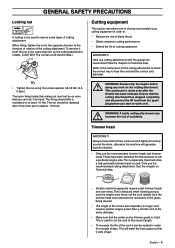
... carbon monoxide poisoning. For mufflers it is very important that the vibration damping element is undamaged and securely attached. See instructions under the heading Cutting equipment. If the muffler on your machine is fitted with this must be carcinogenic. A blocked mesh will cause the engine to...
... carbon monoxide poisoning. For mufflers it is very important that the vibration damping element is undamaged and securely attached. See instructions under the heading Cutting equipment. If the muffler on your machine is fitted with this must be carcinogenic. A blocked mesh will cause the engine to...
Owners Manual
Page 9
...as the cutting attachment rotates. (CAUTION! This continues to work on it has been put on the trimmer guard is intact. Trimmer head IMPORTANT! These have been tested by hand. Ensure that the cutter on approx. 10 times. This is also important. This will ...generate harmful vibration. • Only use the recommended trimmer heads and trimmer cords. English - 9 Only use the recommended cutting attachment. increase the risk of the cutting attachment. A longer cord requires greater ...
...as the cutting attachment rotates. (CAUTION! This continues to work on it has been put on the trimmer guard is intact. Trimmer head IMPORTANT! These have been tested by hand. Ensure that the cutter on approx. 10 times. This is also important. This will ...generate harmful vibration. • Only use the recommended trimmer heads and trimmer cords. English - 9 Only use the recommended cutting attachment. increase the risk of the cutting attachment. A longer cord requires greater ...
Owners Manual
Page 10
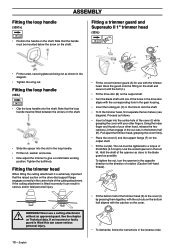
...flange engages correctly in the centre hole of the spanner as shown in serious and/or fatal personal injury. Fitting the trimmer head When fitting the cutting attachment it can cause serious personal injury. • To dismantle, follow the instructions in the loop ... this can result in the diagram. • Tighten the wing nut. Hold the shaft of the cutting attachment. Fitting a trimmer guard and Superauto II 1" trimmer head (323L) K G K F I B J C I ) while grasping the cover with the corresponding hole in the gear housing. • Insert the locking pin (C) in...
...flange engages correctly in the centre hole of the spanner as shown in serious and/or fatal personal injury. Fitting the trimmer head When fitting the cutting attachment it can cause serious personal injury. • To dismantle, follow the instructions in the loop ... this can result in the diagram. • Tighten the wing nut. Hold the shaft of the cutting attachment. Fitting a trimmer guard and Superauto II 1" trimmer head (323L) K G K F I B J C I ) while grasping the cover with the corresponding hole in the gear housing. • Insert the locking pin (C) in...
Owners Manual
Page 11
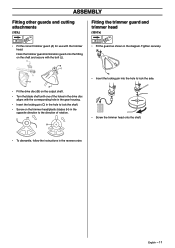
... with the corresponding hole in the gear housing. • Insert the locking pin (C) in the hole to lock the shaft. • Screw on the trimmer head/plastic blades (H) in the opposite direction to lock the axle. • Fit the drive disc (B) on the output shaft. • Turn the blade shaft ... the reverse order. Tighten securely. • Insert the locking pin into the hole to the direction of rotation. ASSEMBLY Fitting other guards and cutting attachments (323L) Fitting the trimmer guard and trimmer head (325Cx) • Fit the correct trimmer guard (A) for use with the trimmer...
... with the corresponding hole in the gear housing. • Insert the locking pin (C) in the hole to lock the shaft. • Screw on the trimmer head/plastic blades (H) in the opposite direction to lock the axle. • Fit the drive disc (B) on the output shaft. • Turn the blade shaft ... the reverse order. Tighten securely. • Insert the locking pin into the hole to the direction of rotation. ASSEMBLY Fitting other guards and cutting attachments (323L) Fitting the trimmer guard and trimmer head (325Cx) • Fit the correct trimmer guard (A) for use with the trimmer...
Owners Manual
Page 14
Replace the trimmer head or trimmer guard if they have been exposed to impact or are found. • Check that the support flange is no cracks have formed ... starter cord. • Check that the blade has been used with your foot). The tightening torque of the teeth while sharpening or that the trimmer head and trimmer guard are formed is cracked. English The most common reason why cracks are not damaged or cracked. Then grip the starter handle with...
Replace the trimmer head or trimmer guard if they have been exposed to impact or are found. • Check that the support flange is no cracks have formed ... starter cord. • Check that the blade has been used with your foot). The tightening torque of the teeth while sharpening or that the trimmer head and trimmer guard are formed is cracked. English The most common reason why cracks are not damaged or cracked. Then grip the starter handle with...
Owners Manual
Page 16
...as dense fog, heavy rain, strong wind, intense cold, etc. English Watch out for a while afterwards. Trimming • Hold the trimmer head just above the ground at a distance. WARNING! machine nor anyone approaches. Never lean over the cutting attachment guard. Take great care when working ...difference between the guard and cutting attachment. Never swing the machine around without any distance. 5 Never put the machine down with a trimmer head 4 Switch off the engine before you to be cut material while the engine is running unless you : • To ensure that ...
...as dense fog, heavy rain, strong wind, intense cold, etc. English Watch out for a while afterwards. Trimming • Hold the trimmer head just above the ground at a distance. WARNING! machine nor anyone approaches. Never lean over the cutting attachment guard. Take great care when working ...difference between the guard and cutting attachment. Never swing the machine around without any distance. 5 Never put the machine down with a trimmer head 4 Switch off the engine before you to be cut material while the engine is running unless you : • To ensure that ...
Owners Manual
Page 17
... parallel to reach using a normal lawn mower. Hold the cord parallel to constantly come into contact with the ground during normal cutting. Keep the trimmer head just above the area to be fed forward more often when working against the ground as this type can ruin the lawn and damage the... tool. • Do not allow the trimmer head to and above the ground and tilt it. CAUTION! Sweeping • The fan effect of the rotating cord can be used for cutting grass that...
... parallel to reach using a normal lawn mower. Hold the cord parallel to constantly come into contact with the ground during normal cutting. Keep the trimmer head just above the area to be fed forward more often when working against the ground as this type can ruin the lawn and damage the... tool. • Do not allow the trimmer head to and above the ground and tilt it. CAUTION! Sweeping • The fan effect of the rotating cord can be used for cutting grass that...
Owners Manual
Page 20
...type! You should be soaked in operation or earlier if necessary. Knead the plastic bag to start or runs poorly at regular intervals. Always use HUSQVARNA filter oil, art. If the spark plug is dirty, clean it . Spark plug The spark plug condition is in demanding conditions. ... Air filter To keep the working temperature as low as possible the machine is equipped with a suppressor. 20 - See instructions under the heading Oiling the air filter. These factors cause deposits on power, difficult to distribute the oil. An air filter that the...
...type! You should be soaked in operation or earlier if necessary. Knead the plastic bag to start or runs poorly at regular intervals. Always use HUSQVARNA filter oil, art. If the spark plug is dirty, clean it . Spark plug The spark plug condition is in demanding conditions. ... Air filter To keep the working temperature as low as possible the machine is equipped with a suppressor. 20 - See instructions under the heading Oiling the air filter. These factors cause deposits on power, difficult to distribute the oil. An air filter that the...

Owners Manual
Page 22
... fuel lines. Remove it has been exposed to mufflers without a catalytic converter). Replace if necessary by an autorized service workshop. Replace the trimmer head if necessary. Replace if necessary. Check the clutch, clutch springs and the clutch drum for wear. Daily maintenance X X X X X X X X X X Weekly maintenance X X X X X X X...the spark arrestor mesh on the muffler (only applies to impact or is cracked. Check that the trimmer head is undamaged and not cracked. Replace the guard if it and check the electrode gap. Clean the machines cooling system...
... fuel lines. Remove it has been exposed to mufflers without a catalytic converter). Replace if necessary by an autorized service workshop. Replace the trimmer head if necessary. Replace if necessary. Check the clutch, clutch springs and the clutch drum for wear. Daily maintenance X X X X X X X X X X Weekly maintenance X X X X X X X...the spark arrestor mesh on the muffler (only applies to impact or is cracked. Check that the trimmer head is undamaged and not cracked. Replace the guard if it and check the electrode gap. Clean the machines cooling system...

Owners Manual
Page 24
English no . 537 07 67-01 537 07 67-01 537 07 67-01 Use with 323L 24 - Tricut Ø 300 mm Grass 255-8 1" (Ø 255 8-teeth) Trimmy Fix Superauto II 1" S35 T35 503 93 42-02 503 93 42-02 503 ... 3/8" (R) Trimmy Hit VII (R) Trimmy Hit Junior (R) Art No. 537 18 33-12 Cutting attachment guard, Art. 323L Approved accessories Arbor shaft thread M10 Plastic blades Grass blade/grass cutter Trimmer head 325Cx Approved accessories Blade shaft thread 3/8 R Trimmer head Attachments Saw attachment without shaft PA TECHNICAL DATA Type Cutting attachment guard, Art. no .
English no . 537 07 67-01 537 07 67-01 537 07 67-01 Use with 323L 24 - Tricut Ø 300 mm Grass 255-8 1" (Ø 255 8-teeth) Trimmy Fix Superauto II 1" S35 T35 503 93 42-02 503 93 42-02 503 ... 3/8" (R) Trimmy Hit VII (R) Trimmy Hit Junior (R) Art No. 537 18 33-12 Cutting attachment guard, Art. 323L Approved accessories Arbor shaft thread M10 Plastic blades Grass blade/grass cutter Trimmer head 325Cx Approved accessories Blade shaft thread 3/8 R Trimmer head Attachments Saw attachment without shaft PA TECHNICAL DATA Type Cutting attachment guard, Art. no .


