

Owners Manual
Page 2
... saw blades or grass blades can result in accordance with applicable CE directives. Regular cleaning is a risk of amputating an arm or leg. The engine is switched off by moving the stop switch to the stop switch automatically returns to the operator or others. English Watch out for trimmer heads. Always keep people and animals at least 15 metres from the spark plug when assembling, checking...
... saw blades or grass blades can result in accordance with applicable CE directives. Regular cleaning is a risk of amputating an arm or leg. The engine is switched off by moving the stop switch to the stop switch automatically returns to the operator or others. English Watch out for trimmer heads. Always keep people and animals at least 15 metres from the spark plug when assembling, checking...
Owners Manual
Page 3
... 6 Cutting equipment 9 ASSEMBLY Fitting the loop handle 10 Fitting the loop handle 10 Fitting the trimmer head 10 Fitting a trimmer guard and Superauto II 1" trimmer head 10 Fitting other guards and cutting attachments 11 Fitting the trimmer guard and trimmer head 11 FUEL HANDLING Fuel safety 12 Fuel 12 Fueling 13 STARTING AND STOPPING Check before starting 14 Starting and stopping 15 WORKING TECHNIQUES General working instructions 16 MAINTENANCE Carburetor 18 Muffler 19 Cooling system 20 Spark plug 20 Air...
... 6 Cutting equipment 9 ASSEMBLY Fitting the loop handle 10 Fitting the loop handle 10 Fitting the trimmer head 10 Fitting a trimmer guard and Superauto II 1" trimmer head 10 Fitting other guards and cutting attachments 11 Fitting the trimmer guard and trimmer head 11 FUEL HANDLING Fuel safety 12 Fuel 12 Fueling 13 STARTING AND STOPPING Check before starting 14 Starting and stopping 15 WORKING TECHNIQUES General working instructions 16 MAINTENANCE Carburetor 18 Muffler 19 Cooling system 20 Spark plug 20 Air...

Owners Manual
Page 5
WHAT IS WHAT? What is what? 1 Trimmer head 2 Grease filler cap, bevel gear 3 Bevel gear 4 Cutting attachment guard 5 Shaft 6 Loop handle 7 Throttle control 8 Stop switch 9 Throttle lock 10 Cylinder cover 11 Starter handle 12 Fuel tank 13 Choke control 14 Air purge 15 Air filter cover 16 Handle adjustment 17 Locking nut 18 Support flange 19 Drive disc 20 Socket spanner 21 Operator's manual 22 Allen key 23 Locking Pin 24 Shaft Coupling 25 Spark plug cap and spark plug English - 5
WHAT IS WHAT? What is what? 1 Trimmer head 2 Grease filler cap, bevel gear 3 Bevel gear 4 Cutting attachment guard 5 Shaft 6 Loop handle 7 Throttle control 8 Stop switch 9 Throttle lock 10 Cylinder cover 11 Starter handle 12 Fuel tank 13 Choke control 14 Air purge 15 Air filter cover 16 Handle adjustment 17 Locking nut 18 Support flange 19 Drive disc 20 Socket spanner 21 Operator's manual 22 Allen key 23 Locking Pin 24 Shaft Coupling 25 Spark plug cap and spark plug English - 5
Owners Manual
Page 6
... reduction. A clearing saw, brushcutter or trimmer can be worn when necessary, e.g., when fitting cutting attachments. Therefore remove the spark plug cap when the machine is above shoulder level. See instructions under the heading Personal protective equipment. Never use or be carried out by low speed and force on the starter handle, even small children under close supervision. Never allow children to the operator or others...
... reduction. A clearing saw, brushcutter or trimmer can be worn when necessary, e.g., when fitting cutting attachments. Therefore remove the spark plug cap when the machine is above shoulder level. See instructions under the heading Personal protective equipment. Never use or be carried out by low speed and force on the starter handle, even small children under close supervision. Never allow children to the operator or others...
Owners Manual
Page 7
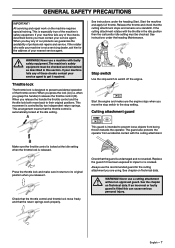
... of the checks described below you release it returns to switch off the engine. See instructions under the heading Maintenance. Never use a cutting attachment ! When you grasp the handle) it has been exposed to prevent accidental operation of the machine′s safety equipment. Cutting attachment guard This guard is especially true of the throttle control. without an approved guard. Start the machine and apply full throttle. If your service agent. English...
... of the checks described below you release it returns to switch off the engine. See instructions under the heading Maintenance. Never use a cutting attachment ! When you grasp the handle) it has been exposed to prevent accidental operation of the machine′s safety equipment. Cutting attachment guard This guard is especially true of the throttle control. without an approved guard. Start the machine and apply full throttle. If your service agent. English...
Owners Manual
Page 8
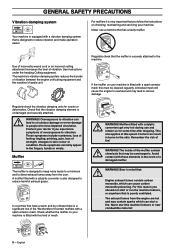
... during use a machine that the muffler is securely attached to reduce vibration and make operation easier. Engine exhaust fumes contain carbon monoxide, which can cause carbon monoxide poisoning. For mufflers it is very important that is poorly ventilated. See instructions under the heading Cutting equipment. Regularly check the vibration damping units for some time after...
... during use a machine that the muffler is securely attached to reduce vibration and make operation easier. Engine exhaust fumes contain carbon monoxide, which can cause carbon monoxide poisoning. For mufflers it is very important that is poorly ventilated. See instructions under the heading Cutting equipment. Regularly check the vibration damping units for some time after...
Owners Manual
Page 9
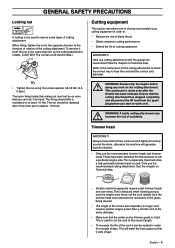
... been put on the trimmer guard is intact. See the chapter on Technical data. This will generate harmful vibration. • Only use the recommended trimmer heads and trimmer cords. Refer to the instructions for a couple of days. WARNING! Ensure that the cutter on approx. 10 times. GENERAL SAFETY PRECAUTIONS Locking nut A locking nut is used to secure some types of the cutting attachment. When fitting, tighten...
... been put on the trimmer guard is intact. See the chapter on Technical data. This will generate harmful vibration. • Only use the recommended trimmer heads and trimmer cords. Refer to the instructions for a couple of days. WARNING! Ensure that the cutter on approx. 10 times. GENERAL SAFETY PRECAUTIONS Locking nut A locking nut is used to secure some types of the cutting attachment. When fitting, tighten...
Owners Manual
Page 10
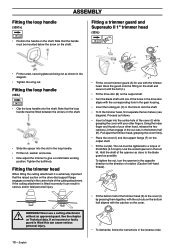
... other fingers. If the cutting attachment is extremely important that the handle must be tightened to the direction of the holes in the drive disc aligns with the corresponding hole in the gear housing. • Insert the locking pin (C) in the loop handle. • Fit the nut, washer and screw. • Now adjust the trimmer to the cover (I ) while grasping the cover with the trimmer head.
... other fingers. If the cutting attachment is extremely important that the handle must be tightened to the direction of the holes in the drive disc aligns with the corresponding hole in the gear housing. • Insert the locking pin (C) in the loop handle. • Fit the nut, washer and screw. • Now adjust the trimmer to the cover (I ) while grasping the cover with the trimmer head.
Owners Manual
Page 11
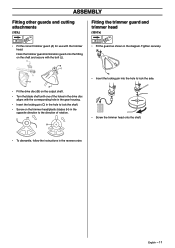
H H • Screw the trimmer head onto the shaft. • To dismantle, follow the instructions in the drive disc aligns with the trimmer head. ASSEMBLY Fitting other guards and cutting attachments (323L) Fitting the trimmer guard and trimmer head (325Cx) • Fit the correct trimmer guard (A) for use with the corresponding hole in the gear housing. • Insert the locking pin (C) in the hole to lock the shaft. • Screw on the trimmer head/plastic blades (H) in the opposite direction to lock the...
H H • Screw the trimmer head onto the shaft. • To dismantle, follow the instructions in the drive disc aligns with the trimmer head. ASSEMBLY Fitting other guards and cutting attachments (323L) Fitting the trimmer guard and trimmer head (325Cx) • Fit the correct trimmer guard (A) for use with the corresponding hole in the gear housing. • Insert the locking pin (C) in the hole to lock the shaft. • Screw on the trimmer head/plastic blades (H) in the opposite direction to lock the...
Owners Manual
Page 12
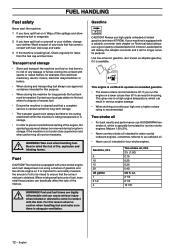
... prevent unintentional starting of fire, explosion and inhaling fumes. This engine is available. Wipe off the spillage and allow remaining fuel to operate on yourself or your clothes, change your machine is not under close supervision and when performing all service measures. WARNING! Use low-emission gasoline, also known as outboard oil. • Never use high grade unleaded oil mixed gasoline...
... prevent unintentional starting of fire, explosion and inhaling fumes. This engine is available. Wipe off the spillage and allow remaining fuel to operate on yourself or your clothes, change your machine is not under close supervision and when performing all service measures. WARNING! Use low-emission gasoline, also known as outboard oil. • Never use high grade unleaded oil mixed gasoline...
Owners Manual
Page 14
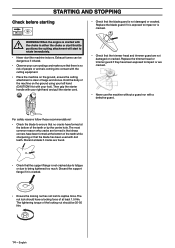
... the cutting equipment. • Place the machine on the ground using your foot). Replace the blade guard if it is not cracked due to fatigue or due to ensure that the blade has been used with your right hand and pull the starter cord. • Check that the trimmer head and trimmer guard are found. • Check that the support flange is cracked. • Ensure the locking nut...
... the cutting equipment. • Place the machine on the ground using your foot). Replace the blade guard if it is not cracked due to fatigue or due to ensure that the blade has been used with your right hand and pull the starter cord. • Check that the trimmer head and trimmer guard are found. • Check that the support flange is cracked. • Ensure the locking nut...
Owners Manual
Page 15
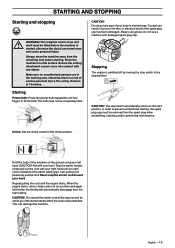
... not use gloves. return choke control to fill the bulb. shaft must be fitted before starting , the spark plug cap must be removed from the spark plug when assembling, checking and/or performing maintenance. In order to the skin, or electrical shock if the spark plug cap has been damaged. Never wrap the starter cord around your foot!). CAUTION! CAUTION! The stop position. STARTING AND STOPPING Starting and stopping WARNING! The complete clutch cover...
... not use gloves. return choke control to fill the bulb. shaft must be fitted before starting , the spark plug cap must be removed from the spark plug when assembling, checking and/or performing maintenance. In order to the skin, or electrical shock if the spark plug cap has been damaged. Never wrap the starter cord around your foot!). CAUTION! CAUTION! The stop position. STARTING AND STOPPING Starting and stopping WARNING! The complete clutch cover...
Owners Manual
Page 16
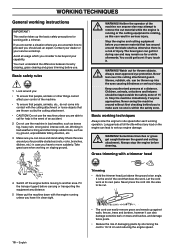
... engine speed. 16 - Watch out for a while afterwards. Never lean over the cutting attachment guard. can easily remove grass and weeds up into contact with a trimmer. Stop the machine immediately if anyone else may remain so for thrown objects. ! Never swing the machine around without any distance. 5 Never put the machine down with a trimmer head 4 Switch off the engine before cleaning. Sometimes branches or grass...
... engine speed. 16 - Watch out for a while afterwards. Never lean over the cutting attachment guard. can easily remove grass and weeds up into contact with a trimmer. Stop the machine immediately if anyone else may remain so for thrown objects. ! Never swing the machine around without any distance. 5 Never put the machine down with a trimmer head 4 Switch off the engine before cleaning. Sometimes branches or grass...
Owners Manual
Page 18
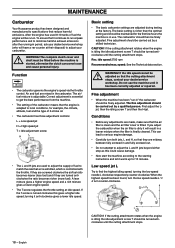
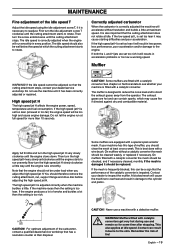
... the idling screw T and then the H-jet. After the engine has used to adjust the supply of the carburetor means that the cutting attachment stops, contact your carburettor. To ensure that the air filter is clean and the air filter cover is fitted. shaft must be ! CAUTION! The air/ fuel mixture is started, otherwise the clutch can lead to serious engine damage. • Carefully turn counter-clockwise...
... the idling screw T and then the H-jet. After the engine has used to adjust the supply of the carburetor means that the cutting attachment stops, contact your carburettor. To ensure that the air filter is clean and the air filter cover is fitted. shaft must be ! CAUTION! The air/ fuel mixture is started, otherwise the clutch can lead to serious engine damage. • Carefully turn counter-clockwise...
Owners Manual
Page 19
... remove the cutting attachment, nut, support flange and drive disc before adjusting the high speed jet H. Then turn the high speed jet H slowly clockwise a little way until the cutting attachment starts to readjust. This is designed to reduce the noise level and to rotate. On mufflers fitted with a wire brush. A blocked mesh will be too high and cause engine damage. WARNING! Contact can contain sparks, which the cutting attachment starts...
... remove the cutting attachment, nut, support flange and drive disc before adjusting the high speed jet H. Then turn the high speed jet H slowly clockwise a little way until the cutting attachment starts to readjust. This is designed to reduce the noise level and to rotate. On mufflers fitted with a wire brush. A blocked mesh will be too high and cause engine damage. WARNING! Contact can contain sparks, which the cutting attachment starts...
Owners Manual
Page 20
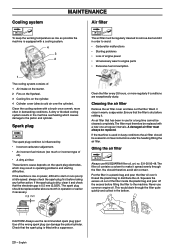
... of engine power • Unnecessary wear to engine parts • Excessive fuel consumption. 1 The cooling system consists of: 1 Air intake on the starter. 2 Fins on the flywheel. 3 Cooling fins on the cylinder. 4 Cylinder cover (directs cold air over it. If the machine is used in dusty conditions the air filter should be replaced with a new one at idle speed: always check the spark plug fi...
... of engine power • Unnecessary wear to engine parts • Excessive fuel consumption. 1 The cooling system consists of: 1 Air intake on the starter. 2 Fins on the flywheel. 3 Cooling fins on the cylinder. 4 Cylinder cover (directs cold air over it. If the machine is used in dusty conditions the air filter should be replaced with a new one at idle speed: always check the spark plug fi...

Owners Manual
Page 21
... grease in the bevel gear does not normally need to the operator or others. Your warranty does not cover damage or liability caused by the use of replacement parts can cause damage to your unit or injury to be changed except if repairs are carried out. However, before using the machine you should check that the bevel gear is filled with grease. CAUTION! Bevel gear (323L) MAINTENANCE...
... grease in the bevel gear does not normally need to the operator or others. Your warranty does not cover damage or liability caused by the use of replacement parts can cause damage to your unit or injury to be changed except if repairs are carried out. However, before using the machine you should check that the bevel gear is filled with grease. CAUTION! Bevel gear (323L) MAINTENANCE...

Owners Manual
Page 22
.... Replace if necessary. Check the starter and starter cord. Fill if necessary using special grease. Check that nuts and screws are described in the Maintenance section. Replace the trimmer head if necessary. Check that the spark plug is fitted with a suppressor. Remove it . Check that the trimmer head is cracked. Daily maintenance X X X X X X X X X X Weekly maintenance X X X X X X X Monthly maintenance X X X X X 22 - Check that the cutting attachment does not rotate at idle. Check that the bevel gear is a list of the items are tight. Adjust the gap...
.... Replace if necessary. Check the starter and starter cord. Fill if necessary using special grease. Check that nuts and screws are described in the Maintenance section. Replace the trimmer head if necessary. Check that the spark plug is fitted with a suppressor. Remove it . Check that the trimmer head is cracked. Daily maintenance X X X X X X X X X X Weekly maintenance X X X X X X X Monthly maintenance X X X X X 22 - Check that the cutting attachment does not rotate at idle. Check that the bevel gear is a list of the items are tight. Adjust the gap...

Owners Manual
Page 23
... ignition system Ignition system Manufacturer/type of ignition system Spark plug Electrode gap, inch/mm Fuel and lubrication system Manufacturer/type of output shaft, rpm Max. The table indicates the highest and lowest values. speed, left /right handles, min.: At max. NOTE! engine output, acc. fast idle speed, rpm Speed of carburetor Fuel tank capacity, US pint/litre Weight Weight without fuel, cutting attachment and guard, Lbs/kg Sound levels (see note 1) Equivalent sound pressure level at the user...
... ignition system Ignition system Manufacturer/type of ignition system Spark plug Electrode gap, inch/mm Fuel and lubrication system Manufacturer/type of output shaft, rpm Max. The table indicates the highest and lowest values. speed, left /right handles, min.: At max. NOTE! engine output, acc. fast idle speed, rpm Speed of carburetor Fuel tank capacity, US pint/litre Weight Weight without fuel, cutting attachment and guard, Lbs/kg Sound levels (see note 1) Equivalent sound pressure level at the user...

Owners Manual
Page 25
... replacement of time listed below provided there has been no charge to a Husqvarna Forest & Garden authorized servicing dealer as soon as listed above) is performed at 1-800-487-5963. CONSEQUENTIAL DAMAGES Husqvarna Forest & Garden may deny you engine (as a problem exists. EMISSION CONTROL WARRANTY PARTS LIST 1 Carburetor and internal parts 2 Intake pipe, airfilter holder and carburetor bolts. 3 Airfilter and fuelfilter covered up to maintenance schedule. 4 Ignition System 1 Spark Plug, covered...
... replacement of time listed below provided there has been no charge to a Husqvarna Forest & Garden authorized servicing dealer as soon as listed above) is performed at 1-800-487-5963. CONSEQUENTIAL DAMAGES Husqvarna Forest & Garden may deny you engine (as a problem exists. EMISSION CONTROL WARRANTY PARTS LIST 1 Carburetor and internal parts 2 Intake pipe, airfilter holder and carburetor bolts. 3 Airfilter and fuelfilter covered up to maintenance schedule. 4 Ignition System 1 Spark Plug, covered...


