

Owners Manual
Page 5
WHAT IS WHAT? What is what? 1 Trimmer head 2 Grease filler cap, bevel gear 3 Bevel gear 4 Cutting attachment guard 5 Shaft 6 Loop handle 7 Throttle control 8 Stop switch 9 Throttle lock 10 Cylinder cover 11 Starter handle 12 Fuel tank 13 Choke control 14 Air purge 15 Air filter cover 16 Handle adjustment 17 Locking nut 18 Support flange 19 Drive disc 20 Socket spanner 21 Operator's manual 22 Allen key 23 Locking Pin 24 Shaft Coupling 25 Spark plug cap and spark plug English - 5
WHAT IS WHAT? What is what? 1 Trimmer head 2 Grease filler cap, bevel gear 3 Bevel gear 4 Cutting attachment guard 5 Shaft 6 Loop handle 7 Throttle control 8 Stop switch 9 Throttle lock 10 Cylinder cover 11 Starter handle 12 Fuel tank 13 Choke control 14 Air purge 15 Air filter cover 16 Handle adjustment 17 Locking nut 18 Support flange 19 Drive disc 20 Socket spanner 21 Operator's manual 22 Allen key 23 Locking Pin 24 Shaft Coupling 25 Spark plug cap and spark plug English - 5
Owners Manual
Page 10
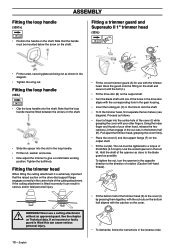
Fitting a trimmer guard and Superauto II 1" trimmer head (323L) K G K F I B J C I ) while grasping the cover with the cut -outs in the loop handle. • Fit the nut...shaft. • Fit the nut (G). Note that engage in the diagram. • Tighten the wing nut. Fitting the loop handle (323L) • Clip the loop handle onto the shaft. Using the index finger and thumb of rotation (Caution! Never use with...the cut -outs on the bottom half aligned with the corresponding hole in the gear housing. • Insert the locking pin (C) in the reverse order. 10 -
Fitting a trimmer guard and Superauto II 1" trimmer head (323L) K G K F I B J C I ) while grasping the cover with the cut -outs in the loop handle. • Fit the nut...shaft. • Fit the nut (G). Note that engage in the diagram. • Tighten the wing nut. Fitting the loop handle (323L) • Clip the loop handle onto the shaft. Using the index finger and thumb of rotation (Caution! Never use with...the cut -outs on the bottom half aligned with the corresponding hole in the gear housing. • Insert the locking pin (C) in the reverse order. 10 -
Owners Manual
Page 11
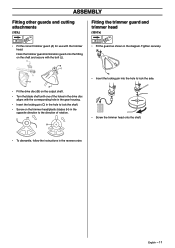
... one of rotation. H H • Screw the trimmer head onto the shaft. • To dismantle, follow the instructions in the reverse order. ASSEMBLY Fitting other guards and cutting attachments (323L) Fitting the trimmer guard and trimmer head (325Cx) • Fit the correct trimmer guard (A) for... use with the corresponding hole in the gear housing. • Insert the locking pin (C) in the hole to...
... one of rotation. H H • Screw the trimmer head onto the shaft. • To dismantle, follow the instructions in the reverse order. ASSEMBLY Fitting other guards and cutting attachments (323L) Fitting the trimmer guard and trimmer head (325Cx) • Fit the correct trimmer guard (A) for... use with the corresponding hole in the gear housing. • Insert the locking pin (C) in the hole to...
Owners Manual
Page 16
... Reduce the risk of the ! machine nor anyone approaches. Check the area around without any distance. 5 Never put the machine down with a trimmer head 4 Switch off the engine before cleaning. Avoid all usage which you have it . You could get hot during use . Watch out for possible obstacles.... Keep unauthorised persons at an angle. Never press the cord into the eyes causing blindness or serious injury. The bevel gear can result in case you consider to move and stand safely. Let the cord work . WARNING! WORKING TECHNIQUES General working operation. WARNING!...
... Reduce the risk of the ! machine nor anyone approaches. Check the area around without any distance. 5 Never put the machine down with a trimmer head 4 Switch off the engine before cleaning. Avoid all usage which you have it . You could get hot during use . Watch out for possible obstacles.... Keep unauthorised persons at an angle. Never press the cord into the eyes causing blindness or serious injury. The bevel gear can result in case you consider to move and stand safely. Let the cord work . WARNING! WORKING TECHNIQUES General working operation. WARNING!...

Owners Manual
Page 22
... on the machine. Check that the locking nut of the carburettor and the space around it. Check that the trimmer head is undamaged and not cracked. Check that the vibration damping elements are tight. Remove it has been exposed to muffl... Clean the outside of view. Daily maintenance X X X X X X X X X X Weekly maintenance X X X X X X X Monthly maintenance X X X X X 22 - Check that the bevel gear is fitted with a catalytic converter). Clean the outside of the cutting equipment is tighten correctly. Check that nuts and screws are not damaged. Check...
... on the machine. Check that the locking nut of the carburettor and the space around it. Check that the trimmer head is undamaged and not cracked. Check that the vibration damping elements are tight. Remove it has been exposed to muffl... Clean the outside of view. Daily maintenance X X X X X X X X X X Weekly maintenance X X X X X X X Monthly maintenance X X X X X 22 - Check that the bevel gear is fitted with a catalytic converter). Clean the outside of the cutting equipment is tighten correctly. Check that nuts and screws are not damaged. Check...


