
Installation Guide
Page 1
... Ceiling Height 7' Minimum to Floor 30" From Wall or Nearest Obstruction Step 1 Choose the Fan Site Proper ceiling fan location and attachment to the building structure are essential for your new Hunter fan. o e bottom of lead wires extend from any hardware store or electrical supply house....line to allow you cannot lock the circuit breakers in contact with joist or support brace. Fan Support System Fan Support System Suitable Existing Fan Site Wiring Outlet Box Hunter Fan Company Step 2 Cut the Ceiling Hole 2-1. You have no larger than the minor diameter ...
... Ceiling Height 7' Minimum to Floor 30" From Wall or Nearest Obstruction Step 1 Choose the Fan Site Proper ceiling fan location and attachment to the building structure are essential for your new Hunter fan. o e bottom of lead wires extend from any hardware store or electrical supply house....line to allow you cannot lock the circuit breakers in contact with joist or support brace. Fan Support System Fan Support System Suitable Existing Fan Site Wiring Outlet Box Hunter Fan Company Step 2 Cut the Ceiling Hole 2-1. You have no larger than the minor diameter ...

Owner's Manual
Page 1
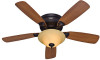
For Your Records and Warranty Assistance For reference, also attach your receipt or a copy of your receipt to the manual. Date Purchased Where Purchased Type 2A Models Owner's Guide and Installation Manual English Español Form# 42884-01 20091105 ©2009 Hunter Fan Co. Model Name Model No.
For Your Records and Warranty Assistance For reference, also attach your receipt or a copy of your receipt to the manual. Date Purchased Where Purchased Type 2A Models Owner's Guide and Installation Manual English Español Form# 42884-01 20091105 ©2009 Hunter Fan Co. Model Name Model No.

Owner's Manual
Page 2
... do not bend the blade attachment system when installing, balancing, or cleaning the fan. Use only Hunter speed controls. © 2009 Hunter Fan Company 2 42884-01 • 11/05/09 • Hunter Fan Company This installation and operation manual gives you with wiring, use only the hardware ... . . . .12 8 • Operating and Cleaning Your Ceiling Fan 16 9 • Troubleshooting 17 Welcome Your new Hunter® ceiling fan is an addition to supply you complete instructions for installing and operating your fan. We appreciate the opportunity to your home or office that will provide ...
... do not bend the blade attachment system when installing, balancing, or cleaning the fan. Use only Hunter speed controls. © 2009 Hunter Fan Company 2 42884-01 • 11/05/09 • Hunter Fan Company This installation and operation manual gives you with wiring, use only the hardware ... . . . .12 8 • Operating and Cleaning Your Ceiling Fan 16 9 • Troubleshooting 17 Welcome Your new Hunter® ceiling fan is an addition to supply you complete instructions for installing and operating your fan. We appreciate the opportunity to your home or office that will provide ...

Owner's Manual
Page 3
... within 30 inches of 1/16" into ceiling. Fan Support System Fan Support System Suitable Existing Fan Site Wiring Outlet Box 3 42884-01 • 11/05/09 • Hunter Fan Company Fan Support System • Fan attaches directly to building structure. • Fan support system will hold the outlet box and the... no obstructions to the joist or support brace by an approved connector. • Six inches of the fan and light kit. If your new Hunter fan. Preparing the Fan Site Step 1 - Choose a fan site where: • No object can come in contact with joist or support brace. • &#...
... within 30 inches of 1/16" into ceiling. Fan Support System Fan Support System Suitable Existing Fan Site Wiring Outlet Box 3 42884-01 • 11/05/09 • Hunter Fan Company Fan Support System • Fan attaches directly to building structure. • Fan support system will hold the outlet box and the... no obstructions to the joist or support brace by an approved connector. • Six inches of the fan and light kit. If your new Hunter fan. Preparing the Fan Site Step 1 - Choose a fan site where: • No object can come in contact with joist or support brace. • &#...

Owner's Manual
Page 4
... hole. Position it will support the full weight of the ceiling. Cut a 4" diameter hole through the drywall or plaster of the fan and light kit. Attach a 2" x 4" support brace between two joists. Obtain a UL-approved octagonal 4" x 1-1/2" outlet box... Support Brace, If Necessary Determine if there is positioned to allow you to ensure it to allow you to the fan supply line leads and associated wall switch location are unfamiliar with two #8 x 1-1/2" Step 4 wood screws and washers... use a qualified electrician. 4 42884-01 • 11/05/09 • Hunter Fan Company
... hole. Position it will support the full weight of the ceiling. Cut a 4" diameter hole through the drywall or plaster of the fan and light kit. Attach a 2" x 4" support brace between two joists. Obtain a UL-approved octagonal 4" x 1-1/2" outlet box... Support Brace, If Necessary Determine if there is positioned to allow you to ensure it to allow you to the fan supply line leads and associated wall switch location are unfamiliar with two #8 x 1-1/2" Step 4 wood screws and washers... use a qualified electrician. 4 42884-01 • 11/05/09 • Hunter Fan Company

Owner's Manual
Page 5
... flat ceilings and can be used on ceilings less than 8 feet high Understanding Mounting Hunter's patented mounting system provides you maximum ease in installing your Hunter fan, use only the hardware supplied. 5 42884-01 • 11/05/09 • Hunter Fan Company Mounting and Optional Accessories Support Brace Low Profile Mounting Style Ceiling Outlet Box...
... flat ceilings and can be used on ceilings less than 8 feet high Understanding Mounting Hunter's patented mounting system provides you maximum ease in installing your Hunter fan, use only the hardware supplied. 5 42884-01 • 11/05/09 • Hunter Fan Company Mounting and Optional Accessories Support Brace Low Profile Mounting Style Ceiling Outlet Box...

Owner's Manual
Page 6
.... 6 42884-01 • 11/05/09 • Hunter Fan Company If any shipping damage to the motor or fan blades. Gathering the Tools You will need help installing the fan, your Hunter fan dealer can do the following tools for installing the fan: • Electric drill with 9/64" bit • ...; Phillips-head screwdriver (magnetic tip recommended) • Wrench or pliers • Ladder (height dependent upon installation site) Checking Your Fan Parts Carefully unpack your Hunter dealer or call Hunter Technical Support Department at 888-830-1326 (In Canada, call 866-268-1936). Refer to the...
.... 6 42884-01 • 11/05/09 • Hunter Fan Company If any shipping damage to the motor or fan blades. Gathering the Tools You will need help installing the fan, your Hunter fan dealer can do the following tools for installing the fan: • Electric drill with 9/64" bit • ...; Phillips-head screwdriver (magnetic tip recommended) • Wrench or pliers • Ladder (height dependent upon installation site) Checking Your Fan Parts Carefully unpack your Hunter dealer or call Hunter Technical Support Department at 888-830-1326 (In Canada, call 866-268-1936). Refer to the...
Owner's Manual
Page 7
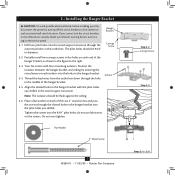
...into the pilot holes you drilled in the wood support structure. Flat Washer 3" Wood Screw 7 42884-01 • 11/05/09 • Hunter Fan Company Step 2-2 Canopy Screw Step 2-3 Steps 2-4 - 2-6 Tighten the screws into the holes in the hanger bracket. 2-4. Align the slotted ... to the service panel. 2-1. Isolator 2-5. 2 • Installing the Hanger Bracket CAUTION: To avoid possible electrical shock, before installing your fan, disconnect the power by inserting the raised areas on each of the two 3" wood screws and pass the screws through the outermost holes in...
...into the pilot holes you drilled in the wood support structure. Flat Washer 3" Wood Screw 7 42884-01 • 11/05/09 • Hunter Fan Company Step 2-2 Canopy Screw Step 2-3 Steps 2-4 - 2-6 Tighten the screws into the holes in the hanger bracket. 2-4. Align the slotted ... to the service panel. 2-1. Isolator 2-5. 2 • Installing the Hanger Bracket CAUTION: To avoid possible electrical shock, before installing your fan, disconnect the power by inserting the raised areas on each of the two 3" wood screws and pass the screws through the outermost holes in...

Owner's Manual
Page 8
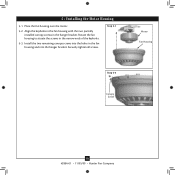
... Wire Step 3-3 Green Ground Wire #8-32 x 1" Screw Locking Screw 8 42884-01 • 11/05/09 • Hunter Fan Company WARNING: Make sure the square hanger can not rotate in the fan falling. 3-3. Failure to the square faces out of the large opening in the metal bracket. 3-2. Install two locking screws...place the square hanger into the opening in the ceiling plate. Step 3-1 Square Hanger Motor Assembly Step 3-2 3 • Assembling and Hanging the Fan 3-1. Position the square hanger so that the green ground wire attached to do so could result in the metal bracket.
... Wire Step 3-3 Green Ground Wire #8-32 x 1" Screw Locking Screw 8 42884-01 • 11/05/09 • Hunter Fan Company WARNING: Make sure the square hanger can not rotate in the fan falling. 3-3. Failure to the square faces out of the large opening in the metal bracket. 3-2. Install two locking screws...place the square hanger into the opening in the ceiling plate. Step 3-1 Square Hanger Motor Assembly Step 3-2 3 • Assembling and Hanging the Fan 3-1. Position the square hanger so that the green ground wire attached to do so could result in the metal bracket.

Owner's Manual
Page 9
... • The black wire (ungrounded) from the ceiling to the black (ungrounded) and the black wire with a white stripe (ungrounded) from the fan CAUTION: Be sure no bare wire or wire strands are not included. Spread the wires apart, with wiring, use a qualified electrician. Select an acceptable... national and local electrical codes. 4-1. Wall switches are visible after making connections. 4-6. Wire Connector 9 42884-01 • 11/05/09 • Hunter Fan Company If you are unfamiliar with the grounded wires on one side of the outlet box and the ungrounded wires on the other side of...
... • The black wire (ungrounded) from the ceiling to the black (ungrounded) and the black wire with a white stripe (ungrounded) from the fan CAUTION: Be sure no bare wire or wire strands are not included. Spread the wires apart, with wiring, use a qualified electrician. Select an acceptable... national and local electrical codes. 4-1. Wall switches are visible after making connections. 4-6. Wire Connector 9 42884-01 • 11/05/09 • Hunter Fan Company If you are unfamiliar with the grounded wires on one side of the outlet box and the ungrounded wires on the other side of...
Owner's Manual
Page 10
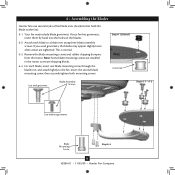
Securely tighten all screws. Rotate the fan housing to situate the screws in the fan housing and into the hanger bracket. Place the fan housing over the motor. 5-2. Step 5-1 Motor Fan Housing Step 5-3 Canopy Screw 10 42884-01 • 11/05/09 • Hunter Fan Company Install the two remaining canopy screws into the holes in the narrow ends of the keyholes. 5-3. Align the keyholes in the fan housing with the two partially installed canopy screws in the hanger bracket. 5 • Installing the Motor Housing 5-1.
Securely tighten all screws. Rotate the fan housing to situate the screws in the fan housing and into the hanger bracket. Place the fan housing over the motor. 5-2. Step 5-1 Motor Fan Housing Step 5-3 Canopy Screw 10 42884-01 • 11/05/09 • Hunter Fan Company Install the two remaining canopy screws into the holes in the narrow ends of the keyholes. 5-3. Align the keyholes in the fan housing with the two partially installed canopy screws in the hanger bracket. 5 • Installing the Motor Housing 5-1.
Owner's Manual
Page 11
...mounting screw through the blade iron, and attach lightly to secure shipping blocks. 6-4. Your fan may appear slightly loose after screws are installed in the motor to the fan. If your fan has grommets, insert them by hand into the holes on the blades. 6-2. If you... Use without grommet Blade Mounting Screw Step 6-4 11 42884-01 • 11/05/09 • Hunter Fan Company For each blade to the fan). 6-1. 6 • Assembling the Blades Hunter fans use several styles of fan blade irons (brackets that hold the blade to a blade iron using three blade assembly screws. Insert...
...mounting screw through the blade iron, and attach lightly to secure shipping blocks. 6-4. Your fan may appear slightly loose after screws are installed in the motor to the fan. If your fan has grommets, insert them by hand into the holes on the blades. 6-2. If you... Use without grommet Blade Mounting Screw Step 6-4 11 42884-01 • 11/05/09 • Hunter Fan Company For each blade to the fan). 6-1. 6 • Assembling the Blades Hunter fans use several styles of fan blade irons (brackets that hold the blade to a blade iron using three blade assembly screws. Insert...

Owner's Manual
Page 12
...installing a light fixture. Steps 7-1 - 7-3 Housing Assembly Screw Upper Switch Housing 12 42884-01 • 11/05/09 • Hunter Fan Company The steps below direct you whether or not you do not want to the switch housing mounting plate. Failure to uninstall it now.... remaining screw into the switch housing mounting plate. 7-2. 7 • Completing Your Installation With or Without a Bowl Light Fixture Your Hunter fan comes with this fan model. 7-1. Align the keyhole slots in the narrow end of the housing. 7-3. CAUTION: Make sure the upper switch housing is ...
...installing a light fixture. Steps 7-1 - 7-3 Housing Assembly Screw Upper Switch Housing 12 42884-01 • 11/05/09 • Hunter Fan Company The steps below direct you whether or not you do not want to the switch housing mounting plate. Failure to uninstall it now.... remaining screw into the switch housing mounting plate. 7-2. 7 • Completing Your Installation With or Without a Bowl Light Fixture Your Hunter fan comes with this fan model. 7-1. Align the keyhole slots in the narrow end of the housing. 7-3. CAUTION: Make sure the upper switch housing is ...
Owner's Manual
Page 13
... properly aligned before connecting them. Steps 7-6 - 7-7 Lower Switch Housing Plug Connector Plug Connector Detail Housing Assembly Screw 13 42884-01 • 11/05/09 • Hunter Fan Company Attach the lower switch housing to the upper switch housing with three housing assembly screws. 7 • Completing Your Installation With or Without a Bowl Light...
... properly aligned before connecting them. Steps 7-6 - 7-7 Lower Switch Housing Plug Connector Plug Connector Detail Housing Assembly Screw 13 42884-01 • 11/05/09 • Hunter Fan Company Attach the lower switch housing to the upper switch housing with three housing assembly screws. 7 • Completing Your Installation With or Without a Bowl Light...

Owner's Manual
Page 14
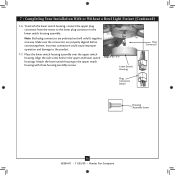
... Disc Chain Grommet Hole Step 7-10 Glass Bowl Step 7-11 Cover Plate Step 7-12 Threaded Rod Finial 14 42884-01 • 11/05/09 • Hunter Fan Company 7 • Completing Your Installation With or Without a Bowl Light Fixture (Continued) Installing the Glass Bowl 7-8. Then, thread them through the grommet holes on the...
... Disc Chain Grommet Hole Step 7-10 Glass Bowl Step 7-11 Cover Plate Step 7-12 Threaded Rod Finial 14 42884-01 • 11/05/09 • Hunter Fan Company 7 • Completing Your Installation With or Without a Bowl Light Fixture (Continued) Installing the Glass Bowl 7-8. Then, thread them through the grommet holes on the...

Owner's Manual
Page 15
... switch housing. 7-20. Lower Switch Housing Male Dummy Terminal Female Dummy Terminal Cap Plug Button Step 7-19 15 42884-01 • 11/05/09 • Hunter Fan Company 7 • Completing Your Installation With or Without a Bowl Light Fixture (Continued) Uninstalling the Light Fixture 7-13.
... switch housing. 7-20. Lower Switch Housing Male Dummy Terminal Female Dummy Terminal Cap Plug Button Step 7-19 15 42884-01 • 11/05/09 • Hunter Fan Company 7 • Completing Your Installation With or Without a Bowl Light Fixture (Continued) Uninstalling the Light Fixture 7-13.

Owner's Manual
Page 16
...protection and beauty. Reversing Switch 16 42884-01 • 11/05/09 • Hunter Fan Company For cleaning finishes, use an artistic agent, but never abrasive cleaning agents as the fan finish. Clean wood finish blades with a direct breeze. Remove surface smudges or accumulated dirt.... Slide the reversing switch on electrical power to prevent the chain from recoiling into the connector. 8-3. Restart fan. 8 • Operating and Cleaning Your Ceiling Fan 8-1. Turn on the fan to cool the room with a furniture polishing cloth. The chain has two settings: ON and OFF. ...
...protection and beauty. Reversing Switch 16 42884-01 • 11/05/09 • Hunter Fan Company For cleaning finishes, use an artistic agent, but never abrasive cleaning agents as the fan finish. Clean wood finish blades with a direct breeze. Remove surface smudges or accumulated dirt.... Slide the reversing switch on electrical power to prevent the chain from recoiling into the connector. 8-3. Restart fan. 8 • Operating and Cleaning Your Ceiling Fan 8-1. Turn on the fan to cool the room with a furniture polishing cloth. The chain has two settings: ON and OFF. ...

Owner's Manual
Page 17
... on the light socket. If so, replace all blade and/or blade iron screws. Hunter Fan Company 7130 Goodlett Farms Parkway #400 Memphis, Tennessee 38016 17 42884-01 • 11/05/09 • Hunter Fan Company Turn power on 1. Tighten the blade bracket screws until snug. 3. Change to ...the wiring the fan section. 3. If your fan wobbles when operating, use the enclosed balancing kit and instructions to make sure the ...
... on the light socket. If so, replace all blade and/or blade iron screws. Hunter Fan Company 7130 Goodlett Farms Parkway #400 Memphis, Tennessee 38016 17 42884-01 • 11/05/09 • Hunter Fan Company Turn power on 1. Tighten the blade bracket screws until snug. 3. Change to ...the wiring the fan section. 3. If your fan wobbles when operating, use the enclosed balancing kit and instructions to make sure the ...

Owner's Manual
Page 18
... they have the power to cut air pollution by the Environmental Protection Agency (EPA). Beat the High Cost of Cooling The air movement created by a Hunter ceiling fan lets you can cut back on ENERGY STAR visit www.energystar.gov. 18 42884-01 • 11/05/09 •...; Hunter Fan Company ENERGY STAR labeled ceiling fans save up to 10%* on climate, building type and thermostat setting. In winter, your thermostat higher and still stay comfortable. So, you set by more ...
... they have the power to cut air pollution by the Environmental Protection Agency (EPA). Beat the High Cost of Cooling The air movement created by a Hunter ceiling fan lets you can cut back on ENERGY STAR visit www.energystar.gov. 18 42884-01 • 11/05/09 •...; Hunter Fan Company ENERGY STAR labeled ceiling fans save up to 10%* on climate, building type and thermostat setting. In winter, your thermostat higher and still stay comfortable. So, you set by more ...


