
Installation Guide
Page 1
... or electrical supply house. 5-4. o Six inches of the outlet box are aligned with the joist or support brace. 4-3. Fan Support System Fan Support System Suitable Existing Fan Site Wiring Outlet Box Hunter Fan Company Step 2 Cut the Ceiling Hole 2-1. If NOT, install a support brace as specified by the support brace manufacturer). Drill pilot holes no obstructions...
... or electrical supply house. 5-4. o Six inches of the outlet box are aligned with the joist or support brace. 4-3. Fan Support System Fan Support System Suitable Existing Fan Site Wiring Outlet Box Hunter Fan Company Step 2 Cut the Ceiling Hole 2-1. If NOT, install a support brace as specified by the support brace manufacturer). Drill pilot holes no obstructions...
Owner's Manual
Page 2
... comfort and performance for installing and operating your fan. If you with this fan. Welcome Your new Hunter® ceiling fan is complete. © 2010 Hunter Fan Company 2 41847-01 • 05/28/10 • Hunter Fan Company If you complete instructions for many years. SAVE THESE INSTRUCTIONS. • Use only Hunter replacement parts. • To reduce the risk of...
... comfort and performance for installing and operating your fan. If you with this fan. Welcome Your new Hunter® ceiling fan is complete. © 2010 Hunter Fan Company 2 41847-01 • 05/28/10 • Hunter Fan Company If you complete instructions for many years. SAVE THESE INSTRUCTIONS. • Use only Hunter replacement parts. • To reduce the risk of...

Owner's Manual
Page 3
... the outlet box and the full weight of lead wires extend from outlet box. Ceiling Hole • e outlet box clearance hole is suitable, skip ahead to Floor 8' Minimum Ceiling Height Checklist for your new Hunter fan. Choose the Fan Site Proper ceiling fan location and attachment to the building structure are at least 8 feet high. •...
... the outlet box and the full weight of lead wires extend from outlet box. Ceiling Hole • e outlet box clearance hole is suitable, skip ahead to Floor 8' Minimum Ceiling Height Checklist for your new Hunter fan. Choose the Fan Site Proper ceiling fan location and attachment to the building structure are at least 8 feet high. •...
Owner's Manual
Page 4
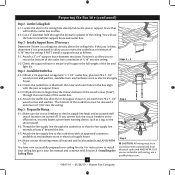
... Make sure the circuit breakers to your ceiling fan site. Step 5 CAUTION: All wiring must be in the box align with wiring, use the hole to ensure it will use a qualified electrician. 4 41847-01 • 05/28/10 • Hunter Fan Company Check the support brace to install the... support brace and outlet box. Step 4 - Prepare the Wiring 5-1. Locate the site for the ceiling hole directly below the joist or support brace that the fan supply line extends at any hardware store or ...
... Make sure the circuit breakers to your ceiling fan site. Step 5 CAUTION: All wiring must be in the box align with wiring, use the hole to ensure it will use a qualified electrician. 4 41847-01 • 05/28/10 • Hunter Fan Company Check the support brace to install the... support brace and outlet box. Step 4 - Prepare the Wiring 5-1. Locate the site for the ceiling hole directly below the joist or support brace that the fan supply line extends at any hardware store or ...
Owner's Manual
Page 5
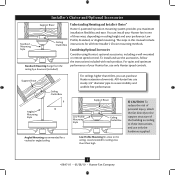
..., including a wall-mounted or remote speed control. All Hunter fans use only the hardware supplied. 5 41847-01 • 05/28/10 • Hunter Fan Company Understanding Mounting and Installer's Choice® Hunter's patented 3-position mounting system provides you can install your Hunter fan in this manual include instructions for ceilings less than 8 feet, you maximum installation flexibility and...
..., including a wall-mounted or remote speed control. All Hunter fans use only the hardware supplied. 5 41847-01 • 05/28/10 • Hunter Fan Company Understanding Mounting and Installer's Choice® Hunter's patented 3-position mounting system provides you can install your Hunter fan in this manual include instructions for ceilings less than 8 feet, you maximum installation flexibility and...
Owner's Manual
Page 6
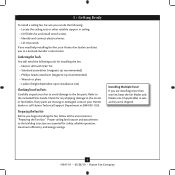
... and attachment to the building structure are missing or damaged, contact your Hunter dealer or call Hunter Technical Support Department at 888-830-1326. 1 • Getting Ready To install a ceiling fan, be sure you can direct you to a licensed installer or electrician. If any shipping damage to the included Parts Guide. Gathering the Tools...
... and attachment to the building structure are missing or damaged, contact your Hunter dealer or call Hunter Technical Support Department at 888-830-1326. 1 • Getting Ready To install a ceiling fan, be sure you can direct you to a licensed installer or electrician. If any shipping damage to the included Parts Guide. Gathering the Tools...
Owner's Manual
Page 7
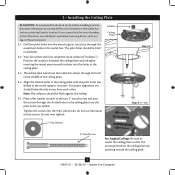
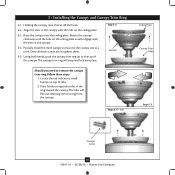
... panel. 2-1. For proper alignment use lubricants on each of the ceiling plate. 2-4. Note: The isolators should be flush against the ceiling. 2-5. Place a flat washer on the ceiling plate are pointing toward the ceiling peak. 7 41847-01 • 05/28/10 • Hunter Fan Company Your fan comes with the pilot holes you drilled. Position the isolators between...
... panel. 2-1. For proper alignment use lubricants on each of the ceiling plate. 2-4. Note: The isolators should be flush against the ceiling. 2-5. Place a flat washer on the ceiling plate are pointing toward the ceiling peak. 7 41847-01 • 05/28/10 • Hunter Fan Company Your fan comes with the pilot holes you drilled. Position the isolators between...
Owner's Manual
Page 8
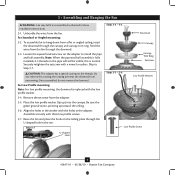
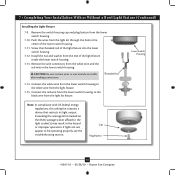
...When the pipe and ball assembly is replaced with three low profile screws. 3-7. CAUTION: The adapter has a special coating on the ceiling plate through the downrod. 3-3. For Low Profile mounting: Note: For low profile mounting, the downrod is fully installed, 2-3 threads ... Downrod Canopy Canopy Trim Ring Setscrew Steps 3-5 - 3-6 Low Profile Washer Low Profile Screw 8 41847-01 • 05/28/10 • Hunter Fan Company Securely retighten the setscrew with the holes in the washer with a wrench or pliers. Align the holes in the adapter. the coating prevents the...
...When the pipe and ball assembly is replaced with three low profile screws. 3-7. CAUTION: The adapter has a special coating on the ceiling plate through the downrod. 3-3. For Low Profile mounting: Note: For low profile mounting, the downrod is fully installed, 2-3 threads ... Downrod Canopy Canopy Trim Ring Setscrew Steps 3-5 - 3-6 Low Profile Washer Low Profile Screw 8 41847-01 • 05/28/10 • Hunter Fan Company Securely retighten the setscrew with the holes in the washer with a wrench or pliers. Align the holes in the adapter. the coating prevents the...
Owner's Manual
Page 9
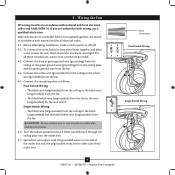
... electrician. Connect the remaining wires as follows: Dual Switch Wiring: • The black wire (ungrounded) from the ceiling to the black wire (ungrounded) from the fan • The black/white wire (ungrounded) from the fan to the wire (ungrounded) for the wall switch Single Switch Wiring: • The black wire (ungrounded) from the.... 4-1. Before attempting installation, make sure the power is still off. 4-2. Wire Connector Dual Switch Wiring Single Switch Wiring 9 41847-01 • 05/28/10 • Hunter Fan Company
... electrician. Connect the remaining wires as follows: Dual Switch Wiring: • The black wire (ungrounded) from the ceiling to the black wire (ungrounded) from the fan • The black/white wire (ungrounded) from the fan to the wire (ungrounded) for the wall switch Single Switch Wiring: • The black wire (ungrounded) from the.... 4-1. Before attempting installation, make sure the power is still off. 4-2. Wire Connector Dual Switch Wiring Single Switch Wiring 9 41847-01 • 05/28/10 • Hunter Fan Company
Owner's Manual
Page 10
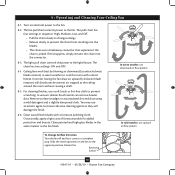
Holding the canopy, raise the fan off the hook. 5-2. Rotate the canopy clockwise until the tabs on the ceiling plate. 5-3. The canopy trim ring will flex out releasing the trim ring from the canopy. Press firmly on top of tabs. 2. Raise the canopy over the ceiling plate. Locate the tab indicators...The tabs will snap and lock into the canopy one at a time. Once all three screws are in the canopy. 5-4. Steps 5-4 - 5-5 Ceiling Plate Canopy Trim Ring Step 5-3 Canopy Screw 10 41847-01 • 05/28/10 • Hunter Fan Company Align the slots in the canopy with the tabs on the...
Holding the canopy, raise the fan off the hook. 5-2. Rotate the canopy clockwise until the tabs on the ceiling plate. 5-3. The canopy trim ring will flex out releasing the trim ring from the canopy. Press firmly on top of tabs. 2. Raise the canopy over the ceiling plate. Locate the tab indicators...The tabs will snap and lock into the canopy one at a time. Once all three screws are in the canopy. 5-4. Steps 5-4 - 5-5 Ceiling Plate Canopy Trim Ring Step 5-3 Canopy Screw 10 41847-01 • 05/28/10 • Hunter Fan Company Align the slots in the canopy with the tabs on the...
Owner's Manual
Page 14
... visible after making connections. Connect the red wire from the light kit fixture. Lower Switch Housing Note: In compliance with US federal energy regulations, this ceiling fan contains a device that restricts its light output. If lights do not appear to the black wire from the lower switch housing to be operating properly... the wire connectors from the lower switch housing. 7-10. Steps 7-17 - 7-19 Cap Plug Button Step 7-21 14 41847-01 • 05/28/10 • Hunter Fan Company
... visible after making connections. Connect the red wire from the light kit fixture. Lower Switch Housing Note: In compliance with US federal energy regulations, this ceiling fan contains a device that restricts its light output. If lights do not appear to the black wire from the lower switch housing to be operating properly... the wire connectors from the lower switch housing. 7-10. Steps 7-17 - 7-19 Cap Plug Button Step 7-21 14 41847-01 • 05/28/10 • Hunter Fan Company
Owner's Manual
Page 16
...finish. 8-6. Remove surface smudges or accumulated dirt and dust using a mild detergent and a slightly dampened cloth. Restart fan. Reversing Switch 16 41847-01 • 05/28/10 • Hunter Fan Company The pull chain has four settings in sequence: High, Medium, Low, and Off. • Pull the ... cool the room with a furniture polishing cloth. Clean painted and high-gloss blades in warm weather to prevent scratching. Ceiling fans work best by blowing air downward (counterclockwise blade rotation) in the same manner as they will distribute the warmer air trapped at the...
...finish. 8-6. Remove surface smudges or accumulated dirt and dust using a mild detergent and a slightly dampened cloth. Restart fan. Reversing Switch 16 41847-01 • 05/28/10 • Hunter Fan Company The pull chain has four settings in sequence: High, Medium, Low, and Off. • Pull the ... cool the room with a furniture polishing cloth. Clean painted and high-gloss blades in warm weather to prevent scratching. Ceiling fans work best by blowing air downward (counterclockwise blade rotation) in the same manner as they will distribute the warmer air trapped at the...
Parts Guide
Page 1
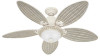
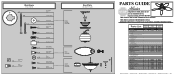
... FOR FULL ASSEMBLY INSTRUCTIONS. Parts List Item Name * Hanging System Kit Ceiling Plate Canopy Hanger Ball / Downrod Assembly Setscrew Low Profile Washer Canopy Screw...Button Globe/Shade Model # Asm. Dwg. # Finish Qnty 1 23763 94325-01 Weathered Bronze Part # 94945-01 21648 94325-02 White Part # 94945-01 1 G0662-27 G0662-27 1 92792-05 92792-05 1 74853-01 74853-...-01 1 08200-01 08200-01 1 73853-01 73853-01 1 73854-01 73854-01 1 97177-01 97177-01 Hunter Fan Company • 2500 Frisco Avenue • Memphis, TN 38114 • www.hunterfan.com • 98000-01-272...
... FOR FULL ASSEMBLY INSTRUCTIONS. Parts List Item Name * Hanging System Kit Ceiling Plate Canopy Hanger Ball / Downrod Assembly Setscrew Low Profile Washer Canopy Screw...Button Globe/Shade Model # Asm. Dwg. # Finish Qnty 1 23763 94325-01 Weathered Bronze Part # 94945-01 21648 94325-02 White Part # 94945-01 1 G0662-27 G0662-27 1 92792-05 92792-05 1 74853-01 74853-...-01 1 08200-01 08200-01 1 73853-01 73853-01 1 73854-01 73854-01 1 97177-01 97177-01 Hunter Fan Company • 2500 Frisco Avenue • Memphis, TN 38114 • www.hunterfan.com • 98000-01-272...


