
Installation Guide
Page 1
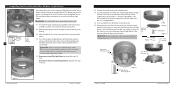
... octagonal 4" x 1-1/2" outlet box • Two #8 x 1-1/2" wood screws and washers • Approved connector for electrical wire Checklist for the ceiling hole directly below the joist or support brace that both the inner and outer holes in the off . Make certain the wiring meets all national and local standards and ANSI/ NFPA 70. For instructions to install your ceiling fan, go to your new Hunter fan. Fan Support System o Fan attaches directly to recess the...
... octagonal 4" x 1-1/2" outlet box • Two #8 x 1-1/2" wood screws and washers • Approved connector for electrical wire Checklist for the ceiling hole directly below the joist or support brace that both the inner and outer holes in the off . Make certain the wiring meets all national and local standards and ANSI/ NFPA 70. For instructions to install your ceiling fan, go to your new Hunter fan. Fan Support System o Fan attaches directly to recess the...

Owner's Manual
Page 1
For Your Records and Warranty Assistance Model Name Catalog/Model No Serial No Date Purchased Where Purchased For reference also attach your receipt or a copy of your receipt to the manual. 42819-01 • 11/14/06
For Your Records and Warranty Assistance Model Name Catalog/Model No Serial No Date Purchased Where Purchased For reference also attach your receipt or a copy of your receipt to the manual. 42819-01 • 11/14/06
Owner's Manual
Page 2
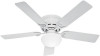
...; Getting Ready 4 2 • Installing the Hanger Bracket 5 3 • Assembling and Hanging the Fan..........6 4 • Wiring the Fan 7 5 • Installing the Motor Housing 8 6 • Assembling the Blades 9 7 • Completing Your Installation With or Without a Light Fixture 10 8 • Operating and Cleaning Your Ceiling Fan 14 9 • Troubleshooting 15 Your new Hunter® ceiling fan is an addition to the support structure of your fan. We are unfamiliar with the best ceiling fan available anywhere in installing your Hunter fan, use only the hardware supplied...
...; Getting Ready 4 2 • Installing the Hanger Bracket 5 3 • Assembling and Hanging the Fan..........6 4 • Wiring the Fan 7 5 • Installing the Motor Housing 8 6 • Assembling the Blades 9 7 • Completing Your Installation With or Without a Light Fixture 10 8 • Operating and Cleaning Your Ceiling Fan 14 9 • Troubleshooting 15 Your new Hunter® ceiling fan is an addition to the support structure of your fan. We are unfamiliar with the best ceiling fan available anywhere in installing your Hunter fan, use only the hardware supplied...
Owner's Manual
Page 3
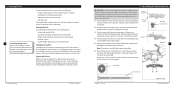
... canopy screw in the hole on each isolator into the pilot holes you to the service panel. 2-1. Hunter Fan Company 42819-01 • 11/14/06 2 • Installing the Hanger Bracket CAUTION: To avoid possible electrical shock, before installing your fan to avoid damage to the outlet box and associated wall switch location. If you cannot lock the circuit breakers in sets, as shown in the wood support structure. Isolator 2-5. Note: The isolators...
... canopy screw in the hole on each isolator into the pilot holes you to the service panel. 2-1. Hunter Fan Company 42819-01 • 11/14/06 2 • Installing the Hanger Bracket CAUTION: To avoid possible electrical shock, before installing your fan to avoid damage to the outlet box and associated wall switch location. If you cannot lock the circuit breakers in sets, as shown in the wood support structure. Isolator 2-5. Note: The isolators...

Owner's Manual
Page 4
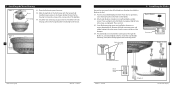
..., lift the motor assembly and place the square hanger into the outlet box. 4-7 Spread the wires apart, with national and local electrical codes. 4-1. Install two locking screws through the ceiling plate into the opening in the fan falling. 3-3. To connect the wires, hold the bare metal leads together and place a wire nut over them carefully back through the holes in the ceiling plate. Make sure the power to do...
..., lift the motor assembly and place the square hanger into the outlet box. 4-7 Spread the wires apart, with national and local electrical codes. 4-1. Install two locking screws through the ceiling plate into the opening in the fan falling. 3-3. To connect the wires, hold the bare metal leads together and place a wire nut over them carefully back through the holes in the ceiling plate. Make sure the power to do...
Owner's Manual
Page 5
... the blade iron, and attach lightly to situate the screws in the hanger bracket. For each blade to the fan). 6-1. Some blade mounting screws are tightened. Align the keyholes in the fan housing with grommet Blade Assembly Screws 6 • Assembling the Blades Step 6-1 (Detail) Grommet Steps 6-1 - 6-2 9 Use without grommet Blade Mounting Screw 42819-01 • 11/14/06 Step 6-4 Hunter Fan Company Securely tighten all screws. Rotate the fan housing to the fan. Remove the blade mounting screws and rubber bumpers from the motor. 5 • Installing the Motor Housing Step...
... the blade iron, and attach lightly to situate the screws in the hanger bracket. For each blade to the fan). 6-1. Some blade mounting screws are tightened. Align the keyholes in the fan housing with grommet Blade Assembly Screws 6 • Assembling the Blades Step 6-1 (Detail) Grommet Steps 6-1 - 6-2 9 Use without grommet Blade Mounting Screw 42819-01 • 11/14/06 Step 6-4 Hunter Fan Company Securely tighten all screws. Rotate the fan housing to the fan. Remove the blade mounting screws and rubber bumpers from the motor. 5 • Installing the Motor Housing Step...
Owner's Manual
Page 6
7 • Completing Your Installation With or Without a Light Fixture Steps 7-1 - 7-3 Housing Assembly Screw 10 Upper Switch Housing Your Hunter fan comes with this fan model. 7-1. This feature gives you do not want to install the light fixture, proceed with the housing assemInbslytallation With or white wire from the lower switch housing. the hole in the housing with step 7-6 now. Feed the upper plug housing. connector through the center opening 7of•thCeompleting Your 7-3. If...
7 • Completing Your Installation With or Without a Light Fixture Steps 7-1 - 7-3 Housing Assembly Screw 10 Upper Switch Housing Your Hunter fan comes with this fan model. 7-1. This feature gives you do not want to install the light fixture, proceed with the housing assemInbslytallation With or white wire from the lower switch housing. the hole in the housing with step 7-6 now. Feed the upper plug housing. connector through the center opening 7of•thCeompleting Your 7-3. If...

Owner's Manual
Page 7
.... Steps 7-6 - 7-7 Lower Switch Housing Plug Connector Detail Housing Assembly Screw Plug Connector CFL bulb (max 19W) Hunter Fan Company Globe Steps 7-12 - 7-13 42819-01 • 11/14/06 8 • Operating and Cleaning Your Ceiling Fan Step Title In warm weather, use downward air flow pattern In cold weather, use a soft brush or lint-free cloth to prevent scratching. Ceiling fans work best by blowing air downward (counterclockwise blade rotation) in this happens, simply reinsert the chain into the connector. 8-3. Remove surface...
.... Steps 7-6 - 7-7 Lower Switch Housing Plug Connector Detail Housing Assembly Screw Plug Connector CFL bulb (max 19W) Hunter Fan Company Globe Steps 7-12 - 7-13 42819-01 • 11/14/06 8 • Operating and Cleaning Your Ceiling Fan Step Title In warm weather, use downward air flow pattern In cold weather, use a soft brush or lint-free cloth to prevent scratching. Ceiling fans work best by blowing air downward (counterclockwise blade rotation) in this happens, simply reinsert the chain into the connector. 8-3. Remove surface...
Owner's Manual
Page 8
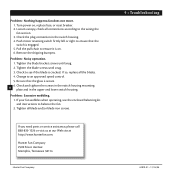
... blade is on , replace fuse, or reset breaker. 2. Remove the shipping bumpers. Tighten the blade screws until snug. 2. Problem: Excessive wobbling. 1. Step Title Problem: Nothing happens; Check the plug connection in the upper and lower switch housing. Check to ensure that the glass is engaged. 5. Be sure that the switch is secure. 6. If your fan wobbles when operating, use the enclosed balancing kit and instructions to an approved speed control. 5. Pull the pull chain to the wiring the fan...
... blade is on , replace fuse, or reset breaker. 2. Remove the shipping bumpers. Tighten the blade screws until snug. 2. Problem: Excessive wobbling. 1. Step Title Problem: Nothing happens; Check the plug connection in the upper and lower switch housing. Check to ensure that the glass is engaged. 5. Be sure that the switch is secure. 6. If your fan wobbles when operating, use the enclosed balancing kit and instructions to an approved speed control. 5. Pull the pull chain to the wiring the fan...
Parts Guide
Page 1
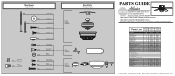
...; ©2011 REFER TO THE INSTALLATION MANUAL FOR FULL ASSEMBLY INSTRUCTIONS. Parts List Item Name Ceiling Plate Mounting Isolator Canopy Screw Locking Screw Wood Screw 1.5" Wood Screw 3" Flat Washer Motor Cover Switch Housing Assembly Light Kit Assembly Blade Iron Set Blade Set Screw, Blade Iron Armature Hardware Kit Blade Grommet Blade Assembly Screw Screw, Machine, 6-32 Wire Connector Screw, Switch Housing Assembly Balancing Kit Cap, Switch Housing Plug Button Thumbscrew Light bulb / Bulb Globe/Shade Model # 20810 20801 Asm. THIS PARTS GUIDE IS FOR REFERENCE ONLY. Hardware (Drawn...
...; ©2011 REFER TO THE INSTALLATION MANUAL FOR FULL ASSEMBLY INSTRUCTIONS. Parts List Item Name Ceiling Plate Mounting Isolator Canopy Screw Locking Screw Wood Screw 1.5" Wood Screw 3" Flat Washer Motor Cover Switch Housing Assembly Light Kit Assembly Blade Iron Set Blade Set Screw, Blade Iron Armature Hardware Kit Blade Grommet Blade Assembly Screw Screw, Machine, 6-32 Wire Connector Screw, Switch Housing Assembly Balancing Kit Cap, Switch Housing Plug Button Thumbscrew Light bulb / Bulb Globe/Shade Model # 20810 20801 Asm. THIS PARTS GUIDE IS FOR REFERENCE ONLY. Hardware (Drawn...


