
Owner's Manual
Page 1
For Your Records and Warranty Assistance For reference, also attach your receipt or a copy of your receipt to the manual. Date Purchased Where Purchased Model Type A Owner's Guide and Installation Manual English Español Form# 41535-01 20110404 ©2011 Hunter Fan Co. Model Name Model No.
For Your Records and Warranty Assistance For reference, also attach your receipt or a copy of your receipt to the manual. Date Purchased Where Purchased Model Type A Owner's Guide and Installation Manual English Español Form# 41535-01 20110404 ©2011 Hunter Fan Co. Model Name Model No.
Owner's Manual
Page 2
...; To reduce the risk of fire, electrical shock, or motor damage, do not bend the blade attachment system when installing, balancing, or cleaning the fan. Use only Hunter speed controls. • This product conforms to UL STD 507 and is certified to STD C22.2 No.113 • Wash your hands after your...
...; To reduce the risk of fire, electrical shock, or motor damage, do not bend the blade attachment system when installing, balancing, or cleaning the fan. Use only Hunter speed controls. • This product conforms to UL STD 507 and is certified to STD C22.2 No.113 • Wash your hands after your...
Owner's Manual
Page 3
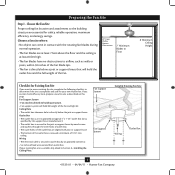
...• e electrical cable is an UL-approved octagonal 4" x 1-1/2" outlet box (or as described on this page. If your new Hunter fan. Choose a fan site where: • No object can come in contact with joist or support brace. • e bottom of the outlet box is... e outlet box is secured to Section 2 • Installing the Ceiling Plate. Fan Support System Fan Support System Suitable Existing Fan Site Wiring Outlet Box 3 41535-01 • 04/04/11 • Hunter Fan Company Ceiling Hole • e outlet box clearance hole is suitable, skip ahead ...
...• e electrical cable is an UL-approved octagonal 4" x 1-1/2" outlet box (or as described on this page. If your new Hunter fan. Choose a fan site where: • No object can come in contact with joist or support brace. • e bottom of the outlet box is... e outlet box is secured to Section 2 • Installing the Ceiling Plate. Fan Support System Fan Support System Suitable Existing Fan Site Wiring Outlet Box 3 41535-01 • 04/04/11 • Hunter Fan Company Ceiling Hole • e outlet box clearance hole is suitable, skip ahead ...
Owner's Manual
Page 4
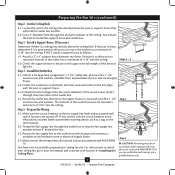
... joist or support brace that will use a qualified electrician. 4 41535-01 • 04/04/11 • Hunter Fan Company Orient the outlet box so that the fan supply line extends at any hardware store or electrical supply house. 4-2. If you to install the support brace and..., securely fasten a prominent warning device, such as follows: 3-1. Install the Outlet Box 4-1. Prepare the Wiring 5-1. Attach the fan supply line to the fan supply line leads and associated wall switch location are unfamiliar with wiring, use the hole to recess the outlet box a minimum of...
... joist or support brace that will use a qualified electrician. 4 41535-01 • 04/04/11 • Hunter Fan Company Orient the outlet box so that the fan supply line extends at any hardware store or electrical supply house. 4-2. If you to install the support brace and..., securely fasten a prominent warning device, such as follows: 3-1. Install the Outlet Box 4-1. Prepare the Wiring 5-1. Attach the fan supply line to the fan supply line leads and associated wall switch location are unfamiliar with wiring, use the hole to recess the outlet box a minimum of...
Owner's Manual
Page 5
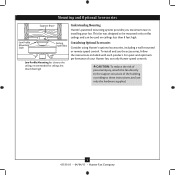
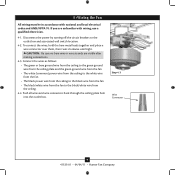
...hardware supplied. 5 41535-01 • 04/04/11 • Hunter Fan Company CAUTION: To reduce the risk of personal injury, attach the fan directly to the support structure of your fan. Considering Optional Accessories Consider using Hunter's optional accessories, including a wall-mounted or remote speed control. Mounting... the ceiling, recommended for ceilings less than 8 feet high. This fan was designed to be mounted only on flat ceilings and can be used on ceilings less than 8 feet high Understanding Mounting Hunter's patented mounting system provides you maximum ease in installing your...
...hardware supplied. 5 41535-01 • 04/04/11 • Hunter Fan Company CAUTION: To reduce the risk of personal injury, attach the fan directly to the support structure of your fan. Considering Optional Accessories Consider using Hunter's optional accessories, including a wall-mounted or remote speed control. Mounting... the ceiling, recommended for ceilings less than 8 feet high. This fan was designed to be mounted only on flat ceilings and can be used on ceilings less than 8 feet high Understanding Mounting Hunter's patented mounting system provides you maximum ease in installing your...
Owner's Manual
Page 6
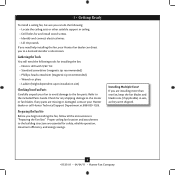
...any parts are missing or damaged, contact your fan to avoid damage to the fan parts. Installing Multiple Fans? Gathering the Tools You will need help installing the fan, your Hunter fan dealer can do the following tools for installing the fan: • Electric drill with 9/64" bit... (magnetic tip recommended) • Wrench or pliers • Ladder (height dependent upon installation site) Checking Your Fan Parts Carefully unpack your Hunter dealer or call Hunter Technical Support Department at 888-830-1326. If any shipping damage to the included Parts Guide. 1 • Getting...
...any parts are missing or damaged, contact your fan to avoid damage to the fan parts. Installing Multiple Fans? Gathering the Tools You will need help installing the fan, your Hunter fan dealer can do the following tools for installing the fan: • Electric drill with 9/64" bit... (magnetic tip recommended) • Wrench or pliers • Ladder (height dependent upon installation site) Checking Your Fan Parts Carefully unpack your Hunter dealer or call Hunter Technical Support Department at 888-830-1326. If any shipping damage to the included Parts Guide. 1 • Getting...
Owner's Manual
Page 7
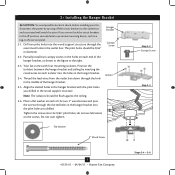
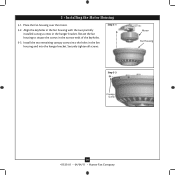
...structure. Note: The isolators should be flush against the ceiling. 2-6. Flat Washer 3" Wood Screw 7 41535-01 • 04/04/11 • Hunter Fan Company Step 2-2 Canopy Screw Step 2-3 Steps 2-4 - 2-6 If you drilled in diameter. Do not over tighten. 2 • Installing the Hanger ...Bracket CAUTION: To avoid possible electrical shock, before installing your fan, disconnect the power by inserting the raised areas on the screws. Drill two pilot holes into the holes in the figure to the...
...structure. Note: The isolators should be flush against the ceiling. 2-6. Flat Washer 3" Wood Screw 7 41535-01 • 04/04/11 • Hunter Fan Company Step 2-2 Canopy Screw Step 2-3 Steps 2-4 - 2-6 If you drilled in diameter. Do not over tighten. 2 • Installing the Hanger ...Bracket CAUTION: To avoid possible electrical shock, before installing your fan, disconnect the power by inserting the raised areas on the screws. Drill two pilot holes into the holes in the figure to the...
Owner's Manual
Page 8
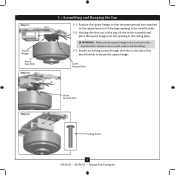
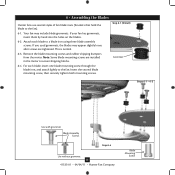
...the ceiling plate. Holding the wires out of the way, lift the motor assembly and place the square hanger into the opening in the fan falling. 3-3. Position the square hanger so that the green ground wire attached to do so could result in the metal bracket. 3-2. ...hanger. Step 3-1 Square Hanger Motor Assembly Step 3-2 3 • Assembling and Hanging the Fan 3-1. Green Ground Wire Step 3-3 Green Ground Wire #8-32 x 1" Screw Locking Screw 8 41535-01 • 04/04/11 • Hunter Fan Company Install two locking screws through the holes in the side of the large opening in...
...the ceiling plate. Holding the wires out of the way, lift the motor assembly and place the square hanger into the opening in the fan falling. 3-3. Position the square hanger so that the green ground wire attached to do so could result in the metal bracket. 3-2. ...hanger. Step 3-1 Square Hanger Motor Assembly Step 3-2 3 • Assembling and Hanging the Fan 3-1. Green Ground Wire Step 3-3 Green Ground Wire #8-32 x 1" Screw Locking Screw 8 41535-01 • 04/04/11 • Hunter Fan Company Install two locking screws through the holes in the side of the large opening in...
Owner's Manual
Page 9
... box and associated wall switch location. 4-2. Push all wires and wire connectors back through the ceiling plate hole into the outlet box. 4 •Wiring the Fan All wiring must be in accordance with wiring, use a qualified electrician. 4-1. CAUTION: Be sure no bare wire or wire strands are unfamiliar with national and... bare metal leads together and place a wire connector over them, then twist clockwise until tight. Step 4-3 Wire Connector 9 41535-01 • 04/04/11 • Hunter Fan Company If you are visible after making connections. 4-3.
... box and associated wall switch location. 4-2. Push all wires and wire connectors back through the ceiling plate hole into the outlet box. 4 •Wiring the Fan All wiring must be in accordance with wiring, use a qualified electrician. 4-1. CAUTION: Be sure no bare wire or wire strands are unfamiliar with national and... bare metal leads together and place a wire connector over them, then twist clockwise until tight. Step 4-3 Wire Connector 9 41535-01 • 04/04/11 • Hunter Fan Company If you are visible after making connections. 4-3.
Owner's Manual
Page 10
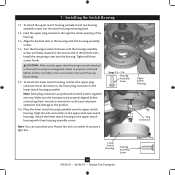
Align the keyholes in the fan housing with the two partially installed canopy screws in the fan housing and into the hanger bracket. Step 5-1 Motor Fan Housing Step 5-3 Canopy Screw 10 41535-01 • 04/04/11 • Hunter Fan Company Install the two remaining canopy screws into the holes in the hanger bracket. Rotate the fan housing to situate the screws in the narrow ends of the keyholes. 5-3. Securely tighten all screws. 5 • Installing the Motor Housing 5-1. Place the fan housing over the motor. 5-2.
Align the keyholes in the fan housing with the two partially installed canopy screws in the fan housing and into the hanger bracket. Step 5-1 Motor Fan Housing Step 5-3 Canopy Screw 10 41535-01 • 04/04/11 • Hunter Fan Company Install the two remaining canopy screws into the holes in the hanger bracket. Rotate the fan housing to situate the screws in the narrow ends of the keyholes. 5-3. Securely tighten all screws. 5 • Installing the Motor Housing 5-1. Place the fan housing over the motor. 5-2.
Owner's Manual
Page 11
... them by hand into the holes on the blades. 6-2. Note: Some blade mounting screws are tightened. 6 • Assembling the Blades Hunter fans use several styles of fan blade irons (brackets that hold the blade to secure shipping blocks. 6-4. This is normal. 6-3. Remove the blade mounting screws and rubber shipping... 6-1 (Detail) Grommet Steps 6-1 - 6-2 Use with grommet Blade Assembly Screws Step 6-4 Use without grommet 11 41535-01 • 04/04/11 • Hunter Fan Company Blade Mounting Screw Insert the second blade mounting screw, then securely tighten both mounting screws. Your...
... them by hand into the holes on the blades. 6-2. Note: Some blade mounting screws are tightened. 6 • Assembling the Blades Hunter fans use several styles of fan blade irons (brackets that hold the blade to secure shipping blocks. 6-4. This is normal. 6-3. Remove the blade mounting screws and rubber shipping... 6-1 (Detail) Grommet Steps 6-1 - 6-2 Use with grommet Blade Assembly Screws Step 6-4 Use without grommet 11 41535-01 • 04/04/11 • Hunter Fan Company Blade Mounting Screw Insert the second blade mounting screw, then securely tighten both mounting screws. Your...
Owner's Manual
Page 12
...screws. 7-4. Steps 7-1 - 7-4 Housing Assembly Screw Lower Switch Housing Housing Assembly Screw 12 41535-01 • 04/04/11 • Hunter Fan Company Upper Switch Housing Plug Connector Steps 7-5 - 7-6 Failure to the product. 7-6. Turn the housing counterclockwise until the housing assembly screws ...narrow end of the keyhole slots. Place the lower switch housing assembly over the upper switch housing. Note: You can customize your Hunter fan with a number of the housing. 7-3. 7 • Installing the Switch Housing 7-1. To attach the lower switch housing, connect ...
...screws. 7-4. Steps 7-1 - 7-4 Housing Assembly Screw Lower Switch Housing Housing Assembly Screw 12 41535-01 • 04/04/11 • Hunter Fan Company Upper Switch Housing Plug Connector Steps 7-5 - 7-6 Failure to the product. 7-6. Turn the housing counterclockwise until the housing assembly screws ...narrow end of the keyhole slots. Place the lower switch housing assembly over the upper switch housing. Note: You can customize your Hunter fan with a number of the housing. 7-3. 7 • Installing the Switch Housing 7-1. To attach the lower switch housing, connect ...

Owner's Manual
Page 13
...using a mild detergent and a slightly dampened cloth. Occasionally, apply a light coat of furniture polish for added protection and beauty. Ceiling fans work best by blowing air downward (counterclockwise blade rotation) in the same manner as they will distribute the warmer air trapped at the ... to prevent scratching. A vacuum cleaner brush nozzle can remove heavier dust. Reversing Switch 13 41535-01 • 04/04/11 • Hunter Fan Company If this happens, simply reinsert the chain into the blades. • The chain uses a breakaway connector that separates if the chain is...
...using a mild detergent and a slightly dampened cloth. Occasionally, apply a light coat of furniture polish for added protection and beauty. Ceiling fans work best by blowing air downward (counterclockwise blade rotation) in the same manner as they will distribute the warmer air trapped at the ... to prevent scratching. A vacuum cleaner brush nozzle can remove heavier dust. Reversing Switch 13 41535-01 • 04/04/11 • Hunter Fan Company If this happens, simply reinsert the chain into the blades. • The chain uses a breakaway connector that separates if the chain is...
Owner's Manual
Page 14
...888‑830‑1326 (In Canada, call 1-866-268-1936) or visit us at our Web site at http://www.hunterfan.com. fan does not move. 1. Check the plug connection in the upper and lower switch housing. Check and tighten the screws in the switch housing ... 7130 Goodlett Farms Pkwy #400 Memphis, Tennessee 38016 14 41535-01 • 04/04/11 • Hunter Fan Company Remove the shipping bumpers. Change to balance the fan. 2. Check to the wiring the fan section. 3. Problem: Noisy operation. 1. Tighten all the blades. 4. Tighten the blade bracket screws until snug. 3. Loosen ...
...888‑830‑1326 (In Canada, call 1-866-268-1936) or visit us at our Web site at http://www.hunterfan.com. fan does not move. 1. Check the plug connection in the upper and lower switch housing. Check and tighten the screws in the switch housing ... 7130 Goodlett Farms Pkwy #400 Memphis, Tennessee 38016 14 41535-01 • 04/04/11 • Hunter Fan Company Remove the shipping bumpers. Change to balance the fan. 2. Check to the wiring the fan section. 3. Problem: Noisy operation. 1. Tighten all the blades. 4. Tighten the blade bracket screws until snug. 3. Loosen ...
Parts Guide
Page 1
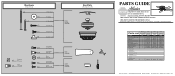
... # Finish Qnty 1 1 1 11 1 1 1 1 1 1 20806 94314-02 Bright Brass Part # G1669-01 99631-05 G0677-06 63755-...14 99631-05 G0677-05 63755-05 92511-03 73846-01 63756-42 G0090-01 94314-00-863 65666-01 65666-01 Hunter Fan Company • 7130 Goodlett Farms Pkwy. #400 • Memphis, TN 38016 • www.hunterfan.com • ... Screw, Blade Assembly Blade Grommet Screw, Switch Housing Assembly Screw, Machine, 6-32 Hanger Bracket Assembly Blade Assembly Switch Housing Assembly Fan Parts (Not Drawn to Scale) PARTS GUIDE Using this Parts Guide, make sure all parts are missing, DO NOT RETURN THIS...
... # Finish Qnty 1 1 1 11 1 1 1 1 1 1 20806 94314-02 Bright Brass Part # G1669-01 99631-05 G0677-06 63755-...14 99631-05 G0677-05 63755-05 92511-03 73846-01 63756-42 G0090-01 94314-00-863 65666-01 65666-01 Hunter Fan Company • 7130 Goodlett Farms Pkwy. #400 • Memphis, TN 38016 • www.hunterfan.com • ... Screw, Blade Assembly Blade Grommet Screw, Switch Housing Assembly Screw, Machine, 6-32 Hanger Bracket Assembly Blade Assembly Switch Housing Assembly Fan Parts (Not Drawn to Scale) PARTS GUIDE Using this Parts Guide, make sure all parts are missing, DO NOT RETURN THIS...


