
User Manual
Page 3
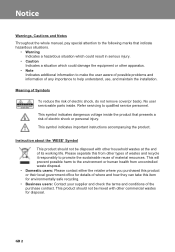
No user serviceable parts inside the product that indicate hazardous situations. • Warning Indicates a hazardous situation which could result in serious injury. • Caution Indicates a situation which could damage the equipment or other apparatus. • Note Indicates additional information to make the user aware of possible problems and information of any importance to qualified service personnel. Instruction about the 'WEEE' Symbol...
No user serviceable parts inside the product that indicate hazardous situations. • Warning Indicates a hazardous situation which could result in serious injury. • Caution Indicates a situation which could damage the equipment or other apparatus. • Note Indicates additional information to make the user aware of possible problems and information of any importance to qualified service personnel. Instruction about the 'WEEE' Symbol...

User Manual
Page 4
... product from the mains before you are not sure of the type of power supplied to your home, consult your local power company. • Disconnect the product from the wall outlet before cleaning. • Use a light damp cloth (no objects filled with international safety standards. EARTHING • The LNB cable must be left uncovered to liquid of any unsupported attachments as...
... product from the mains before you are not sure of the type of power supplied to your home, consult your local power company. • Disconnect the product from the wall outlet before cleaning. • Use a light damp cloth (no objects filled with international safety standards. EARTHING • The LNB cable must be left uncovered to liquid of any unsupported attachments as...

User Manual
Page 7
... 10.2 Service and Support GB40 10.3 Remote Control Code List GB41 10.4 OPEN SOURCE SOFTWARE NOTICE GB70 Installation Wizard GB17 3.1 Language GB17 3.2 Display GB17 3.3 Time Zone GB17 3.4 Search Channels GB18 3.5 Automatic Search GB18 3.6 Results GB18 4. Basic Operation GB19 4.1 Switching Channel GB19 4.2 Volume Control GB19 4.3 Resolution GB19 4.4 Wide GB19 4.5 Audio GB19 4.6 Subtitle GB19 4.7 Teletext GB19 4.8 Programme Information (i-plate GB20 4.9 Radio GB20 5. Media List GB27 8.1 Playing Files GB29 8.2 Editing Files GB30 9. TV Guide GB22 6.1 Table Guide GB22...
... 10.2 Service and Support GB40 10.3 Remote Control Code List GB41 10.4 OPEN SOURCE SOFTWARE NOTICE GB70 Installation Wizard GB17 3.1 Language GB17 3.2 Display GB17 3.3 Time Zone GB17 3.4 Search Channels GB18 3.5 Automatic Search GB18 3.6 Results GB18 4. Basic Operation GB19 4.1 Switching Channel GB19 4.2 Volume Control GB19 4.3 Resolution GB19 4.4 Wide GB19 4.5 Audio GB19 4.6 Subtitle GB19 4.7 Teletext GB19 4.8 Programme Information (i-plate GB20 4.9 Radio GB20 5. Media List GB27 8.1 Playing Files GB29 8.2 Editing Files GB30 9. TV Guide GB22 6.1 Table Guide GB22...

User Manual
Page 11
LNB 1 OUT Connect another digital satellite receiver. 3. ETHERNET Use a LAN cable to connect the network. 10.USB PORT Connect a USB storage device. 11.POWER SWITCH Power on/off 12.POWER CORD Connects to two cables can be connected. 4. Up to the power cord. ** Note: The image shown may differ from the actual product. SPDIF Use an S/PDIF cable to connect to the TV or VCR. 9. HDMI Use a component cable to connect to the audio system. 8. LNB 1/2 IN Connect a satellite antenna cable. VIDEO Use an RCA cable to connect to the TV or...
LNB 1 OUT Connect another digital satellite receiver. 3. ETHERNET Use a LAN cable to connect the network. 10.USB PORT Connect a USB storage device. 11.POWER SWITCH Power on/off 12.POWER CORD Connects to two cables can be connected. 4. Up to the power cord. ** Note: The image shown may differ from the actual product. SPDIF Use an S/PDIF cable to connect to the TV or VCR. 9. HDMI Use a component cable to connect to the audio system. 8. LNB 1/2 IN Connect a satellite antenna cable. VIDEO Use an RCA cable to connect to the TV or...

User Manual
Page 12
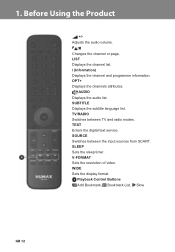
EXIT Exits all On-Screen Display (OSD) screens. Note: The image shown may differ from the actual product. OK Selects (Enters) a menu or confirms a selection. BACK Returns to the previous screen. MUTE Mutes audio. Goes back to the previous channel. MODE Changes the mode of remote. GUIDE Displays the programme guide. NUMERIC (0-9) TV Portal Currently not supported. MEDIA Displays the media list. STANDBY Switches between operation and standby modes. MENU Displays the main menu. Playback Control Buttons Play, Pause, Stop...
EXIT Exits all On-Screen Display (OSD) screens. Note: The image shown may differ from the actual product. OK Selects (Enters) a menu or confirms a selection. BACK Returns to the previous screen. MUTE Mutes audio. Goes back to the previous channel. MODE Changes the mode of remote. GUIDE Displays the programme guide. NUMERIC (0-9) TV Portal Currently not supported. MEDIA Displays the media list. STANDBY Switches between operation and standby modes. MENU Displays the main menu. Playback Control Buttons Play, Pause, Stop...
User Manual
Page 13
** +/Adjusts the audio volume. i (Information) Displays the channel and programme information. SUBTITLE Displays the subtitle language list. SLEEP Sets the sleep timer. OPT+ Displays the channels attributes. WIDE Sets the display format. Playback Control Buttons Add Bookmark, Bookmark List, Slow P Changes the channel or page. V-FORMAT Sets the resolution of video. AUDIO Displays the audio list. TEXT Enters the digital text service. SOURCE Switches between TV and radio modes. TV/RADIO Switches between the input sources from SCART. LIST Displays the channel list.
** +/Adjusts the audio volume. i (Information) Displays the channel and programme information. SUBTITLE Displays the subtitle language list. SLEEP Sets the sleep timer. OPT+ Displays the channels attributes. WIDE Sets the display format. Playback Control Buttons Add Bookmark, Bookmark List, Slow P Changes the channel or page. V-FORMAT Sets the resolution of video. AUDIO Displays the audio list. TEXT Enters the digital text service. SOURCE Switches between TV and radio modes. TV/RADIO Switches between the input sources from SCART. LIST Displays the channel list.

User Manual
Page 14
... using this connection, the specified functions for gaining optimum signal quality. Select the most appropriate procedure depending on the equipment you have. ** Warning: Connect all components before you to LNB 1 IN connector. 2. Always turn off the product, TV and other devices. Connect two satellite coaxial cables from the wall to view different channels while recording or record two channels at the same time. 1. Connect a satellite coaxial cable from the wall directly...
... using this connection, the specified functions for gaining optimum signal quality. Select the most appropriate procedure depending on the equipment you have. ** Warning: Connect all components before you to LNB 1 IN connector. 2. Always turn off the product, TV and other devices. Connect two satellite coaxial cables from the wall to view different channels while recording or record two channels at the same time. 1. Connect a satellite coaxial cable from the wall directly...

User Manual
Page 16
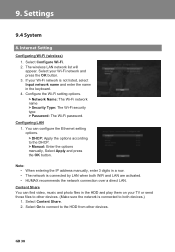
... settings in Installation Wizard or System>Internet Setting>Configure Wi-Fi are the same. ** Note: • We recommend the network connection over a direct LAN. • Make sure the distance between the Wi-Fi access point and the product is recommended to use the security type. Plug in the Wi-Fi setting menu. 3. This may not function or respond. ** Enter the same password in the wireless USB dongle to the USB port...
... settings in Installation Wizard or System>Internet Setting>Configure Wi-Fi are the same. ** Note: • We recommend the network connection over a direct LAN. • Make sure the distance between the Wi-Fi access point and the product is recommended to use the security type. Plug in the Wi-Fi setting menu. 3. This may not function or respond. ** Enter the same password in the wireless USB dongle to the USB port...

User Manual
Page 20
.... button or entering the channel Press the VOL +/- Press the TEXT button. Press the MUTE button to stop the audio temporarily. The current resolution will be displayed. Each time you press the WIDE button, the display format changes. Each time you press the V-FORMAT button, the resolution changes. You can set the display format. The subtitle will be displayed in teletext mode. You can switch the current channel by pressing the CH number directly using the button. Press the SUBTITLE button and...
.... button or entering the channel Press the VOL +/- Press the TEXT button. Press the MUTE button to stop the audio temporarily. The current resolution will be displayed. Each time you press the WIDE button, the display format changes. Each time you press the V-FORMAT button, the resolution changes. You can set the display format. The subtitle will be displayed in teletext mode. You can switch the current channel by pressing the CH number directly using the button. Press the SUBTITLE button and...

User Manual
Page 23
... GUIDE button. Note: • You can view the programme information of other groups. Press the MENU button and select TV Guide. Find will help you manage them in several ways. The TV guide is an on-screen guide of grid type which displays the programme information of channels in time and date order. You can set recordings or reminders for future programmes. • Press the BLUE button to list the channel...
... GUIDE button. Note: • You can view the programme information of other groups. Press the MENU button and select TV Guide. Find will help you manage them in several ways. The TV guide is an on-screen guide of grid type which displays the programme information of channels in time and date order. You can set recordings or reminders for future programmes. • Press the BLUE button to list the channel...

User Manual
Page 28
... the OK button. > HDD: Displays the internal HDD. > USB: Displays each partition of format FAT12/16/32. Press the MENU button and select Video, Music or Photo. You can play video, music or photo stored in several ways. You can access Media List in the internal hard disk drive, the USB storage devices or the DLNA compliant devices. Connect a USB storage device for USB playback. • Supported features according...
... the OK button. > HDD: Displays the internal HDD. > USB: Displays each partition of format FAT12/16/32. Press the MENU button and select Video, Music or Photo. You can play video, music or photo stored in several ways. You can access Media List in the internal hard disk drive, the USB storage devices or the DLNA compliant devices. Connect a USB storage device for USB playback. • Supported features according...

User Manual
Page 32
Maturity Rating, Change STB Password System Language, Audio Language, Subtitle Language Power On Timer, Channel, Volume, Repeat, Power Off Timer, Daylight Saving Time Screen Ratio, Display Format, Letter & Pillar Box Colour Digital Audio Output, Lip-Sync Start Padding Time, End Padding Time, Instant Replay Time, Skip Forward Time, Recording Trace Info Display Time, Transparency, Subtitle Font In this chapter you can set options for parental control, language, time, video, audio, recording and screen display.
Maturity Rating, Change STB Password System Language, Audio Language, Subtitle Language Power On Timer, Channel, Volume, Repeat, Power Off Timer, Daylight Saving Time Screen Ratio, Display Format, Letter & Pillar Box Colour Digital Audio Output, Lip-Sync Start Padding Time, End Padding Time, Instant Replay Time, Skip Forward Time, Recording Trace Info Display Time, Transparency, Subtitle Font In this chapter you can set options for parental control, language, time, video, audio, recording and screen display.

User Manual
Page 33
You can edit all channels in the channel list or make changes to the favourite lists of the channel data is .udf format. In this chapter you have chosen. The channel data can add or remove channels from the receiver to the receiver or exported from the favourite groups. You can be imported from the USB to a USB device (such as USB memory stick). The file format of the channels you can delete, move, lock or rename multiple channels.
You can edit all channels in the channel list or make changes to the favourite lists of the channel data is .udf format. In this chapter you have chosen. The channel data can add or remove channels from the receiver to the receiver or exported from the favourite groups. You can be imported from the USB to a USB device (such as USB memory stick). The file format of the channels you can delete, move, lock or rename multiple channels.

User Manual
Page 34
... the satellite. Test Transponder: Check the signal status of each transponder and select the one with the best quality. 3. LNB Frequency: Select the LNB frequency. 22kHz Tone: Select On when using a 22kHZ tone switch box. Set the satellite by selecting Transponder. DiSEqC: Select the DiSEqC switch. MENU -> Settings -> Installation Press the RED button and select your antenna and search the available TV and radio channels. Installation menu allows you to configure your antenna type. Software update and default setting...
... the satellite. Test Transponder: Check the signal status of each transponder and select the one with the best quality. 3. LNB Frequency: Select the LNB frequency. 22kHz Tone: Select On when using a 22kHZ tone switch box. Set the satellite by selecting Transponder. DiSEqC: Select the DiSEqC switch. MENU -> Settings -> Installation Press the RED button and select your antenna and search the available TV and radio channels. Installation menu allows you to configure your antenna type. Software update and default setting...
User Manual
Page 37
... enter the password. OTA, an abbreviation of Over-the-Air, means that the software can also search and download new software manually. Note: • The default password is essential to have forgotten your password, contact your aerial. You can be downloaded through your local distributor. • To format the HDD, mark Format HDD. ** Warning: Note that you perform factory default, all values to the factory default. 2. You will be reset. MENU -> Setting -> nstallation -> Software Update...
... enter the password. OTA, an abbreviation of Over-the-Air, means that the software can also search and download new software manually. Note: • The default password is essential to have forgotten your password, contact your aerial. You can be downloaded through your local distributor. • To format the HDD, mark Format HDD. ** Warning: Note that you perform factory default, all values to the factory default. 2. You will be reset. MENU -> Setting -> nstallation -> Software Update...
User Manual
Page 39
... security type > Password: The Wi-Fi password. ** Configuring LAN 1. If your Wi-Fi network and press the OK button. 3. Configuring Wi-Fi (wireless) 1. Select Configure Wi-Fi. 2. You can find video, music and photo files in a row. • The network is connected to both WiFi and LAN are activated. • HUMAX recommends the network connection over a direct LAN. ** Content Share You can configure the Ethernet setting options. > DHCP: Apply the options according...
... security type > Password: The Wi-Fi password. ** Configuring LAN 1. If your Wi-Fi network and press the OK button. 3. Configuring Wi-Fi (wireless) 1. Select Configure Wi-Fi. 2. You can find video, music and photo files in a row. • The network is connected to both WiFi and LAN are activated. • HUMAX recommends the network connection over a direct LAN. ** Content Share You can configure the Ethernet setting options. > DHCP: Apply the options according...

User Manual
Page 44
DISPLAY LIST P+ PPVR MENU AUDIO, LANGUAGE SUBTITLE HDD, DVD/HDD TITLE SLOW; Appendix Button YELLOW BLUE MEDIA GUIDE OK UP LEFT RIGHT DOWN EXIT BACK VOL+ VOL- D/A; DTV/TV; SURROUND BAND RANDOM RANDOM SOURCE, FUNCTION GB 43 LAST CHANNEL VOL+ VOLINFO, OSD; DIGITIAL TEXT SUBPAGE TEXT TIME TEXT INDEX TEXT POSITION TEXT CANCEL; STEP SOURCE, TV/DVD, TV/DISK AUDIO YELLOW BLUE DSP MODE OK UP LEFT RIGHT DOWN EXIT REPEAT...
DISPLAY LIST P+ PPVR MENU AUDIO, LANGUAGE SUBTITLE HDD, DVD/HDD TITLE SLOW; Appendix Button YELLOW BLUE MEDIA GUIDE OK UP LEFT RIGHT DOWN EXIT BACK VOL+ VOL- D/A; DTV/TV; SURROUND BAND RANDOM RANDOM SOURCE, FUNCTION GB 43 LAST CHANNEL VOL+ VOLINFO, OSD; DIGITIAL TEXT SUBPAGE TEXT TIME TEXT INDEX TEXT POSITION TEXT CANCEL; STEP SOURCE, TV/DVD, TV/DISK AUDIO YELLOW BLUE DSP MODE OK UP LEFT RIGHT DOWN EXIT REPEAT...

User Manual
Page 71
...All rights reserved. HUMAX products use certain open source operating system software distributed pursuant to GNU GENERAL PUBLIC LICENSE Version 2 and GNU LESSER GENERAL LICENSE Version 2.1 each as defined and published by the Free Software Foundation, Inc. ** The following GPL and LGPL software source codes used in this product ...which is valid for up to three years from the date of original download of the software or purchase of this software are made available under an MIT-style license. GPL Software linux busybox avinfo e2fsprogs This package, the EXT2 filesystem utilities, are ...
...All rights reserved. HUMAX products use certain open source operating system software distributed pursuant to GNU GENERAL PUBLIC LICENSE Version 2 and GNU LESSER GENERAL LICENSE Version 2.1 each as defined and published by the Free Software Foundation, Inc. ** The following GPL and LGPL software source codes used in this product ...which is valid for up to three years from the date of original download of the software or purchase of this software are made available under an MIT-style license. GPL Software linux busybox avinfo e2fsprogs This package, the EXT2 filesystem utilities, are ...

User Manual
Page 79
... be a special need to encourage the widest possible use a particular library in order to permit linking those libraries into non-free programs. When a program is legally speaking a combined work that any free program. However, the Lesser license provides advantages in order to run that it becomes a de-facto standard. For example, permission to use this license. ** Most GNU software, including some libraries...
... be a special need to encourage the widest possible use a particular library in order to permit linking those libraries into non-free programs. When a program is legally speaking a combined work that any free program. However, the Lesser license provides advantages in order to run that it becomes a de-facto standard. For example, permission to use this license. ** Most GNU software, including some libraries...

User Manual
Page 80
.... A "work to any change. You may copy and distribute verbatim copies of any software library or other authorized party saying it , in any medium, provided that you must cause the files modified to control compilation and installation of its scope. The modified work based on the Library (independent of the use some of those functions and data) to say, a work...
.... A "work to any change. You may copy and distribute verbatim copies of any software library or other authorized party saying it , in any medium, provided that you must cause the files modified to control compilation and installation of its scope. The modified work based on the Library (independent of the use some of those functions and data) to say, a work...


