

User Manual
Page 1
...** ** ** Nagravision is a registered trademark of Mindport BV. Keep this user manual next to your offer or use and maintain the receiver at maximum performance. ** ** ** ** ** Notice ** Copyright (Copyright © 2001 HUMAX Corporation) Not to be able to safely install, use of the information contained in... N.V. CryptoWorks (TM) is subject to change without notice. Please read this user manual carefully, to your ** receiver for purchasing a HUMAX satellite receiver. HUMAX does not have any responsibility for direct, indirect, accidental, necessary and other damage due...
...** ** ** Nagravision is a registered trademark of Mindport BV. Keep this user manual next to your offer or use and maintain the receiver at maximum performance. ** ** ** ** ** Notice ** Copyright (Copyright © 2001 HUMAX Corporation) Not to be able to safely install, use of the information contained in... N.V. CryptoWorks (TM) is subject to change without notice. Please read this user manual carefully, to your ** receiver for purchasing a HUMAX satellite receiver. HUMAX does not have any responsibility for direct, indirect, accidental, necessary and other damage due...
User Manual
Page 2
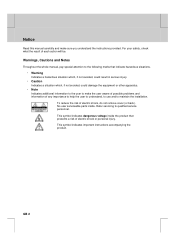
Warnings, Cautions and Notes Throughout the whole manual, pay special attention to the following marks that presents a risk of electric shock or personal injury. ** This symbol indicates important instructions accompanying the product. ** ** ** GB 2 ** ** **...other apparatus. • Note ** Indicates additional information to the user to make sure you understand the instructions provided. ** ** ** ** ** Notice ** Read this manual carefully and make the user aware of possible problems and information of any importance to help the user to understand, to use and to maintain...
Warnings, Cautions and Notes Throughout the whole manual, pay special attention to the following marks that presents a risk of electric shock or personal injury. ** This symbol indicates important instructions accompanying the product. ** ** ** GB 2 ** ** **...other apparatus. • Note ** Indicates additional information to the user to make sure you understand the instructions provided. ** ** ** ** ** Notice ** Read this manual carefully and make the user aware of possible problems and information of any importance to help the user to understand, to use and to maintain...
User Manual
Page 6
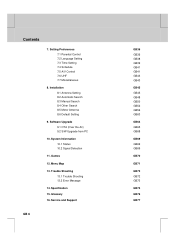
Setting Preferences 7.1 Parental Control 7.2 Language Setting 7.3 Time Setting 7.4 Schedule 7.5 A/V Control 7.6 UHF 7.7 Miscellaneous 8. Installation 8.1 Antenna Setting 8.2 Automatic Search 8.3 Manual Search 8.4 Other Search 8.5 Motor Antenna 8.6 Default Setting 9. Software Upgrade ** 9.1 OTA (Over the Air) 9.2 S/W Upgrade from PC 10. Menu Map ** 13. System Information 10.1 Status 10.2 ...
Setting Preferences 7.1 Parental Control 7.2 Language Setting 7.3 Time Setting 7.4 Schedule 7.5 A/V Control 7.6 UHF 7.7 Miscellaneous 8. Installation 8.1 Antenna Setting 8.2 Automatic Search 8.3 Manual Search 8.4 Other Search 8.5 Motor Antenna 8.6 Default Setting 9. Software Upgrade ** 9.1 OTA (Over the Air) 9.2 S/W Upgrade from PC 10. Menu Map ** 13. System Information 10.1 Status 10.2 ...

User Manual
Page 7
Before Using the Receiver ** This chapter provides detailed instructions on the product and its accessories. ** 1.1 Package Contents Please check all package contents before using your receiver. ** ** ** ** Batteries (2) Remote Control Unit (1) User's Manual (1) ** Note: Since faults may occur if the remote controller is being left without a battery for a long time, always keep the battery inserted in the remote controller. ** GB 7 ** ** ** ** ** ** ** ** ** ** ** ** 1.
Before Using the Receiver ** This chapter provides detailed instructions on the product and its accessories. ** 1.1 Package Contents Please check all package contents before using your receiver. ** ** ** ** Batteries (2) Remote Control Unit (1) User's Manual (1) ** Note: Since faults may occur if the remote controller is being left without a battery for a long time, always keep the battery inserted in the remote controller. ** GB 7 ** ** ** ** ** ** ** ** ** ** ** ** 1.
User Manual
Page 15
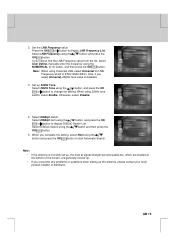
... you encounter any problems or questions when setting up 22kHz Tone. When you cannot find the LNB Frequency value from the list, select User Define, manually enter the frequency using the button and press the OK button to display DiSEqC Switch List. ** Select DiSEqC Switch using the button, and press the...
... you encounter any problems or questions when setting up 22kHz Tone. When you cannot find the LNB Frequency value from the list, select User Define, manually enter the frequency using the button and press the OK button to display DiSEqC Switch List. ** Select DiSEqC Switch using the button, and press the...

User Manual
Page 39
.... 3. Select Subtitle Display using the or button. Select your desired option and press the OK button. Select Time Setting using the button. 2. Manual Subtitles are displayed automatically in the language when you select the subtitle language by pressing the SUBTITLE button at remote controller. ** 4. Subtitle Font ** You can ...
.... 3. Select Subtitle Display using the or button. Select your desired option and press the OK button. Select Time Setting using the button. 2. Manual Subtitles are displayed automatically in the language when you select the subtitle language by pressing the SUBTITLE button at remote controller. ** 4. Subtitle Font ** You can ...
User Manual
Page 45
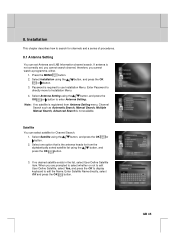
... the OK button. ** GB 45 ** ** ** ** ** ** ** Select one option that is the antenna heads for from Antenna Setting menu, Channel Search such as Automatic Search, Manual Search, Multiple Manual Search, Advanced Search is registered from the alphabetically sorted satellite list using the button, and press the OK or button to Installation Menu. 4. ** ** ** ** ** 8. Select...
... the OK button. ** GB 45 ** ** ** ** ** ** ** Select one option that is the antenna heads for from Antenna Setting menu, Channel Search such as Automatic Search, Manual Search, Multiple Manual Search, Advanced Search is registered from the alphabetically sorted satellite list using the button, and press the OK or button to Installation Menu. 4. ** ** ** ** ** 8. Select...
User Manual
Page 50
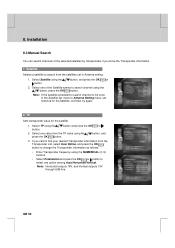
... the Satellite, and then try again. 2. Note: Horizontal outputs 18V, and Vertical outputs 13V through LNB line. ** GB 50 ** ** ** ** ** ** ** Select TP using the button. Installation ** 8.3 Manual Search ** You can search channels of the Satellite names to search from the TP value using the button, and press the OK button. 3. Satellite Selects...
... the Satellite, and then try again. 2. Note: Horizontal outputs 18V, and Vertical outputs 13V through LNB line. ** GB 50 ** ** ** ** ** ** ** Select TP using the button. Installation ** 8.3 Manual Search ** You can search channels of the Satellite names to search from the TP value using the button, and press the OK button. 3. Satellite Selects...

User Manual
Page 52
... the MENU button to ** GB 52 ** ** ** ** ** ** ** Press the BACK or button to return to run Menu. 2. Search Type You can complete the setting and start Manual Search. 2. Select Search Type using the or button. Select Channel Type using the or button. The next procedures are the same as those of Automatic...
... the MENU button to ** GB 52 ** ** ** ** ** ** ** Press the BACK or button to return to run Menu. 2. Search Type You can complete the setting and start Manual Search. 2. Select Search Type using the or button. Select Channel Type using the or button. The next procedures are the same as those of Automatic...

User Manual
Page 53
Advanced Search ** You can enter the PID value for Satellite and TP is the same as those of Manual Search. Select the PID to start searching. 1. Set PID value. ** Auto Search PID value automatically. ** Hexadecimal Enter PID value in Decimal . 3. Select Search and press ... PID Enter the Video PID value. The next procedures are the same as that of Automatic Search. Refer to the Satellite and TP setting for Manual Search. ** Video PID, Audio PID, PCR PID You can find your desired channel by entering Video, Audio and PCR Packet ID directly In Other Search...
Advanced Search ** You can enter the PID value for Satellite and TP is the same as those of Manual Search. Select the PID to start searching. 1. Set PID value. ** Auto Search PID value automatically. ** Hexadecimal Enter PID value in Decimal . 3. Select Search and press ... PID Enter the Video PID value. The next procedures are the same as that of Automatic Search. Refer to the Satellite and TP setting for Manual Search. ** Video PID, Audio PID, PCR PID You can find your desired channel by entering Video, Audio and PCR Packet ID directly In Other Search...

User Manual
Page 55
...selected item. Select one option among Auto, 1/2, 2/3, 3/4, 5/6, 7/8, and press the OK button. ** Search You can run Multiple Manual Search. Multiple Manual Search If you wish to search multiple Transponder at the same time, you can complete setting and start SMATV Search. 2. Select one option...using the button, and press the OK or button. 3. Note: Settings for Satellite, Search Type, and Channel Type are the same as those of Manual Search. ** ** ** ** ** ** ** FEC 1. or button to start searching. 1. The next procedures are the same as those of Automatic Search...
...selected item. Select one option among Auto, 1/2, 2/3, 3/4, 5/6, 7/8, and press the OK button. ** Search You can run Multiple Manual Search. Multiple Manual Search If you wish to search multiple Transponder at the same time, you can complete setting and start SMATV Search. 2. Select one option...using the button, and press the OK or button. 3. Note: Settings for Satellite, Search Type, and Channel Type are the same as those of Manual Search. ** ** ** ** ** ** ** FEC 1. or button to start searching. 1. The next procedures are the same as those of Automatic Search...

User Manual
Page 56
... TP from the Transponder list, press the OK button, select Edit, and then press the OK button to parent menu. Select a specific TP from Multiple Manual Search, and press the OK or button. 2. Installation ** Edit TP List You can select multiple TPs to add a new Transponder data. 3.
... TP from the Transponder list, press the OK button, select Edit, and then press the OK button to parent menu. Select a specific TP from Multiple Manual Search, and press the OK or button. 2. Installation ** Edit TP List You can select multiple TPs to add a new Transponder data. 3.
User Manual
Page 66
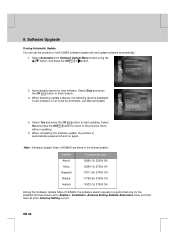
...22000 5/6 Sirius 12054 (V) 27500 3/4 Hispasat 11811 (H) 27500 3/4 Nilesat 11765 (H) 27500 3/4 Hotbird 11623 (V) 27500 3/4 ** Among the Software Update Sites of HUMAX are listed in Installation -Antenna Setting-Satellite Alternative menu and that have all other Antenna Setting correct. ** ** GB 66 ** ** ** ** ** ** ** ...following result is performed only for new software. When completing the software update, the product is not found by Automatic, use Manual Update. 4. Software Upgrade ** If using the button, and press the OK or button. 2. If new software is ...
...22000 5/6 Sirius 12054 (V) 27500 3/4 Hispasat 11811 (H) 27500 3/4 Nilesat 11765 (H) 27500 3/4 Hotbird 11623 (V) 27500 3/4 ** Among the Software Update Sites of HUMAX are listed in Installation -Antenna Setting-Satellite Alternative menu and that have all other Antenna Setting correct. ** ** GB 66 ** ** ** ** ** ** ** ...following result is performed only for new software. When completing the software update, the product is not found by Automatic, use Manual Update. 4. Software Upgrade ** If using the button, and press the OK or button. 2. If new software is ...

User Manual
Page 67
.... 6. Select the the Satellite which updated software is the same as how to start with Antenna Setting. 2. Select Manual from Software Update Menu screen using the button, and press the OK or button. Select FEC value. Enter Polarisation value.... Search and Press the OK button to the Manual Update Menu. 8. Enter Transponder Frequency in the List, select User Define and enter manually. 5. It is automatically powered off and on again. ** GB 67 ** ** ** ** ** ** ** ** ** ** ** ** ** ** Manual Update You can perform Manual Update only if you know which satellite has ...
.... 6. Select the the Satellite which updated software is the same as how to start with Antenna Setting. 2. Select Manual from Software Update Menu screen using the button, and press the OK or button. Select FEC value. Enter Polarisation value.... Search and Press the OK button to the Manual Update Menu. 8. Enter Transponder Frequency in the List, select User Define and enter manually. 5. It is automatically powered off and on again. ** GB 67 ** ** ** ** ** ** ** ** ** ** ** ** ** ** Manual Update You can perform Manual Update only if you know which satellite has ...


