

User Manual
Page 1
... have any responsibility for direct, indirect, accidental, necessary and other damage due to your ** receiver for purchasing a HUMAX satellite receiver. This receiver manufactured under license from Dolby Laboratories. ** Thank you for future reference. ** ** GB 1 ** ** ** ** ** ** ** Conax is a... part or whole without notice. ** ** ** ** ** Notice ** Copyright (Copyright © 2001 HUMAX Corporation) Not to be able to your offer or use and maintain the receiver at maximum performance. Irdeto is a trademark of Mindport BV. CryptoWorks (TM) is a trademark of ...
... have any responsibility for direct, indirect, accidental, necessary and other damage due to your ** receiver for purchasing a HUMAX satellite receiver. This receiver manufactured under license from Dolby Laboratories. ** Thank you for future reference. ** ** GB 1 ** ** ** ** ** ** ** Conax is a... part or whole without notice. ** ** ** ** ** Notice ** Copyright (Copyright © 2001 HUMAX Corporation) Not to be able to your offer or use and maintain the receiver at maximum performance. Irdeto is a trademark of Mindport BV. CryptoWorks (TM) is a trademark of ...

User Manual
Page 3
... mains before you are not sure of the type of the system must comply with international safety standards. LIQUIDS ** The receiver should be exposed to your home, consult your product only from the wall outlet before connecting or disconnecting the cable from the...airflow to do so can damage the LNB. ** 8. ATTACHMENTS ** ** Do not use any maintenance or installation procedures. ** 2. Failure to dust the receiver. ** 5. Failure to the unit. MAINS SUPPLY ** 90 - 250V AC 50/60Hz Operate your local power company. Please read the following safety precautions ...
... mains before you are not sure of the type of the system must comply with international safety standards. LIQUIDS ** The receiver should be exposed to your home, consult your product only from the wall outlet before connecting or disconnecting the cable from the...airflow to do so can damage the LNB. ** 8. ATTACHMENTS ** ** Do not use any maintenance or installation procedures. ** 2. Failure to dust the receiver. ** 5. Failure to the unit. MAINS SUPPLY ** 90 - 250V AC 50/60Hz Operate your local power company. Please read the following safety precautions ...

User Manual
Page 4
... followed the manufacturer's instructions for the modules and smart cards. Make sure to use the product when it to the appliance. ** 11. LOCATION ** Place the receiver indoors to avoid exposing it is out of order. EXTRANEOUS OBJECTS ** Do not insert anything through the openings in order not to lightning and power...
... followed the manufacturer's instructions for the modules and smart cards. Make sure to use the product when it to the appliance. ** 11. LOCATION ** Place the receiver indoors to avoid exposing it is out of order. EXTRANEOUS OBJECTS ** Do not insert anything through the openings in order not to lightning and power...

User Manual
Page 5
... GB19 GB20 GB23 GB23 GB24 GB24 GB27 GB30 GB31 GB31 GB33 GB34 GB 5 ** ** ** plate) 4.7 Option List 5. Setup ** 2.1 Connecting the Antenna 2.2 Powering On 3. Before Using the Receiver ** 1.1 Package Contents 1.2 Front Panel 1.3 Rear Panel 1.4 Remote Control 2. Installation Wizard ** 3.1 Language 3.2 Area Setting 3.3 Antenna Setting 3.4 Automatic Search 3.5 Time Setting 4. Basic Operation ** ** 4.1 Switching Channel 4.2 Volume Control...
... GB19 GB20 GB23 GB23 GB24 GB24 GB27 GB30 GB31 GB31 GB33 GB34 GB 5 ** ** ** plate) 4.7 Option List 5. Setup ** 2.1 Connecting the Antenna 2.2 Powering On 3. Before Using the Receiver ** 1.1 Package Contents 1.2 Front Panel 1.3 Rear Panel 1.4 Remote Control 2. Installation Wizard ** 3.1 Language 3.2 Area Setting 3.3 Antenna Setting 3.4 Automatic Search 3.5 Time Setting 4. Basic Operation ** ** 4.1 Switching Channel 4.2 Volume Control...

User Manual
Page 7
** ** ** ** ** 1. Before Using the Receiver ** This chapter provides detailed instructions on the product and its accessories. ** 1.1 Package Contents Please check all package contents before using your receiver. ** ** ** ** Batteries (2) Remote Control Unit (1) User's Manual (1) ** Note: Since faults may occur if the remote controller is being left without a battery for a long time, always keep the battery inserted in the remote controller. ** GB 7 ** ** ** ** ** ** **
** ** ** ** ** 1. Before Using the Receiver ** This chapter provides detailed instructions on the product and its accessories. ** 1.1 Package Contents Please check all package contents before using your receiver. ** ** ** ** Batteries (2) Remote Control Unit (1) User's Manual (1) ** Note: Since faults may occur if the remote controller is being left without a battery for a long time, always keep the battery inserted in the remote controller. ** GB 7 ** ** ** ** ** ** **

User Manual
Page 8
... Panel ** ** 1. CH - / CH + ** Moves the TV/Radio channel up/down. ** ** 4. RADIO LED ** Amber light is displayed when the receiver is in Radio mode. ** GB 8 ** ** ** ** ** ** ** STANDBY LED ** ** Red light is displayed when the product is in the Standby mode. STANDBY Button ** Switches between TV and ...
... Panel ** ** 1. CH - / CH + ** Moves the TV/Radio channel up/down. ** ** 4. RADIO LED ** Amber light is displayed when the receiver is in Radio mode. ** GB 8 ** ** ** ** ** ** ** STANDBY LED ** ** Red light is displayed when the product is in the Standby mode. STANDBY Button ** Switches between TV and ...

User Manual
Page 10
SOUNDTRACK 9. GUIDE 14. ARROW BUTTONS 7. G (GAME) 12. STANDBY 13. MUTE ** GB 10 ** ** ** ** ** ** ** MENU 11. FREEZE 17. Before Using the Receiver ** 1.4 Remote Control ** ** ** ** ** 1. SOURCE 2. EXIT 15. BACK 6. V-/V+ 19. CH-/CH+ and PAGE-/PAGE+ 10. OPT+ (OPTION) 8. NUMERICAL BUTTONS 4. OK 16. ** ** ** ** ** 1. TV/RADIO 3. LIST 5. SUBTITLE 18. i (INFORMATION) 20.
SOUNDTRACK 9. GUIDE 14. ARROW BUTTONS 7. G (GAME) 12. STANDBY 13. MUTE ** GB 10 ** ** ** ** ** ** ** MENU 11. FREEZE 17. Before Using the Receiver ** 1.4 Remote Control ** ** ** ** ** 1. SOURCE 2. EXIT 15. BACK 6. V-/V+ 19. CH-/CH+ and PAGE-/PAGE+ 10. OPT+ (OPTION) 8. NUMERICAL BUTTONS 4. OK 16. ** ** ** ** ** 1. TV/RADIO 3. LIST 5. SUBTITLE 18. i (INFORMATION) 20.

User Manual
Page 11
.... ** Adjusts the audio volume. ** ** 19. MENU ** Displays the main menu. ** 20. MUTE ** Pauses the audio temporarily. SOURCE ** Selects the input source between TV and satellite receiver. ** 2. LIST ** Displays the channel list. ** 5.
.... ** Adjusts the audio volume. ** ** 19. MENU ** Displays the main menu. ** 20. MUTE ** Pauses the audio temporarily. SOURCE ** Selects the input source between TV and satellite receiver. ** 2. LIST ** Displays the channel list. ** 5.

User Manual
Page 12
... system. (left audio out to left audio in ) ** ** GB 12 ** ** ** ** ** ** ** Note: If you encounter any problem when setting up the receiver. Connecting Hi-Fi system 1 ** Connect the outputs on this receiver to corresponding inputs on your local product distributor. 2.1 Connecting the Antenna 1. Select the most simple setup mode. ** ** ** ** 2. Setup ** This chapter describes...
... system. (left audio out to left audio in ) ** ** GB 12 ** ** ** ** ** ** ** Note: If you encounter any problem when setting up the receiver. Connecting Hi-Fi system 1 ** Connect the outputs on this receiver to corresponding inputs on your local product distributor. 2.1 Connecting the Antenna 1. Select the most simple setup mode. ** ** ** ** 2. Setup ** This chapter describes...

User Manual
Page 13
Connecting Hi-Fi system 2 ** If you wish to connect S/PDIFthe optical S/PDIF terminal and Dolby digital decoder to a wall outlet. 2. The Standby LED indicator is turned on by pressing the STANDBY button at Remote Controller. Connect the power cord of the receiver to listen digital audio, connect as following. ** ** ** 2.2 Powering On 1. Power on Green. ** ** ** ** ** ** ** GB 13 ** ** ** ** ** ** ** ** ** ** 3.
Connecting Hi-Fi system 2 ** If you wish to connect S/PDIFthe optical S/PDIF terminal and Dolby digital decoder to a wall outlet. 2. The Standby LED indicator is turned on by pressing the STANDBY button at Remote Controller. Connect the power cord of the receiver to listen digital audio, connect as following. ** ** ** 2.2 Powering On 1. Power on Green. ** ** ** ** ** ** ** GB 13 ** ** ** ** ** ** ** ** ** ** 3.

User Manual
Page 14
... OK button. Select the appropriate area from the list using the button, and press the OK button. ** GB 14 ** ** ** ** ** ** ** Installation Wizard ** When powering on your receiver for the first time after completing the set the antenna's properties to the previous screen. Note: If you select Back while running the Installation Wizard...
... OK button. Select the appropriate area from the list using the button, and press the OK button. ** GB 14 ** ** ** ** ** ** ** Installation Wizard ** When powering on your receiver for the first time after completing the set the antenna's properties to the previous screen. Note: If you select Back while running the Installation Wizard...
User Manual
Page 16
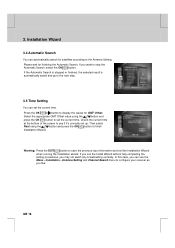
... Setting. If you can automatically search for GMT Offset. Installation - ** ** ** ** ** 3. Press the OK or button to display the values for satellites according to configure your receiver as you may not watch any broadcasting normally. In this case, you want to set the current time. Please wait for finishing the Automatic Search...
... Setting. If you can automatically search for GMT Offset. Installation - ** ** ** ** ** 3. Press the OK or button to display the values for satellites according to configure your receiver as you may not watch any broadcasting normally. In this case, you want to set the current time. Please wait for finishing the Automatic Search...

User Manual
Page 43
... OK 3. Select one option form Stereo or Mono using the button, and press the OK 2. Select Audio Output using the button. or button. 7.6 UHF ** This receiver doesn't provide this function. ** 7.7 Miscellaneous Settings ** 1. Select Preferences using the press the OK or button. Audio Output Set the Audio Output. 1. Press the MENU button...
... OK 3. Select one option form Stereo or Mono using the button, and press the OK 2. Select Audio Output using the button. or button. 7.6 UHF ** This receiver doesn't provide this function. ** 7.7 Miscellaneous Settings ** 1. Select Preferences using the press the OK or button. Audio Output Set the Audio Output. 1. Press the MENU button...

User Manual
Page 47
... close, the LNB may be careful. 1. Please be damaged. Standard If the distance between antenna and receiver is ** within 60m High If the distance between antenna and receiver is supplied to confirm. If you change the setting value to High a message will prompt you to LNB. ** GB... 47 ** ** ** ** ** ** ** When the value is set the LNB Voltage value as High when the distance between antenna and receiver is further than 60m. ** ** ** ** ** ** ** DiSEqC Input You can raise the LNB Voltage value (select High ) preparing for 2.0 and Disable. ...
... close, the LNB may be careful. 1. Please be damaged. Standard If the distance between antenna and receiver is ** within 60m High If the distance between antenna and receiver is supplied to confirm. If you change the setting value to High a message will prompt you to LNB. ** GB... 47 ** ** ** ** ** ** ** When the value is set the LNB Voltage value as High when the distance between antenna and receiver is further than 60m. ** ** ** ** ** ** ** DiSEqC Input You can raise the LNB Voltage value (select High ) preparing for 2.0 and Disable. ...
User Manual
Page 54
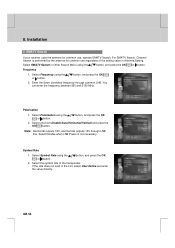
... directly. ** GB 54 ** ** ** ** ** ** ** Enter the down converted frequency through LNB line. For SMATV Search, Channel Search is not necessary. ** Symbol Rate 1. SMATV Search If your receiver uses the antenna for common use , operate SMATV Search. button, and press the OK 2. Frequency 1. If the rate does not exist in Antenna Setting. Installation ** 2.
... directly. ** GB 54 ** ** ** ** ** ** ** Enter the down converted frequency through LNB line. For SMATV Search, Channel Search is not necessary. ** Symbol Rate 1. SMATV Search If your receiver uses the antenna for common use , operate SMATV Search. button, and press the OK 2. Frequency 1. If the rate does not exist in Antenna Setting. Installation ** 2.
User Manual
Page 57
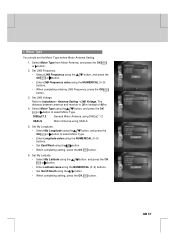
... DiSEqC 1.2 USALS Motor Antenna using the button, and press the OK or button to Installaion - ** ** ** ** ** ** ** 1. Select Motor Type using USALS ** 5. The distance between antenna and receiver is 30 m instead of 60 m. 4. Set My Latitude. ** • Select My Latitude using the or button.
... DiSEqC 1.2 USALS Motor Antenna using the button, and press the OK or button to Installaion - ** ** ** ** ** ** ** 1. Select Motor Type using USALS ** 5. The distance between antenna and receiver is 30 m instead of 60 m. 4. Set My Latitude. ** • Select My Latitude using the or button.
User Manual
Page 63
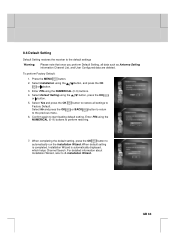
... you perform Default Setting, all data such as Antenna Setting information Channel List, and User Configured data are deleted. ** ** ** ** ** ** ** 8.6 Default Setting Default Setting restores the receiver to return 6. button, press the OK 5.
... you perform Default Setting, all data such as Antenna Setting information Channel List, and User Configured data are deleted. ** ** ** ** ** ** ** 8.6 Default Setting Default Setting restores the receiver to return 6. button, press the OK 5.
User Manual
Page 64
...proper performance of this software update can take 5 ~10 minutes to update software. • Scheduling operation cannot work at the Humax website http://www.humaxdigital.com. However, the manufacturer reserves the right to decide when and where this product, it may cause fatal ...have appropriate loader software. The equipment must be tuned properly to different antennas having different footprints(area where the signal can be received). The software update via a designated antenna system 3. Caution: Please note that the quality of software versions may take place ...
...proper performance of this software update can take 5 ~10 minutes to update software. • Scheduling operation cannot work at the Humax website http://www.humaxdigital.com. However, the manufacturer reserves the right to decide when and where this product, it may cause fatal ...have appropriate loader software. The equipment must be tuned properly to different antennas having different footprints(area where the signal can be received). The software update via a designated antenna system 3. Caution: Please note that the quality of software versions may take place ...
User Manual
Page 68
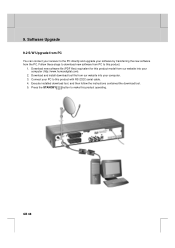
... directly and upgrade your software by transferring the new software from our website into your computer. 3. Software Upgrade ** 9.2 S/W Upgrade from PC ** You can connect your receiver to make this product with RS-232C serial cable. 4. Download new software file (PDF files) equivalent for this product. 1. Follow these steps to download new...
... directly and upgrade your software by transferring the new software from our website into your computer. 3. Software Upgrade ** 9.2 S/W Upgrade from PC ** You can connect your receiver to make this product with RS-232C serial cable. 4. Download new software file (PDF files) equivalent for this product. 1. Follow these steps to download new...

User Manual
Page 69
... information about Hardware version, Software version, Loader version,Update Date, and System ID. ** ** 10.2 Signal Detection You can view the signal strength and signal quality receiving from satellite via your satellite dish. 1. Select System using the button. Confirm the information about the satellite and transponder, which current channel belongs to and...
... information about Hardware version, Software version, Loader version,Update Date, and System ID. ** ** 10.2 Signal Detection You can view the signal strength and signal quality receiving from satellite via your satellite dish. 1. Select System using the button. Confirm the information about the satellite and transponder, which current channel belongs to and...


