

User Manual
Page 24
... Press the OPT+ button. 2. Press the OPT+ button. 2. Select Lock option using the button. Note: When switching to the Locked Channel, you must enter the password to the next channel. ** ** ** ** ** ** ** ** GB 23 ** ** ** button, and press the OK 5. button, and press the OK 4. ...Select Lock using the button. You will be prompted to enter your password to save the changes automatically. Enter password using the button to unlock the channel. 6. Move to the parent menu using the NUMERICAL (0~9) buttons to delete the...
... Press the OPT+ button. 2. Press the OPT+ button. 2. Select Lock option using the button. Note: When switching to the Locked Channel, you must enter the password to the next channel. ** ** ** ** ** ** ** ** GB 23 ** ** ** button, and press the OK 5. button, and press the OK 4. ...Select Lock using the button. You will be prompted to enter your password to save the changes automatically. Enter password using the button to unlock the channel. 6. Move to the parent menu using the NUMERICAL (0~9) buttons to delete the...

User Manual
Page 27
Press the OK or button, select your password. Edit channels - Press the MENU button. 2. button, and press the OK button, and press the 4. And the sub-group of Satellite and Scramble channel list ... enter your desired sub-group using the assigned numeric for the selected sub-group is displayed. ** Note: The sub-group of Channel Search. Select your password using the display its sub-groups. Select Edit Channels using the OK or button. Enter your desired channel group using NUMERICAL (0~9) buttons. The channel list...
Press the OK or button, select your password. Edit channels - Press the MENU button. 2. button, and press the OK button, and press the 4. And the sub-group of Satellite and Scramble channel list ... enter your desired sub-group using the assigned numeric for the selected sub-group is displayed. ** Note: The sub-group of Channel Search. Select your password using the display its sub-groups. Select Edit Channels using the OK or button. Enter your desired channel group using NUMERICAL (0~9) buttons. The channel list...

User Manual
Page 29
... using the NUMERICAL (0~9) buttons to the selected location in the channel list using the button. 2. The selected channel(s) is switched into Unlocked channel. • Enter Password using the button, and press the OK button. When you press Unlock, Locked channel is not available for a while. ** ** 4. Note: Move is switched into Unlock...
... using the NUMERICAL (0~9) buttons to the selected location in the channel list using the button. 2. The selected channel(s) is switched into Unlocked channel. • Enter Password using the button, and press the OK button. When you press Unlock, Locked channel is not available for a while. ** ** 4. Note: Move is switched into Unlock...

User Manual
Page 35
... or restricted by selecting the scheduled programme and pressing the OK button. ** 1. Moves to the next 7 days. 3. Reserving (Reserving a Watching) You can automatically reserve your Password to one day after . Select No and press the OK button not to exit the Time Bar. Day Moves to complete the reservation. ** GB 34...
... or restricted by selecting the scheduled programme and pressing the OK button. ** 1. Moves to the next 7 days. 3. Reserving (Reserving a Watching) You can automatically reserve your Password to one day after . Select No and press the OK button not to exit the Time Bar. Day Moves to complete the reservation. ** GB 34...

User Manual
Page 38
...; If the channel is automatically displayed by watching time, you will be prompted to enter your desired Start Time using the NUMERICAL (0~9) buttons. Enter your Password to ** complete the reservation. ** GB 37 ** ** ** ** ** ** ** Enter your desired channel number using the NUMERICAL (0~9) buttons. Enter your desired End Time using the button. 5. button and...
...; If the channel is automatically displayed by watching time, you will be prompted to enter your desired Start Time using the NUMERICAL (0~9) buttons. Enter your Password to ** complete the reservation. ** GB 37 ** ** ** ** ** ** ** Enter your desired channel number using the NUMERICAL (0~9) buttons. Enter your desired End Time using the button. 5. button and...

User Manual
Page 39
Press the MENU button. 2. button, 2. Press the MENU or EXIT button to ask Password, enter the Password using the NUMERICAL (0~9) buttons. 7.1 Parental Control You can easily select any item from the menu using the NUMERICAL (0~9) buttons. ** ** 1. You can set censorship, watching time, ... environment. ** Note: • Press the BACK or button to save the changes and return to the age level you have set parental control for your Password. 1. ** ** ** ** ** 7.
Press the MENU button. 2. button, 2. Press the MENU or EXIT button to ask Password, enter the Password using the NUMERICAL (0~9) buttons. 7.1 Parental Control You can easily select any item from the menu using the NUMERICAL (0~9) buttons. ** ** 1. You can set censorship, watching time, ... environment. ** Note: • Press the BACK or button to save the changes and return to the age level you have set parental control for your Password. 1. ** ** ** ** ** 7.

User Manual
Page 40
..., and press the OK button 4. Select the Allow Time Control using the NUMERICAL (0~9) buttons, and press OK button. 3. When you have to enter Password to watch the programme which is blocked by Allow Time. Or you wish to watch any programme during unspecified time. 3. Enter New... without considering the age level. Setting Allow Watch Time You can watch programme only while the time specified by the age level. 2. Select Change Password using the button, and press the OK or button. ** Disable You can be watched because there is "0000". Select Enable or Disable the ...
..., and press the OK button 4. Select the Allow Time Control using the NUMERICAL (0~9) buttons, and press OK button. 3. When you have to enter Password to watch the programme which is blocked by Allow Time. Or you wish to watch any programme during unspecified time. 3. Enter New... without considering the age level. Setting Allow Watch Time You can watch programme only while the time specified by the age level. 2. Select Change Password using the button, and press the OK or button. ** Disable You can be watched because there is "0000". Select Enable or Disable the ...
User Manual
Page 49
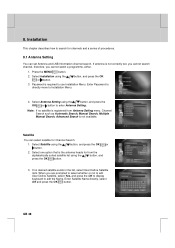
...whether or not to edit User Define Satellite, select Yes, and press the OK to display keyboard to edit the Name. Enter Password to directly move to use Installation Menu. Select Antenna Setting using the button. If no satellite is registered from the alphabetically sorted ... menu, Channel Search such as Automatic Search, Manual Search, Multiple Manual Search, Advanced Search is the antenna heads for Channel Search. 1. Password is not correctly set Antenna and LNB Information channel search. Note: If no desired satellite exists in the list, select User Define Satellite item...
...whether or not to edit User Define Satellite, select Yes, and press the OK to display keyboard to edit the Name. Enter Password to directly move to use Installation Menu. Select Antenna Setting using the button. If no satellite is registered from the alphabetically sorted ... menu, Channel Search such as Automatic Search, Manual Search, Multiple Manual Search, Advanced Search is the antenna heads for Channel Search. 1. Password is not correctly set Antenna and LNB Information channel search. Note: If no desired satellite exists in the list, select User Define Satellite item...

User Manual
Page 67
... OK button to start upgrading. Select Installation using the NUMERICAL (0~9) buttons. 4. When completing the software update, the equipment is automatically powered off and on 1. Enter Password using the or button. button, and press the OK or ** 3. Select Yes and press the OK Select No and press the OK menu. Please wait...
... OK button to start upgrading. Select Installation using the NUMERICAL (0~9) buttons. 4. When completing the software update, the equipment is automatically powered off and on 1. Enter Password using the or button. button, and press the OK or ** 3. Select Yes and press the OK Select No and press the OK menu. Please wait...


