

User Manual
Page 3
...manual carefully and make the user aware of possible problems and information of any importance to help the user to understand, to use and to maintain the installation. ** ** To reduce the risk of electric shock or personal injury. ** This symbol indicates important instructions accompanying the product. No user serviceable parts... information to the user to the following marks that presents a risk of electric shock, do not remove cover (or back). GB 2 Warnings, Cautions and Notes Throughout the whole manual, pay special attention to make sure you understand the provided instructions....
...manual carefully and make the user aware of possible problems and information of any importance to help the user to understand, to use and to maintain the installation. ** ** To reduce the risk of electric shock or personal injury. ** This symbol indicates important instructions accompanying the product. No user serviceable parts... information to the user to the following marks that presents a risk of electric shock, do not remove cover (or back). GB 2 Warnings, Cautions and Notes Throughout the whole manual, pay special attention to make sure you understand the provided instructions....
User Manual
Page 4
... ** Disconnect the product from the satellite dish. ATTACHMENTS ** Do not use any maintenance or installation procedures ** 2. CONNECTION TO THE TV ** Disconnect the product from the mains before connecting or disconnecting the cable from the wall outlet before cleaning. ** Use a light damp cloth (no objects filled with SABS 061. Disconnect the receiver from the type of power source indicated on the apparatus. ** 4. Please...
... ** Disconnect the product from the satellite dish. ATTACHMENTS ** Do not use any maintenance or installation procedures ** 2. CONNECTION TO THE TV ** Disconnect the product from the mains before connecting or disconnecting the cable from the wall outlet before cleaning. ** Use a light damp cloth (no objects filled with SABS 061. Disconnect the receiver from the type of power source indicated on the apparatus. ** 4. Please...

User Manual
Page 7
... Option List 5. Channel List ** 5.1 Displaying and Switching Channel List 5.2 Changing Channel List Group 5.3 Edit Channels 5.4 Edit Favourite Channels 5.5 Channel Change Mode GB9 GB9 GB10 GB11 GB12 GB16 GB16 GB17 GB18 GB18 GB18 GB19 GB20 GB20 GB21 GB21 GB21 GB21 GB22 GB22 GB24 GB27 GB27 GB27 GB28 GB31 GB34 GB 6 Setup ** 2.1 Connecting the Antenna 2.2 Powering On 3. Contents ** 1. Before Using the Receiver ** 1.1 Package Contents 1.2 Front Panel 1.3 Rear Panel 1.4 Remote Control 2. Basic Operation ** 4.1 Switching Channel 4.2 Volume Control 4.3 Change the Subtitle Language 4.4 Change...
... Option List 5. Channel List ** 5.1 Displaying and Switching Channel List 5.2 Changing Channel List Group 5.3 Edit Channels 5.4 Edit Favourite Channels 5.5 Channel Change Mode GB9 GB9 GB10 GB11 GB12 GB16 GB16 GB17 GB18 GB18 GB18 GB19 GB20 GB20 GB21 GB21 GB21 GB21 GB22 GB22 GB24 GB27 GB27 GB27 GB28 GB31 GB34 GB 6 Setup ** 2.1 Connecting the Antenna 2.2 Powering On 3. Contents ** 1. Before Using the Receiver ** 1.1 Package Contents 1.2 Front Panel 1.3 Rear Panel 1.4 Remote Control 2. Basic Operation ** 4.1 Switching Channel 4.2 Volume Control 4.3 Change the Subtitle Language 4.4 Change...
User Manual
Page 12
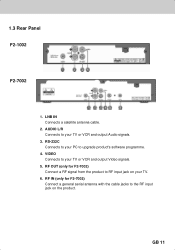
LNB IN ** Connects a satellite antenna cable. ** 2. VIDEO ** Connects to upgrade product's software programme. ** 4. GB 11 RS-232C ** Connects to your PC to your TV or VCR and output Video signals. ** 5. RF OUT (only for F2-7002) ** Connect a general aerial antenna with the cable jacks to your TV. ** 6. RF IN (only for F2-7002) ** Connect a RF signal from the product to RF input jack on the product. AUDIO L/R ** Connects to the RF input jack on your TV or VCR and output Audio signals. ** 3. ** ** 1.3 Rear Panel ** F2-1002 ** F2-7002 ** 1.
LNB IN ** Connects a satellite antenna cable. ** 2. VIDEO ** Connects to upgrade product's software programme. ** 4. GB 11 RS-232C ** Connects to your PC to your TV or VCR and output Video signals. ** 5. RF OUT (only for F2-7002) ** Connect a general aerial antenna with the cable jacks to your TV. ** 6. RF IN (only for F2-7002) ** Connect a RF signal from the product to RF input jack on the product. AUDIO L/R ** Connects to the RF input jack on your TV or VCR and output Audio signals. ** 3. ** ** 1.3 Rear Panel ** F2-1002 ** F2-7002 ** 1.
User Manual
Page 14
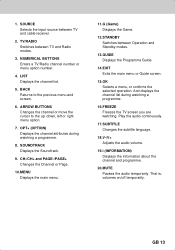
... the input source between Operation and Standby modes. ** 13.GUIDE ** Displays the Programme Guide. ** 14.EXIT ** Exits the main menu or Guide screen. ** 15.OK ** Selects a menu, or confirms the selected operation. LIST ** Displays the channel list. ** 5. CH-/CH+ and PAGE-/PAGE+ ** Changes the Channel or Page. ** 10.MENU ** Displays the main menu. ** 11.G (Game) ** Displays the Game. ** 12.STANDBY ** Switches between TV and cable receiver. ** 2. Play the audio continuously. ** 17.SUBTITLE ** Changes the subtitle language. ** 18.V-/V+ ** Adjusts the audio volume. ** 19.i (INFORMATION...
... the input source between Operation and Standby modes. ** 13.GUIDE ** Displays the Programme Guide. ** 14.EXIT ** Exits the main menu or Guide screen. ** 15.OK ** Selects a menu, or confirms the selected operation. LIST ** Displays the channel list. ** 5. CH-/CH+ and PAGE-/PAGE+ ** Changes the Channel or Page. ** 10.MENU ** Displays the main menu. ** 11.G (Game) ** Displays the Game. ** 12.STANDBY ** Switches between TV and cable receiver. ** 2. Play the audio continuously. ** 17.SUBTITLE ** Changes the subtitle language. ** 18.V-/V+ ** Adjusts the audio volume. ** 19.i (INFORMATION...
User Manual
Page 16
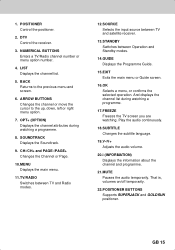
...the input source between TV and satellite receiver. ** 13.STANDBY ** Switches between Operation and Standby modes. ** 14.GUIDE ** Displays the Programme Guide. ** 15.EXIT ** Exits the main menu or Guide screen. ** 16.OK ** Selects a menu, or confirms the selected operation. LIST ** Displays the channel list. ** 5. OPT+ (OPTION) ** Displays the channel attributes during watching a programme. ** 17.FREEZE ** Freezes the TV screen you are watching. Play the audio continuously. ** 18.SUBTITLE ** Changes the subtitle language. ** 19.V-/V+ ** Adjusts the audio volume. ** 20.i (INFORMATION...
...the input source between TV and satellite receiver. ** 13.STANDBY ** Switches between Operation and Standby modes. ** 14.GUIDE ** Displays the Programme Guide. ** 15.EXIT ** Exits the main menu or Guide screen. ** 16.OK ** Selects a menu, or confirms the selected operation. LIST ** Displays the channel list. ** 5. OPT+ (OPTION) ** Displays the channel attributes during watching a programme. ** 17.FREEZE ** Freezes the TV screen you are watching. Play the audio continuously. ** 18.SUBTITLE ** Changes the subtitle language. ** 19.V-/V+ ** Adjusts the audio volume. ** 20.i (INFORMATION...

User Manual
Page 20
... button to display satellites list. Select LNB frequency using 22kHz tone switch, select Enable. If you complete the setting, select Next using the button and press the OK button to start Automatic Search. When using the button, and press the OK button. Select satellite using the button, and press the OK or button to watch the programme. 1. Also, if you select Universal, 22KHz tone value is correctly set the antenna's properties to change the setting. ** ** 3.3 Antenna Setting You can set...
... button to display satellites list. Select LNB frequency using 22kHz tone switch, select Enable. If you complete the setting, select Next using the button and press the OK button to start Automatic Search. When using the button, and press the OK button. Select satellite using the button, and press the OK or button to watch the programme. 1. Also, if you select Universal, 22KHz tone value is correctly set the antenna's properties to change the setting. ** ** 3.3 Antenna Setting You can set...

User Manual
Page 22
... desired subtitle language using the Programme Guide or Channel List. button to the channel directly. 3. Select your desired channel numeric using one of the screen. 3. Language Setting - GB 21 Basic Operation ** This chapter describes functions such as switching channel, volume control, and basic features for watching programmes. 4.1 Switching Channel You can select a default subtitle language by selecting MENU - Press the MUTE buttons to switch between TV channel and Radio channel. Press the SUBTITLE language list. Then the subtitle will be displayed...
... desired subtitle language using the Programme Guide or Channel List. button to the channel directly. 3. Select your desired channel numeric using one of the screen. 3. Language Setting - GB 21 Basic Operation ** This chapter describes functions such as switching channel, volume control, and basic features for watching programmes. 4.1 Switching Channel You can select a default subtitle language by selecting MENU - Press the MUTE buttons to switch between TV channel and Radio channel. Press the SUBTITLE language list. Then the subtitle will be displayed...

User Manual
Page 37
... is located. Viewing Programme Information Using Time Bar You can automatically reserve your Password. If you press the button repeatedly, the same operation is locked, parental controlled or restricted by watching time, you will be prompted to one day before . Moves to the next 7 days. 3. Press the GUIDE button. 2. button not to complete the reservation. Enter your Password to reserve 4. Day Moves to move as follows. Each button functions as...
... is located. Viewing Programme Information Using Time Bar You can automatically reserve your Password. If you press the button repeatedly, the same operation is locked, parental controlled or restricted by watching time, you will be prompted to one day before . Moves to the next 7 days. 3. Press the GUIDE button. 2. button not to complete the reservation. Enter your Password to reserve 4. Day Moves to move as follows. Each button functions as...

User Manual
Page 50
... for from Antenna Setting menu, Channel Search such as Automatic Search, Manual Search, Multiple Manual Search, Advanced Search is not correctly set Antenna and LNB Information for Channel Search. 1. 8. button, and press the 3. Enter Password to directly move to use Installation Menu. Press the MENU button. 2. GB 49 Password is registered from the alphabetically sorted satellite list using the button, and press the OK or button to search for channels and a series of procedures. 8.1 Antenna Setting You can select satellite for channel search. When you cannot watch...
... for from Antenna Setting menu, Channel Search such as Automatic Search, Manual Search, Multiple Manual Search, Advanced Search is not correctly set Antenna and LNB Information for Channel Search. 1. 8. button, and press the 3. Enter Password to directly move to use Installation Menu. Press the MENU button. 2. GB 49 Password is registered from the alphabetically sorted satellite list using the button, and press the OK or button to search for channels and a series of procedures. 8.1 Antenna Setting You can select satellite for channel search. When you cannot watch...

User Manual
Page 51
... Installation ** Satellite Alternative You can enter LNB Frequency. 1. button, and 2. Enable Searches the selected satellite. ** Note: If there is no satellite that Satellite Alternative is set to the 22kHz tone switch box. In this case, the 22kHz tone value is not available. ** LNB Frequency (MHz) You can search and watch a programme by using the OK or button. ** Enable Selects Enable if Dual LNB is not used or 2 antennas are connected to Enable, Channel Search is disabled...
... Installation ** Satellite Alternative You can enter LNB Frequency. 1. button, and 2. Enable Searches the selected satellite. ** Note: If there is no satellite that Satellite Alternative is set to the 22kHz tone switch box. In this case, the 22kHz tone value is not available. ** LNB Frequency (MHz) You can search and watch a programme by using the OK or button. ** Enable Selects Enable if Dual LNB is not used or 2 antennas are connected to Enable, Channel Search is disabled...

User Manual
Page 58
... as those of Automatic Search. Multiple Manual Search If you can complete setting and start SMATV Search. 2. Select one option among Satellite, Edit TP List, Scrambled Type, Channel Type using the button, press the OK or button to search multiple transponder at the same time, you wish to enable the Multiple Manual Search. 2. Select Multiple Manual Search from Other Search Menu using the button, and press the OK or button. Refer to Manual Search. ** ** Symbol Rate 1. Select Symbol...
... as those of Automatic Search. Multiple Manual Search If you can complete setting and start SMATV Search. 2. Select one option among Satellite, Edit TP List, Scrambled Type, Channel Type using the button, press the OK or button to search multiple transponder at the same time, you wish to enable the Multiple Manual Search. 2. Select Multiple Manual Search from Other Search Menu using the button, and press the OK or button. Refer to Manual Search. ** ** Symbol Rate 1. Select Symbol...

User Manual
Page 59
... data. Note: When you select Default List and press OK default transponder list is displayed. ** GB 58 8. button to delete. 5. When completing configuring transponder list, select Save and press the OK or button. Select a specific transponder from the transponder list, press the OK button, select Delete, and then press the OK button to search at a time and change the setting for Transponder. 1. Installation ** Edit TP List You can select multiple transponders to add a new...
... data. Note: When you select Default List and press OK default transponder list is displayed. ** GB 58 8. button to delete. 5. When completing configuring transponder list, select Save and press the OK or button. Select a specific transponder from the transponder list, press the OK button, select Delete, and then press the OK button to search at a time and change the setting for Transponder. 1. Installation ** Edit TP List You can select multiple transponders to add a new...

User Manual
Page 60
...restore all data such as Antenna Setting information Channel List, and User Configured data are deleted. GB 59 When completing the default setting, press the OK button to Factory Default. Enter password using the or button. Installation Wizard. Select No and press the OK or BACK button to return to perform restoring. 7. For detailed information about Installation Wizard, refer to start loading default setting. Enter password using the OK or button. Select Installation using the NUMERICAL(0~9) button. 4. When default setting is completed, Installation Wizard is...
...restore all data such as Antenna Setting information Channel List, and User Configured data are deleted. GB 59 When completing the default setting, press the OK button to Factory Default. Enter password using the or button. Installation Wizard. Select No and press the OK or BACK button to return to perform restoring. 7. For detailed information about Installation Wizard, refer to start loading default setting. Enter password using the OK or button. Select Installation using the NUMERICAL(0~9) button. 4. When default setting is completed, Installation Wizard is...

User Manual
Page 61
... may be received). GB 60 9. Over the Air (OTA) is high. It is only limited to certain geographical regions mainly due to keep the power on and the power cord plugged in during software update. The equipment should have the most up-to pull out the signal line (LNB Cable) during software update. Upgrade software when the quality of "over the air via a designated antenna system 3. If...
... may be received). GB 60 9. Over the Air (OTA) is high. It is only limited to certain geographical regions mainly due to keep the power on and the power cord plugged in during software update. The equipment should have the most up-to pull out the signal line (LNB Cable) during software update. Upgrade software when the quality of "over the air via a designated antenna system 3. If...

User Manual
Page 63
... new software is automatically powered off and on again. When completing the software update, the product is not found by Automatic, use Manual Update. 5. Select Automatic from Software Update Menu screen using Automatic Update You can set to find HUMAX software update site and update software automatically. 2. Antenna Setting - When detecting update software, the following table. Software Update ** 4. Satellite Alternative menu and that have all other Antenna Setting correct. ** GB 62 Note: Software Update Sites of HUMAX, the software search operation is displayed...
... new software is automatically powered off and on again. When completing the software update, the product is not found by Automatic, use Manual Update. 5. Select Automatic from Software Update Menu screen using Automatic Update You can set to find HUMAX software update site and update software automatically. 2. Antenna Setting - When detecting update software, the following table. Software Update ** 4. Satellite Alternative menu and that have all other Antenna Setting correct. ** GB 62 Note: Software Update Sites of HUMAX, the software search operation is displayed...

User Manual
Page 64
... User Define Transponder data in the List, select User Define and enter manually. 5. Please wait until it is provided. 3. For unlisted satellite, start button to return to the Manual Update Menu. 8. Enter Transponder Frequency in which updated software is not found in Manual Search. If it is completed. 10.When completing the software update, the product is displayed whether or not New Software exist. Select FEC value. Note: How to setting Satellite and Transponder for Manual Update...
... User Define Transponder data in the List, select User Define and enter manually. 5. Please wait until it is provided. 3. For unlisted satellite, start button to return to the Manual Update Menu. 8. Enter Transponder Frequency in which updated software is not found in Manual Search. If it is completed. 10.When completing the software update, the product is displayed whether or not New Software exist. Select FEC value. Note: How to setting Satellite and Transponder for Manual Update...

User Manual
Page 69
... Audio button to connecting TV and antenna. - Reservation is off. Replace LNB with new one if it not overlapped with the one if satellite dish is plugged into bigger one with low nise factor if the noise factor is correct. - Remote controller does not operate ** - Check the main power cable and check that Antenna line is damaged or out of Remote controller. 6. Use 75 coaxial cable to change the Sound Track type. 5. The receiving...
... Audio button to connecting TV and antenna. - Reservation is off. Replace LNB with new one if it not overlapped with the one if satellite dish is plugged into bigger one with low nise factor if the noise factor is correct. - Remote controller does not operate ** - Check the main power cable and check that Antenna line is damaged or out of Remote controller. 6. Use 75 coaxial cable to change the Sound Track type. 5. The receiving...

User Manual
Page 70
satellite. Satellite dish is internally shorten. Wrong antenna setting. Change the LNB. LNB is too small. Remove the alien substance and contact local service center if it is inserted by alien substance or damaged. Increase the LNB voltage or connect a signal amplifier. Change to confirm if the channel has Audio. Set the antenna correctly. Press the Audio button to a large dish. Replace LNB Cable. Replace LNB. LNB In Port is damaged. ** ** 13.2 Error Message Error message No or bad signal The audio is not pointing at...
satellite. Satellite dish is internally shorten. Wrong antenna setting. Change the LNB. LNB is too small. Remove the alien substance and contact local service center if it is inserted by alien substance or damaged. Increase the LNB voltage or connect a signal amplifier. Change to confirm if the channel has Audio. Set the antenna correctly. Press the Audio button to a large dish. Replace LNB Cable. Replace LNB. LNB In Port is damaged. ** ** 13.2 Error Message Error message No or bad signal The audio is not pointing at...
User Manual
Page 73
... a signal on the screen directly. Glossary ** DiSEqC (Digital Satellite Equipment Control) A standard through satellite system. ** Transponder An automatic device that the user needs or has to high frequency. OSD information includes brightness, contrast, tuning, RGB adjustment, and screen size and positions (top, left, width, and height), and so on the satellite dish. Sometimes it is the range of an audio device such as stereo tape recorder. ** LNB (Low Noise Block...
... a signal on the screen directly. Glossary ** DiSEqC (Digital Satellite Equipment Control) A standard through satellite system. ** Transponder An automatic device that the user needs or has to high frequency. OSD information includes brightness, contrast, tuning, RGB adjustment, and screen size and positions (top, left, width, and height), and so on the satellite dish. Sometimes it is the range of an audio device such as stereo tape recorder. ** LNB (Low Noise Block...


