

User Manual
Page 1
Digital Terrestrial MHP Receiver The default PIN Code is set to 0000. User's Manual DTT nano
Digital Terrestrial MHP Receiver The default PIN Code is set to 0000. User's Manual DTT nano
User Manual
Page 2
...provide information on the characteristics of Telenor Conax AS. Warranty The warranty does not cover parts which could result in the manual. GB2 User's Manual Note: You can download the electronic version of prior notice for additions or changes that indicate hazardous situations. • ... additional information to make the user aware of possible problems and information of the product in the future. Humax srl has no obligation of the user's manual from the website www.humaxdigital.com. The information and features of any importance to change without prior notice....
...provide information on the characteristics of Telenor Conax AS. Warranty The warranty does not cover parts which could result in the manual. GB2 User's Manual Note: You can download the electronic version of prior notice for additions or changes that indicate hazardous situations. • ... additional information to make the user aware of possible problems and information of the product in the future. Humax srl has no obligation of the user's manual from the website www.humaxdigital.com. The information and features of any importance to change without prior notice....
User Manual
Page 3
... is expired. Refer servicing to the principle one in the application of the administrative fines according to an authorized collection center for one. GB3 User's Manual This means that the customer must be supported. The symbol with the crossed refuse bin, present on the product, indicates that presents a risk of the...
... is expired. Refer servicing to the principle one in the application of the administrative fines according to an authorized collection center for one. GB3 User's Manual This means that the customer must be supported. The symbol with the crossed refuse bin, present on the product, indicates that presents a risk of the...
User Manual
Page 4
... the product. 6. Please read the following safety precautions carefully. ATTACHMENTS • Do not use any object, and do so can damage the aerial. 8. GB4 User's Manual LOCATION • Place the product indoors to avoid exposing it to lightning, rain or sun. • Do not place it near a radiator or heat register...
... the product. 6. Please read the following safety precautions carefully. ATTACHMENTS • Do not use any object, and do so can damage the aerial. 8. GB4 User's Manual LOCATION • Place the product indoors to avoid exposing it to lightning, rain or sun. • Do not place it near a radiator or heat register...
User Manual
Page 5
... side of lightning. 3. LIGHTNING, STORM or NOT IN USE • Unplug the product from melting. • The mains plug, as the original part. GB5 User's Manual Warning 1.
... side of lightning. 3. LIGHTNING, STORM or NOT IN USE • Unplug the product from melting. • The mains plug, as the original part. GB5 User's Manual Warning 1.
User Manual
Page 6
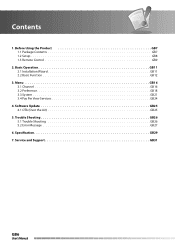
Service and Support GB31 GB6 User's Manual Software Update GB25 4.1 OTA (Over the Air GB25 5. Specification GB29 7. Trouble Shooting GB26 5.1 Trouble Shooting GB26 5.2 Error Message GB27 6. Menu GB16 3.1 Channel GB16 3.2 Preference GB18 3.3 System GB21 3.4 Pay Per View Services GB24 4. Contents 1. Before Using the Product GB7 1.1 Package Contents GB7 1.2 Setup GB8 1.3 Remote Control GB9 2. Basic Operation GB11 2.1 Installation Wizard GB11 2.2 Basic Function GB12 3.
Service and Support GB31 GB6 User's Manual Software Update GB25 4.1 OTA (Over the Air GB25 5. Specification GB29 7. Trouble Shooting GB26 5.1 Trouble Shooting GB26 5.2 Error Message GB27 6. Menu GB16 3.1 Channel GB16 3.2 Preference GB18 3.3 System GB21 3.4 Pay Per View Services GB24 4. Contents 1. Before Using the Product GB7 1.1 Package Contents GB7 1.2 Setup GB8 1.3 Remote Control GB9 2. Basic Operation GB11 2.1 Installation Wizard GB11 2.2 Basic Function GB12 3.
User Manual
Page 7
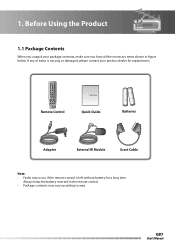
Before Using the Product 1.1 Package Contents When you have all the necessary items shown in the remote control. • Package contents may occur if the remote control is missing or damaged, please contact your package contents, make sure you unpack your product dealer for a long time. Always keep the battery inserted in figure below. Remote Control Quick Guide Quick Guide Batteries Adapter External IR Module Scart Cable Note: • Faults may vary according to area. 1. GB7 User's Manual If any of items is left without battery for replacement.
Before Using the Product 1.1 Package Contents When you have all the necessary items shown in the remote control. • Package contents may occur if the remote control is missing or damaged, please contact your package contents, make sure you unpack your product dealer for a long time. Always keep the battery inserted in figure below. Remote Control Quick Guide Quick Guide Batteries Adapter External IR Module Scart Cable Note: • Faults may vary according to area. 1. GB7 User's Manual If any of items is left without battery for replacement.
User Manual
Page 8
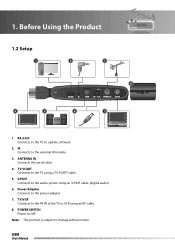
1. GB8 User's Manual IR Connects to change without notice. TV SCART Connects to the TV using an S/PDIF cable. (digital audio) 6. S/PDIF Connects to the RF IN of the TV or VCR using an RF cable. 8. Note: The product is subject to the external IR module. 3. Before Using the Product 1.2 Setup 1 2 3 4 5 8 ANTENNA IN TV/VCR 6 7 1. ANTENNA IN Connects the aerial cable. 4. Power Adapter Connects to update software. 2. RS-232C Connects to the PC to the power adapter. 7. TV/VCR Connects to the audio system using a TV SCART cable. 5. POWER SWITCH Power on/off.
1. GB8 User's Manual IR Connects to change without notice. TV SCART Connects to the TV using an S/PDIF cable. (digital audio) 6. S/PDIF Connects to the RF IN of the TV or VCR using an RF cable. 8. Note: The product is subject to the external IR module. 3. Before Using the Product 1.2 Setup 1 2 3 4 5 8 ANTENNA IN TV/VCR 6 7 1. ANTENNA IN Connects the aerial cable. 4. Power Adapter Connects to update software. 2. RS-232C Connects to the PC to the power adapter. 7. TV/VCR Connects to the audio system using a TV SCART cable. 5. POWER SWITCH Power on/off.
User Manual
Page 9
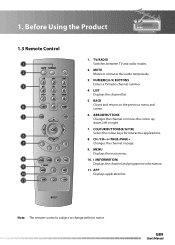
... list. 18 19 Note: The remote control is subject to the previous m1e3nu and 6. BACK Closes and screen. returns to change without notice. GB9 User's Manual ARROW BUTTONS Changes the channel or moves the c1u4rsor up, down, left or right. 7. MENU Displays the main menu. 10.
... list. 18 19 Note: The remote control is subject to the previous m1e3nu and 6. BACK Closes and screen. returns to change without notice. GB9 User's Manual ARROW BUTTONS Changes the channel or moves the c1u4rsor up, down, left or right. 7. MENU Displays the main menu. 10.
User Manual
Page 10
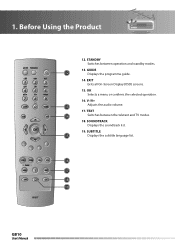
EXIT Exits all On-Screen Display (OSD) screens. 15. GUIDE 12 Displays the programme guide. 14. TEXT 14 Switches between operation and standby modes. 13. Before Using the Product 12. OK Selects a menu or confirms the selected operation. 16. SUBTITLE 15 Displays the subtitle language list. 16 17 18 19 GB10 User's Manual STANDBY Switches between the teletext and TV modes. 18. SOUNDTRACK Displays the soundtrack list. 19. 1. V-/V+ 13 Adjusts the audio volume. 17.
EXIT Exits all On-Screen Display (OSD) screens. 15. GUIDE 12 Displays the programme guide. 14. TEXT 14 Switches between operation and standby modes. 13. Before Using the Product 12. OK Selects a menu or confirms the selected operation. 16. SUBTITLE 15 Displays the subtitle language list. 16 17 18 19 GB10 User's Manual STANDBY Switches between the teletext and TV modes. 18. SOUNDTRACK Displays the soundtrack list. 19. 1. V-/V+ 13 Adjusts the audio volume. 17.
User Manual
Page 11
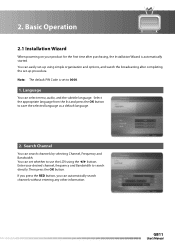
... whether to save the selected language as a default language. 2. Then press the OK button. You can select menu, audio, and the subtitle language. GB11 User's Manual 2. Language You can set -up procedure. Select the appropriate language from the list and press the OK button to use the LCN using simple organization...
... whether to save the selected language as a default language. 2. Then press the OK button. You can select menu, audio, and the subtitle language. GB11 User's Manual 2. Language You can set -up procedure. Select the appropriate language from the list and press the OK button to use the LCN using simple organization...
User Manual
Page 12
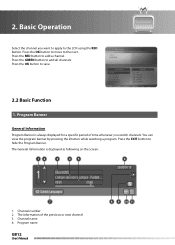
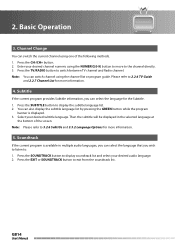
Press the EXIT button to add a channel. Channel number 2. Program name GB12 User's Manual Basic Operation Select the channel you switch channels. Puntata ... 09:00 09:45 Subtitle Languages 6 29/08 04:18 OK 7 8 9 10 11 1. Press the RED ...
Press the EXIT button to add a channel. Channel number 2. Program name GB12 User's Manual Basic Operation Select the channel you switch channels. Puntata ... 09:00 09:45 Subtitle Languages 6 29/08 04:18 OK 7 8 9 10 11 1. Press the RED ...
User Manual
Page 13
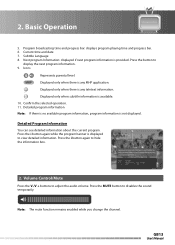
... information. 9. Press the button to disables the sound temporarily. Confirm the selected operation. 11. Press the i button again to adjust the audio volume. GB13 User's Manual Subtitle Language 8. Detailed program information Note: If there is no available program information, program information is available. 10. Note: The mute function remains enabled while...
... information. 9. Press the button to disables the sound temporarily. Confirm the selected operation. 11. Press the i button again to adjust the audio volume. GB13 User's Manual Subtitle Language 8. Detailed program information Note: If there is no available program information, program information is available. 10. Note: The mute function remains enabled while...
User Manual
Page 14
.... 2. Basic Operation 3. Press the TV/RADIO button to exit from the soundtrack list. Please refer to 3.2.6 Subtitle and 3.3.2 Language Options for more information. 5. GB14 User's Manual Then the subtitle will be displayed in multiple audio languages, you can select the language that you can switch the current channel using the channel...
.... 2. Basic Operation 3. Press the TV/RADIO button to exit from the soundtrack list. Please refer to 3.2.6 Subtitle and 3.3.2 Language Options for more information. 5. GB14 User's Manual Then the subtitle will be displayed in multiple audio languages, you can select the language that you can switch the current channel using the channel...
User Manual
Page 15
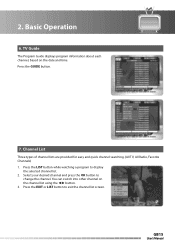
Press the LIST button while watching a program to change the channel. GB15 User's Manual 2. Select your desired channel and press the OK button to display the selected channel list. 2. Basic Operation 6. You can switch into other channel on the ...
Press the LIST button while watching a program to change the channel. GB15 User's Manual 2. Select your desired channel and press the OK button to display the selected channel list. 2. Basic Operation 6. You can switch into other channel on the ...
User Manual
Page 16
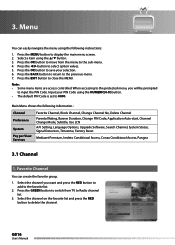
... the previous-menu. 7. When accessing to the protected menu, you want and press the RED button to add to input the PIN Code. GB16 User's Manual Main Menu shows the following instructions: 1. Press the EXIT button to the sub-menu. 4. Select a item using the following information : Channel Preference System Pay per...
... the previous-menu. 7. When accessing to the protected menu, you want and press the RED button to add to input the PIN Code. GB16 User's Manual Main Menu shows the following instructions: 1. Press the EXIT button to the sub-menu. 4. Select a item using the following information : Channel Preference System Pay per...
User Manual
Page 17
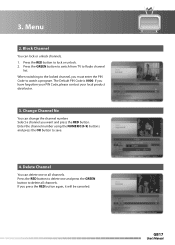
... contact your local product distributor. 3. Press the RED button to delete one or all channels. If you want and press the RED button. GB17 User's Manual Press the GREEN button to switch from TV to delete all channels. Change Channel No You can lock or unlock channels. 1. 3.
... contact your local product distributor. 3. Press the RED button to delete one or all channels. If you want and press the RED button. GB17 User's Manual Press the GREEN button to switch from TV to delete all channels. Change Channel No You can lock or unlock channels. 1. 3.
User Manual
Page 18
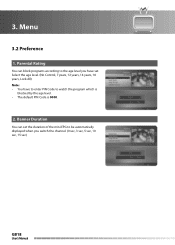
Select the age level. (No Control, 7 years, 12 years, 14 years, 18 years, Lock All) Note: • You have set the duration of the mini EPG to watch the program which is blocked by the age level. • The default PIN Code is 0000. 2. Banner Duration You can block programs according to the age level you have to enter PIN Code to be automatically displayed when you switch the channel. (0 sec, 3 sec, 5 sec, 10 sec, 15 sec) GB18 User's Manual Menu 3.2 Preference 1. Parental Rating You can set . 3.
Select the age level. (No Control, 7 years, 12 years, 14 years, 18 years, Lock All) Note: • You have set the duration of the mini EPG to watch the program which is blocked by the age level. • The default PIN Code is 0000. 2. Banner Duration You can block programs according to the age level you have to enter PIN Code to be automatically displayed when you switch the channel. (0 sec, 3 sec, 5 sec, 10 sec, 15 sec) GB18 User's Manual Menu 3.2 Preference 1. Parental Rating You can set . 3.
User Manual
Page 19
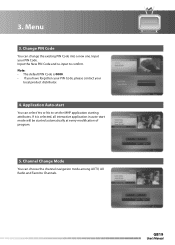
... PIN Code is selected, all interactive application in auto-start You can select Yes or No to confirm. Input your local product distributor. 4. GB19 User's Manual Menu 3. Application Auto-start mode will be started automatically at every modification of program. 5. Channel Change Mode You can change the existing PIN Code into...
... PIN Code is selected, all interactive application in auto-start You can select Yes or No to confirm. Input your local product distributor. 4. GB19 User's Manual Menu 3. Application Auto-start mode will be started automatically at every modification of program. 5. Channel Change Mode You can change the existing PIN Code into...
User Manual
Page 20
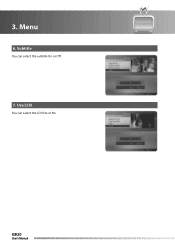
Menu 6. GB20 User's Manual Use LCN You can select the subtitle On or Off. 7. Subtitle You can select the LCN Yes or No. 3.
Menu 6. GB20 User's Manual Use LCN You can select the subtitle On or Off. 7. Subtitle You can select the LCN Yes or No. 3.


