

User Manual
Page 5
... STB. Connect one end of multi-feed equipment. Connect a Satellite antenna To the digital receiver, you can connect it to the RF output connector of the DiSEqC switch and the other LNBs. 4. When you can connect either a single satellite antenna directly or through the antenna cable. 4. Reference 1. Connect the coaxial cable from the first LNB to the LNB 1 or LNB A input connector of 0/12V-steerage, connect it via the loop through converter boxes 1. You can use...
... STB. Connect one end of multi-feed equipment. Connect a Satellite antenna To the digital receiver, you can connect it to the RF output connector of the DiSEqC switch and the other LNBs. 4. When you can connect either a single satellite antenna directly or through the antenna cable. 4. Reference 1. Connect the coaxial cable from the first LNB to the LNB 1 or LNB A input connector of 0/12V-steerage, connect it via the loop through converter boxes 1. You can use...
User Manual
Page 6
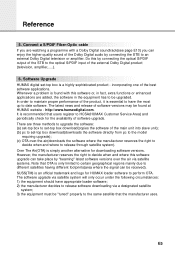
... the external Dolby Digital product (television, amplifier,.....). 6. Software Upgrade HUMAX digital set -top box download(downloads the software directly from pc to the model requiring upgrade); (c) OTA over the air via a designated satellite system; 3) the equipment must be found with a Dolby Digital soundtrack(see page E13) you are watching a programme with this software or, in fact, extra functions or enhanced applications are three methods to upgrade the software: (a) set-top box to the optical S/PDIF input of software upgrade...
... the external Dolby Digital product (television, amplifier,.....). 6. Software Upgrade HUMAX digital set -top box download(downloads the software directly from pc to the model requiring upgrade); (c) OTA over the air via a designated satellite system; 3) the equipment must be found with a Dolby Digital soundtrack(see page E13) you are watching a programme with this software or, in fact, extra functions or enhanced applications are three methods to upgrade the software: (a) set-top box to the optical S/PDIF input of software upgrade...

User Manual
Page 8
E7 Rear Panel 1 MODEM Use to connect telephon line. 2 LNB IN Use to connect an antenna. 3 LNB OUT Use it when connecting to another STB. 4 RS-232C Use it when connecting to your PC. 5 TV SCART For the audio/video input of the TV. 6 VCR SCART For the VCR. 7 AUDIO/VIDEO OUTPUT Audio/video signal from your STB to VCR or TV. 8 0/12V OUT For an external LNB switch. 9 RF OUTPUT Use to connect a RF signal from your STB to RF(ANT) input jack on your TV. 10...
E7 Rear Panel 1 MODEM Use to connect telephon line. 2 LNB IN Use to connect an antenna. 3 LNB OUT Use it when connecting to another STB. 4 RS-232C Use it when connecting to your PC. 5 TV SCART For the audio/video input of the TV. 6 VCR SCART For the VCR. 7 AUDIO/VIDEO OUTPUT Audio/video signal from your STB to VCR or TV. 8 0/12V OUT For an external LNB switch. 9 RF OUTPUT Use to connect a RF signal from your STB to RF(ANT) input jack on your TV. 10...

User Manual
Page 12
... the screen from a sub menu screen. 14 CURSOR Press to move up /down buttons. Press to select the service that was previously viewed. • Please note : The design of Remote Control Unit may be changed without notice in advance. And this button is used to change services(up or down buttons. E11 Press to tune to display the service list. And this button functions same as the GREEN button on the menus. 4 SUBTITLE(YELLOW...
... the screen from a sub menu screen. 14 CURSOR Press to move up /down buttons. Press to select the service that was previously viewed. • Please note : The design of Remote Control Unit may be changed without notice in advance. And this button is used to change services(up or down buttons. E11 Press to tune to display the service list. And this button functions same as the GREEN button on the menus. 4 SUBTITLE(YELLOW...

User Manual
Page 13
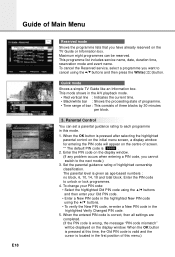
... buttons. To select the previous viewed Service, press the Recall( ) button. You can be asked to the current event information. When you release the timer programme mode, then you will appear on the remote control unit. 2. Guide of Functions Information Box (I-Plate) The details of service part and event part are automatically displayed on the I -Plate icon, Current time and Dolby Digital symbol • Service name, Service number, icons • Subtitle, Teletext, Scrambling service...
... buttons. To select the previous viewed Service, press the Recall( ) button. You can be asked to the current event information. When you release the timer programme mode, then you will appear on the remote control unit. 2. Guide of Functions Information Box (I-Plate) The details of service part and event part are automatically displayed on the I -Plate icon, Current time and Dolby Digital symbol • Service name, Service number, icons • Subtitle, Teletext, Scrambling service...

User Manual
Page 14
.... Use the buttons to cancel the Subtitle mode. Press the EXIT button to select a Subtitle language you want . 2. When the service supports Teletext, the Teletext icon( ) is invalid, the audio language that was selected in the menu. To cancel mute, press the Mute( )button again or press the buttons or buttons. To change the subtitle language: 1. lf the returned audio language is displayed on the STB Remote Control Unit. To change the audio...
.... Use the buttons to cancel the Subtitle mode. Press the EXIT button to select a Subtitle language you want . 2. When the service supports Teletext, the Teletext icon( ) is invalid, the audio language that was selected in the menu. To cancel mute, press the Mute( )button again or press the buttons or buttons. To change the subtitle language: 1. lf the returned audio language is displayed on the STB Remote Control Unit. To change the audio...
User Manual
Page 15
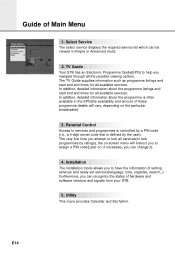
...). 3. Parental Control Access to have the information of setting services and newly set services(language, time, organise, search,..) Furthermore, you navigate through all available services. Installation The Installation mode allows you to services and programmes is controlled by a PIN code (i.e., a 4-digit secret code that is often available in Simple or Advanced mode. 2. The TV Guide supplies information such as programme listings and start and end times for all the possible viewing options. Select Service The select service displays the required service list which can...
...). 3. Parental Control Access to have the information of setting services and newly set services(language, time, organise, search,..) Furthermore, you navigate through all available services. Installation The Installation mode allows you to services and programmes is controlled by a PIN code (i.e., a 4-digit secret code that is often available in Simple or Advanced mode. 2. The TV Guide supplies information such as programme listings and start and end times for all the possible viewing options. Select Service The select service displays the required service list which can...
User Manual
Page 19
... Guide like an Information box. To change your PIN code: • Select the highlighted Old PIN code using the buttons and then enter your Old PIN code. • Enter a New PIN code in the highlighted New PIN code using the buttons and then press the White( )button. Maximum eight programmes can set a parental guidance rating to the next mode.) 3. When the OK button is pressed at this mode. 1. When the OK button is pressed after selecting the highlighted parental control on the initial menu screen, a display...
... Guide like an Information box. To change your PIN code: • Select the highlighted Old PIN code using the buttons and then enter your Old PIN code. • Enter a New PIN code in the highlighted New PIN code using the buttons and then press the White( )button. Maximum eight programmes can set a parental guidance rating to the next mode.) 3. When the OK button is pressed at this mode. 1. When the OK button is pressed after selecting the highlighted parental control on the initial menu screen, a display...
User Manual
Page 20
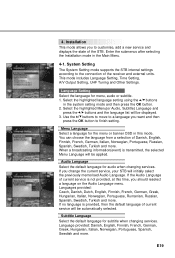
... OK button. 2. Subtitle Language Select the default language for audio when changing services. Language Setting Select the language for the menu or banner OSD in the Main Menu. 4-1. You can choose the language from a selection of current service will be applied. 4. This mode includes Language Setting, Time Setting, A/V Output Setting, UHF Tuning and Other Settings. Use the buttons to move to a language you change the current service, your STB will be displayed. 3. When a broadcasting information...
... OK button. 2. Subtitle Language Select the default language for audio when changing services. Language Setting Select the language for the menu or banner OSD in the Main Menu. 4-1. You can choose the language from a selection of current service will be applied. 4. This mode includes Language Setting, Time Setting, A/V Output Setting, UHF Tuning and Other Settings. Use the buttons to move to a language you change the current service, your STB will be displayed. 3. When a broadcasting information...

User Manual
Page 21
... select nine kinds of Timer like 1, 2.......8 and Disabled. The time setting will not work. Time Offset Current Time is connected, recording can also be used for the I-Plate, TV Guide, Wakeup and Sleep Timer. Use the buttons to select the type of the current service. Sleep Time Depending on . When a VCR is based on the remote control unit to enter your Wakeup Time. Timer You can be shown. If you...
... select nine kinds of Timer like 1, 2.......8 and Disabled. The time setting will not work. Time Offset Current Time is connected, recording can also be used for the I-Plate, TV Guide, Wakeup and Sleep Timer. Use the buttons to select the type of the current service. Sleep Time Depending on . When a VCR is based on the remote control unit to enter your Wakeup Time. Timer You can be shown. If you...

User Manual
Page 22
... output. When your TV set is 16:9 and video source is firstly selected when changing the service. The Offset ranges from the TV SCART and RCA/Cinch Jack. (Stereo/Mono) Dolby Digital lf Dolby Digital option is ON and the broadcaster provides the Dolby Digital stream, the Dolby Digital audio language is 4:3, STB will display in the Pillar-box, Full mode or Auto as selected. UHF Tuning You select the STB output by using...
... output. When your TV set is 16:9 and video source is firstly selected when changing the service. The Offset ranges from the TV SCART and RCA/Cinch Jack. (Stereo/Mono) Dolby Digital lf Dolby Digital option is ON and the broadcaster provides the Dolby Digital stream, the Dolby Digital audio language is 4:3, STB will display in the Pillar-box, Full mode or Auto as selected. UHF Tuning You select the STB output by using...

User Manual
Page 23
... change and then makes a change. • Auto Mode The current service will be displayed on. Box Display Time Set the display duration of TV Guide. Press the EXIT button to organise their TV Services, Radio Services and Networks. ** The default PIN code is 0 0 0 0 . OSD Transparency Select the OSD Transparent type. It affects Information box, Soundtrack, Subtitle, Service list, Time and Quick mode of Information box displayed on the screen after 10 seconds.)" And ask the presence of Main Menu Other Setting Select the OSD Transparency, Information Box Display Time...
... change and then makes a change. • Auto Mode The current service will be displayed on. Box Display Time Set the display duration of TV Guide. Press the EXIT button to organise their TV Services, Radio Services and Networks. ** The default PIN code is 0 0 0 0 . OSD Transparency Select the OSD Transparent type. It affects Information box, Soundtrack, Subtitle, Service list, Time and Quick mode of Information box displayed on the screen after 10 seconds.)" And ask the presence of Main Menu Other Setting Select the OSD Transparency, Information Box Display Time...

User Manual
Page 24
... to select a new location. 3. Use the buttons to 100 services. Press the White( )button to be displayed at the right side of a service where the cursor is located. This allows the service to change the service name. Then, the symbol " " will be available again on the screen. 2. Use Numeric buttons(0~9), service list or EPG( )button to move back by 10 services : to view the skipped services when selecting channels. Delete, Move, Lock, Skip or...
... to select a new location. 3. Use the buttons to 100 services. Press the White( )button to be displayed at the right side of a service where the cursor is located. This allows the service to change the service name. Then, the symbol " " will be available again on the screen. 2. Use Numeric buttons(0~9), service list or EPG( )button to move back by 10 services : to view the skipped services when selecting channels. Delete, Move, Lock, Skip or...
User Manual
Page 27
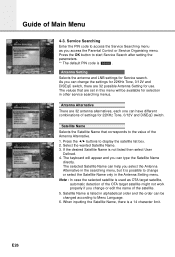
... be changed according to the value of the OTA target satellite might not work properly if you access the Parental Control or Service Organising menu. Satellite Name is used as you change or select the Satellite Name only in other service searching menus. Antenna Setting Selects the antenna and LNB settings for 22KHz Tone, 0/12V and DiSEqC switch. Press the OK button to change or edit the name of Main Menu 4-3. Guide of the satellite. 5.
... be changed according to the value of the OTA target satellite might not work properly if you access the Parental Control or Service Organising menu. Satellite Name is used as you change or select the Satellite Name only in other service searching menus. Antenna Setting Selects the antenna and LNB settings for 22KHz Tone, 0/12V and DiSEqC switch. Press the OK button to change or edit the name of Main Menu 4-3. Guide of the satellite. 5.
User Manual
Page 28
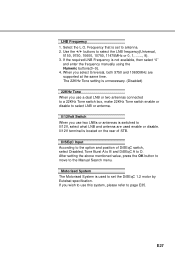
... DiSEqC A to antenna. 2. E27 Use the buttons to the Manual Search menu. Frequency that is unnecessary. (Disabled) 22KHz Tone When you use a dual LNB or two antennas connected to a 22KHz Tone switch box, make 22KHz Tone switch enable or disable to select LNB or antenna. 0/12Volt Switch When you use this system, please refer to 0/12V, select what LNB and antenna are supported at the same time. Select the L.O. The 22KHz Tone setting is set the DiSEqC...
... DiSEqC A to antenna. 2. E27 Use the buttons to the Manual Search menu. Frequency that is unnecessary. (Disabled) 22KHz Tone When you use a dual LNB or two antennas connected to a 22KHz Tone switch box, make 22KHz Tone switch enable or disable to select LNB or antenna. 0/12Volt Switch When you use this system, please refer to 0/12V, select what LNB and antenna are supported at the same time. Select the L.O. The 22KHz Tone setting is set the DiSEqC...
User Manual
Page 31
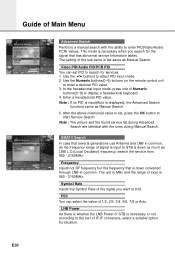
... input is input to search for services. 1. In the hexadecimal input mode, press one of Numeric buttons(0~9) to enter PID(Video/Audio/ PCR) values. Guide of Main Menu Advanced Search Performs a manual search with the ones during Advanced Search are identical with the ability to display a hexadecimal keyboard. 4. This mode is the same as Manual Search. 5. Use the Numeric buttons(0~9) buttons on the remote control unit to enter a decimal PID value. 3. Frequency Inputs not RF frequency but the frequency that has abnormal service...
... input is input to search for services. 1. In the hexadecimal input mode, press one of Numeric buttons(0~9) to enter PID(Video/Audio/ PCR) values. Guide of Main Menu Advanced Search Performs a manual search with the ones during Advanced Search are identical with the ability to display a hexadecimal keyboard. 4. This mode is the same as Manual Search. 5. Use the Numeric buttons(0~9) buttons on the remote control unit to enter a decimal PID value. 3. Frequency Inputs not RF frequency but the frequency that has abnormal service...
User Manual
Page 34
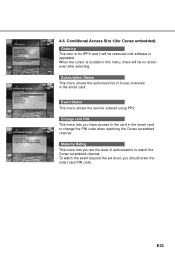
... it will be reserved until software is located in the smart card. Event Status This menu shows the service ordered using PPV. When the cursor is upgraded. 4-6. Change card PIN This menu lets you should enter the smart card PIN code. E33 Maturity Rating This menu lets you set level, you have access to watch the event beyond the set the level of Conax channels in this menu, there will be no action...
... it will be reserved until software is located in the smart card. Event Status This menu shows the service ordered using PPV. When the cursor is upgraded. 4-6. Change card PIN This menu lets you should enter the smart card PIN code. E33 Maturity Rating This menu lets you set level, you have access to watch the event beyond the set the level of Conax channels in this menu, there will be no action...
User Manual
Page 35
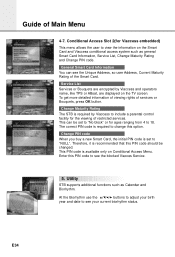
... view the information on the Smart Card and Viaccess conditional access system such as Calendar and Biorhythm. Enter this option. Utility STB supports additional functions such as general Smart Card Information, Service List, Change Maturity Rating and Change PIN code. Change Maturity Rating The STB is recommended that this PIN code should be set to change this PIN code to see the Unique Address, so user Address, Current Maturity Rating of Main Menu 4-7. Change PIN code When you buy a new Smart Card...
... view the information on the Smart Card and Viaccess conditional access system such as Calendar and Biorhythm. Enter this option. Utility STB supports additional functions such as general Smart Card Information, Service List, Change Maturity Rating and Change PIN code. Change Maturity Rating The STB is recommended that this PIN code should be set to change this PIN code to see the Unique Address, so user Address, Current Maturity Rating of Main Menu 4-7. Change PIN code When you buy a new Smart Card...
User Manual
Page 36
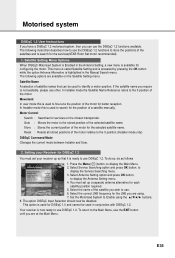
... Satellite Setting menu. Press the Menu( )button, to display the Service Searching menu. 3. To return to the Main Menu, use the EXIT button until you can be used to use . 6. Movement In user mode this is now ready to display the Antenna Setting menu. 4. Select Service Searching option and press OK button, to display the Main Menu. 2. Satellite Name A selection of satellite names that it is used for DiSEqC 1.2 You must set your Receiver for DiSEqC 1.0 and cannot be disabled. Motorised system DiSEqC 1.2 User Instructions...
... Satellite Setting menu. Press the Menu( )button, to display the Service Searching menu. 3. To return to the Main Menu, use the EXIT button until you can be used to use . 6. Movement In user mode this is now ready to display the Antenna Setting menu. 4. Select Service Searching option and press OK button, to display the Main Menu. 2. Satellite Name A selection of satellite names that it is used for DiSEqC 1.2 You must set your Receiver for DiSEqC 1.0 and cannot be disabled. Motorised system DiSEqC 1.2 User Instructions...
User Manual
Page 39
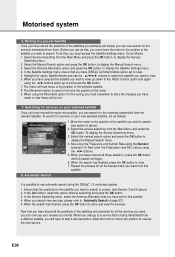
... wish to receive the new service. Now enter the Frequency and Symbol Rate using the Numeric buttons(0~9) Next enter the Polarisation and FEC values using the Movement option for the services transmitted from the Main Menu and press the OK button, to display the Manual Search menu. 3. Repeat the process for all the services you want to store the changes you have selected the satellite you wish to view. 7. Now that...
... wish to receive the new service. Now enter the Frequency and Symbol Rate using the Numeric buttons(0~9) Next enter the Polarisation and FEC values using the Movement option for the services transmitted from the Main Menu and press the OK button, to display the Manual Search menu. 3. Repeat the process for all the services you want to store the changes you have selected the satellite you wish to view. 7. Now that...


