Ascend P6 User Guide
Page 2
Contents Foreword 1 Safety precautions 2 Preparations 3 Your phone at a glance 3 Inserting or removing a micro-SIM card 4 Inserting or removing a microSD card 6 Charging the battery 7 Powering your phone on and off 8 Setting up your phone for the first time 8 Getting started 9 Gestures 9 Locking and unlocking the screen 10 Getting to know your home screen 11 Using the notification panel 14 Accessing applications 15 Texting 15 Turning on gloves mode 18 Personalizing your phone 19 Setting the theme 19 Changing the wallpaper 19 Setting the home screen ...
Contents Foreword 1 Safety precautions 2 Preparations 3 Your phone at a glance 3 Inserting or removing a micro-SIM card 4 Inserting or removing a microSD card 6 Charging the battery 7 Powering your phone on and off 8 Setting up your phone for the first time 8 Getting started 9 Gestures 9 Locking and unlocking the screen 10 Getting to know your home screen 11 Using the notification panel 14 Accessing applications 15 Texting 15 Turning on gloves mode 18 Personalizing your phone 19 Setting the theme 19 Changing the wallpaper 19 Setting the home screen ...
Ascend P6 User Guide
Page 3
Contents What you can do during a call 28 Making a conference call 29 Answering a third-party call 29 Making emergency calls 29 Other call services 30 People 32 Creating a contact 32 Searching for a contact 32 Copying contacts 32 Importing or exporting contacts 33 Adding a contact to your favorites 34 Deleting contacts 34 Merging contacts 34 Sharing contacts 34 Contact groups 35 Messaging 37 Sending a text message 37 Sending a multimedia message 37 Replying to a message 37 Searching for a message 38 Managing messages 38 Modifying message settings 39...
Contents What you can do during a call 28 Making a conference call 29 Answering a third-party call 29 Making emergency calls 29 Other call services 30 People 32 Creating a contact 32 Searching for a contact 32 Copying contacts 32 Importing or exporting contacts 33 Adding a contact to your favorites 34 Deleting contacts 34 Merging contacts 34 Sharing contacts 34 Contact groups 35 Messaging 37 Sending a text message 37 Sending a multimedia message 37 Replying to a message 37 Searching for a message 38 Managing messages 38 Modifying message settings 39...
Ascend P6 User Guide
Page 4
... memory status 67 Managing applications 68 Downloading applications 68 Installing an application 68 Viewing applications 68 Uninstalling an application 69 Clearing the application cache 69 Huawei applications 70 Backup 70 Cloud Sync 71 Phone Finder 71 Google services 73 Gmail 73 Talk 74 Maps 74 YouTube 75 Play Store 76 iii
... memory status 67 Managing applications 68 Downloading applications 68 Installing an application 68 Viewing applications 68 Uninstalling an application 69 Clearing the application cache 69 Huawei applications 70 Backup 70 Cloud Sync 71 Phone Finder 71 Google services 73 Gmail 73 Talk 74 Maps 74 YouTube 75 Play Store 76 iii
Ascend P6 User Guide
Page 5
Contents Basic utilities 77 Calendar 77 Clock 78 Calculator 79 Notes 79 Weather 79 FM radio 81 Accounts and sync 83 Adding an account 83 Deleting an account 83 Turning on data synchronization 83 Modifying account synchronization settings 84 Settings 85 Turning on or off airplane mode 85 Tone settings 85 Display settings 86 Turning on the power manager 86 Setting the date and time 87 Changing the system language 87 Modifying location service settings 88 Setting the PIN of your SIM card 88 Restoring factory settings 89 Online update 89 Accessibility...
Contents Basic utilities 77 Calendar 77 Clock 78 Calculator 79 Notes 79 Weather 79 FM radio 81 Accounts and sync 83 Adding an account 83 Deleting an account 83 Turning on data synchronization 83 Modifying account synchronization settings 84 Settings 85 Turning on or off airplane mode 85 Tone settings 85 Display settings 86 Turning on the power manager 86 Setting the date and time 87 Changing the system language 87 Modifying location service settings 88 Setting the PIN of your SIM card 88 Restoring factory settings 89 Online update 89 Accessibility...
Ascend P6 User Guide
Page 6
Please read it carefully before you for your new phone and safety precautions. Note Caution Provides additional information. Foreword Thank you start using the phone. Indicates potential problems that may vary. The actual product may arise without the proper care and, if necessary, how to the features and functions of your reference only. Symbols and definitions The following symbols are for choosing the HUAWEI Ascend P6 smartphone. All pictures and illustrations in this document are used in this document. This guide introduces you to handle these problems. 1
Please read it carefully before you for your new phone and safety precautions. Note Caution Provides additional information. Foreword Thank you start using the phone. Indicates potential problems that may vary. The actual product may arise without the proper care and, if necessary, how to the features and functions of your reference only. Symbols and definitions The following symbols are for choosing the HUAWEI Ascend P6 smartphone. All pictures and illustrations in this document are used in this document. This guide introduces you to handle these problems. 1
Ascend P6 User Guide
Page 7
Safety precautions Please read these devices. Your phone is not meant for use your phone near high-precision electronic devices. Your safety should always be your phone. The phone may interfere with a strong electromagnetic field. Use only approved batteries and chargers to disassemble your phone wet. Follow local laws and regulations. The phone may affect the performance of explosions. Do not place your phone or its accessories away from the phone may cause interference or present a hazard. Observe any sort and avoid getting your phone or its accessories. Do ...
Safety precautions Please read these devices. Your phone is not meant for use your phone near high-precision electronic devices. Your safety should always be your phone. The phone may interfere with a strong electromagnetic field. Use only approved batteries and chargers to disassemble your phone wet. Follow local laws and regulations. The phone may affect the performance of explosions. Do not place your phone or its accessories away from the phone may cause interference or present a hazard. Observe any sort and avoid getting your phone or its accessories. Do ...
Ascend P6 User Guide
Page 8
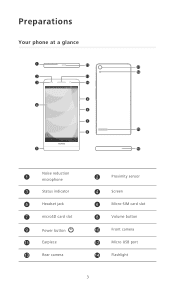
Preparations Your phone at a glance ... 1 12 13 14 2 11 3 10 9 4 8 7 15 6 5 16 Noise reduction 1 microphone 3 Status indicator 5 Headset jack 7 microSD card slot 9 Power button 11 Earpiece 13 Rear camera 2 Proximity sensor 4 Screen 6 Micro-SIM card slot 8 Volume button 10 Front camera 12 Micro USB port 14 Flashlight 3
Preparations Your phone at a glance ... 1 12 13 14 2 11 3 10 9 4 8 7 15 6 5 16 Noise reduction 1 microphone 3 Status indicator 5 Headset jack 7 microSD card slot 9 Power button 11 Earpiece 13 Rear camera 2 Proximity sensor 4 Screen 6 Micro-SIM card slot 8 Volume button 10 Front camera 12 Micro USB port 14 Flashlight 3
Ascend P6 User Guide
Page 9
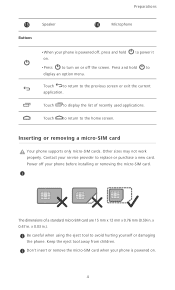
Touch to return to replace or purchase a new card. Power off the screen. Keep the eject tool away from children. to power it •Press to turn on or off your phone before installing or removing the micro-SIM card. Press and hold on. Inserting or removing a micro-SIM card ...Your phone supports only micro-SIM cards. x 0.03 in . Contact your service provider to the home screen. The dimensions of recently used applications. x 0.47 in .). Don't insert or remove the micro-SIM card when your phone is powered off, press and hold to display the list of a ...
Touch to return to replace or purchase a new card. Power off the screen. Keep the eject tool away from children. to power it •Press to turn on or off your phone before installing or removing the micro-SIM card. Press and hold on. Inserting or removing a micro-SIM card ...Your phone supports only micro-SIM cards. x 0.03 in . Contact your service provider to the home screen. The dimensions of recently used applications. x 0.47 in .). Don't insert or remove the micro-SIM card when your phone is powered off, press and hold to display the list of a ...
Ascend P6 User Guide
Page 10
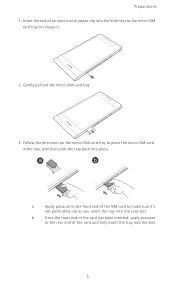
Preparations 1. a b a Apply pressure to the front end of an eject tool or paper clip into the card slot. Insert the end of the SIM card to make sure it's not portruding out as you insert the tray into the hole next to the micro-SIM card tray to release it. 2. Follow the directions on the micro-SIM card tray to the rear end of the card has been inserted, apply pressure to place the micro-SIM card in the tray, and then push the tray back into the slot. 5 b Once the front end of the card and fully insert the tray into place. Gently pull out the micro-SIM card tray. 3....
Preparations 1. a b a Apply pressure to the front end of an eject tool or paper clip into the card slot. Insert the end of the SIM card to make sure it's not portruding out as you insert the tray into the hole next to the micro-SIM card tray to release it. 2. Follow the directions on the micro-SIM card tray to the rear end of the card has been inserted, apply pressure to place the micro-SIM card in the tray, and then push the tray back into the slot. 5 b Once the front end of the card and fully insert the tray into place. Gently pull out the micro-SIM card tray. 3....
Ascend P6 User Guide
Page 11
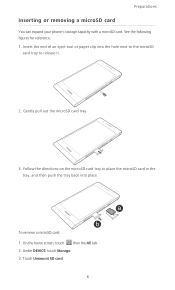
See the following figures for reference. 1. Insert the end of an eject tool or paper clip into place. a b To remove a microSD card: 1. Gently pull out the microSD card tray. 3. On the home screen, touch then the All tab. 2. Touch Unmount SD card. 6 Preparations Inserting or removing a microSD card ...You can expand your phone's storage capacity with a microSD card. Follow the directions on the microSD card tray to place the microSD card in the tray, and then push the tray back into the hole next to the microSD card tray to release it. 2. Under DEVICE, touch Storage. 3.
See the following figures for reference. 1. Insert the end of an eject tool or paper clip into place. a b To remove a microSD card: 1. Gently pull out the microSD card tray. 3. On the home screen, touch then the All tab. 2. Touch Unmount SD card. 6 Preparations Inserting or removing a microSD card ...You can expand your phone's storage capacity with a microSD card. Follow the directions on the microSD card tray to place the microSD card in the tray, and then push the tray back into the hole next to the microSD card tray to release it. 2. Under DEVICE, touch Storage. 3.
Ascend P6 User Guide
Page 12
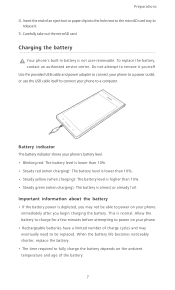
Battery indicator The battery indicator shows your phone to a computer. When the battery life becomes noticeably shorter, replace the battery. • The time required to fully charge the battery depends on your phone. • Rechargeable batteries have a limited number of charge cycles and may eventually need to be able to power on the ambient temperature and age of an eject tool or paper clip into the hole next to the microSD card tray to remove it . 5. Insert the end of the battery. 7 Do not attempt to release it yourself. Use the provided USB cable and power adapter to ...
Battery indicator The battery indicator shows your phone to a computer. When the battery life becomes noticeably shorter, replace the battery. • The time required to fully charge the battery depends on your phone. • Rechargeable batteries have a limited number of charge cycles and may eventually need to be able to power on the ambient temperature and age of an eject tool or paper clip into the hole next to the microSD card tray to remove it . 5. Insert the end of the battery. 7 Do not attempt to release it yourself. Use the provided USB cable and power adapter to ...

Ascend P6 User Guide
Page 13
When you power on your phone, press and hold . • To power off your phone, press and hold for 10 or more seconds to restart your phone. Powering your phone on and off ... • To power on your phone or open some applications for the first time, follow the onscreen instructions to display an option menu, and If errors occur and you through basic operations. If the battery level is very low on the home screen. 8 Setting up . to set it plays an alert tone and displays a message. To read these instructions again, touch Mgmt. > on power, it up your phone for the ...
When you power on your phone, press and hold . • To power off your phone, press and hold for 10 or more seconds to restart your phone. Powering your phone on and off ... • To power on your phone or open some applications for the first time, follow the onscreen instructions to display an option menu, and If errors occur and you through basic operations. If the battery level is very low on the home screen. 8 Setting up . to set it plays an alert tone and displays a message. To read these instructions again, touch Mgmt. > on power, it up your phone for the ...
Ascend P6 User Guide
Page 14
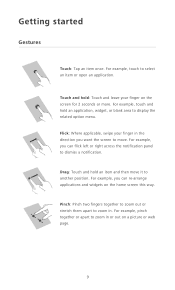
For example, touch and hold an application, widget, or blank area to another position. Drag: Touch and hold : Touch and leave your finger in the direction you want the screen to move it to display the related option menu. For example, you can flick left or right across the notification panel to zoom in . Touch and hold an item and then move . Pinch: Pinch two fingers together to zoom out or stretch them apart to select an item or open an application. For example, pinch together or apart to dismiss a notification. Flick: Where applicable, swipe your finger on a picture ...
For example, touch and hold an application, widget, or blank area to another position. Drag: Touch and hold : Touch and leave your finger in the direction you want the screen to move it to display the related option menu. For example, you can flick left or right across the notification panel to zoom in . Touch and hold an item and then move . Pinch: Pinch two fingers together to zoom out or stretch them apart to select an item or open an application. For example, pinch together or apart to dismiss a notification. Flick: Where applicable, swipe your finger on a picture ...
Ascend P6 User Guide
Page 15
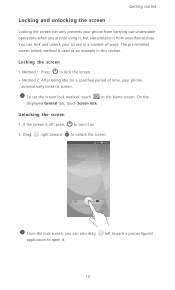
The pre-installed screen unlock method is off, press to lock the screen. • Method 2: After being idle for a specified period of time, your screen in this section. On the displayed General tab, touch Screen lock. Drag right toward a preconfigured 10 You can also drag application to unlock the screen. Locking the screen • Method 1: Press to turn it on the home screen. If the screen is used as an example in a number of ways. left toward to open it from carrying out undesirable operations when you can lock and unlock your phone automatically locks its screen....
The pre-installed screen unlock method is off, press to lock the screen. • Method 2: After being idle for a specified period of time, your screen in this section. On the displayed General tab, touch Screen lock. Drag right toward a preconfigured 10 You can also drag application to unlock the screen. Locking the screen • Method 1: Press to turn it on the home screen. If the screen is used as an example in a number of ways. left toward to open it from carrying out undesirable operations when you can lock and unlock your phone automatically locks its screen....
Ascend P6 User Guide
Page 16
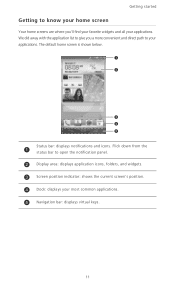
Flick down from the 1 status bar to open the notification panel. 2 Display area: displays application icons, folders, and widgets. 3 Screen position indicator: shows the current screen's position. 4 Dock: displays your applications. Getting started Getting to know your home screen ...Your home screens are where you a more convenient and direct path to your applications. The default home screen is shown below. 1 2 3 4 5 Status bar: displays notifications and icons. We did away with the application list to give you 'll find your favorite widgets and all your most common applications. 5 ...
Flick down from the 1 status bar to open the notification panel. 2 Display area: displays application icons, folders, and widgets. 3 Screen position indicator: shows the current screen's position. 4 Dock: displays your applications. Getting started Getting to know your home screen ...Your home screens are where you a more convenient and direct path to your applications. The default home screen is shown below. 1 2 3 4 5 Status bar: displays notifications and icons. We did away with the application list to give you 'll find your favorite widgets and all your most common applications. 5 ...
Ascend P6 User Guide
Page 17
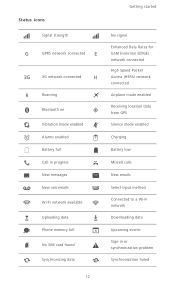
Status icons Signal strength G GPRS network connected E 3G 3G network connected H 5 Roaming Bluetooth on Vibration mode enabled Alarms enabled Battery full Call in progress New messages New voicemails Wi-Fi network available Uploading data Phone memory full No SIM card found Synchronizing data Getting started No signal Enhanced Data Rates for GSM Evolution (EDGE) network connected High Speed Packet Access (HSPA) network connected Airplane mode enabled Receiving location data from GPS Silence mode enabled Charging Battery low Missed calls New emails Select input method Connected ...
Status icons Signal strength G GPRS network connected E 3G 3G network connected H 5 Roaming Bluetooth on Vibration mode enabled Alarms enabled Battery full Call in progress New messages New voicemails Wi-Fi network available Uploading data Phone memory full No SIM card found Synchronizing data Getting started No signal Enhanced Data Rates for GSM Evolution (EDGE) network connected High Speed Packet Access (HSPA) network connected Airplane mode enabled Receiving location data from GPS Silence mode enabled Charging Battery low Missed calls New emails Select input method Connected ...

Ascend P6 User Guide
Page 18
Your phone lets you create more home screens for various application icons and widgets. • Flick left and right across the screen to switch between home screens Running out of space on the home screen? Not to display the home screen thumbnails. Touch a thumbnail to a computer USB tethering on Switching between the home screens. • Pinch two fingers together to worry. Getting started Portable Wi-Fi hotspot on Connected to a VPN More notifications Headset plugged in Connected to enter that particular home screen. 13
Your phone lets you create more home screens for various application icons and widgets. • Flick left and right across the screen to switch between home screens Running out of space on the home screen? Not to display the home screen thumbnails. Touch a thumbnail to a computer USB tethering on Switching between the home screens. • Pinch two fingers together to worry. Getting started Portable Wi-Fi hotspot on Connected to a VPN More notifications Headset plugged in Connected to enter that particular home screen. 13
Ascend P6 User Guide
Page 19
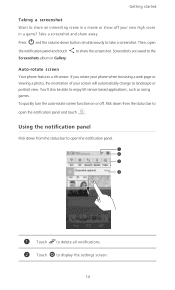
Take a screenshot and share away. Then, open the notification panel and touch Screenshots album in a game? You'll also be able to share the screenshot. To quickly turn the auto-rotate screen function on or off your screen will automatically change to landscape or portrait view. Using the notification panel ...Flick down from the status bar to open the notification panel. 1 2 3 4 1 Touch to delete all notifications. 2 Touch to display the settings screen. 14 Getting started Taking a screenshot Want to share an interesting scene in a movie or show off , flick down from the status...
Take a screenshot and share away. Then, open the notification panel and touch Screenshots album in a game? You'll also be able to share the screenshot. To quickly turn the auto-rotate screen function on or off your screen will automatically change to landscape or portrait view. Using the notification panel ...Flick down from the status bar to open the notification panel. 1 2 3 4 1 Touch to delete all notifications. 2 Touch to display the settings screen. 14 Getting started Taking a screenshot Want to share an interesting scene in a movie or show off , flick down from the status...
Ascend P6 User Guide
Page 20
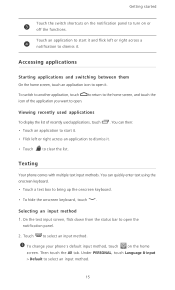
To switch to another application, touch to return to the home screen, and touch the icon of recently used applications, touch . To change your phone's default input method, touch on or 3 off the functions. Accessing applications ...Starting applications and switching between them On the home screen, touch an application icon to open the notification panel. 2. You can then: • Touch an application to start it . On the text input screen, flick down from the status bar to bring up the onscreen keyboard. • To hide the onscreen keyboard, touch . Viewing recently used ...
To switch to another application, touch to return to the home screen, and touch the icon of recently used applications, touch . To change your phone's default input method, touch on or 3 off the functions. Accessing applications ...Starting applications and switching between them On the home screen, touch an application icon to open the notification panel. 2. You can then: • Touch an application to start it . On the text input screen, flick down from the status bar to bring up the onscreen keyboard. • To hide the onscreen keyboard, touch . Viewing recently used ...
Ascend P6 User Guide
Page 21
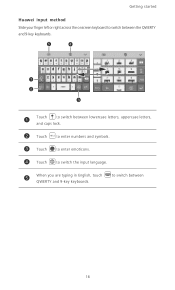
to switch the input language. 5 When you are typing in English, touch QWERTY and 9-key keyboards. Getting started Huawei input method Slide your finger left or right across the onscreen keyboard to switch between the QWERTY and 9-key keyboards. 5 4 1 2 3 1 Touch a to switch between lowercase letters, uppercase letters, and caps lock. 2 Touch *#12 to enter numbers and symbols. 3 Touch to enter emoticons. 4 Touch to switch between 16
to switch the input language. 5 When you are typing in English, touch QWERTY and 9-key keyboards. Getting started Huawei input method Slide your finger left or right across the onscreen keyboard to switch between the QWERTY and 9-key keyboards. 5 4 1 2 3 1 Touch a to switch between lowercase letters, uppercase letters, and caps lock. 2 Touch *#12 to enter numbers and symbols. 3 Touch to enter emoticons. 4 Touch to switch between 16
