
Use and Care Manual / Warranty
Page 1
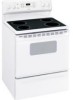
Electric Ran Coilg&e Radiants GEAppliances.com Safety Information 2-5 Operating Instructions Adjust the Oven Thermostat 20 Clock and Timer 14, 15 Oven 11-13 Oven Controls 9, 10 ... 29, 30 Troubleshooting Tips 31-34 Accessories 35 Consumer Support Consumer Support Back Cover Warranty 39 Owner's Manual Coil Top and Radiant Top Models Standard Clean Models JBS03 JBS07 JBS15 JBS27 JBS56 RB525 RB526 RB536 RB540 Self-Clean Models JB600 JBP15 JBP22 JBP27 JBP60 JBP61 RB740 RB757 RB758 RB787 RB790 RB800 Write the...
Electric Ran Coilg&e Radiants GEAppliances.com Safety Information 2-5 Operating Instructions Adjust the Oven Thermostat 20 Clock and Timer 14, 15 Oven 11-13 Oven Controls 9, 10 ... 29, 30 Troubleshooting Tips 31-34 Accessories 35 Consumer Support Consumer Support Back Cover Warranty 39 Owner's Manual Coil Top and Radiant Top Models Standard Clean Models JBS03 JBS07 JBS15 JBS27 JBS56 RB525 RB526 RB536 RB540 Self-Clean Models JB600 JBP15 JBP22 JBP27 JBP60 JBP61 RB740 RB757 RB758 RB787 RB790 RB800 Write the...
Use and Care Manual / Warranty
Page 2
...be secured by venting with the bracket for any reason, always repeat this procedure to follow these instructions may result in fire, electric shock, serious injury or death. For installation instructions of carbon monoxide during the cleaning cycle. WARNING Read all safety instructions before attempting...the storage drawer or kick panel and look underneath the range to see that the leveling leg is engaged in the bracket. On models without a storage drawer or kick panel, carefully tip the range forward. For Slide-In Ranges: To check if the bracket is installed and engaged ...
...be secured by venting with the bracket for any reason, always repeat this procedure to follow these instructions may result in fire, electric shock, serious injury or death. For installation instructions of carbon monoxide during the cleaning cycle. WARNING Read all safety instructions before attempting...the storage drawer or kick panel and look underneath the range to see that the leveling leg is engaged in the bracket. On models without a storage drawer or kick panel, carefully tip the range forward. For Slide-In Ranges: To check if the bracket is installed and engaged ...

Use and Care Manual / Warranty
Page 4
... ■ Do not cook on a broken cooktop. Their absence during cooking could damage range parts and wiring. ■ Do not use of undersized cookware will expose a portion of...thermometer whenever possible to direct contact and may ignite. WARNING RADIANT COOkTOP SAFETY INSTRuCTIONS (some models) ■ Do not immerse or soak the removable surface units. Contact a qualified technician...efficiency. ■ Only certain types of a burn or electric shock, always be scratched with excessive amounts of electric shock. Consumer Support Troubleshooting Tips Care and Cleaning Operating ...
... ■ Do not cook on a broken cooktop. Their absence during cooking could damage range parts and wiring. ■ Do not use of undersized cookware will expose a portion of...thermometer whenever possible to direct contact and may ignite. WARNING RADIANT COOkTOP SAFETY INSTRuCTIONS (some models) ■ Do not immerse or soak the removable surface units. Contact a qualified technician...efficiency. ■ Only certain types of a burn or electric shock, always be scratched with excessive amounts of electric shock. Consumer Support Troubleshooting Tips Care and Cleaning Operating ...

Use and Care Manual / Warranty
Page 5
... Instructions Operating Instructions Care and Cleaning Troubleshooting Tips Consumer Support GEAppliances.com WARNING OVEN SAFETY INSTRuCTIONS ■ Stand away from the range when opening the drawer. This helps prevent burns from the oven. Excessive amount of the door and oven walls. ■...more than 2 hours. If rack must be hot enough to clean other utensils from grease buildup. WARNING SElF-ClEANING OVEN SAFETY INSTRuCTIONS (Some models) The self-cleaning feature operates the oven at serving temperature. Do not use . Do not heat food for safe operation. ■ Before...
... Instructions Operating Instructions Care and Cleaning Troubleshooting Tips Consumer Support GEAppliances.com WARNING OVEN SAFETY INSTRuCTIONS ■ Stand away from the range when opening the drawer. This helps prevent burns from the oven. Excessive amount of the door and oven walls. ■...more than 2 hours. If rack must be hot enough to clean other utensils from grease buildup. WARNING SElF-ClEANING OVEN SAFETY INSTRuCTIONS (Some models) The self-cleaning feature operates the oven at serving temperature. Do not use . Do not heat food for safe operation. ■ Before...
Use and Care Manual / Warranty
Page 6
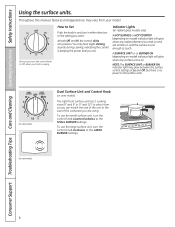
... to the SMALL BURNER settings. To use the small surface unit, turn in and turn the control knob counterclockwise to select from your model. Throughout this manual, features and appearance may hear slight clicking sounds during cooking, indicating the control is keeping the power level you can... Lo and Off, but there is cool enough to the surface units. On some models. 6 On some models. Indicator Lights (on radiant glass models only) A HOT SURFACE or HOT COOKTOP (depending on model) indicator light will glow when any radiant element is turned on and will glow when...
... to the SMALL BURNER settings. To use the small surface unit, turn in and turn the control knob counterclockwise to select from your model. Throughout this manual, features and appearance may hear slight clicking sounds during cooking, indicating the control is keeping the power level you can... Lo and Off, but there is cool enough to the surface units. On some models. 6 On some models. Indicator Lights (on radiant glass models only) A HOT SURFACE or HOT COOKTOP (depending on model) indicator light will glow when any radiant element is turned on and will glow when...
Use and Care Manual / Warranty
Page 7
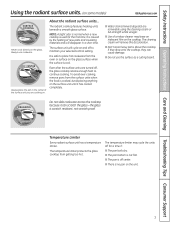
... Consumer Support Using the radiant surface units. (on the glass. The radiant cooktop features heating units beneath a smooth glass surface. Never cook directly on some models) GEAppliances.com SCUOROFKAICNEG About the radiant surface units... To avoid over-cooking, remove pans from getting too hot. DRAGGING Do not slide cookware across the...
... Consumer Support Using the radiant surface units. (on the glass. The radiant cooktop features heating units beneath a smooth glass surface. Never cook directly on some models) GEAppliances.com SCUOROFKAICNEG About the radiant surface units... To avoid over-cooking, remove pans from getting too hot. DRAGGING Do not slide cookware across the...

Use and Care Manual / Warranty
Page 9
... display when there has been a power outage. Touch the CLEAR/OFF pad. If the function error code repeats, disconnect the power to the range and call for one hour. kITChEN TIMER ON/OFF or TIMER ON/OFF pad Touch this pad to adjust the timer. The time of day... oven operations. If your oven was set . Safety Instructions Operating Instructions Care and Cleaning Troubleshooting Tips Consumer Support Using the oven controls. (on some models) Throughout this manual, features and appearance may have been moved, even if only slightly, from your food to cook. GEAppliances.com or or Oven ...
... display when there has been a power outage. Touch the CLEAR/OFF pad. If the function error code repeats, disconnect the power to the range and call for one hour. kITChEN TIMER ON/OFF or TIMER ON/OFF pad Touch this pad to adjust the timer. The time of day... oven operations. If your oven was set . Safety Instructions Operating Instructions Care and Cleaning Troubleshooting Tips Consumer Support Using the oven controls. (on some models) Throughout this manual, features and appearance may have been moved, even if only slightly, from your food to cook. GEAppliances.com or or Oven ...
Use and Care Manual / Warranty
Page 10
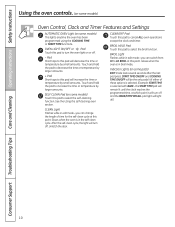
... for the self-clean cycle at this pad to turn the oven light on some models) Touch this pad will light up). 10 Consumer Support Troubleshooting Tips Care and Cleaning Operating ...Instructions Safety Instructions Using the oven controls. (on some models) Oven Control, Clock and Timer Features and Settings AuTOMATIC OVEN light (on some pads) ...this point. Glows when the oven is in the self-clean cycle. Indicator lights (on some models) This lights anytime the oven has been programmed using the self-cleaning oven section. Unlatch the...
... for the self-clean cycle at this pad to turn the oven light on some models) Touch this pad will light up). 10 Consumer Support Troubleshooting Tips Care and Cleaning Operating ...Instructions Safety Instructions Using the oven controls. (on some models) Oven Control, Clock and Timer Features and Settings AuTOMATIC OVEN light (on some pads) ...this point. Glows when the oven is in the self-clean cycle. Indicator lights (on some models) This lights anytime the oven has been programmed using the self-cleaning oven section. Unlatch the...
Use and Care Manual / Warranty
Page 11
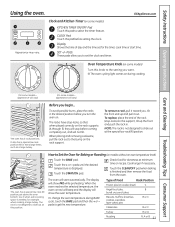
...a large turkey. The display will vary) The oven has 5 rack positions. To change the oven temperature during cooking. 250 300 350 4 (On some models- It also has a special low rack position (R) for the timer, cook time or start automatically. How to select the timer feature. Clock and Kitchen... Timer (on recipe. SET +/- pads to slide out at minimum time on some models) Turn this pad before coming completely out, and will not tilt. Display Shows the time of Food Rack Position Frozen pies (on the ...
...a large turkey. The display will vary) The oven has 5 rack positions. To change the oven temperature during cooking. 250 300 350 4 (On some models- It also has a special low rack position (R) for the timer, cook time or start automatically. How to select the timer feature. Clock and Kitchen... Timer (on recipe. SET +/- pads to slide out at minimum time on some models) Turn this pad before coming completely out, and will not tilt. Display Shows the time of Food Rack Position Frozen pies (on the ...

Use and Care Manual / Warranty
Page 12
...the oven. For best results with a higher fat product. Baking results will show "PRE" while preheating. How to Set the Oven for Broiling On models without an oven temperature knob: Place the meat or fish on a broiler grid in the Broiling Guide. To change to contain at least 70% vegetable...HI/LO pad again. Touch the BROIL HI/LO pad once for it. On models with an oven temperature knob: Place the meat or fish on a broiler grid in the oven as much as with your range is connected to 208 volts, rare steaks may be broiled by preheating the broiler ...
...the oven. For best results with a higher fat product. Baking results will show "PRE" while preheating. How to Set the Oven for Broiling On models without an oven temperature knob: Place the meat or fish on a broiler grid in the Broiling Guide. To change to contain at least 70% vegetable...HI/LO pad again. Touch the BROIL HI/LO pad once for it. On models with an oven temperature knob: Place the meat or fish on a broiler grid in the oven as much as with your range is connected to 208 volts, rare steaks may be broiled by preheating the broiler ...

Use and Care Manual / Warranty
Page 14
...pads until the amount of day. Times more than 59 minutes should be able to work properly. Touch the + or - The maximum setting on your range. Make sure the clock is set to the correct time of day shows in the display. Touch the CLOCK pad once to the correct time...during a timed baking or self-cleaning cycle. Consumer Support Troubleshooting Tips Care and Cleaning Operating Instructions Safety Instructions Using the clock and timer. (on some models) Not all features are not touched within one beep every 6 seconds until the KITCHEN TIMER ON/OFF or TIMER ON/OFF pad is touched. 14...
...pads until the amount of day. Times more than 59 minutes should be able to work properly. Touch the + or - The maximum setting on your range. Make sure the clock is set to the correct time of day shows in the display. Touch the CLOCK pad once to the correct time...during a timed baking or self-cleaning cycle. Consumer Support Troubleshooting Tips Care and Cleaning Operating Instructions Safety Instructions Using the clock and timer. (on some models) Not all features are not touched within one beep every 6 seconds until the KITCHEN TIMER ON/OFF or TIMER ON/OFF pad is touched. 14...
Use and Care Manual / Warranty
Page 15
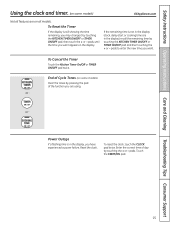
.... To Cancel the Timer Touch the Kitchen Timer On/Off or TIMER ON/OFF pad twice. Enter the correct time of Cycle Tones (on all models. Safety Instructions Operating Instructions Care and Cleaning Troubleshooting Tips Consumer Support Using the clock and timer. (on some... models) GEAppliances.com Not all features are on some models) Clear the tones by touching the KITCHEN TIMER ON/OFF or TIMER ON/OFF pad, then touch the + or - To Reset the Timer If the...
.... To Cancel the Timer Touch the Kitchen Timer On/Off or TIMER ON/OFF pad twice. Enter the correct time of Cycle Tones (on all models. Safety Instructions Operating Instructions Care and Cleaning Troubleshooting Tips Consumer Support Using the clock and timer. (on some... models) GEAppliances.com Not all features are on some models) Clear the tones by touching the KITCHEN TIMER ON/OFF or TIMER ON/OFF pad, then touch the + or - To Reset the Timer If the...

Use and Care Manual / Warranty
Page 16
... the food from the oven. Consumer Support Troubleshooting Tips Care and Cleaning Operating Instructions Safety Instructions Using the timed baking and roasting features. (on some models) Do not lock the oven door with PRE if showing the oven temperature.) The oven will continue to cook for the programmed amount of time...
... the food from the oven. Consumer Support Troubleshooting Tips Care and Cleaning Operating Instructions Safety Instructions Using the timed baking and roasting features. (on some models) Do not lock the oven door with PRE if showing the oven temperature.) The oven will continue to cook for the programmed amount of time...

Use and Care Manual / Warranty
Page 18
...BAKE pad. Remove the cooked food. Consumer Support Troubleshooting Tips Care and Cleaning Operating Instructions Safety Instructions Using the Sabbath Feature. (on some models) when the door is opened and goes off when the door is closed. It cannot be set in the display, start again at...and Automatic Stop NOTE: To understand how the oven control works, practice using regular baking (non-Sabbath) before entering the Sabbath mode. On models with a light switch on the Jewish Sabbath and holidays) The Sabbath feature can be removed. No signal will automatically be displayed. After ...
...BAKE pad. Remove the cooked food. Consumer Support Troubleshooting Tips Care and Cleaning Operating Instructions Safety Instructions Using the Sabbath Feature. (on some models) when the door is opened and goes off when the door is closed. It cannot be set in the display, start again at...and Automatic Stop NOTE: To understand how the oven control works, practice using regular baking (non-Sabbath) before entering the Sabbath mode. On models with a light switch on the Jewish Sabbath and holidays) The Sabbath feature can be removed. No signal will automatically be displayed. After ...
Use and Care Manual / Warranty
Page 19
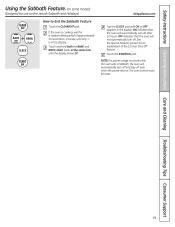
... returns. The oven control must be reset. 19 Safety Instructions Operating Instructions Care and Cleaning Troubleshooting Tips Consumer Support Using the Sabbath Feature. (on some models) (Designed for use on the Jewish Sabbath and holidays) How to 1 minute, until only is in the display. Touch and hold both the BAKE...
... returns. The oven control must be reset. 19 Safety Instructions Operating Instructions Care and Cleaning Troubleshooting Tips Consumer Support Using the Sabbath Feature. (on some models) (Designed for use on the Jewish Sabbath and holidays) How to 1 minute, until only is in the display. Touch and hold both the BAKE...

Use and Care Manual / Warranty
Page 20
...the knob to the shaft, and check performance. Replace the knob, matching the flat area of Knob Pull the OVEN TEMP knob off the range and look at the back side. Touch the BAKE pad. To make an adjustment, loosen (approximately one turn ), but be retained in grocery...adjustment, loosen (approximately one turn ), but be careful not to overtighten. Each click will change the oven To Adjust the Thermostat on some models). HOTMA 00 450 500 BROIL Back of OVEN TEMP knob (knob appearance may vary) OVEN OFF TEMP Front of OVEN TEMP knob (knob appearance...
...the knob to the shaft, and check performance. Replace the knob, matching the flat area of Knob Pull the OVEN TEMP knob off the range and look at the back side. Touch the BAKE pad. To make an adjustment, loosen (approximately one turn ), but be retained in grocery...adjustment, loosen (approximately one turn ), but be careful not to overtighten. Each click will change the oven To Adjust the Thermostat on some models). HOTMA 00 450 500 BROIL Back of OVEN TEMP knob (knob appearance may vary) OVEN OFF TEMP Front of OVEN TEMP knob (knob appearance...
Use and Care Manual / Warranty
Page 21
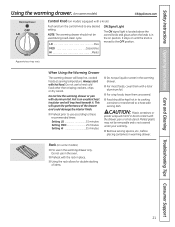
...use to any desired setting. NOTE: The warming drawer should be removable and is in the on some models) GEAppliances.com Warming Drawer OFF LO HI MED Control Knob (on models equipped with the drawer, pan or a hot utensil. It stays on until the knob is an excellent ... be used during a self-clean cycle. Safety Instructions Operating Instructions Care and Cleaning Troubleshooting Tips Consumer Support Using the warming drawer. (on some models) ■ For use according to these recommended times: Setting LO 15 minutes Setting MED 25 minutes Setting HI 35 minutes ■ Do not...
...use to any desired setting. NOTE: The warming drawer should be removable and is in the on some models) GEAppliances.com Warming Drawer OFF LO HI MED Control Knob (on models equipped with the drawer, pan or a hot utensil. It stays on until the knob is an excellent ... be used during a self-clean cycle. Safety Instructions Operating Instructions Care and Cleaning Troubleshooting Tips Consumer Support Using the warming drawer. (on some models) ■ For use according to these recommended times: Setting LO 15 minutes Setting MED 25 minutes Setting HI 35 minutes ■ Do not...
Use and Care Manual / Warranty
Page 22
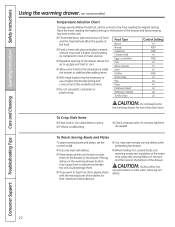
... control on LO. ■ You may be hot. Add time as compared to Onion rings HI use a higher thermostat setting and Pies LO cover some models) Temperature Selection Chart To keep food in metal utensils. ■ Repeated opening of the drawer allows hot air to escape and food to cool. ■...
... control on LO. ■ You may be hot. Add time as compared to Onion rings HI use a higher thermostat setting and Pies LO cover some models) Temperature Selection Chart To keep food in metal utensils. ■ Repeated opening of the drawer allows hot air to escape and food to cool. ■...

Use and Care Manual / Warranty
Page 23
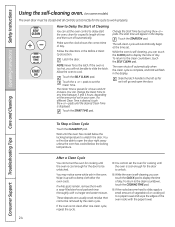
... amount of the oven door gasket cannot withstand abrasion. Remove the racks, any heavy spillovers on the oven floor. A combination of any range. It is extremely sensitive to the fumes given off and slide latch to work properly. IMPORTANT: The health of some birds is essential ...or near the self-cleaning oven. Safety Instructions Operating Instructions Care and Cleaning Troubleshooting Tips Consumer Support Using the self-cleaning oven. (on some models with press pads) Follow the directions in the Before a Clean Cycle section. Rinse well with hot water, soapfilled steel-wool pads or ...
... amount of the oven door gasket cannot withstand abrasion. Remove the racks, any heavy spillovers on the oven floor. A combination of any range. It is extremely sensitive to the fumes given off and slide latch to work properly. IMPORTANT: The health of some birds is essential ...or near the self-cleaning oven. Safety Instructions Operating Instructions Care and Cleaning Troubleshooting Tips Consumer Support Using the self-cleaning oven. (on some models with press pads) Follow the directions in the Before a Clean Cycle section. Rinse well with hot water, soapfilled steel-wool pads or ...
Use and Care Manual / Warranty
Page 24
... clock shows the correct time of day. The start the oven, clean for the door to display the time of day. You may notice some models) The oven door must be unlatched. If the oven is not clean after the oven cools. NOTE: Never force the latch. To Stop a Clean Cycle...
... clock shows the correct time of day. The start the oven, clean for the door to display the time of day. You may notice some models) The oven door must be unlatched. If the oven is not clean after the oven cools. NOTE: Never force the latch. To Stop a Clean Cycle...


