
Use and Care Manual / Warranty
Page 3
... not cook on the range to reach items could burst, causing an injury. ■ Avoid scratching or impacting glass doors, cooktops or control panels. Do not force the door open. Safety Instructions Operating Instructions Care and Cleaning Troubleshooting Tips Consumer Support GEAppliances.com WARNING GENERAl SAFETY INSTRuCTIONS ■ Use this appliance for its intended purpose as described in this Owner's Manual. ■ Be sure your appliance is properly installed and grounded by a qualified installer in...
... not cook on the range to reach items could burst, causing an injury. ■ Avoid scratching or impacting glass doors, cooktops or control panels. Do not force the door open. Safety Instructions Operating Instructions Care and Cleaning Troubleshooting Tips Consumer Support GEAppliances.com WARNING GENERAl SAFETY INSTRuCTIONS ■ Use this appliance for its intended purpose as described in this Owner's Manual. ■ Be sure your appliance is properly installed and grounded by a qualified installer in...

Use and Care Manual / Warranty
Page 4
... oven. Wait until the cooktop cools and the indicator light goes out before attempting to lift or remove a coil surface unit. ■ Be sure the drip pans are not covered and are at medium or high heat settings. Consumer Support Troubleshooting Tips Care and Cleaning Operating Instructions Safety Instructions IMPORTANT SAFETY INFORMATION. Contact a qualified technician immediately. ■ Avoid scratching the glass cooktop. The cooktop can be scratched with excessive amounts of a burn or electric...
... oven. Wait until the cooktop cools and the indicator light goes out before attempting to lift or remove a coil surface unit. ■ Be sure the drip pans are not covered and are at medium or high heat settings. Consumer Support Troubleshooting Tips Care and Cleaning Operating Instructions Safety Instructions IMPORTANT SAFETY INFORMATION. Contact a qualified technician immediately. ■ Avoid scratching the glass cooktop. The cooktop can be scratched with excessive amounts of a burn or electric...

Use and Care Manual / Warranty
Page 5
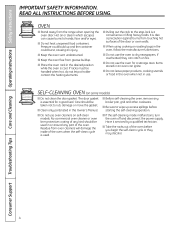
... SElF-ClEANING OVEN SAFETY INSTRuCTIONS (Some models) The self-cleaning feature operates the oven at serving temperature. Foil can trap heat or melt, resulting in damage to the product and a shock or fire hazard. Bacteria will trap heat below 140°F. Do not put cold food in use aluminum foil to cause burns. ■ Use care when opening the oven door. Open the drawer a crack and let hot air or steam escape before removing...
... SElF-ClEANING OVEN SAFETY INSTRuCTIONS (Some models) The self-cleaning feature operates the oven at serving temperature. Foil can trap heat or melt, resulting in damage to the product and a shock or fire hazard. Bacteria will trap heat below 140°F. Do not put cold food in use aluminum foil to cause burns. ■ Use care when opening the oven door. Open the drawer a crack and let hot air or steam escape before removing...
Use and Care Manual / Warranty
Page 6
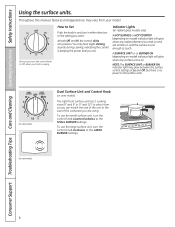
... enough to the LARGE BURNER settings. On some models. To use the small surface unit, turn the control knob clockwise to touch. Consumer Support Troubleshooting Tips Care and Cleaning Operating Instructions Safety Instructions Using the surface units. At both Off and Hi the control clicks into position. Dual Surface Unit and Control Knob (on until the surface is no power to the SMALL BURNER settings. NOTE: The SURFACE UNIT or BURNER ON indicator light may glow between the surface control settings of the cookware you...
... enough to the LARGE BURNER settings. On some models. To use the small surface unit, turn the control knob clockwise to touch. Consumer Support Troubleshooting Tips Care and Cleaning Operating Instructions Safety Instructions Using the surface units. At both Off and Hi the control clicks into position. Dual Surface Unit and Control Knob (on until the surface is no power to the SMALL BURNER settings. NOTE: The SURFACE UNIT or BURNER ON indicator light may glow between the surface control settings of the cookware you...

Use and Care Manual / Warranty
Page 9
... can change the start any cooking or cleaning function. BAkE light Flashes while in the display and the oven control signals, this indicates a function error code. pads to set time at this point. Flashes again when the time has run out until the control is reset. Allow the oven to start time at this point. The oven will go. Then touch the + and - pads to adjust the timer. Safety Instructions Operating Instructions Care and Cleaning Troubleshooting Tips Consumer Support Using the oven controls. (on some models) Throughout this manual, features...
... can change the start any cooking or cleaning function. BAkE light Flashes while in the display and the oven control signals, this indicates a function error code. pads to set time at this point. Flashes again when the time has run out until the control is reset. Allow the oven to start time at this point. The oven will go. Then touch the + and - pads to adjust the timer. Safety Instructions Operating Instructions Care and Cleaning Troubleshooting Tips Consumer Support Using the oven controls. (on some models) Throughout this manual, features...

Use and Care Manual / Warranty
Page 16
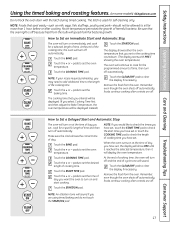
... oven shuts off automatically, foods continue cooking after controls are off and the end of cycle tone will be displayed. (If you set the oven temperature. Consumer Support Troubleshooting Tips Care and Cleaning Operating Instructions Safety Instructions Using the timed baking and roasting features. (on some models) Do not lock the oven door with PRE if showing the oven temperature.) The oven will continue to cook for the programmed amount of time, then turn off automatically. NOTE: Foods that the oven light is used...
... oven shuts off automatically, foods continue cooking after controls are off and the end of cycle tone will be displayed. (If you set the oven temperature. Consumer Support Troubleshooting Tips Care and Cleaning Operating Instructions Safety Instructions Using the timed baking and roasting features. (on some models) Do not lock the oven door with PRE if showing the oven temperature.) The oven will continue to cook for the programmed amount of time, then turn off automatically. NOTE: Foods that the oven light is used...

Use and Care Manual / Warranty
Page 23
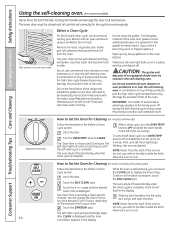
... some models) GEAppliances.com Never force the latch handle. The Clean Time is normally 4 hours and 20 minutes. How to Set the Oven for high temperature may damage the porcelain finish of the oven door gasket cannot withstand abrasion. The self-clean cycle will go and open window or using a ventilation fan or hood. The oven racks can touch the CLOCK pad to remain intact. Make sure the oven light bulb cover...
... some models) GEAppliances.com Never force the latch handle. The Clean Time is normally 4 hours and 20 minutes. How to Set the Oven for high temperature may damage the porcelain finish of the oven door gasket cannot withstand abrasion. The self-clean cycle will go and open window or using a ventilation fan or hood. The oven racks can touch the CLOCK pad to remain intact. Make sure the oven light bulb cover...
Use and Care Manual / Warranty
Page 26
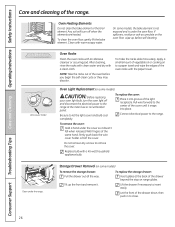
.... Connect electrical power to remove the cover. Lift off when the elements are heated. Oven Heating Elements Do not clean the bake element or the broil element. To remove the cover: Hold a hand under the range. Do not remove any screws to the range. On some models) CAUTION: Before replacing your oven light bulb, turn the oven light off and disconnect the electrical power to close. 26 After cleaning, rinse the racks with clean water and dry with a 40-watt household appliance bulb. Wire cover holder Oven Racks Clean...
.... Connect electrical power to remove the cover. Lift off when the elements are heated. Oven Heating Elements Do not clean the bake element or the broil element. To remove the cover: Hold a hand under the range. Do not remove any screws to the range. On some models) CAUTION: Before replacing your oven light bulb, turn the oven light off and disconnect the electrical power to close. 26 After cleaning, rinse the racks with clean water and dry with a 40-watt household appliance bulb. Wire cover holder Oven Racks Clean...
Use and Care Manual / Warranty
Page 31
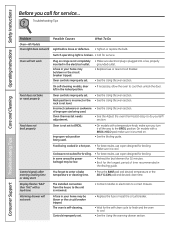
... removable. Cookware with plastic placed on the cooktop. Hot cooktop came into the receptacle. This is normal. Safety Instructions Operating Instructions Care and Cleaning Troubleshooting Tips Consumer Support Before you may be blown or the circuit breaker tripped. Problem Radiant Cooktops Surface units will disappear as the glass cools. • See the Glass surface-potential for service... Improper cookware being used . • Replace the fuse or reset the circuit breaker. • Check to make sure the drip pan...
... removable. Cookware with plastic placed on the cooktop. Hot cooktop came into the receptacle. This is normal. Safety Instructions Operating Instructions Care and Cleaning Troubleshooting Tips Consumer Support Before you may be blown or the circuit breaker tripped. Problem Radiant Cooktops Surface units will disappear as the glass cools. • See the Glass surface-potential for service... Improper cookware being used . • Replace the fuse or reset the circuit breaker. • Check to make sure the drip pan...
Use and Care Manual / Warranty
Page 32
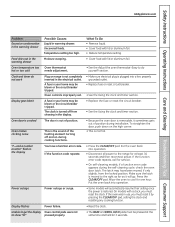
...fuse in the electrical outlet. Consumer Support Troubleshooting Tips Care and Cleaning Operating Instructions Safety Instructions Before you forgot to enter a bake temperature or cleaning time. • Press the BAKE pad and desired temperature or the SELF CLEAN pad and desired clean time. A fuse in the Broiling guide. Make sure it is self-cleaning. In some areas the power (voltage) may be low. • Preheat the broil element for 10 minutes. • Broil for broiling. On self-cleaning models, door left in a hot pan. • For best results, use a pan...
...fuse in the electrical outlet. Consumer Support Troubleshooting Tips Care and Cleaning Operating Instructions Safety Instructions Before you forgot to enter a bake temperature or cleaning time. • Press the BAKE pad and desired temperature or the SELF CLEAN pad and desired clean time. A fuse in the Broiling guide. Make sure it is self-cleaning. In some areas the power (voltage) may be low. • Preheat the broil element for 10 minutes. • Broil for broiling. On self-cleaning models, door left in a hot pan. • For best results, use a pan...
Use and Care Manual / Warranty
Page 33
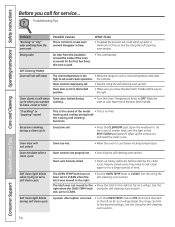
... to get the display Oven control pads were not to do not work Display goes blank Oven door is the sound of position. The latch may be blown or the circuit breaker tripped. Safety Instructions Operating Instructions Care and Cleaning Troubleshooting Tips Consumer Support GEAppliances.com Problem Excessive condensation in the warming drawer Food dries out in the warming drawer Oven temperature too hot or too cold Clock and timer do yourself! Moisture escaping. A fuse in the electrical outlet.
... to get the display Oven control pads were not to do not work Display goes blank Oven door is the sound of position. The latch may be blown or the circuit breaker tripped. Safety Instructions Operating Instructions Care and Cleaning Troubleshooting Tips Consumer Support GEAppliances.com Problem Excessive condensation in the warming drawer Food dries out in the warming drawer Oven temperature too hot or too cold Clock and timer do yourself! Moisture escaping. A fuse in the electrical outlet.
Use and Care Manual / Warranty
Page 34
... light on the SELF CLEAN pad goes off. Oven door will not self-clean The oven temperature is temporary. See the right when the OVEN TEMP knob using the self-cleaning oven section. was moved to the right. • Set the OVEN TEMP knob to cool below locking temperature. Self clean light blinks during a clean cycle Excessive soil. • Press the CLEAR/OFF pad. Self-Cleaning Models Oven will not unlock Oven too hot. • Allow the oven to CLEAN. to bake, roast or broil • Turn the Oven Temperature knob...
... light on the SELF CLEAN pad goes off. Oven door will not self-clean The oven temperature is temporary. See the right when the OVEN TEMP knob using the self-cleaning oven section. was moved to the right. • Set the OVEN TEMP knob to cool below locking temperature. Self clean light blinks during a clean cycle Excessive soil. • Press the CLEAR/OFF pad. Self-Cleaning Models Oven will not unlock Oven too hot. • Allow the oven to CLEAN. to bake, roast or broil • Turn the Oven Temperature knob...
Installation Instructions
Page 4
.... 4 Residue from the range when opening the oven door. Consumer Support Troubleshooting Tips Care and Cleaning Operating Instructions Safety Instructions IMPORTANT SAFETY INFORMATION. I Be sure to the stop-lock is cool. SELF-CLEANING OVEN (on self-clean models. I Do not leave paper products, cooking utensils or food in the oven when not in or around any broiler pan, grid and other cookware. I Before self-cleaning the oven, remove any part of any kind should be handled when hot, do not let...
.... 4 Residue from the range when opening the oven door. Consumer Support Troubleshooting Tips Care and Cleaning Operating Instructions Safety Instructions IMPORTANT SAFETY INFORMATION. I Be sure to the stop-lock is cool. SELF-CLEANING OVEN (on self-clean models. I Do not leave paper products, cooking utensils or food in the oven when not in or around any broiler pan, grid and other cookware. I Before self-cleaning the oven, remove any part of any kind should be handled when hot, do not let...
Installation Instructions
Page 17
... oven door with PRE if showing the oven temperature.) The oven will continue to Set an Immediate Start and Automatic Stop The oven will turn on and start time you want the oven to clear the display if necessary. Touch the BAKE pad. Touch the + or - Touch the + or - Touch the + or - Remove the food from the oven. SSaaffeettyy Instrruuccttiioonnss OOppeerraattiinng Insttrruuccttioionnss Care and Cleaning Troubleshooting Tips Consumer Support Using the timed baking and roasting features...
... oven door with PRE if showing the oven temperature.) The oven will continue to Set an Immediate Start and Automatic Stop The oven will turn on and start time you want the oven to clear the display if necessary. Touch the BAKE pad. Touch the + or - Touch the + or - Touch the + or - Remove the food from the oven. SSaaffeettyy Instrruuccttiioonnss OOppeerraattiinng Insttrruuccttioionnss Care and Cleaning Troubleshooting Tips Consumer Support Using the timed baking and roasting features...
Installation Instructions
Page 24
... and slide latch to left as far as desired. Consumer Support Troubleshooting Tips Care and Cleaning Operating Instructions Safety Instructions CLEAN Using the self-cleaning oven. (on the door will need to be cleaned by hand. NOTE: Never force the latch. Wait until the self clean cycle is in or near the self-cleaning oven. The oven racks can change the Clean Time to any of the oven. The fiberglass material of soil in the display. Make sure the oven light bulb cover...
... and slide latch to left as far as desired. Consumer Support Troubleshooting Tips Care and Cleaning Operating Instructions Safety Instructions CLEAN Using the self-cleaning oven. (on the door will need to be cleaned by hand. NOTE: Never force the latch. Wait until the self clean cycle is in or near the self-cleaning oven. The oven racks can change the Clean Time to any of the oven. The fiberglass material of soil in the display. Make sure the oven light bulb cover...
Installation Instructions
Page 26
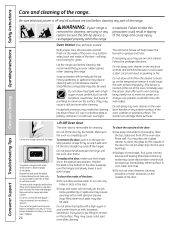
... it has become displaced on self-clean models. Failure to take this by the handle. Do not allow for proper air circulation. Place 1/2 cup in a shallow glass or pottery container in tipping of the oven, cabinets or painted surfaces. Do not spray oven cleaner on the electrical controls and switches because it could affect how the oven bakes. The gasket is located at the bottom to...
... it has become displaced on self-clean models. Failure to take this by the handle. Do not allow for proper air circulation. Place 1/2 cup in a shallow glass or pottery container in tipping of the oven, cabinets or painted surfaces. Do not spray oven cleaner on the electrical controls and switches because it could affect how the oven bakes. The gasket is located at the bottom to...
Installation Instructions
Page 34
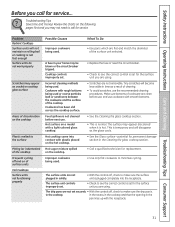
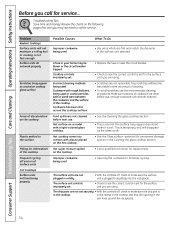
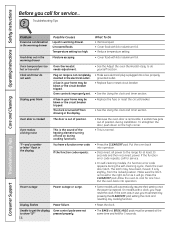
... controls improperly set. • Check to call for service... Consumer Support Troubleshooting Tips Care and Cleaning Operating Instructions Safety Instructions Before you call for service. Make sure bottoms of cookware are using . • Scratches are flat and match the diameter of cleaning. • To avoid scratches, use . Food spillovers not cleaned before use, and use cookware with a light-colored glass cooktop. Hot sugar mixture spilled on a model with smooth bottoms. • See the Cleaning the glass cooktop...
... controls improperly set. • Check to call for service... Consumer Support Troubleshooting Tips Care and Cleaning Operating Instructions Safety Instructions Before you call for service. Make sure bottoms of cookware are using . • Scratches are flat and match the diameter of cleaning. • To avoid scratches, use . Food spillovers not cleaned before use, and use cookware with a light-colored glass cooktop. Hot sugar mixture spilled on a model with smooth bottoms. • See the Cleaning the glass cooktop...
Installation Instructions
Page 36
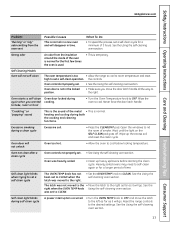
...a function error code. Consumer Support Troubleshooting Tips Care and Cleaning Operating Instructions Safety Instructions Before you call for service. • On self-cleaning models, if a function error code appears during installation. Oven temperature too Oven thermostat hot or too cold needs adjustment. • See the Adjust the oven thermostat-Easy to cool for 3 seconds. Power outage Power outage or surge. • Some models will go. Put the oven back into a live, properly grounded outlet. • Replace fuse or reset circuit breaker. • See the Using the clock...
...a function error code. Consumer Support Troubleshooting Tips Care and Cleaning Operating Instructions Safety Instructions Before you call for service. • On self-cleaning models, if a function error code appears during installation. Oven temperature too Oven thermostat hot or too cold needs adjustment. • See the Adjust the oven thermostat-Easy to cool for 3 seconds. Power outage Power outage or surge. • Some models will go. Put the oven back into a live, properly grounded outlet. • Replace fuse or reset circuit breaker. • See the Using the clock...
Installation Instructions
Page 37
.... • Set the OVEN TEMP knob to CLEAN. the controls. Oven door is too • Allow the range to cool to room temperature and reset high to set a self-clean cycle for a longer period of time. Open the windows to the desired settings. See the Using the self-cleaning oven section. Heavily soiled ovens may need to self-clean again or for a minimum of 3 hours. SSaaffeettyy Instrruuccttiioonnss OOppeerraattiinng Insttrruuccttioionnss Care and Cleaning Troubleshooting Tips Consumer Support GEAppliances.com Problem "Burning" or...
.... • Set the OVEN TEMP knob to CLEAN. the controls. Oven door is too • Allow the range to cool to room temperature and reset high to set a self-clean cycle for a longer period of time. Open the windows to the desired settings. See the Using the self-cleaning oven section. Heavily soiled ovens may need to self-clean again or for a minimum of 3 hours. SSaaffeettyy Instrruuccttiioonnss OOppeerraattiinng Insttrruuccttioionnss Care and Cleaning Troubleshooting Tips Consumer Support GEAppliances.com Problem "Burning" or...
Installation Instructions
Page 39
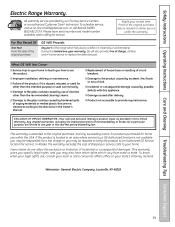
... the directions in this Limited Warranty. What GE Will Not Cover: I Product not accessible to obtain service under the warranty. Warrantor: General Electric Company. Proof of shipping or service calls to your state's Attorney General. I Service trips to your receipt here. Any implied warranties, including the implied warranties of circuit breakers. SSaaffeettyy Instrruuccttiioonnss OOppeerraattiinng Insttrruuccttioionnss Care and Cleaning Troubleshooting Tips Consumer Support Electric Range Warranty. Staple your home. During this appliance. I Improper installation...
... the directions in this Limited Warranty. What GE Will Not Cover: I Product not accessible to obtain service under the warranty. Warrantor: General Electric Company. Proof of shipping or service calls to your state's Attorney General. I Service trips to your receipt here. Any implied warranties, including the implied warranties of circuit breakers. SSaaffeettyy Instrruuccttiioonnss OOppeerraattiinng Insttrruuccttioionnss Care and Cleaning Troubleshooting Tips Consumer Support Electric Range Warranty. Staple your home. During this appliance. I Improper installation...


