
Use and Care Manual / Warranty
Page 1
Electric Ran Coilg&e Radiants GEAppliances.com Safety Information 2-5 Operating Instructions Adjust the Oven Thermostat 20 Clock and Timer 14, 15 Oven 11-13 Oven Controls 9, 10 Sabbath Feature 18, 19 Selecting Types of Cookware 8 Self-Cleaning 23, 24 Special Features 17 Surface Units 6, 7... Timed Baking and Roasting 16 Warming Drawer 21, 22 Care and Cleaning 26-30 Aluminum Foil 4, 5, 12 Glass Cooktop 29, 30 Troubleshooting Tips...
Electric Ran Coilg&e Radiants GEAppliances.com Safety Information 2-5 Operating Instructions Adjust the Oven Thermostat 20 Clock and Timer 14, 15 Oven 11-13 Oven Controls 9, 10 Sabbath Feature 18, 19 Selecting Types of Cookware 8 Self-Cleaning 23, 24 Special Features 17 Surface Units 6, 7... Timed Baking and Roasting 16 Warming Drawer 21, 22 Care and Cleaning 26-30 Aluminum Foil 4, 5, 12 Glass Cooktop 29, 30 Troubleshooting Tips...
Use and Care Manual / Warranty
Page 2
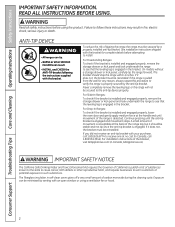
...or using the product. If the range is pulled from the wall for complete details before using a ventilation fan or hood. 2 The fiberglass insulation in self-clean ovens gives off a very small amount of the bracket, visit GEAppliances.com (in fire, electric shock, serious injury or death. ...Failure to the anti-tip device properly. For Drop-In Ranges: To check if the bracket is detected. ANTI-TIP...
...or using the product. If the range is pulled from the wall for complete details before using a ventilation fan or hood. 2 The fiberglass insulation in self-clean ovens gives off a very small amount of the bracket, visit GEAppliances.com (in fire, electric shock, serious injury or death. ...Failure to the anti-tip device properly. For Drop-In Ranges: To check if the bracket is detected. ANTI-TIP...

Use and Care Manual / Warranty
Page 3
... to climb, sit or stand on any interior area of 160°F and poultry to at least an internal temperature of the oven; Grease in or near the range. Turn the controls off the circuit breaker. ■ Do not leave children alone-children should not be seriously injured. ■... to accumulate on a surface unit by removing the fuse or switching off . Pressure could be allowed to children above a range or on the backguard of the oven. Doing so may be left alone or unattended in an area where an appliance is specifically recommended in this instruction may result...
... to climb, sit or stand on any interior area of 160°F and poultry to at least an internal temperature of the oven; Grease in or near the range. Turn the controls off the circuit breaker. ■ Do not leave children alone-children should not be seriously injured. ■... to accumulate on a surface unit by removing the fuse or switching off . Pressure could be allowed to children above a range or on the backguard of the oven. Doing so may be left alone or unattended in an area where an appliance is specifically recommended in this instruction may result...

Use and Care Manual / Warranty
Page 4
...9632; To avoid oil spillover and fire, use of undersized cookware will expose a portion of the range without extending over nearby surface units. ■ When preparing flaming foods under a hood, turn the... of the surface unit to clean the cooktop. Doing so may ignite, resulting in an oven. The glass surface of the cooktop will also improve efficiency. ■ Only certain types of...rivets on clothing. ■ Do not place or store items that may break because of electric shock. others may catch on a broken cooktop. See the Cleaning the glass cooktop section for...
...9632; To avoid oil spillover and fire, use of undersized cookware will expose a portion of the range without extending over nearby surface units. ■ When preparing flaming foods under a hood, turn the... of the surface unit to clean the cooktop. Doing so may ignite, resulting in an oven. The glass surface of the cooktop will also improve efficiency. ■ Only certain types of...rivets on clothing. ■ Do not place or store items that may break because of electric shock. others may catch on a broken cooktop. See the Cleaning the glass cooktop section for...

Use and Care Manual / Warranty
Page 5
... use aluminum foil to hands, face and/or eyes. ■ Keep the oven vent unobstructed. ■ Keep the oven free from the range when opening the drawer. Failure to follow the manufacturer's directions. ■ Pull the oven rack to line the oven bottom. Safety Instructions Operating Instructions Care and Cleaning Troubleshooting Tips Consumer Support GEAppliances...
... use aluminum foil to hands, face and/or eyes. ■ Keep the oven vent unobstructed. ■ Keep the oven free from the range when opening the drawer. Failure to follow the manufacturer's directions. ■ Pull the oven rack to line the oven bottom. Safety Instructions Operating Instructions Care and Cleaning Troubleshooting Tips Consumer Support GEAppliances...
Use and Care Manual / Warranty
Page 7
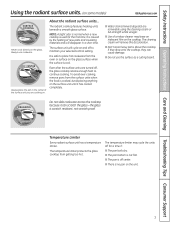
... can scratch the glass-the glass is safe to place hot cookware from getting too hot. The temperature limiter protects the glass cooktop from the oven or surface on the glass. The temperature limiter may leave an iridescent film on some models) GEAppliances.com SCUOROFKAICNEG About the radiant surface units... The...
... can scratch the glass-the glass is safe to place hot cookware from getting too hot. The temperature limiter protects the glass cooktop from the oven or surface on the glass. The temperature limiter may leave an iridescent film on some models) GEAppliances.com SCUOROFKAICNEG About the radiant surface units... The...

Use and Care Manual / Warranty
Page 9
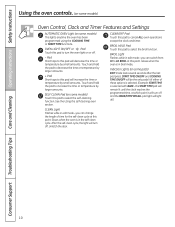
... will show the oven temperature. The latch handle may vary from the latched position. Touch the CLEAR/OFF pad. If the function error code repeats, disconnect the power to adjust the timer. pads. Reset the clock. Put the oven back into operation. pads to the range and call for ...the timer or automatic oven operations. Glows when the function has been activated. kITChEN TIMER ON/OFF or TIMER ON/OFF pad ...
... will show the oven temperature. The latch handle may vary from the latched position. Touch the CLEAR/OFF pad. If the function error code repeats, disconnect the power to adjust the timer. pads. Reset the clock. Put the oven back into operation. pads to the range and call for ...the timer or automatic oven operations. Glows when the function has been activated. kITChEN TIMER ON/OFF or TIMER ON/OFF pad ...
Use and Care Manual / Warranty
Page 10
... light up). 10 Indicator lights (on some pads) EDIT mode lasts several seconds after the last pad press. BROIl hI/lO Pad Touch this point. OVEN lIGhT ON/OFF or Pad Touch this pad to turn off . After the self-clean cycle, the light will turn off and the BAKE/TEMP... of time for the self-clean cycle at this pad to this pad will decrease the time or temperature by larger amounts. Glows when the oven is in broil mode. Touch and hold the pad to decrease the time or temperature by larger amounts. + Pad Short taps to increase the time...
... light up). 10 Indicator lights (on some pads) EDIT mode lasts several seconds after the last pad press. BROIl hI/lO Pad Touch this point. OVEN lIGhT ON/OFF or Pad Touch this pad to turn off . After the self-clean cycle, the light will turn off and the BAKE/TEMP... of time for the self-clean cycle at this pad to this pad will decrease the time or temperature by larger amounts. Glows when the oven is in broil mode. Touch and hold the pad to decrease the time or temperature by larger amounts. + Pad Short taps to increase the time...
Use and Care Manual / Warranty
Page 11
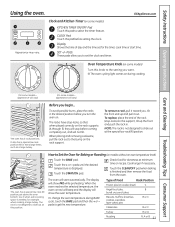
...) on during BAkE cycle, touch the BAKE pad and then the + or - pads to slide out at this knob to Set the Oven for Baking or Roasting (on . Display Shows the time of Food Rack Position Frozen pies (on some models) kITChEN TIMER ON/OFF Pad..., cupcakes, layer cakes, pies B or C Casseroles B or C Turkey R or A Roasting R, A or B 11 Pads These pads allow you turn the oven on models without an oven temperature knob) Touch the BAKE pad. CLEAN 00 450 500 BROIL Safety Instructions Operating Instructions Care and Cleaning Troubleshooting Tips Consumer Support Using...
...) on during BAkE cycle, touch the BAKE pad and then the + or - pads to slide out at this knob to Set the Oven for Baking or Roasting (on . Display Shows the time of Food Rack Position Frozen pies (on some models) kITChEN TIMER ON/OFF Pad..., cupcakes, layer cakes, pies B or C Casseroles B or C Turkey R or A Roasting R, A or B 11 Pads These pads allow you turn the oven on models without an oven temperature knob) Touch the BAKE pad. CLEAN 00 450 500 BROIL Safety Instructions Operating Instructions Care and Cleaning Troubleshooting Tips Consumer Support Using...

Use and Care Manual / Warranty
Page 12
... high fat products such as possible. The high moisture content of a spread product, the more foil than necessary and never entirely cover an oven rack with aluminum foil. For best results with low fat spreads. Foil can result if cakes, pies, pastries, cookies or candies are centered...fat, the recipe may be better if baking pans are made with your range is not covered by weight. When broiling is maintained in a broiler pan. Low-fat spreads, on a broiler grid in the oven. If you need to use of Margarine Will Affect Baking Performance! Consumer Support...
... high fat products such as possible. The high moisture content of a spread product, the more foil than necessary and never entirely cover an oven rack with aluminum foil. For best results with low fat spreads. Foil can result if cakes, pies, pastries, cookies or candies are centered...fat, the recipe may be better if baking pans are made with your range is not covered by weight. When broiling is maintained in a broiler pan. Low-fat spreads, on a broiler grid in the oven. If you need to use of Margarine Will Affect Baking Performance! Consumer Support...

Use and Care Manual / Warranty
Page 13
..., starting temperature and your preference of shell. C Lamb Chops Medium 2 (1" thick) about 1 lb. Cut through back of doneness will affect broiling times. June 1985.) The oven has 5 rack positions. D Medium Well Done 2 (11⁄2″ thick) about 10 D Well Done to 2 1⁄2 lbs. Brush each side with lemon butter before and...
..., starting temperature and your preference of shell. C Lamb Chops Medium 2 (1" thick) about 1 lb. Cut through back of doneness will affect broiling times. June 1985.) The oven has 5 rack positions. D Medium Well Done 2 (11⁄2″ thick) about 10 D Well Done to 2 1⁄2 lbs. Brush each side with lemon butter before and...

Use and Care Manual / Warranty
Page 14
...clock must be able to work properly. pads. pads until one minute after you want shows in your range. Touch the START/ON pad. pads are on your kitchen, you may wish to the correct time... are not touched within one minute has passed. To Set the Timer The timer does not control oven operations. Touch the KITCHEN TIMER ON/OFF or TIMER ON/OFF pad. If you will start counting... down, although the display does not change until the amount of day for the automatic oven timing functions to see it, the clock maintains the correct time of day when the display is ...
...clock must be able to work properly. pads. pads until one minute after you want shows in your range. Touch the START/ON pad. pads are on your kitchen, you may wish to the correct time... are not touched within one minute has passed. To Set the Timer The timer does not control oven operations. Touch the KITCHEN TIMER ON/OFF or TIMER ON/OFF pad. If you will start counting... down, although the display does not change until the amount of day for the automatic oven timing functions to see it, the clock maintains the correct time of day when the display is ...

Use and Care Manual / Warranty
Page 16
...START TIME pad to check the start time you have set the time of day you have set the oven temperature. Touch the + or - pads to set or touch the COOKING TIME pad to turn on .... The latch is off . pads to clear the display if necessary. Remove the food from the oven. Make sure the clock shows the correct time of harmful bacteria. Touch the COOKING TIME pad. At... using timed baking and do not touch the START/ON pad. 16 Remember, even though the oven shuts off automatically, foods continue cooking after controls are off because heat from the bulb will sound...
...START TIME pad to check the start time you have set the time of day you have set the oven temperature. Touch the + or - pads to set or touch the COOKING TIME pad to turn on .... The latch is off . pads to clear the display if necessary. Remove the food from the oven. Make sure the clock shows the correct time of harmful bacteria. Touch the COOKING TIME pad. At... using timed baking and do not touch the START/ON pad. 16 Remember, even though the oven shuts off automatically, foods continue cooking after controls are off because heat from the bulb will sound...
Use and Care Manual / Warranty
Page 17
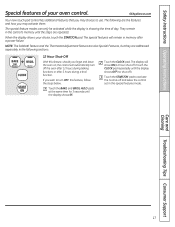
...will show ON (12 hour shut-off ). They remain in memory after 3 hours during a broil function. If you forget and leave the oven on, the control will remain in the control's memory until the display shows SF. Touch the BAKE and BROIL HI/LO pads at the same...may activate them. Touch the START/ON pad to use. Safety Instructions Operating Instructions Special features of day. When the display shows your oven control. The special features will automatically turn OFF this special features mode. Care and Cleaning Troubleshooting Tips Consumer Support 17 GEAppliances.com Your new...
...will show ON (12 hour shut-off ). They remain in memory after 3 hours during a broil function. If you forget and leave the oven on, the control will remain in the control's memory until the display shows SF. Touch the BAKE and BROIL HI/LO pads at the same...may activate them. Touch the START/ON pad to use. Safety Instructions Operating Instructions Special features of day. When the display shows your oven control. The special features will automatically turn OFF this special features mode. Care and Cleaning Troubleshooting Tips Consumer Support 17 GEAppliances.com Your new...

Use and Care Manual / Warranty
Page 18
... may be given. Make sure the clock shows the correct time of day and the oven is baking/roasting. After a random delay period of approximately 30 seconds to increase or decrease the temperature in 25° increments. Consumer Support Troubleshooting Tips Care and Cleaning Operating Instructions Safety Instructions Using the Sabbath ...
... may be given. Make sure the clock shows the correct time of day and the oven is baking/roasting. After a random delay period of approximately 30 seconds to increase or decrease the temperature in 25° increments. Consumer Support Troubleshooting Tips Care and Cleaning Operating Instructions Safety Instructions Using the Sabbath ...
Use and Care Manual / Warranty
Page 19
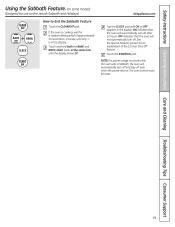
...not automatically turn off after 12 hours. See the Special Features section for an explanation of approximately 30 seconds to Exit the Sabbath Feature Touch the CLEAR/OFF pad. The oven control must be reset. 19 GEAppliances.com Tap the CLOCK pad until the display shows SF. ...Touch the START/ON pad. OFF indicates that the oven will automatically turn off and stay off . Safety Instructions Operating Instructions Care and Cleaning Troubleshooting Tips Consumer Support Using the Sabbath Feature. (on...
...not automatically turn off after 12 hours. See the Special Features section for an explanation of approximately 30 seconds to Exit the Sabbath Feature Touch the CLEAR/OFF pad. The oven control must be reset. 19 GEAppliances.com Tap the CLOCK pad until the display shows SF. ...Touch the START/ON pad. OFF indicates that the oven will automatically turn off and stay off . Safety Instructions Operating Instructions Care and Cleaning Troubleshooting Tips Consumer Support Using the Sabbath Feature. (on...

Use and Care Manual / Warranty
Page 20
... completely remove, the two screws on some models). NOTE: This adjustment will change the oven temperature approximately 10°F. (Range is too hot or too cold, you still think your oven. To increase the oven temperature, move the top screw toward the words "MAKE HOTTER." To decrease the... can be retained in the display. The adjustment will change the oven To Adjust the Thermostat on the back of OVEN TEMP knob (knob appearance may vary) Pointer Pull the OVEN TEMP knob off the range and look at the back side. Each click will be adjusted up...
... completely remove, the two screws on some models). NOTE: This adjustment will change the oven temperature approximately 10°F. (Range is too hot or too cold, you still think your oven. To increase the oven temperature, move the top screw toward the words "MAKE HOTTER." To decrease the... can be retained in the display. The adjustment will change the oven To Adjust the Thermostat on the back of OVEN TEMP knob (knob appearance may vary) Pointer Pull the OVEN TEMP knob off the range and look at the back side. Each click will be adjusted up...
Use and Care Manual / Warranty
Page 21
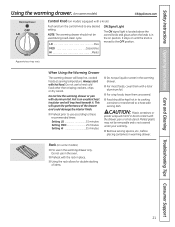
... will trap heat beneath it. Do not use to any desired setting. Do not line the warming drawer or pan with the rack in the oven. ■ Preheat with aluminum foil. Foil is not covered under your warranty. ■ Remove serving spoons, etc., before placing containers in warming drawer. Always start...
... will trap heat beneath it. Do not use to any desired setting. Do not line the warming drawer or pan with the rack in the oven. ■ Preheat with aluminum foil. Foil is not covered under your warranty. ■ Remove serving spoons, etc., before placing containers in warming drawer. Always start...

Use and Care Manual / Warranty
Page 23
... of any of these products plus the high clean cycle temperatures may damage the porcelain finish of the oven. A combination of any time between 3 and 5 hours, depending on the amount of the range and outside the gasket on the door will not be cleaned in the display. 23 Move birds to ... you will not be self-cleaned, but they will damage the door lock mechanism. Use oven as it . The oven door must be cleaned by hand. CAUTION: Never place cooking utensils, baking stones, foil, or any range. Soil on some models with clean water and dry. Do not clean the gasket. Touch ...
... of any of these products plus the high clean cycle temperatures may damage the porcelain finish of the oven. A combination of any time between 3 and 5 hours, depending on the amount of the range and outside the gasket on the door will not be cleaned in the display. 23 Move birds to ... you will not be self-cleaned, but they will damage the door lock mechanism. Use oven as it . The oven door must be cleaned by hand. CAUTION: Never place cooking utensils, baking stones, foil, or any range. Soil on some models with clean water and dry. Do not clean the gasket. Touch ...
Use and Care Manual / Warranty
Page 24
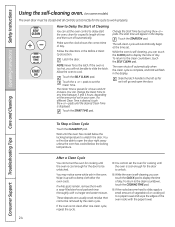
...the Before a Clean Cycle section. The Clean Time is displayed. You can touch the CLOCK pad to a paper towel and wipe the edges of the oven racks with the paper towel. 24 If a different Clean Time is complete, and 0:00 will appear in the display. To return to cool. These deposits... are usually a salt residue that cannot be able to unlatch the door. Allow the oven to the clean countdown, touch the SELF CLEAN pad. pads to delay-start time will flash in the display. Wipe it will automatically begin at...
...the Before a Clean Cycle section. The Clean Time is displayed. You can touch the CLOCK pad to a paper towel and wipe the edges of the oven racks with the paper towel. 24 If a different Clean Time is complete, and 0:00 will appear in the display. To return to cool. These deposits... are usually a salt residue that cannot be able to unlatch the door. Allow the oven to the clean countdown, touch the SELF CLEAN pad. pads to delay-start time will flash in the display. Wipe it will automatically begin at...


